Introduction
I am really excited to be here today to talk about the basics of burn care which is something that I feel very passionate about. I do want to give a brief warning that there are some graphic pictures but nothing that I find wildly gross. I want to give you guys a good overview of how to take care of a burn patient in the acute setting. We will not get too much into the outpatient setting, but we will touch on some of the long-term implications. The goals are to identify the types of burn, burn depth, implications for wound healing and functional recovery, define the different types of surgical burn interventions and purposes for each in the wound healing process, and describe the appropriate positioning, therapeutic exercise, scar, and edema management intervention based on the timing, location, and depth of the burn.
Skin Anatomy
Functions of Skin
- A barrier for immune protection
- Thermoregulation
- Sensory feedback from the environment
- Prevent penetration from outside forces/objects
- Vitamin D production
- Allows for motion and function
- Resists mechanical stress
The functions of the skin are a barrier for immune protection, thermoregulation, sensory feedback from the environment, to prevent penetration from outside forces and objects, vitamin D production, allow for motion and function and to resist mechanical stress, also for cosmesis because if we did not have our skin we would all look a lot different.
Here is a basic diagram of the skin in Figure 1.

Figure 1. Skin model.
We are going to be focusing mostly on these three layers over here: the epidermis, the dermis, and the hypodermis. As you can see, the skin is much more than just this top layer. There are hair follicles, sweat glands, nerves, and capillaries that live inside these layers.
Layers of the Skin
- Epidermis
- Outermost layer
- Made of squamous cells
- Dermis
- Contains capillaries, hair follicles, and nerves
- Subcutaneous tissue (aka hypodermis)
- Contains fat, larger blood vessels, nerves
- Insulating layer
The epidermis is the outermost layer, and it is made of squamous cells. This is what we see on the exterior of someone. The dermis is the thicker layer underneath, and this contains the capillaries, hair follicles, and nerves. Down below is the subcutaneous tissue and that contains fat, larger blood vessels, and nerves. It is our insulative layer sometimes also called the hypodermis.
Burn Depth
We no longer use the terms first degree, second degree, or third-degree burn. We now use terms that more correlate to the layers of the skin and the depth of the burn.
Superficial
- Histological depth: Epidermis
- Characterization: Painful, dry
- Color: Red, bright pink
- Healing: 3-7 days with peeling, does not scar
- NOT included in TBSA %
The first type of burn is a superficial burn. This affects the epidermis of the skin (see Figure 2).
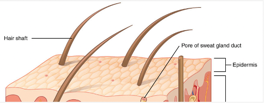
Figure 2. Superficial- epidermis layer.
It is painful and dry, and it is usually a red or bright pink. It takes three to seven days to heal, does not scar, does not change the pigment, and is not included in the total burn surface area (TBSA) percentage. We will get into this later, but that is how we calculate the size of a burn. These types of burns do not get calculated into it. A good example is a sunburn as seen in Figure 3.

Figure 3. Example of sunburn.
Superficial Partial
- Layers affected: Epidermis, papillary dermis
- Characterization: Painful, blistered, blanchable, moist/weeping
- Color: Bright red
- Healing: 7-21 days, re-epithelialization. Minimal to no scarring, may have pigment changes. Does not require surgical intervention
The next layer of depth is superficial partial, and that now is affecting a little bit into the dermis, not all the way through the dermis, but just the top layer and this epidermis (see Figure 4).
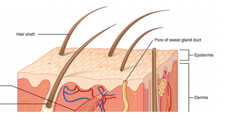
Figure 4. Superficial partial- the epidermis and part of the dermis.
These burns are very painful and wet. There are usually blisters on these burns, and they are blanchable. If you push your finger onto it, you will see that capillary refill. It will go from white to pink very quickly. They are usually bright red, and it takes seven to 21 days for these wounds to heal. Usually, people do not have scarring. Sometimes, they might have a little bit of hyperpigmentation where it heals a little bit darker, but most people heal these without issues. These types of burns do not require surgical intervention, but they are calculated into the TBSA. A good example of this is a blistering sunburn or a curling iron burn. It goes away but it is very painful and blistered.
Deep Partial
- Layers affected: Epidermis, papillae, and reticular dermis
- Characterization: May not have pain, blanching indicates healing, pseudoeschar with protein buildup
- Color: Light pink to mottled white
- Healing: 21-35 days if no infection, may convert to full thickness. Can develop hypertrophic scarring
The next one is a deep partial burn. This is one that we will talk about a lot. Now, the epidermis and the dermis are all affected (see Figure 5).

Figure 5. Deep partial- all of the epidermis and dermis.
These might not be painful if they are deep enough because the nerves may be damaged. They usually blanch and if you push on it, there will be capillary refills. If they do that, that indicates healing. Sometimes these wounds convert, meaning that they turn into a full-thickness burn. The blanching then minimizes or goes away. An example is in Figure 6.
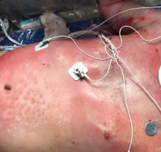
Figure 6. Example of a deep partial burn.
This is when surgery is now indicated. These wounds may have a pseudoeschar which is a buildup of protein on top of the scar that needs to be debrided when they come in. It is mottled white to light pink. The lighter a burn is the more concerning. These take 21 to 35 days if there is no infection. As I said, they may convert to a full-thickness burn and therefore then that can lead to more hypertrophic scarring.
Full Thickness
- Layers affected: Epidermis, dermis to subcutaneous tissue or deeper to bone
- Characterization: Waxy, dry, leathery, painless, hair falls out easily
- Color: Mixed white, waxy, pearly
- Healing: Requires skin grafting, often hypertrophic scarring
The last one is a full-thickness burn (see Figure 7). Now, you are getting really deep. These burns go into the subcutaneous tissue and even down to the bone.
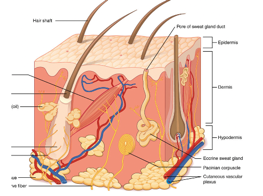
Figure 7. Full-thickness- The epidermis, dermis, and hypodermis.
These burns are waxy, dry, leathery. These burns are painless because all of the nerves have been damaged. The hair falls out really easily because the follicles have all been damaged as well. The legs in Figure 8 have sustained a very severe burn.

Figure 8. Example of a full-thickness burn.
This white area indicates a full-thickness burn. This darker area here is what that eschar that we talked about with those deep partial burns. That is his dead skin and protein buildup on top and that will need to be debrided. Further down you can see that the red area is more of a partial burn. We see all three types of burns on this patient: full-thickness, deep partial, and superficial partial burns. This is a great picture to give you a perspective on the differences. The only way to heal a full-thickness burn is to do a skin graft. Again, there is often hypertrophic scarring which is those raised scars that we will get into later. The other thing about this is that if they do extend to the bone, then that is usually when an amputation is needed.
Burn Types
- Flame: Often deep burns with clothing igniting
- Contact: From touching a hot surface, ex. motorcycle exhaust pipe to leg
- Scald or Grease: Hot liquid
- Flash: Fast source of energy, ex. flash while lighting a grill
- Electrical: Current passes through the body, often deep internal injury
- Radiation: Most common is sunburn
- Chemical: Strong acids or corrosive materials, often concrete
- Cold Burn (Frostbite): Vasoconstriction causes ischemia, frequently requiring amputation
- Friction: Road rash, sports injury, carpet, etc.
How do people get burns? This is not an exclusive list, but these are the most common types of burns that we will run through. A flame burn is exactly what it sounds like. It is fire directly onto the skin like with clothes catching fire. Sometimes you see a demarcation line from socks or underwear. A contact burn is from touching a hot surface. We see this a lot with motorcycle exhaust pipes touching somebody's calf or leg, hair straighteners, curling irons, or people touching a stove. A scald or a grease burn is from a hot liquid. This is more common in the pediatric population, but we also see a lot of this with kitchen accidents or even patients with diabetes or a spinal cord injury who are insensate. A flash burn is from a fast source of energy. A good example of that is when someone opens up the grill and gets that big flash of fire. We see this from brush fires where people pour gasoline over brush or a campfire. When somebody has an electrical burn, the current passes through the body so there is often deep internal injury as well. There are usually entry and exit points. The exit point tends to be larger than the entry because the speed of the force has slowed down, and so the wound is worse. They calculate an additional part into the total surface burn area to account for that arc through the body and the internal injury. These are electricians getting hurt or from lightning strikes.
These patients tend to have a lot of comorbidities like cardiac complications, brain injury, and other internal organ damage. These tend to be more complex patients. Radiation injuries are another type. The most common is sunburn, but we also see cancer-related or work-related radiation injuries. Chemical burns are from anything that is a strong acid or corrosive material on the skin. For example. people kneeling to do concrete work and get it on their knees. We also see a lot of oven cleaner splashing or getting on people's hands and giving them a pretty significant chemical burn. We also talk about cold injuries like frostbite. This is when the vasoconstriction from the cold temperatures cause ischemia, and these injuries frequently require amputation. There are many different ways to treat frostbite, and they are a little bit different than a burn from a medical standpoint. They can be given TPA just like we give to stroke patients to help try and restore blood to those areas. If that is unsuccessful, then the affected part is usually amputated. The last type of burn is from friction. This is like a road rash or a sports injury on turf. These tend to be very painful sometimes resulting in a degloving injury where the skin kind of peels off. These often have skin and nerve damage like brachial plexus injuries or something like that. Of all the gross things that we see, for some reason, those degloving injuries really get to me. It is not listed here but also associated with burns is an inhalation injury. We frequently see this with smokers or those on oxygen patients or somebody who is in a house fire who was exposed to the smoke for an extended period of time. They will do a bronch when they come in to assess visually what their airway looks like, but that can also be calculated into the total burn surface area if it is significant.
Burn Classification and Terminology
Total Burn Surface Area (TBSA)
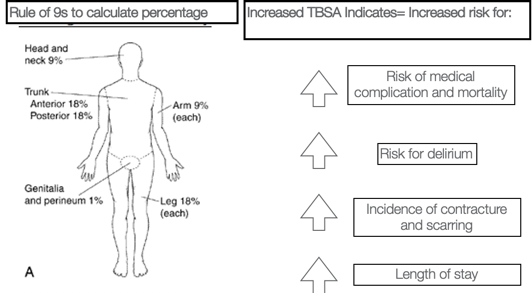
Figure 9. Lund-Browder Chart, 2013. Retrieved from https://commons.wikimedia.org/wiki/File:Lund-Browder_chart burn_injury_area.PNG
The total burn surface area is also known as the TBSA. We use the rule of nines to generally calculate the percentage. The head is 9%, the trunk is 18, each arm is nine, each leg is 18., and hands are 1%. If the EMTs are looking at a patient, they use this percentage to notify the hospital staff. The higher the TBSA, then the higher the risk for medical complications and comorbidity. Somebody who has a small hand burn is going to be much different than somebody who is 75% burned over their body. There is a high risk of delirium and an increased incidence of contractures and scarring. We usually say one to two days per TBSA. For example, you get somebody with a 40% TBSA burn, you can expect them to be there for 60 to 80 days most likely. This is good for the patients to know and have realistic expectations of their healing process. Figure 10 shows the Lund-Browder chart from the patient whose legs we were looking at earlier.
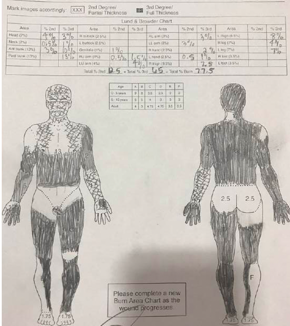
Figure 10. Lund-Browder chart from the client in Figure 8.
You can see that he did not have his bottom burned. Each cheek here would be 2.5%. The Xs show more partial burns. This diagram is important to be able to look and see where all of his wounds are and what we would want to do from an intervention standpoint.
- Dictates fluid resuscitation protocol
- Location and depth of burn
- Calculation of TBSA %
- Completed for every admission
- Can change if wounds convert to deeper burns
This also dictates the fluid resuscitation protocol or the volume of fluid that the patient will need during that first initial acute phase. Again, if these wounds do convert to deeper burns, then sometimes these Lund-Browder charts are adjusted to account for that. You can see that this patient had 12.5% partial burns and 65% full-thickness burns for a total TBSA of 77.5% burns. The expected length of stay for him would be about 80 to 140 days. I think he stayed with us for 120 days.
Cutaneous Functional Unit
- Area of skin recruited during movement to allow ROM
- More relevant indicator of contracture risk and therapy intervention
- Ex. Hand burns have small TBSA but higher risk for contracture vs. abdominal burn
A cutaneous functional unit is kind of a newer concept in the burn world, but this touches on the area of skin that is recruited during movement to allow for range of motion. It is a relevant indicator for contracture risk and therapy intervention because again a hand burn is 1.25% but that might have so many more functional implications versus somebody who has an abdominal burn where it is not crossing as many joints or affecting as much movement. This is not necessarily something that we use in terminology like we use the TBSA, but it is just kind of a concept to remember that the size of the burn does not always indicate the functional indication. From a therapy standpoint, we usually think more about where the location of the burn is and how that will affect the movement.
Contracture
- Loss of ROM due to scarring and decreased elasticity of wound healing
- Described in the position they are contracted into
- Ex. Neck flexion contracture for someone who can’t reach extension
- Positioning and stretching are the most important ways to prevent it!
- The primary role of the burn therapist is contracture prevention.
- Patients will often undergo long-term surgical or laser intervention of contractures.
A contracture is the loss of range of motion due to scarring or decreased elasticity with wound healing, and we describe it in the position they are contracted. For example, if somebody has a neck flexion contracture, it is somebody that cannot extend or an elbow flexion contracture is somebody who is stuck in flexion. The most important ways to prevent contractures are through positioning and stretching. This is pretty much our job in the hospital is to work on contracture prevention especially from the initial admission of these patients. Patients are going to have long-term implications and contractures. Somebody might have a z-plasty to correct it, or now we are doing a lot of laser therapy to work on these contractures. You are at higher risk for contracture if you have darker skin or a deeper burn, and some people heal differently than others.
Surgical Management of Burns
This is important because our therapy intervention is so dependent on what surgical intervention the team has to pursue. We are going to go through some of the different options and why and when they use them.
Escharotomy
- Emergent management of full-thickness, circumferential burns
- Release through eschar (burnt tissue) to improve elasticity and prevent compartment syndrome
- Can also be done on the abdomen for chest expansion
- Activity: No specific activity restrictions. High risk for contracture due to the depth of these burns
This is something that is done right on admission, and it is an emergent procedure. It is for circumferential burns where they release the eschar or this burnt tissue to improve the elasticity and prevent compartment syndrome. Here are some examples in Figure 11.
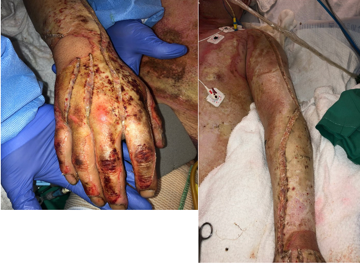
Figure 11. Examples of escharotomies.
The skin gets very tight and hard as we talked about in full-thickness burns. If it is circumferential, there is nowhere for that fluid to release and it can cause compartment syndrome, nerve damage, and many more complications. Escharotomies are done to release this. They can also be done on the abdomen because again if that tissue is not elastic and it can affect somebody's respiratory status and breathing. There are no specific activity restrictions for somebody with an escharotomy, but if you are going to see a patient and they already had escharotomies done, then you know they are at very high risk for contractures.
Dehydrated Human Amnion/chorion Membrane
- Treatment in partial-thickness burns
- Provide an extracellular matrix to promote healing and manage inflammation
- Minimal to no scarring
- No activity restrictions
- Sometimes used over donor sites to facilitate healing of new partial depth wound
The next one is the dehydrated human amnion/chorion membrane. We tend to call these amniotic membranes instead as it is a little bit easier. These are used for the treatment of partial-thickness burns and can be seen in Figure 12.
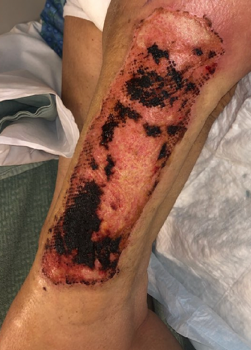
Figure 12. Example of an amnion/chorion membrane.
These provide an extracellular matrix to promote healing and manage inflammation. There is usually minimal to no scarring with this. There are no activity restrictions, and they re often used over the donor sites to facilitate healing of the wound that we have created. We are going to get into this later, but a donor site is where we take skin and put it somewhere else on the body for grafting, so essentially, we are giving somebody a new partial-thickness wound. It is common to put this membrane overtop to facilitate the healing of that wound.
ReCell® Autologous Cell Harvesting Device
- Smaller donor site
- Often used for deep partial-thickness burns
- Harvest skin: Break down with enzyme solution and mechanically; put in buffer solution and spray on skin
- 80:1 ratio for coverage v. 2:1 of meshed graft
- Activity: Surgeon dependent, often ok for gentle activity
ReCell is a new technology in the last few years. It uses smaller donor sites, and it is for deep partial-thickness burns. They harvest a small donor site by breaking it down with an enzyme solution and a mechanical machine that shakes and breaks the donor skin down. This is then put into a buffer solution and then sprayed onto the skin. People call it the spray-on cells. It is an 8:1 ratio for coverage, whereas most grafts are two, four, or six to one thus you are able to cover so much more. And, these donor sites are very painful and take a long time to heal. Activity restrictions are very surgeon-dependent, but it is often okay for gentle active range of motion. As they get closer to healing, you can progress to stretching. But again, the surgeons generally dictate when and how often. These grafts are usually covered in a clear dressing and then wrapped in multiple other dressings. Many times we see these patients during their wound care, and we can see the graft through the clear membrane. In this way, we know how much strain we are putting on the graft.
IntegraTM
- Bovine collagen and silicone layers which promote revascularization and cellular regrowth to develop healthy wound bed in preparation for grafting
- Frequently used overexposed tendons, full-thickness burns, and less vascularized areas
- Activity: No specific precautions, though may be immobilized if tendons are exposed or pin placed in joints
IntegraTM is a bovine collagen and silicone layer which promotes revascularization and cellular regrowth to help develop a healthy wound bed in preparation for grafting. Essentially, it is used over areas that have exposed tendons or very full-thickness burns that are less vascularized, and this is to help provide a wound bed for the graft to go on. These pictures are all of the same hand.
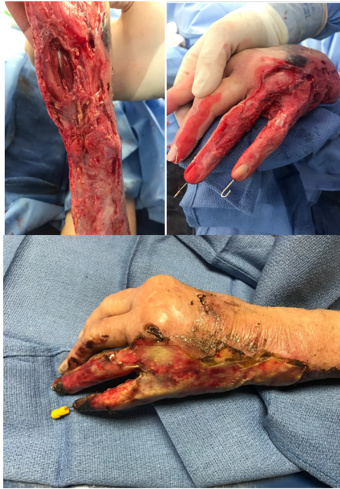
Figure 13. Example of IntegraTM.
You can see in the top pictures exposed muscles, tendons, and bones. Those areas are not a vascularized or granulated wound bed. Any grafts are going to fail if transplanted there. Thus, Integra is placed overtop to help develop that wound bed, and then that way they can graft overtop of a wound bed. This is usually put in place and then changed out every one to two weeks depending on the patient. Once the wound bed looks good, they will graft. You can also see pins that they have through these fingers. Due to the level of damage and the exposed tendon, these fingers were pinned into extension. Unfortunately, this patient actually did lose these fingers as they were pretty necrotic, but she was able to heal through the wrist because of the Integra. There are no specific precautions for Integra. It again is very surgeon-dependent. If somebody has a pin in their hand, you are not going to be able to do activity anyway so then we do splint these patients.
Xenograft
- Rarely used intervention
- Use of pig skin as coverage for a large wound in preparation for autographing
- No activity restrictions
The next thing that we have is a xenograft. This is not that common, but people almost always ask me about this so that is why I put it in here. It is the use of pig skin as coverage for a large wound in preparation for autografting. The Integra that I just spoke about has some bovine collagen so it is actually a more upgraded technology from this. This used to be common practice. When we do use it, there are no activity restrictions for it.
Allograft
- Cadaver skin
- Temporary coverage used to promote healthy wound bed in preparation for autograft
- Decreases infection risk, fluid loss, temperature regulation
- Often for large TBSA burns without enough available donor sites
- Activity: no activity precautions (unless specified by MD)
Allograft is very similar to xenograft except instead of being pig skin, it is cadaver skin. This is used for temporary coverage to promote a healthy wound bed in preparation for autografting, help with decreasing infection risk and fluid loss, and dor temperature regulation. This is most commonly used in patients that have very large TBSA burns without enough donor sites to cover all of that. The patient, whose Lund and Browder form that we saw before, used this method as you can see in Figure 14.
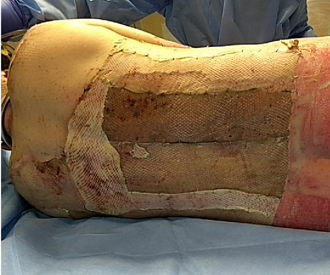
Figure 14. Example of an allograft.
He only had areas on his buttocks and this upper back to take grafts from and that was not enough to cover everything. He also was medically unstable at the time so grafting was not appropriate right away. They were able to put this cadaver skin on him. Your body is never going to grow into the allograft so it will need to be excised and replaced with autograft, but it is something good in the meantime for coverage. We also actually tend to use this a lot in the Jehovah's Witness population because those patients cannot take blood products so sometimes it takes multiple rounds of grafting to close certain wounds. Allografting is a good interim step. You can see that the donor's skin is a darker color than the patient's. There are no activity precautions because eventually, this is all going to come off. It is still important to keep the patients moving during this phase when they are covered in allografting because their joints can still tighten.
Autografting
- Self-donation harvested from “donor site” on unburned area (often anterior thigh or abdomen)
- Final stage for wound healing
- Sheet grafts
- Over cosmetic areas (face, hands)
- Mesh grafts
- Mesh pattern (usually 4:1, for larger areas), grafts heal from outside in through interstices
- Activity: Initially immobilized if crossing joints for first 5 days until takedown of OR dressings
- After 5 days, usually cleared for AROM POD 5/6
- PROM initiated 7-10 days
- Depends on surgeon preference and graft healing
- Splinting may be used
- High risk for contracture, scar banding, hypertrophic scar banding
This is the self-donation from an unburned area to a burned area. We take skin from a donor site, run it through a mesher, and then it is placed on the wound. This is the final stage for wound healing and the most important kind of graft that we see. There are two ways that they can do it. A sheet graft is where they take the skin from the donor site and then they directly place it onto the burn. These are usually areas that are very cosmetic like the face, hands, neck, and smaller areas. The meshing graft is often 2:1 or 4:1, and that is what you see here in Figure 15.
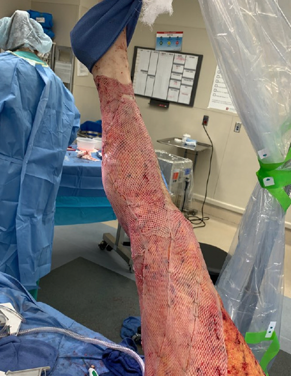
Figure 15. Example of an autograft.
I think this looks probably like a two to one. They take different donor sites and run it through a mesher so it can extend longer. The grafts heal through the interstices of those holes that are there. They cut and had to excise all the way down to his fat, and now they are using skin to cover it. This is his healthy skin that was not burned. Generally speaking, before somebody's autografted, they can move as much as they want. After the autograft, they are initially immobilized if it is crossing a joint for the first five days. We do not typically do that for legs, but more for the upper body because the risk-benefit of somebody not moving and being on bed rest is higher versus the risk of graft failure for that. We still encourage mobility even if it is on the legs, but they are bulky-wrapped in the OR to help with the adherence of those grafts. On the hands, we generally splint into a resting hand position or elbow into extension to kind of give that graft time to adhere in the best functional position. For the first five days, no one touches anything on the graft. There is no wound care done. After 5 days, they take them to the tub room and take off the dressings. This is when they are cleared for some gentle active range of motion. We are always present for that. If the graft is looking really fragile or there is a lot of hematomas, we push off any movement for another day or two.
After the first seven to 10 days, that is when the graft has taken or not. If the graft is still looking fragile, it is important to only do passive range of motion. They may require touch-up grafting. It depends on the surgeon's preference so there is not a hard and fast rule for the five and seven-day range, but rather it is a general timeline to initiate those milestones. These autografts are at very high risk for contracture. One question that people always ask is if they take a donor area from a site that has hair, and they put it somewhere that does not have hair, does that matter? That is not a problem because it is not a full flap. It is a split-thickness graft and only the top layer so there are no issues with hair or anything like that. When somebody is getting a face graft, a lot of times they will take a donor site closer in pigmentation and sun exposure. For example, instead of taking it from the leg, they take it from the back of the neck or the chest to help cosmetically.
Autograft Healing
- 0-24 hours – grafts stick by weak fibrin bonds, adhered post sx. by staples and/or fibrin glue
- 24 – 48 hours: capillaries invade skin graft
- 4 – 5 days: collagen linkages are made between the wound bed and the graft, Begin AROM
- MD clearance is necessary prior to any ROM along the grafted area(s).
- NO SHEARING
- Minimize handling
Here is the timeline for autograft healing. In the first 24 hours, the grafts are stuck by a week fibrin bond or glue that is done in the OR and usually stapled in place as well. Over the next 48 hours, this is when it starts to vascularize. In four to five days while we are still waiting to start treating, this is when the collagen starts to link up and a take-down occurs. Figure 16 is an initial take-down on post-op day five.
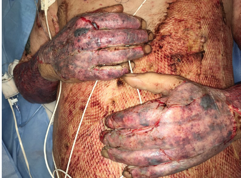
Figure 16. POD 5 days- Take down.
You can see some hematomas and see how hyperpigmented and red it is. You can also see the seams of the graft. He was probably cleared for some active range of motion at this point. Now we are on day 12 (see Figure 17).
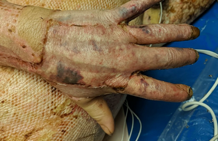
Figure 17. POD 12 days.
There are still some small hematomas and you can again see the borders, but the coloration is looking a lot better. It is starting to kind of smooth out a little bit. Figure 18 shows the same patient two months post-op.
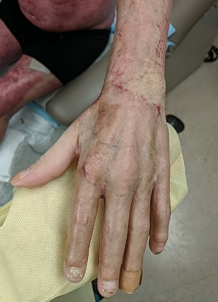
Figure 18. POD 2 months.
Now, you can see how smooth this looks. You can still see the seam here, but compared to this mesh grafting that is peaking through on the lateral wrist side, you can tell that this sheet graft is really nice and smooth. This is really important when you are working with these patients and you are stretching them. You want to avoid handling this area as much as possible because if you are grabbing them and cranking on them, the friction from your hands can cause sheering to occur. It requires doctor clearance to progress any range of motion.
Donor Site Healing
- Creation of partial-thickness wound to harvest skin for autografting
- Very painful
- Heal within 10-14 days, no ROM restrictions
- Little to no scarring, sometimes hyperpigmentation
- Most frequently anterior thigh, abdomen, though in large burns can be taken from any spared area (scalp, scrotum, etc.)
Figure 19 shows the donor site.
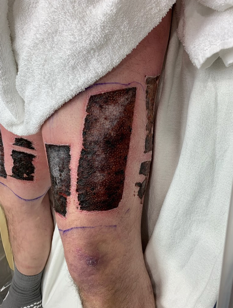
Figure 19. Donor sites.
This donor site looks very black. This is covered in what is called collagenase which is something that helps with clotting so that is why it is so black. They usually are very red. This was a patient with a degloving injury who had multiple surgeries and different donor sites on each leg for these touch-up surgeries. This is where we created a partial thickness wound to harvest the skin for autografting as we talked about previously. It is very painful. This is usually the part the patients struggle with the most because with full-thickness burns they do not have pain, and now we have given them a very painful wound. They heal within 10 to 14 days. There is no range of motion restriction. Actually, it is best for the patients to continue to move through the pain. And, there is little to no scarring. Some patients are just bad healers and may have some scarring issues. Additionally, some people will have hyperpigmentation in those areas and remain pretty red for a while. They will heal up eventually. These are most frequently taken from the anterior thigh. The abdomen, the back, and the butt are also common areas. Sometimes, they have to be taken from very random places like the scalp or scrotum for those that have large burns.
Cultured Epithelial Autografts (CEAs)
- Utilized in high TBSA situations when donor sites are not readily available or enough to cover the wound
- Cultures are sent to an outside lab/vendor where they are grown in “cassettes” and sent back to burn center where they can be applied to the patient
- Wide mesh autograft placed underneath CEAs
- Extremely fragile and susceptible to shearing
- Activity:
- Immobilized for 7-10 days after placement
- The surgeon may order bed rest if on posterior legs, buttocks, or back
- After MD clearance for PROM, progress the same as autograft
When the donor sites are limited to a small area, this is when we resort to allografting or other types of things including CEAs which is a cultured epithelial autograft. This is used in high TBSA situations when there are no donor sites available. If a patient only has their scalp and their scrotum as a donor site, it is going to take forever to cover their body. In these cases, upon admission, the doctors take a biopsy from their armpit. They send it to an outside lab or vendor across the country where the skin is then grown into cassettes and sent back to the burn center where it is applied. You can see these cassettes or the little patchworks noted in Figure 20.
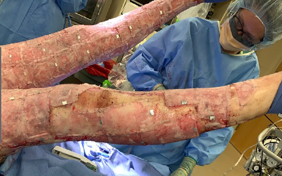
Figure 20. Example of a cultured epithelial autograft CEA.
They take a small donor site and do an 8 to 1 underneath, and then they put the CEAs overtop. These are very fragile like one thin layer of cells. It is almost always immobilized for seven to 10 days after the placement. Again, it is surgeon-dependent and sometimes a risk-benefit. If the patient is really delirious or really getting weak, then they kind of concede with the understanding that they will probably have to do some touch-up grafting. They may order bed rest if it is on the posterior legs, butt, or back, but we try to not do that. We sometimes have to utilize sand beds if that is the case. Again, this is surgeon clearance for range of motion and not usually that five-day window.
Amputation
- When the burn is extensive to the depth of bone or affecting the vascular area
- Most often seen in cold injury/frostbite to digits of hands/toes
- Infection may result in an inability to salvage limbs
- Therapeutic intervention consistent with standard amputee care
- Large focus on contracture prevention of remaining joints to maximize candidacy for prosthetic long term.
- Involvement of orthopedic and physical medicine and rehabilitation team often indicated.
The last surgical intervention is amputation which we touched on with the frostbite. This is when the burn is extensive to the depth of bone or affecting the vascular area. Infection is also a common reason because they are so susceptible to infection. Once somebody has had an amputation, we need to provide standard amputee care. We also need to focus largely on contracture prevention for any remaining joints to maximize their candidacy for prosthetics. For example, if somebody has a leg and a flank burn, it is so important to focus on that hip to prevent a contracture to make them a good candidate for a prosthesis. Orthopedics and physical medicine and rehab are often involved with these patients as well.
Therapy Evaluation and Intervention
Timeline of Intervention
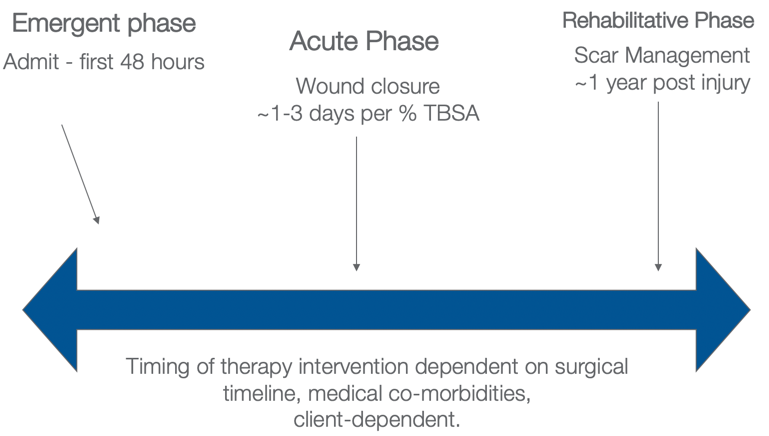
Figure 21. The different phases of intervention.
This is a delicate balance with these patients as we are fighting contraindicating precautions, behaviors, pain, medicines, intubations, and all of those different things. Our treatment depends on the client, the surgical timeline, and medical comorbidities. This is a general framework.
The emergent phase is the first 48 hours. The acute phase is wound closure and the grafting phases. As I said, they usually are in the hospital one to three days per TBSA percentage point. In the rehabilitative phase, we are focused on scar management and function. This can be up to one year as scars develop, and this is often managed on an outpatient basis.
Emergent Phase (0-48 Hours)
- Evaluation of injury: Cause? Where is burn? What is depth? What joints does it cross?
- *POSITIONING*
- Reduce edema, contracture risk, peripheral nerve damage
- Comorbidities?
- Trauma? Inhalation? Psych? Orthopedic?
- Prevent/reduce medical complications
- Delirium prevention
- Early mobility for cardiopulmonary
- Pressure injury prevention
- Monitoring and addressing Acute Stress Disorder
- Educate patient and family
- Set expectations and timeline of therapy for the duration
- Fear about movement
- Begin ROM
- A/AROM and engagement in functional tasks
This is the patient (see Figure 21) that we have been seeing in all of these different pictures. This is what he looked like when he came in.
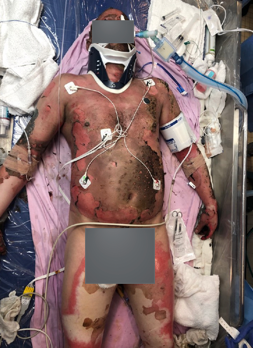
Figure 22. Example of emergent phase.
What do we do? What is our role? The first thing we look at is the cause of the burn? Where is the burn? What is the depth? What joints are affected? Our job in these first 48 hours is positioning. The goal of positioning is to reduce edema, contracture risk, and manage any risk for peripheral nerve damage. We also take a peek at their comorbidities. Do they have orthopedic injuries that provide barriers to the positioning precautions? A common one that we see is a shoulder injury and an axillary burn. We want them in abduction, but they cannot because of their shoulder injury. How are we going to work with that? Are there other trauma injuries? Is there an inhalation injury? What kind of psychiatric comorbidities do they have? This can be a huge barrier to what we do as well. We also want to prevent and reduce medical complications via early mobility to decrease delirium, increase cardiopulmonary function, and prevent pressure injuries. These patients are so vulnerable because they already have damaged skin. How do we prevent further damage? We need to monitor and address acute stress disorders to keep their mental health on the radar during this time as these injuries do tend to be very traumatic.
This is a great time for us to start with patient and family education because the patients are out of it or are overwhelmed. It is good to set expectations and a timeline with the caregivers. We have already talked about the timeline based on the TBSA, and it is good for the families to know that information upfront. There also tends to be a very high fear of movement. We are often asked, "Am I going to do more damage if I move? Why are you making me move; this hurts." Whatever you can do to keep them moving in this phase is really important to maintain their strength, range of motion, preventing edema, and having them buy into the therapy process. While stretching and passive range of motion are not indicated at this time, active and active assist range of motion are appropriate for engagement and participation in functional tasks.
Acute Phase
- Continue with Emergent Phase interventions
- Edema reduction
- Splinting/positioning
- ROM
- The pending phase of autograft healing will progress from immobilization > POD#5 AROM > PROM stretching
- Functional mobility and ADL engagement
- Therapeutic dressings
- Prioritize and emphasize area(s) in greatest need of treatment
- Many medical complications will arise during this phase
- Renal failure
- Sepsis
- Delirium
- Pneumonia
- Infection
- Hyper metabolism
- Cardiac
- ICU acquired myopathy
The acute phase focuses on edema reduction, splinting, and range of motion. We have already talked about autografting, functional mobility, and therapeutic dressings. We need to make sure that wound care is done in a way that facilitates the movement that you are aiming for. This can be really hard, but we need to prioritize and emphasize the areas of greatest need. You cannot conquer every joint every session so we need to focus on where they need it.
There can also be many medical complications that arise during this phase like renal failure, sepsis, delirium, pneumonia, infection, hypermetabolism, and cardiac issues. There are so many things that are going on with these patients. We have to pay attention not only to the burn but everything else that is going on with the patients including their mental health.
Rehabilitative Phase
- Home Stretching Program
- Self-PROM, caregiver training
- Scar Management
- Maturation occurs for ~ 1-year post-injury
- Scar Massage
- Custom Compression Garments
- Desensitization
- Community reintegration
- Return to work, leisure activity
- Psychosocial/cognitive- Burn Specific Health Scale, PTSD Scale
In the rehabilitative phase, we focus on home stretching programs, scar management, desensitization, and again the psychosocial piece.
Interventions
Positioning
A position of comfort is a position of contracture. Patients are going to want to rest in positions that are not good for them. This is a picture of somebody with a large burn in Figure 23. They are positioned with their axillae in abduction, elbows in extension, wrists and hands in resting functional positions, and no pillows behind their head. The foot of the bed should be locked out, and the patients are typically put in Rooke boots if their ankles are involved.
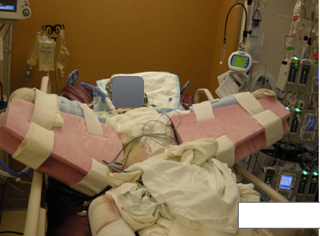
Figure 23. Proper positioning to prevent contractures.
Neck Burns.
- Promote next extension
- Prevent preference for unilateral cervical flexion
- No pillows! (Sand pillows are ok)
- Custom thermoplastic or silicone lined splints or Watusi collars post-op
For a neck burn, we want to promote extension and prevent a unilateral cervical lateral flexion. Again, we use no pillows. The sand pillows or Z-flos are okay to provide comfort but we do not want pillows pushing them into flexion. As you can see here, we sometimes make a custom thermoplastic splint (see Figure 24).
Figure 24. Example of a thermoplastic splint.
Once they are all healed up, you can make a silicone-lined splint to help soften those grafts or a Watusi collar which is often what you see in more third-world countries involving different layers that you can take off. It is hard to explain, but we use Tubigrip layers added one at a time for increasing range of motion using a static progressive approach.
Axillary Burns.
- Promote Abduction
- Prevent Internal Rotation
- Hip abduction wedges
- SCOI bracing
- 3+ pillows
We want to promote abduction, prevent internal rotation, and prevent scar banding. You can see this patient has some pretty severe scar banding in Figure 25.
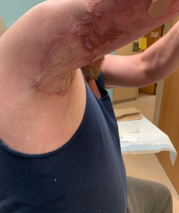
Figure 25. Example of scar banding.
At a minimum, we encourage three pillows under the patient, but if they are quite involved, then we will use a hip abduction pillow or an SCOI brace which is also sometimes called an airplane splint to promote this abducted positioning.
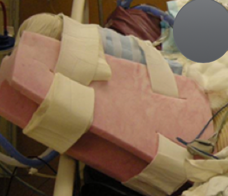
Figure 26. Abducted shoulder positioning.
Elbow Burns.
- Promote extension
- Elbow restraints/Freedom splints
- Anterior slab thermoplastic splints
For the elbows, we want them in extension. You saw in that first picture of the man who was pretty involved that he had a Freedom splint on. Sometimes people call them Posey splints depending on where you work. It is technically a restraint so people cannot grab their IVs, but we also use it to promote elbow extension. We use that early on for comfort, but once somebody is closer to healing, we will make one of these thermoplastic splints with straps to hold it in place (see Figure 27).
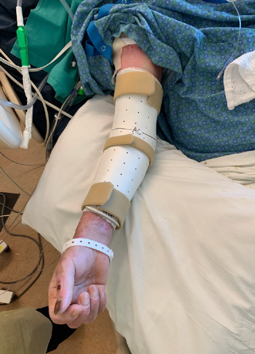
Figure 27. Thermoplastic extension splint.
You can also have these ACE-wrapped on.
Knees.
- Promote extension
- The foot of the bed locked out
- No pillows under knees
- Knee immobilizer at rest if contracting
- Encourage mobilization when able
We want to promote extension in the knees and keep the foot of the bed locked out. We also want no pillows under the knees. If they are starting to contract, a knee immobilizer can sometimes be used, but the most important thing for these patients is to keep walking.
Ankles.
- Promote dorsiflexion
- Rooke boots
- Posterior slab splints
For the ankles, we want the same thing. Mobility facilitates range of motion. To promote dorsiflexion, we can either make splints or use Rooke boots if we are starting to notice some plantar contractures.
Hand/Wrist.
- Intrinsic plus positioning
- Wrist extension, MCP flexion, PIP, and DIP extension
- For small burns:
- Customize splint to immobilize only necessary joints and allow AROM of unaffected joint
Figure 28 shows intrinsic plus positioning with wrist extension, MCP flexion, PIP extension, DIP extension with the thumb abducted.
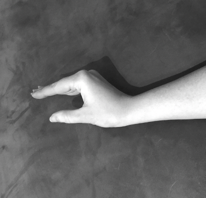
Figure 28. Intrinsic plus positioning.
We use resting hand splints to promote this, but often with the initial edema, it is very hard to get the true resting hand intrinsic plus positioning. We do the best that we can, but this is the ultimate goal for somebody at rest. For smaller burns, it is encouraged to customize splints so that you are only immobilizing what is necessary and allowing range of motion at the unaffected joints. As you can see in Figure 29, only these two fingers were re-splinted. We wanted the patient to be able to at least do some sort of opposition and utilize the thumb and those other fingers.
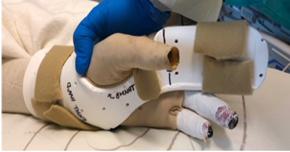
Figure 29. Custom splint.
Splinting
When do we splint and for how long?
No Splinting.
- Partial-thickness burns
- Full-thickness burns prior to autografting with the patient participating in AROM/functional use during the day
You do not splint for partial thickness burns especially superficial partial. There is no indication for that. For the deep partial, if you are noticing that somebody is getting tight, that is a different story. However, for those partial-thickness burns where patients are maintaining their range of motion, it is not necessary. For full-thickness burns, it is okay prior to autografting to not splint somebody if they are participating in active range of motion, and they are functionally using it during the day and not showing much tightness.
Splinting At All Times.
- Post-autografting until POD #5 (or cleared for activity by MD)
- Patients with exposed tendons
- Intubated and sedated patients who are not able to complete AROM
We want them splinted at all times in that post-op period that we talked about before. This would be post-autografting until post-op day five or cleared for activity by the doctor or patients with exposed tendons as we talked about with the pins in the fingers. You are not going to want those patients doing any sort of range of motion. You also do not want them bumping those pins into things as that can be really painful for them. Splinting at all times is appropriate in this situation. Patients that are on Integra need to be in a splint to protect those exposed tendons and strain in those joints. Additionally, we splint at all times for patients who are intubated and sedated because they are not able to complete active range of motion. They are not moving at all so they are at high risk for contracture from that alone. We want them to be resting in a functional position. Wearing splints 24/7 can be really uncomfortable for them, especially when their whole upper body is involved. Sometimes we will concede and let them alternate. For example, when nursing comes every two hours to turn them, they can switch splits to the opposite sides. We like to keep the hand splints on at all times, but sometimes we allow for the Freedom splints and the hip abduction wedges to alternate as otherwise they are spread out like an airplane and have a hard time sleeping. This is client-dependent.
Nighttime Splinting.
- If decreased ROM noted in deep partial burns or prior to autografting
- Post autografting for ~1-2 weeks if decreased ROM
- Delirious or confused patients for graft protection
Nighttime splinting is a great way to address those patients who get tight and you are starting to notice some decreased range of motion but they are participating during activities during the day. Sometimes we also say nighttime or rest. Thus, if somebody is in bed, then we put their splints back on. When they are up and doing things, it is okay to take it off. This is usually done in those deep partial burns that are tight but are not getting grafted right now. A couple of weeks after autografting, if they are starting to heal up and they are tight, you may opt to keep the splints on. This also goes for those that are confused or delirious.
Edema Management in Emergent/Acute Phase
- Elevation positioning (2+ pillows)
- AROM when able
- Squeezing sponge
- Therapeutic wound dressings
- ACE figure 8 wrapping
- Once healed or close to being healed:
- Coban wrapping
- Edema glove placement
- Massage
It is important to do edema management during this initial phase. Elevation positioning with 2+ pillows is going to be the first line of defense. We also want to encourage active range of motion and make sure that the way that the wound care techs are wrapping their fingers is not promoting any worse edema. They should have ACE figure-eight wrapping over their dressings, and then as they start to heal, then we can put them in Coban as you see in Figure 30.
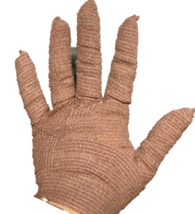
Figure 30. Example of Coban for edema management.
We can also use edema gloves or the Tensoflex or Tubigrip on their arms or legs to help facilitate that edema. It also helps with compression which we are going to get into later. Edema management in this acute phase is very important.
Desensitization
- Hypersensitivity can be a barrier to engagement in ADLs
- Once healed, patients educated to expose scars to different textures, temperatures, and touch
- When a patient takes off gloves or compression during exercise, encourage exposure to different sensations
- Ex. dry washcloth vs. smooth pillowcase
- Touching a cup of ice progressing to holding an ice cube
- Graded exposure to improve engagement in the environment
Patients also tend to have issues with hypersensitivity. Once they are healed, we want to expose their scars to different textures, temperatures, and touch with a graded desensitization program. In our hospital, we give out these little kits in Figure 31 that have different textures of fabric for them to touch like silky, scratchy, and soft (felt). We also give them a dry washcloth and have them rub it over their hands as they can tolerate it. They can alternate this with soft fabrics for neuro-reeducation.
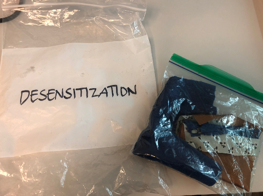
Figure 31. Example of a desensitization kit.
You can progress them from touching a cup of ice to then holding an ice cube depending on their tolerance. One of the biggest complaints I hear is, "It just hurts to touch everything."
Goniometry
- Complete after stretching
- Can measure under anesthesia to get maximize PROM and determine if true contracture, heterotrophic ossification occurring vs. pain limitations, and guarding during stretching
- Distance from fingertip to distal palmar crease is a fast glance way to monitor full composite fist ROM in between goniometer measurements
- Frequency? Client dependent, every 1-2 weeks pending progress or decline
Goniometry is needed to track progress. We often do this under anesthesia. We go into the ORs and measure the patients to determine what their maximum passive range of motion is. In this way, we can see if they truly have a contracture or if they are holding out on us beca