Michelle: I appreciate everyone taking the time for this course today. I hope it is helpful for you and your clients. We are going to be talking about positioning the pelvis within a wheelchair seating system. Although we are going to overview this in an hour, it is certainly not a simple task for a lot of our clients. It is not something where we can simply pull out a recipe and follow it. It is also hard to look at challenges in isolation. For example, it is hard to look at a posterior pelvic tilt without looking at what is going on with the client's entire body. But for the purposes of examining this material in depth, we are going to do just that. We are going to tease out specific challenges, but keep in mind that context.
Positioning Strategies
- Not a cookbook approach
- Can’t really look at challenges in isolation
- Always keep in mind the possible causes and your goals
- Goals can be used as justifications for funding
- Positioning Chart
It is also important that if we are looking at a specific challenge, like a posterior pelvic tilt, that we keep in mind what might be causing that and our goals in addressing it. Hopefully, our goal is a little more substantial than, "I am a therapist and we are not supposed to let people sit that way." Our goals can then be used as justifications for what we are recommending and for funding for equipment that may be required for that client.
One of your handouts is a positioning chart. Again, it is only a reference because this is not as simple as I wish it was. It is not a cookbook approach, but it could be used as a reference as you go through some of the specific positioning challenges, specifically with the pelvis. If you lose your handout for some reason, it is also available in the resources on my website.
Assessment
We are not going to dig into seating assessment here today. There are other courses on OccupationalTherapy.com that address the mat examination and seating assessment. Instead, we are going to jump right into positioning the pelvis, but do not forget that a big part of that is the mat examination. We need to get the client out of their seating system. We need to look at their position, ideally in supine like we see here in Figure 1.
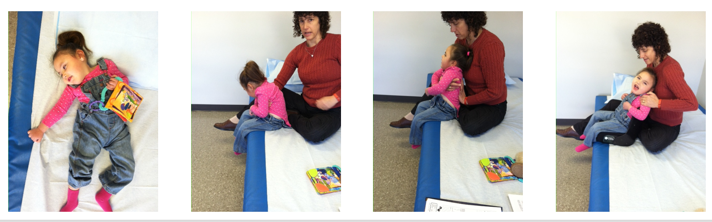
Figure 1. Riley's mat evaluation.
We want to see what is going on with Riley's position if we take away gravity in the far left picture. In the other pictures, you can see I have positioned Riley onto sitting at the edge of the mat table, and now we have gravity impacting her. Gravity is going to lead to a change in her position. You can see a lot of curvature in her spine in the 2nd picture from the left. Then, in the next picture, I am determining where to provide support for her. Where I put my hand is where I need support from the seating system. Finally, in the far right picture, we are trialing something for her, and her position is already looking a whole lot better than it was at the beginning.
Positioning Challenges: the Pelvis
We are going to jump into specific challenges that we often see when positioning someone in their wheelchair seating system. We start with the pelvis because it is really the cornerstone of the person's position. The position of the pelvis greatly influences the position of the trunk and the lower extremities. Depending on the position of our trunk, that is how we balance our head and isolate and use our upper extremities functionally. There are specific challenges of the pelvis, primarily a posterior pelvic tilt, which is the bane of my existence. We can also see an anterior pelvic tilt, pelvic rotation, and a pelvic obliquity.
- Posterior pelvic tilt
- Anterior pelvic tilt
- Pelvic rotation
- Pelvic obliquity
Posterior Pelvic Tilt
We are going to start with a posterior pelvic tilt. In a posterior pelvic tilt, the top of the pelvis is tipped rearward posteriorly. If we look at the images in Figure 2, the pelvis is leaning rearward.
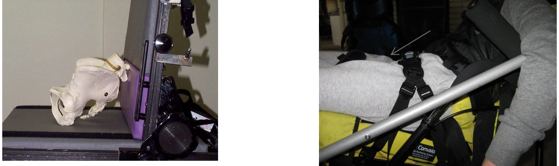
Figure 2. Examples of posterior pelvic tilt.
This is sometimes called sacral sitting. This is because a client may bear weight on the sacrum, and that is certainly not where we want them to bear weight. If we see a pressure injury in this area, it can be a result of this extreme position. In the right picture, we have a young man who is in an adult umbrella style stroller. It does not provide him adequate support as he has in his wheelchair seating system. Unfortunately, he ends up in a significant amount of posterior pelvic tilt.
Let's Try It
Let's try this out on ourselves. You may not have a client in front of you, but we do have our own bodies, and our own bodies can really inform what we do with our clients. Sit up nice and straight, and sit on your hands. See if you can find those ITs, your ischial tuberosities, or those two boney prominences that we sit on. Now, let your pelvis slide into that posterior pelvic tilt. It is a rotation movement. We are not simply moving forward with our pelvis. Our pelvis is rotating. The top of the pelvis is moving rearward, and our ITs are moving forward. Where did those ITs go? They are probably not in your hands anymore. They have jumped in front of your hands. We have quite a bit of flexibility, and our ITs can get really quite a way forward from the back of the seating system. Think about what your spine is doing as a result of this posterior pelvic tilt. Your spine is now in a flexed position, a kyphosis. It is now really hard to sit up straight. This impacts our ability to balance our head when our pelvis is in a posterior tilt. This is why it is so important to address this.
Possible Causes
What can cause a posterior pelvic tilt? If we see a posterior pelvic tilt and jump to a solution, we may not choose the best solution because we may not be addressing the specific cause. Here are some common causes that we may see.
- Low abdominal/trunk tone
- Tight hamstrings
- Seat depth too long
- Limited range of motion, particularly limited hip flexion
- Sliding forward on the seat
- Extensor thrust
- Sling seat and back
Posterior pelvic tilt may be caused by simply a loss or lack of tone in the trunk causing the trunk to collapse into a flexed position and posterior pelvic tilt. Tight hamstrings can pull the pelvis into a posterior tilt. If the wheelchair seat is too long, we will not be able to pull the pelvis back into a neutral position. The range of motion can limit the ability of somebody to reach a neutral position without the correct seat to back angle. We will talk more about that in a minute. Some clients simply slide forward on the seat, while some actively extend and thrust forward on the seat. And then finally, for those unfortunate few who are stuck in a chair with a sling seat and/or back, it is just about impossible to sit without collapsing into a posterior tilt. It also promotes a kyphotic position. Their legs also often end up adducted and internally rotated. Sling seats and backs, especially those nice old worn out ones, promote an unhealthy position.
Low abdominal trunk tone. Let's say we are dealing with someone who has low tone in their trunk. I see a lot of people who have increased muscle tone. However, many times the increased tone is mostly in the extremities and the trunk and neck can still display low tone. The pelvis and the trunk collapse into a kyphotic position. Perhaps, we can use some seating products and seat the client pretty well, but slowly their trunk collapses as they are not able to maintain that. This can happen with muscle weakness as well.
What do we do?
- Provide support to the posterior superior surface of the pelvis to block backward movement
- Biangular back or PSIS pad
- Anteriorly sloped seat or drop footrests to allow hip extension
- Pulls pelvis into an anterior tilt
As I mentioned earlier, a posterior pelvic tilt is not simply the pelvis moving forward, it is the pelvis rotating. It is important to provide support to the back, or the posterior superior surface of the pelvis to block that rearward posterior movement. This means we do not want that slingback, but rather we need a firmer surface to prevent that rearward rotation. Some specific strategies that sometimes work are a biangular back or a PSIS pad. We will take a look at that in a second here. Another strategy that sometimes works is to use an anterior slope to the seat. With this, the knees end up just a little lower than the hips. We do not want the knees much lower than the hips because then they might slide out of their seat. But, by dropping those knees just a little bit or lowering the foot rests, we can simulate that. This tends to pull the pelvis into an anterior tilt.
A biangular back is sometimes part of a linear seating system, like the one pictured here in Figure 3.
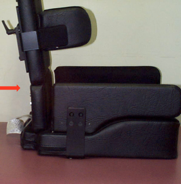
Figure 3. Biangular back by Rehabilitech.
This shape is often seen in off the shelf type backs that you can get for a wheelchair seating system. We might also see this in a custom molded seat. The lower portion of this biangular back ends right at about the PSIS (Posterior Superior Iliac Spines), where the arrow is. This angle between the lower back and the seat is rather closed, maybe 90, 95, even 100 degrees, but the upper part is opened a little bit beyond that. Some of these seats have angle adjustable hardware so that we can choose how much of a difference in angle that we want there. Why do we extend the upper portion? Our back is not a perfectly flat surface, and by allowing a little extension above the pelvis, we are promoting a more upright trunk. We are also providing that more closed angle at the posterior pelvis to prevent the posterior tilt, but we are respecting the natural curvatures of the spine by allowing some space behind the pelvis. This concept, whether it is in a linear seat, an off the shelf back, or in a molded back, is a strategy to promote an extension of the trunk and to discourage a posterior pelvic tilt.
Sometimes I use a PSIS pad, posterior superior iliac support, as seen in Figure 4.
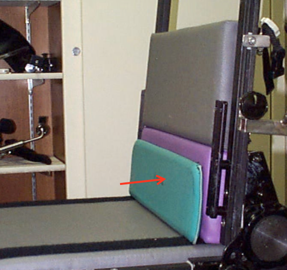
Figure 4. PSIS pad.
You can just take a relatively soft pad and slide it behind the client. Even though I work with a variety of height clients, the height of the pelvis does not always vary as much you would think, not nearly as much as the length of the femur for example. I could get these pads, maybe half inch wide even in depth, and slide it behind the client in their own seating system to see if it appeared to discourage that posterior pelvic tilt, promote trunk extension, or both. Another way you could do this is to take a hand towel, not too thick, and slide it behind the client. Lean them forward and place this behind the pelvis to see if it is working. If it is, then we know we need to do something along these lines within the seating system itself.
Tight hamstrings. Another cause of posterior pelvic tilt that is very common in many of our clients is tight hamstrings. I do not know about your hamstrings, but mine are not as loose as I would like them to be. Hamstrings, as we know, are attached at the hip and at the knee. If they are tight, the client is going to want to either bring their knee back to relieve the pull on the hamstring or slide their pelvis forward. Either of these is going to relieve the pull on the hamstring. Our clients are not going to tolerate a prolonged stretch. Additionally, that prolonged stretch is usually going to result in a stretch reflex anyway, and they will have a tighter muscle at the end of the day. There are two different things we can do to compensate for those tight hamstrings and posterior pelvic tilt.
- Open seat to back angle
- Decrease thigh to calf angle
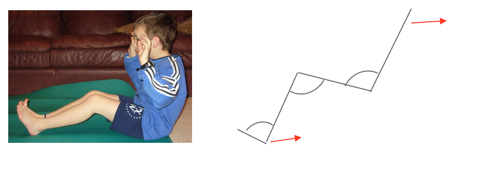
Figure 5. Tight hamstrings and solutions.
We can either open the seat to back angle, relieving the pull on the hamstring, but hopefully maintain alignment and neutral tilt to the pelvis. Or, we can tuck those feet in. Sometimes, we have to do a combination of both. The main challenge with bringing those feet back, decreasing the thigh to calf angle, are front casters. If we bring these footrests too far back, unless we are dealing with a short child, these footrests are going to hit or interfere with the casters. It is important to work with the complex rehab equipment supplier to look at various product options that allow us to decrease that angle without resulting in caster interference. And again, opening the seat to back angle can be helpful for relieving the pull on the hamstrings. Sometimes a very small amount can make quite a difference.
Figure 6 shows a 90-degree angle. This is a seating simulator we used to use at the Children's Hospital in Denver.
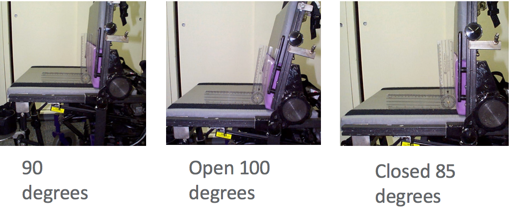
Figure 6. Seat simulator with different back angles.
The 90-degree angle is a really hard position to maintain. In the middle picture, we have opened up to 100 degrees, and gravity would now help this person's posture a bit or relieve a pull on the hamstrings. Some of our clients inadvertently end up in a closed angle (picture on far right). This is really impossible to maintain, thus it is important to make sure that the client is not in a closed angle. We could place a goniometer right on the client's thigh and trunk and look at that angle to make sure it is not 90 degrees or less.
Long seat depth. An all too common cause and this is certainly preventable, is an overly long seat depth. In Figure 7, we have a client whose knee is just past the length of the cushion. I could pull back on this person all day long, but their pelvis is not going to be back here in the seat because it is too long.

Figure 7. Seat depth too long.
One easy tip for determining if this is a problem is to lean the client forward, instead of pulling them back by their armpits. If they can tolerate it, I fold the client forward. If I can see daylight between the back of the seating system and the back of my client, then I know they are not all the way back. And if I grab the belt loops of their pants and scoot them back, but they cannot get all the way back because they are hitting the front of the cushion, I know the seat depth is too long. Providing the correct seat depth can correct this issue.
ROM limitations. Another challenge is the range of motion limitations, particularly in hip flexion (Figure 8).
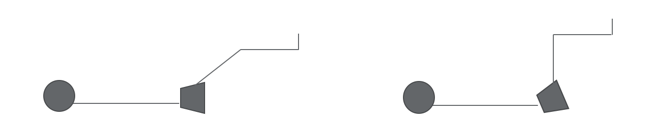
Figure 8. Examples of hip flexion.
One of the first things to do in a mat eval is taking the client out of the chair and place them in supine on a mat. Then, slowly bring their leg into hip flexion with one hand firmly on the pelvis. Depending on how big the client is, you may need help. I work with a lot of kids so I usually can do this by myself. As you are flexing the hip, you want to see if the pelvis starts walking back into a posterior tilt. This is when you know that they have exceeded their available range. We need to flex the leg as much as possible while maintaining a neutral tilt to the pelvis. This angle then becomes the proper seat to back angle, and sometimes it is not quite 90 degrees. You might have to back off of this a little bit in order to keep the pelvis in a neutral position.
- Accommodate fixed limitation in hip flexion by opening seat to back angle
- Accommodate asymmetries with contoured or molded positioning system
If there is a limitation in hip flexion, you have to open the seat to back angle to match that range limitation. If someone has significant asymmetries, they may require a contour or molded positioning system to address that.