Background
- My background
- 9 years in pediatric burns
- Initiated scar management protocols for OT/PT
- Established OT/PT role in vascular & burn clinic
- Burn/Scar-related publications:
- Parry, I. S., Schneider, J. C., Yelvington, M., Sharp, P., Serghiou, M., Ryan, C. M., & Nedelec, B. (2020). Systematic review and expert consensus on the use of orthoses (splints and casts) with adults and children after burn injury to determine practice guidelines. Journal of Burn Care & Research, 41(3), 503-534.
- Sharp, P. A., Pan, B., Yakuboff, K., & Rothchild, D. (2016). Development of a best evidence statement for the use of pressure therapy for management of hypertrophic scarring. J Burn Care Res., 37(4):255-64.
- Nedelec, B., Carter, A., Forbes, L., Hsu, S. C., McMahon, M., Parry, I., Ryan, C. M., Serghiou, M. A., Schneider, J. C., Sharp, P. A., Oliveira, A. D., Boruff, J. (2015). Practice guidelines for the application of nonsilicone or silicone gels and gel sheets after burn injury. J Burn Care Res., 36(3):345-374.
- Parry, I., & Esselman, P. C. Collaborators: Nedelec, B., Balakrishnan, C., Calvert, C. T., Hsu, S. C., Crump, D., Flitton, M. T., Gabriel, V., Garner, W., Helm, P., Moss, L., Rimmer, R. B., Ryan, C. M., Schneider, J .C., Sharp, P. A., Shetler, M., Laker, C. Y., & Yohannan, S. K. (2011). Clinical competencies for burn rehabilitation therapists. J Burn Care Res, 32(4), 458-467.
Thank you so much for joining me. The first part of my career was in pediatric burns, and I worked at Shriners Hospital in Cincinnati, Ohio. This is completely focused on pediatric burns. Here is a picture from that time (Figure 1).
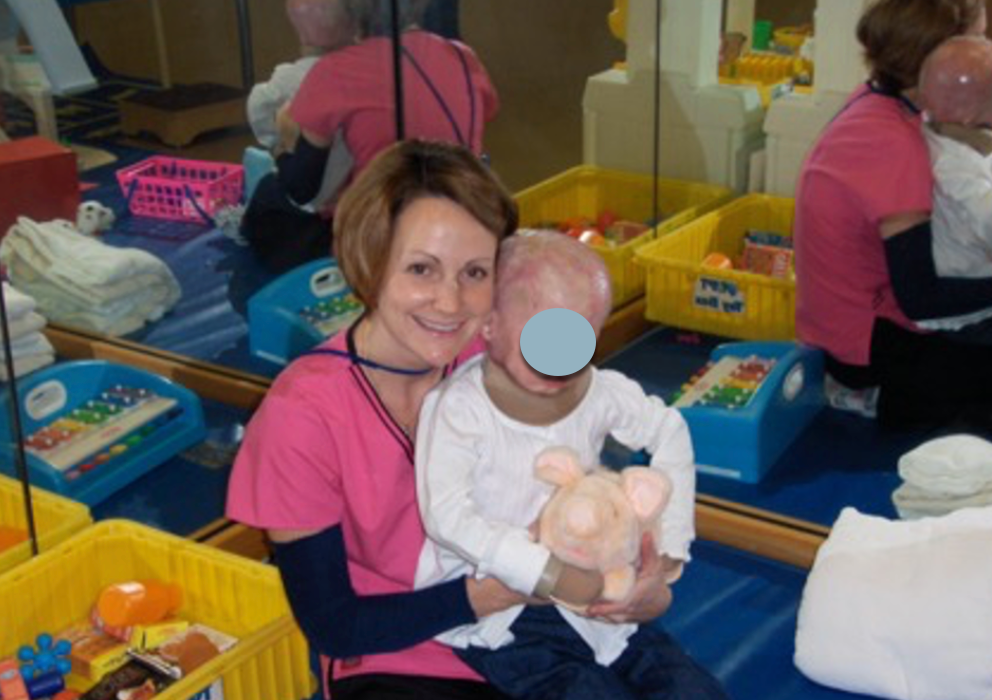
Figure 1. Patti at Shriners Hospital in Cincinnati.
After nine years, I decided to move into general pediatrics at Cincinnati Children's. When I got there, I worked in neuro rehab and saw kids after traumas, like car accidents and gunshot wounds. Many had scars, and none of my coworkers knew what to do with them. Some of them were also being missed functionally. I began to bring all of my scar management knowledge into my work in general pediatrics. I used some of these skills to start up a vascular and burn clinic at Cincinnati Children's. I am hoping to share my experience with this and share it with you today.
Why Are Scars Important?
Why are scars important? I am sure you are familiar with this diagram of the International Classification of Functioning, Disability, and Health made by the World Health Organization. This is a nice way to map out how any condition impacts a person.
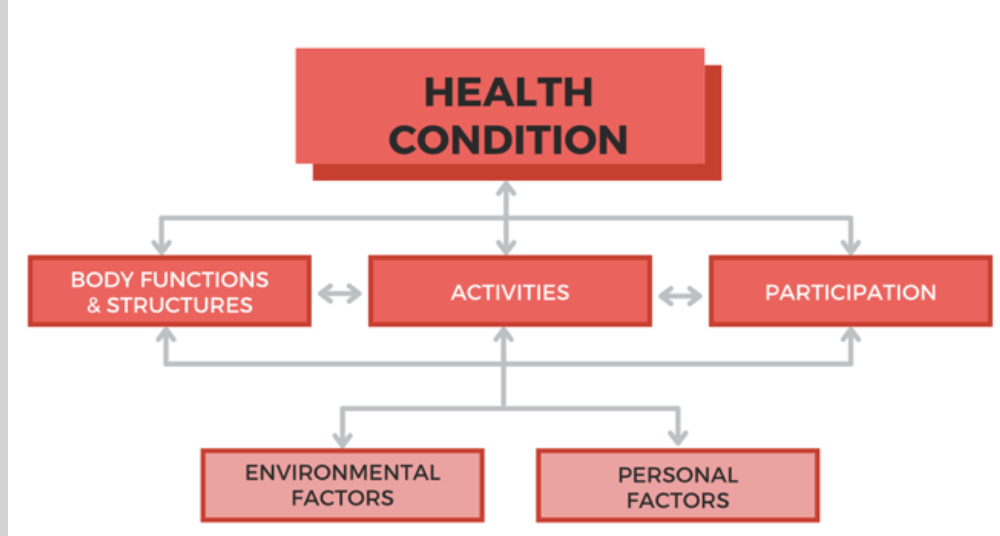
Figure 2. International Classification of Functioning, Disability, & Health (WHO, 1980).
On the left, we see body functions and structures, in the middle, activities, or the components of things that we do day to day, and then participation and how we participate in life. As OTs, we aim to improve participation by working on activities. What does this have to do with scars? Scars impact body functions and structures as it impacts the skin.
Skin is the largest organ in your body. It has many jobs. It protects you from the environment from organisms and any hazards, keeps your body temperature regulated, provides your sensation, and it is what people see or your appearance. When we have an abnormal or an interfering scar, a person's range of motion is decreased both passively and actively. Limited active range may also affect the strength and function of the joints. If a person cannot stretch as much as they used to, they may not be able to do things like reaching things off high shelves, doing their hair, or bending down and tying their shoes. Anything that you do with your body can be impacted by an injury to your skin.
Then, you bring into account things like culture. Cultures value appearance and looking good, normal, and symmetrical. A scar may impact a person's confidence, self-esteem, and participation. Sometimes, something as small as a scar can really have a big downstream impact.
Skin Anatomy
Let's now review a little bit about skin anatomy, as noted in Figure 3.
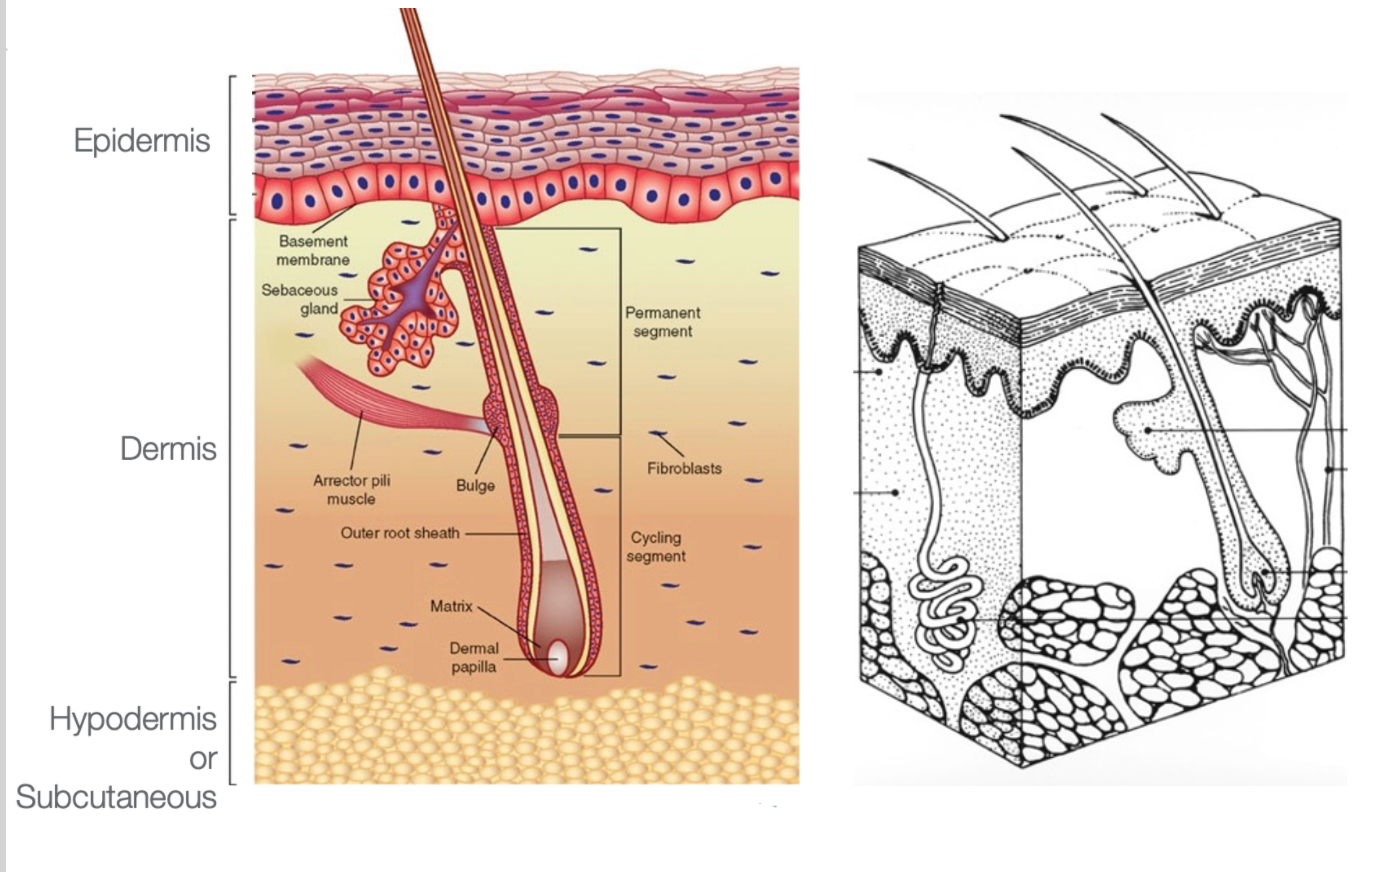
Figure 3. Skin anatomy.
The top layer is your epidermis is where the cells are located and are sloughed off. Underneath the dermis is where all the structures that reproduce skin are. This layer has hair follicles, sweat glands, oil glands, and everything to keep the skin healthy and regenerating. Under that is the hypodermis or subcutaneous layer like fat, muscles, and anything under that. The dermal layer is what is crucial, and when we interrupt that, we have problems.
Burn Review
This presentation is not about burns, but burns are a nice way to discuss scar management. Burns cause an injury to a big portion of your skin. Keep in mind, any injury to your skin would apply here.
Superficial or 1st Degree Injury
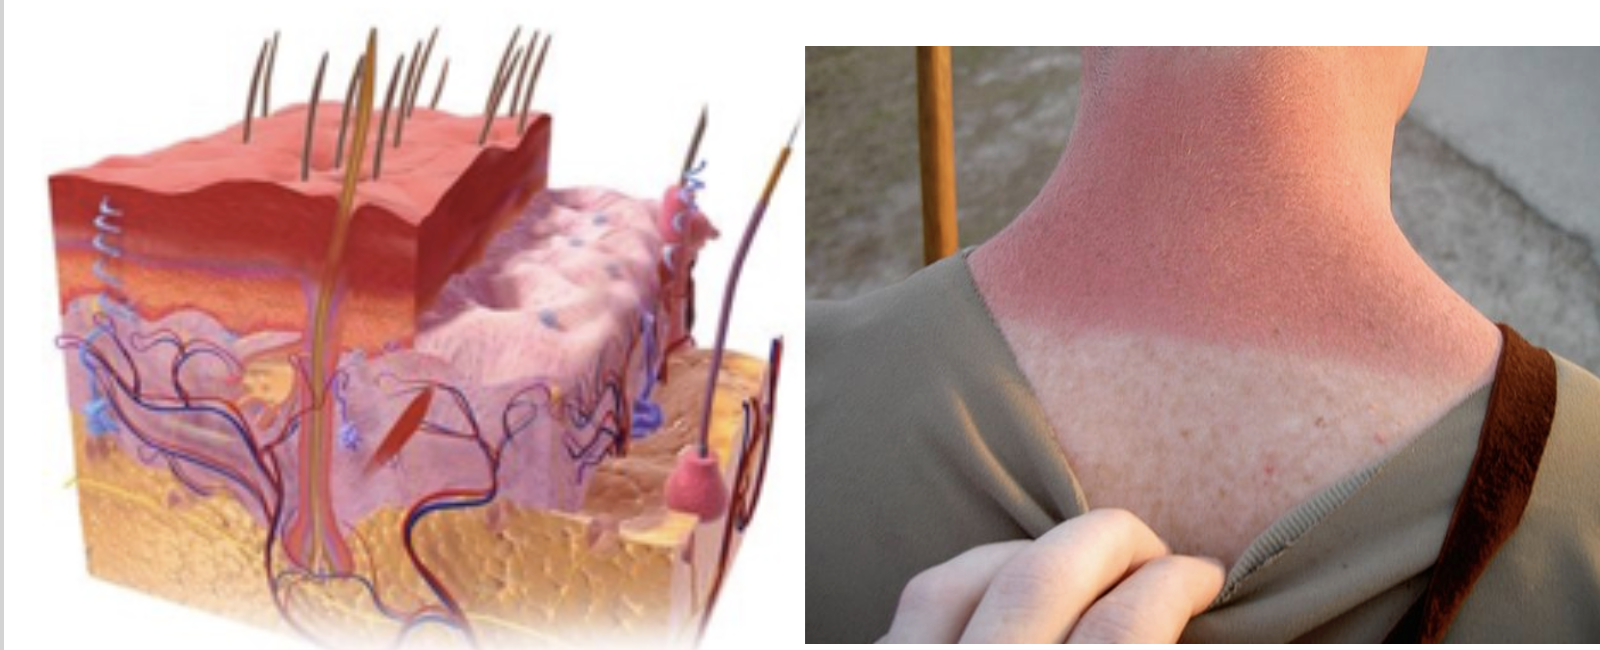
Figure 4. Example of a superficial or 1st-degree injury.
A superficial or a 1st-degree injury is when just the epidermis is affected. This can be a sunburn, a mild scrape, or anything like that. The epidermal layer is interfered with, and it can be painful, swollen, and itchy. This generally heals on its own within a few days.
Partial Thickness or 2nd Degree Injury
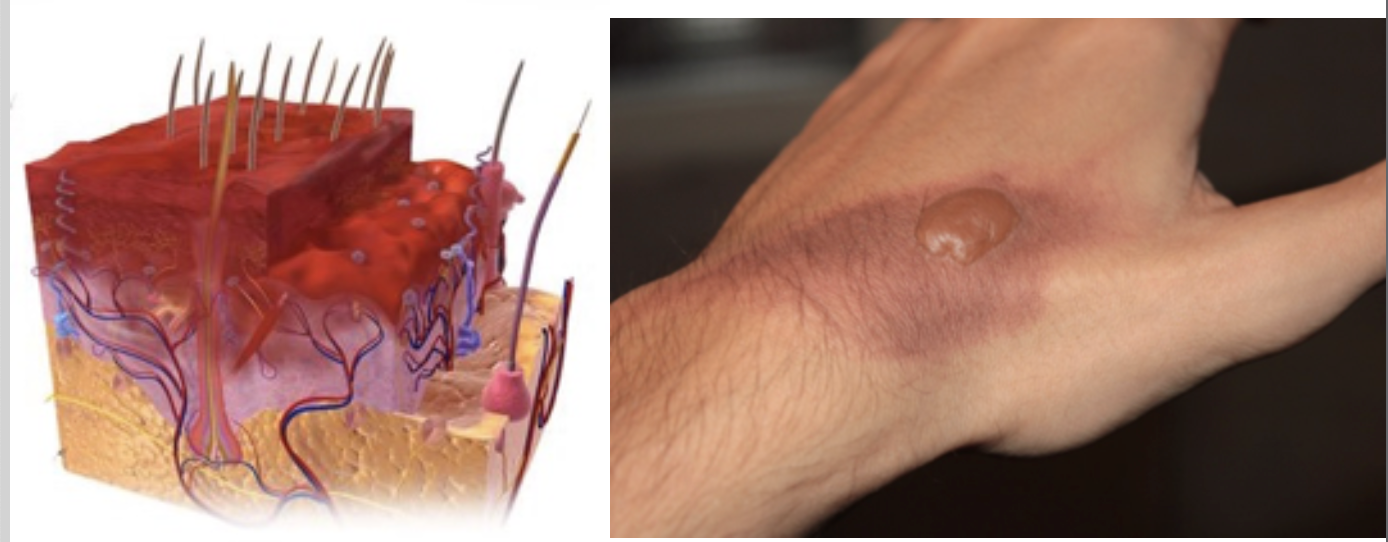
Figure 5. Example of a partial-thickness or 2nd-degree injury.
Next, we have a 2nd degree injury, also referred to as a partial thickness injury. This is going into part of the dermal layer and interfering with some of those structures that reproduce skin.
You can also have a deep partial thickness injury or a superficial partial thickness injury. You do not really need to know the difference. It is just when the burn goes deeper. This interferes with the body's ability to heal itself. We will talk more about it later, but this is the thing that is going to put you at risk for developing abnormal scars, the amount of time it takes you to heal up that wound.
These 2nd degree injuries can be a bad sunburn where you get blisters. Growing up in the '70s, we often got sunburns with blisters. Other 2nd degree injuries could be from chemicals or small fires. When there are blisters, it will be painful as the nerve fibers are exposed.
Full Thickness or 3rd Degree Injury
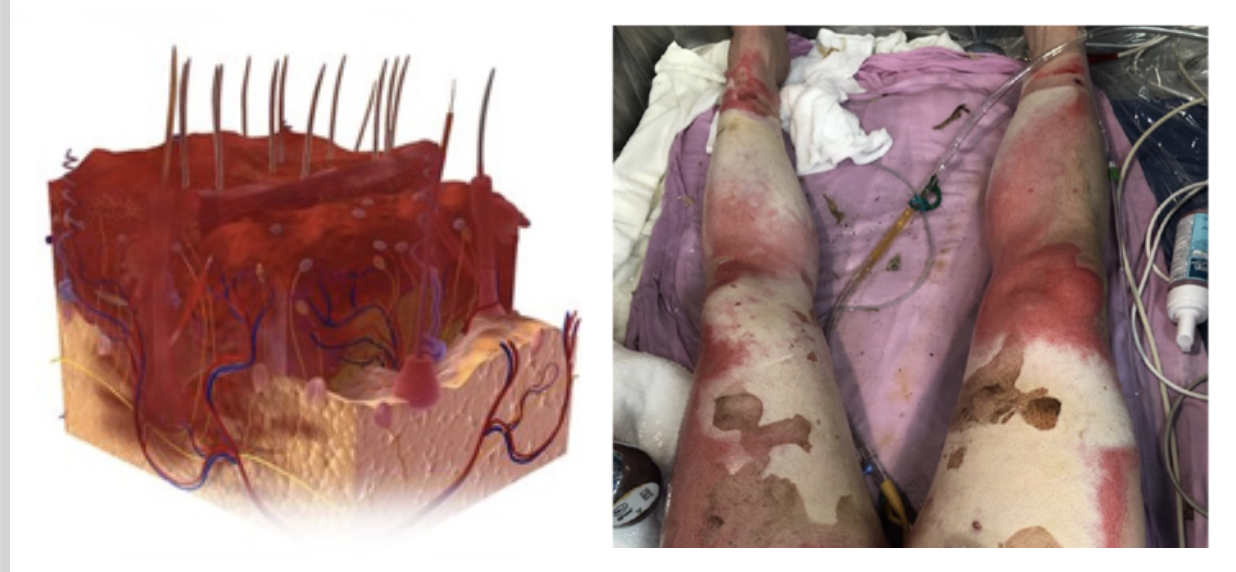
Figure 6. Example of a full-thickness or 3rd-degree injury.
A full-thickness injury or a 3rd-degree burn is when the entire dermal layer is damaged. All of the components that keep your skin healthy and keep it moist and mobile are disrupted. Additionally, all of the structures that produce the skin are damaged. For these types of injuries, we have to intervene.
A 3rd-degree injury could be white, waxy, yellow, or black, depending on how injured it is. These are surprisingly not very painful because all the nerve fibers are gone. It will be more painful around the edges or around the parts that were burned less, but the part that has the deepest injuries is generally not painful initially.
Types of Wound Closures
- Primary intention –
- Clean wound edges are approximated soon after injury
- Surgical incisions, simple cuts
- When a malignant portion of skin is removed and then stitched back together, this is called a primary closure
- Secondary intention –
- The wound is too large for edges to be approximated
- Granulation tissue must develop for skin regeneration
- This takes time and leaves a scar
- Tertiary intention/Delayed primary closure –
- The wound is cleaned initially and given some time to heal, then closed with primary closure or skin grafting
- Common for traumatic or wounds that may have been exposed to bacteria
Now, we are going to look at how wounds close. There are three main types of how wounds close. Primary intention or healing by primary intention is when we can easily close the edges of a wound. This would be a simple cut where you put a Band-Aid or some Steri-Strips on it, and the edges of the wound go back together soon after injury. It generally heals fine. This category also includes things like surgical incisions. This is where the cut is clean. They bring it back together, which heals pretty quickly. This also includes things like biopsies or the removal of a malignant piece of skin.
Healing by secondary intention is where we have issues with scarring. We have issues with tertiary as well, but primarily, it is the secondary intention that gets us into trouble. This is when the wound is too large for the edges to be approximated as the wound is too big. In this case, we have to encourage the skin to form new skin in the form of granulation tissue which we will discuss in the next couple of slides. Additionally, we have to regrow those parts that can regrow skin, which takes time, cleanliness, and good health. As I said, the more time the wound is unhealed, the more potential you have to scar.
Tertiary intention or delayed primary closure is found with massive wounds and skin grafting. The wound is cleaned and debrided of the dead tissue. This process gives the tissue some time to regain some health, and then we close it with a skin graft. Sometimes with primary closure, like in the case of a big, deep chronic ulcer, they will pull out all the really impaired tissue, give the client some antibiotics, let it heal, and then bring the edges together. However, in general, this is when we are talking about skin grafts. When we do a skin graft, the edges of the graft take time to heal, and that is where you will see most of the scarring. Delayed primary closures are common for traumatic wounds that are really dirty or any kind of wound that may have been exposed to bacteria or something that happened in the environment.
Figure 7 is an example of a wound that was closed by primary intention, either surgically or it just healed in on its own.

Figure 7. A wound closed by primary intention.
You can see it's nice and linear, healed pretty quickly, so there's not a ton of scarring. Figure 8 shows secondary intention.
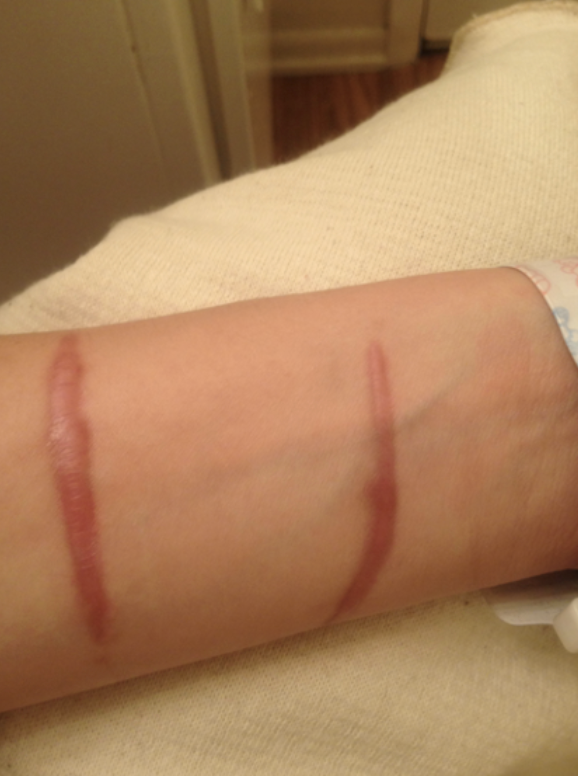
Figure 8. Comparison of wound 1-year post-accident.
In this picture, you can see a road rash. Many kids get these types of injuries from falls. You can see that the area that takes the longest to heal (red arrow) is the area that forms the most scar.
Skin Grafting
Overview
- Generally performed when an otherwise healthy (non-infected) wound would take longer than 3 weeks to heal
- First performed by Sir Harold Delf Gillies in 1917 on Walter Yeo
Skin grafting is generally performed when an otherwise healthy area is too big and would take way too long to heal. This would be like a large burn. Theoretically, you can allow the healthy skin surrounding that to form granulation tissue, and it will eventually work its way to the middle. However, because skin protects us from the environment, the time that it would take may put the person at too much risk. We want to reduce bacteria/infection, pain, and scarring by grafting the area.
I thought this was interesting. The first skin graft was performed by someone named Sir Harold Gillies in 1917 on Walter Yeo. He was in the military, and he lost his eyelids in an explosion. This was the first graft ever done, and they called it a skin flap surgery. Apparently, there was a lot of infection, and it was difficult, but I just thought that I would share.
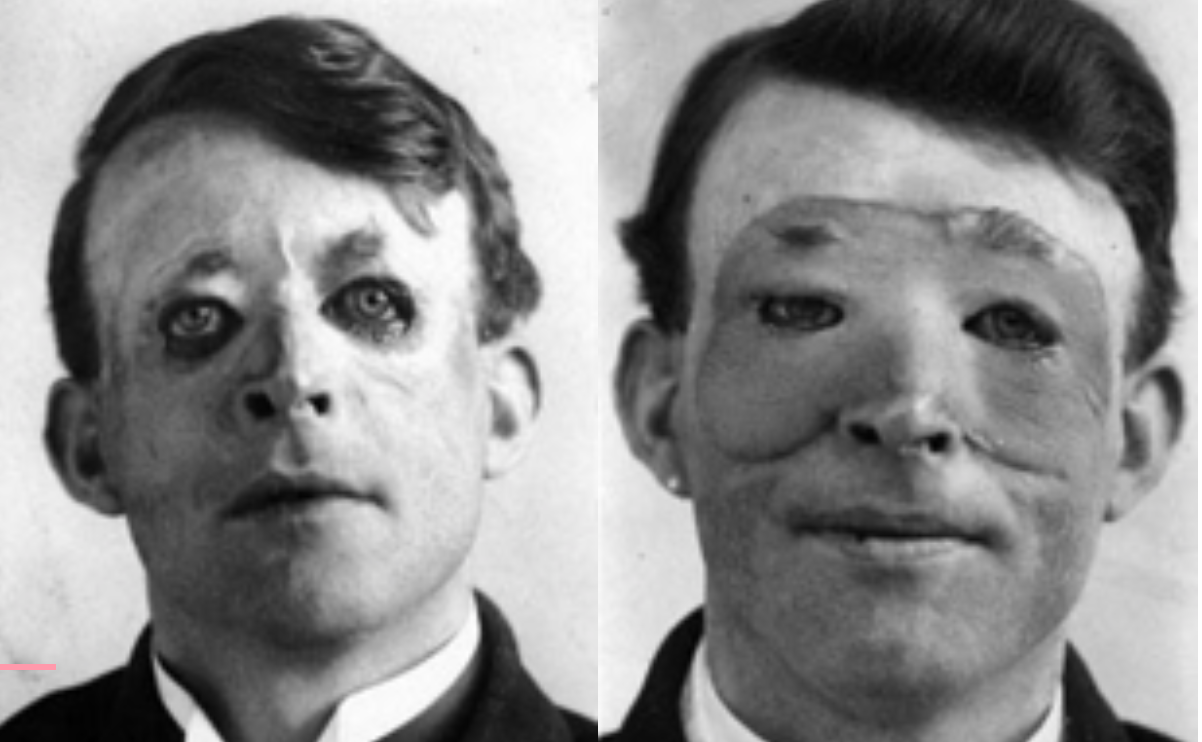
Figure 9. First skin graft.
Temporary Vs. Permanent Coverage
- Temporary coverage = biological wound dressing
- Allograft – donor (cadaver) skin
- Xenograft – pig skin
- Permanent coverage
- Autograft – the patient’s undamaged skin is taken as a donor
- Cultured skin substitute – cloned skin, not widely available, generally only available in research trials
Skin grafting is not always a permanent coverage. There are a couple of different things you can do. When someone has an extensive burn or a large injury and too big that you cannot harvest the donor site fast enough, you have to use some dressing. Again, if you do not have skin, you are exposed to the environment and are at risk for infection. This is not good. You can cover smaller wounds with bandages, but larger wounds (like 80% of the body is burned) need to be covered with temporary grafts. These stay in place for 5 to 10 days, depending on how sick the person is.
When we use cadaver skin or donor skin, that is considered an allograft. You can also use pig skin called a xenograft. The body will reject that skin within two weeks because it is a foreign object. The only permanent coverage a person can have is their own skin. When we do that, it is called an autograft. This is when you take undamaged skin from the individual and put it on the damaged area.
Some artificial skins are created by cloning. This is used for huge burn injuries, like 95 to 97%, if there is only minimal skin for a donor site. It would take forever to keep harvesting that donor site. They grow these cloned skin cells in a lab. This is typically only used in research trials. There are different forms, and they are pretty fragile. Thus, autografting is the standard. It would be nice if we did not have to harvest donor sites at some point in the future, but at this point, that is the best way to go.
Sheet Auto-grafting
If you have never seen grafting, here is an example in Figure 10.
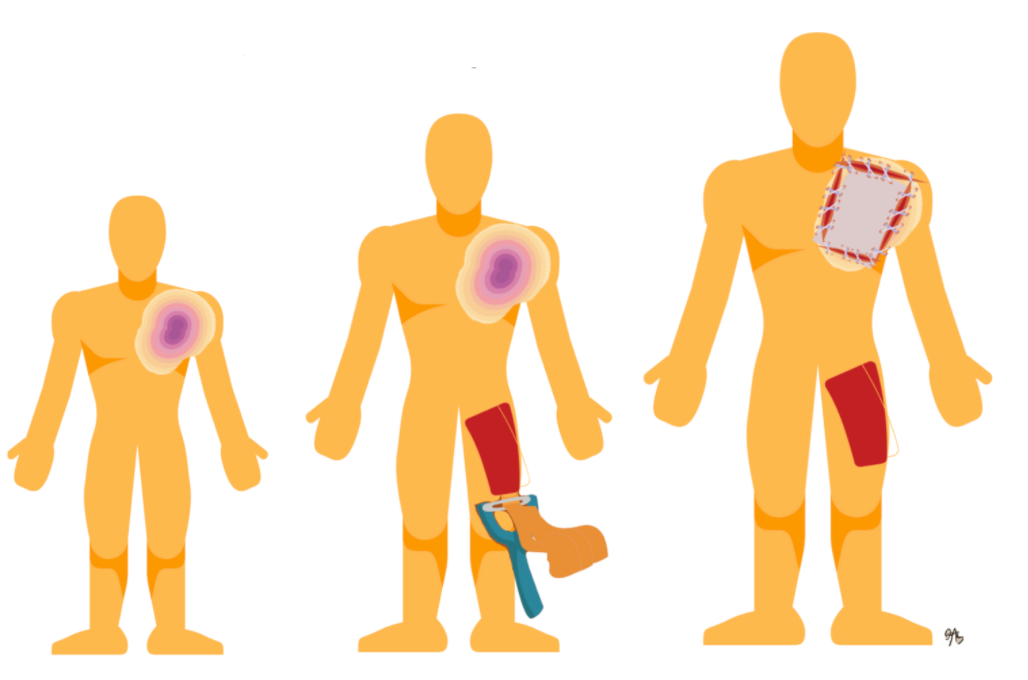
Figure 10. Example of grafting.
You would take the skin from an undamaged area and out of sight. You would not want to use a donor site from their face or other exposed areas. This skin is usually taken from thighs, buttocks, and sometimes backs. The scalp can also be used as it heals really quickly. They take a chunk of that undamaged skin with a device called a dermatome. It looks like a cheese grater. They can determine how much thickness they need to take depending on the size of the wound, and then they just transplant it over by stitching or stapling that on.
Donor Site
- Uninjured site from which skin is removed to be grafted on the injured area
- Resembles a 2nd-degree injury
- Painful
- Heals by secondary intention in 10-14 days
- May scar, depending on the thickness of skin taken
Around the edges of the graft and the donor site itself will need to heal by secondary intention. An example of a donor site is in Figure 11.
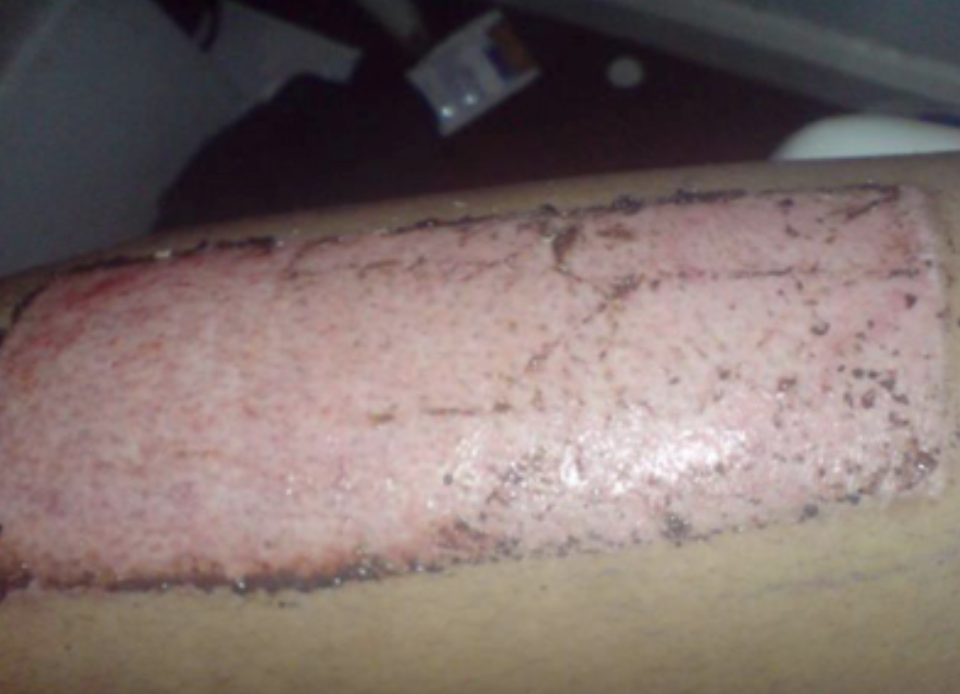
Figure 11. Example of a donor site.
Essentially, what you are doing is giving the person a superficial 2nd-degree injury. It will heal within 10 to 14 days on its own. They are painful and bleed. Many nice wound dressings can stay in place for several days to make it more tolerable. Again, if you have a big enough injury, it puts that skin at more risk for scarring.
Meshed Auto-grafting
Another way to manage a big injury is by using meshed auto-grafting. If there is no big donor site or do not want to reharvest donor sites, you can mesh it. There is a device called a Tanner mesher. This is where you take the graft, run it through this device, and put little holes in it. By doing this, you can expand the graft to cover a larger area. It can expand from two to nine times as big. The bigger the mesh and the little holes, the more potential it is for scarring. This is an example of the process that I drew in Figure 12.
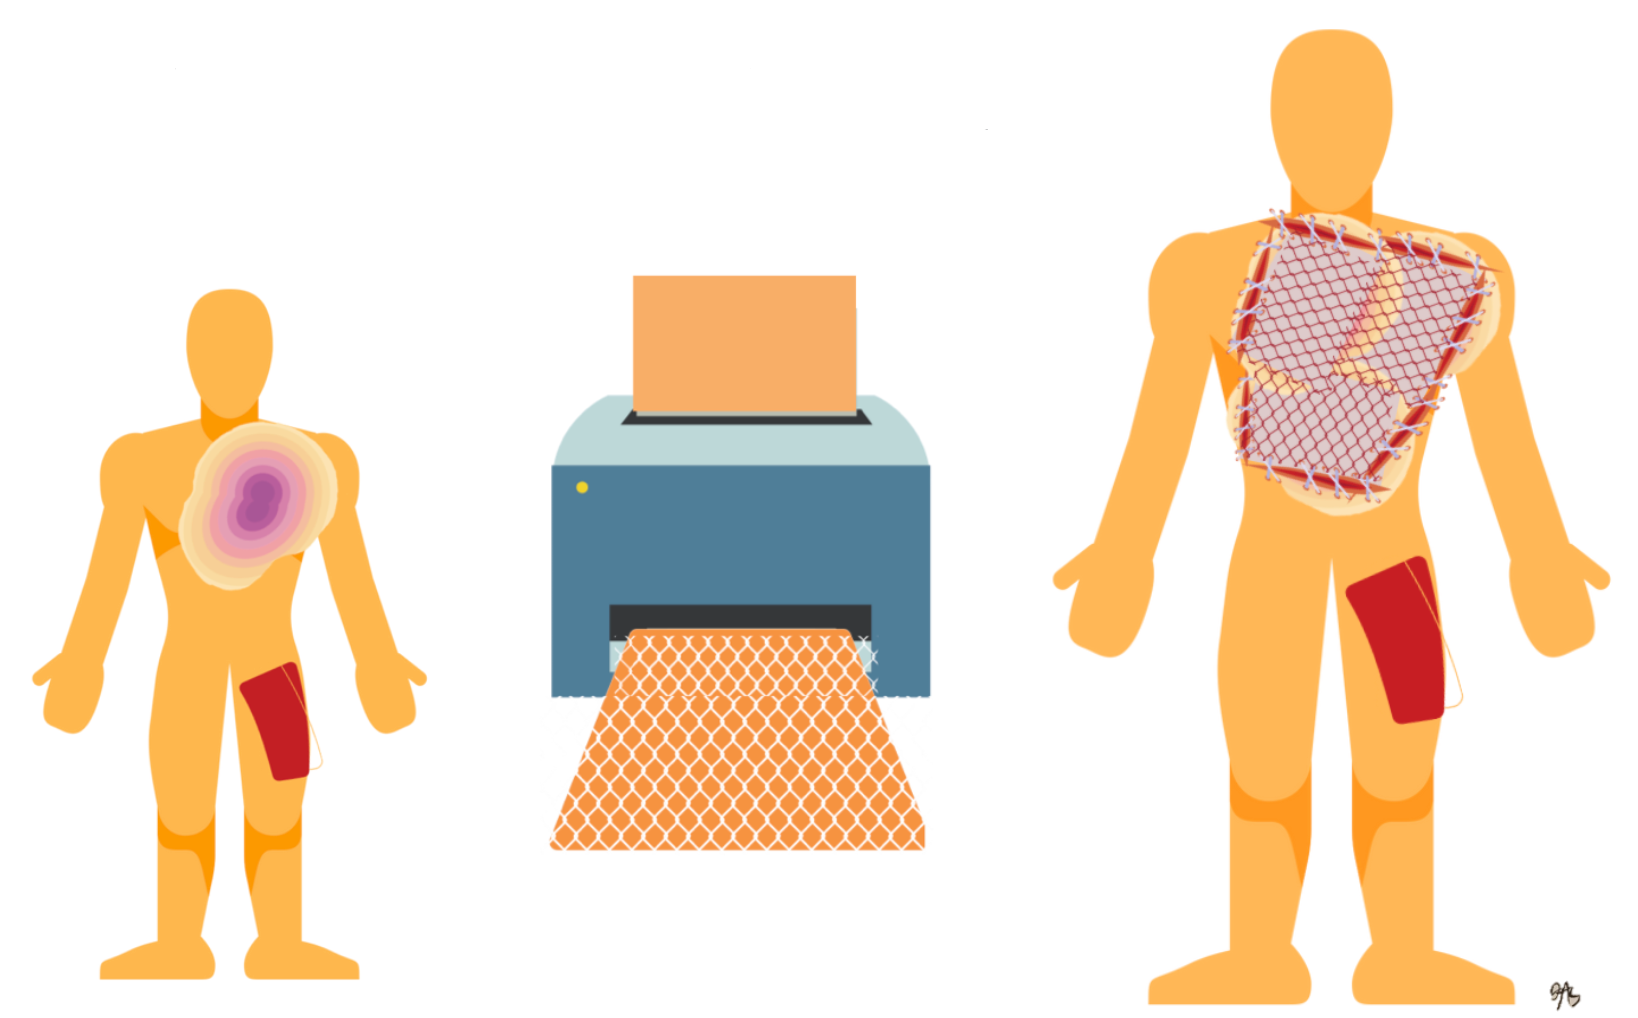
Figure 12. Mesh autograft.
Often, they use mesh grafts in central locations where they are less visible. They would never use it on a face or hands if they could help it. In Figure 13, you can see a diagram of this.
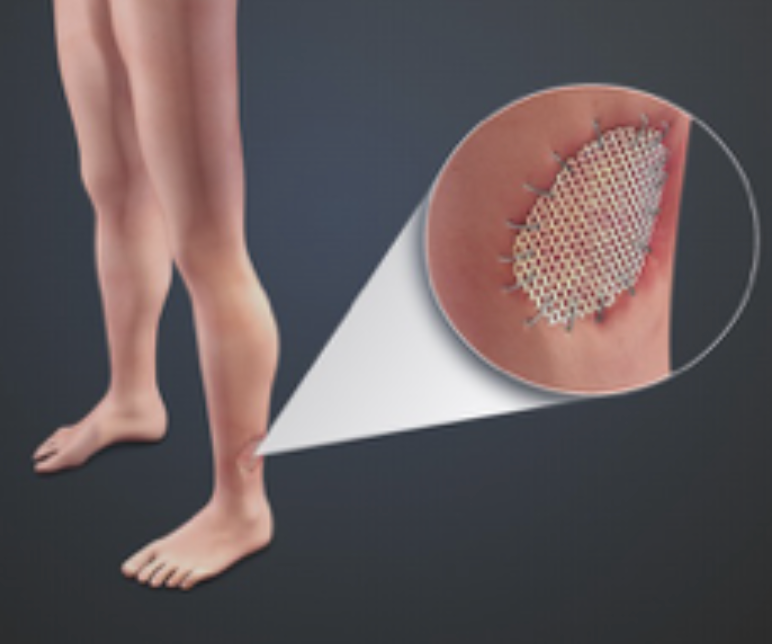
Figure 13. Example of a mesh auto-graft.
Figure 14 shows how the meshed appearance is permanent.
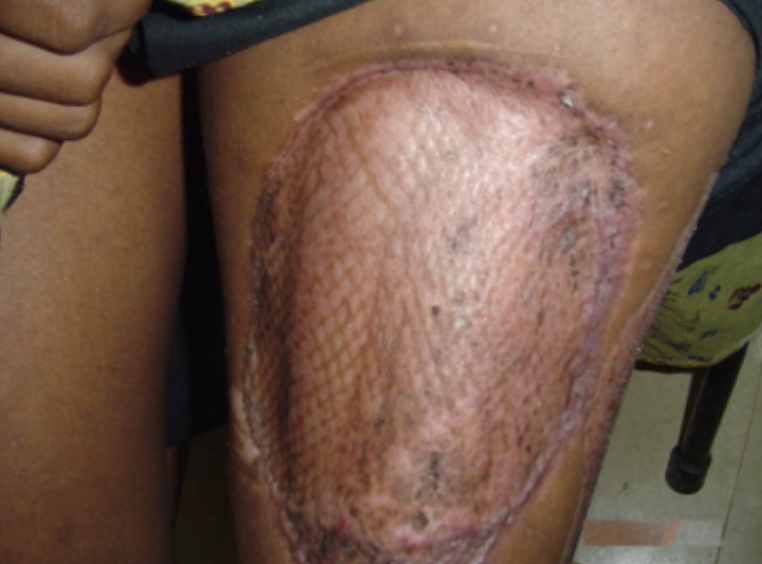
Figure 14. Mesh appearance in a scar.
You can see in between the little spaces where it healed in on its own, and then you can see around the edges of the graft is where a lot of the scarring is because that had to heal in as well.
Graft Progression Over Time
- Post-op STAG (split-thickness auto-graft)
Figure 15 shows pictures of a graft progression over time.
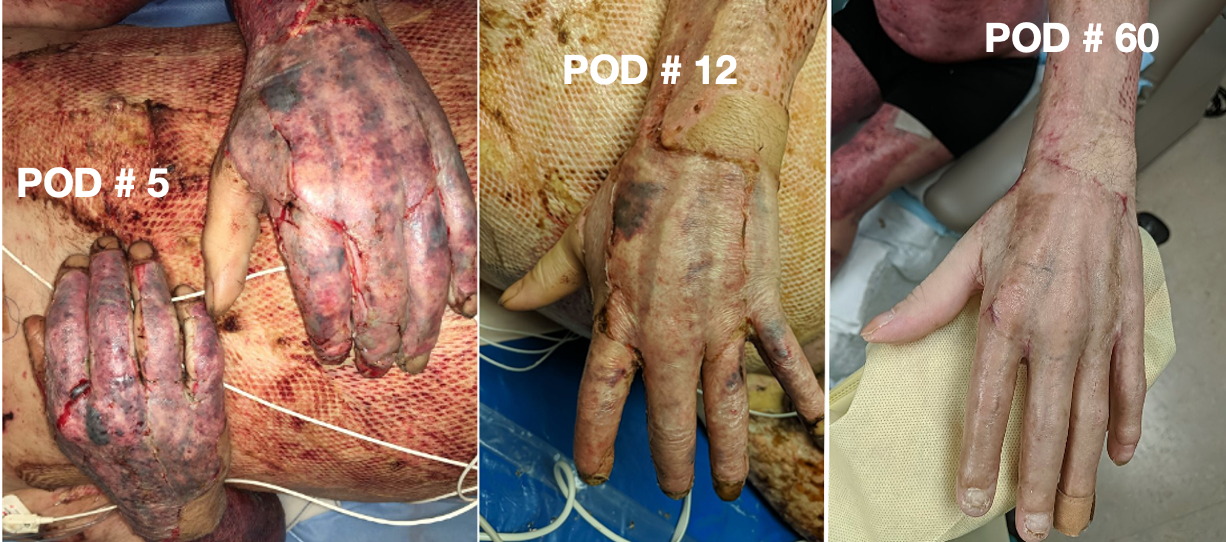
Figure 15. Progression of graft over time.
This is a picture of graft progression over time. On the person's hands are sheet autografting or split-thickness autografting. You can see that the grafts have adhered nicely. Some of the purple areas probably would have some trouble staying on if there is a blood clot under there. It does not have as much opportunity to adhere, but this looks pretty good. It is nice and pink, and that meshed graft on the abdomen might be a little bit older. You can see it is adhered and starting to heal. Post-op day 5 is when the stitches or the staples come out as it has adhered at that point. On post-op day 12, you can see that they have been moving, the swelling is down, and it is looking better. At two months post-op, you can see it looks more like normal skin.
Wound Healing
Video 1: Skin Wound Healing
Here is a video on the healing process. We will talk a little more in-depth, but I thought this was just a nice way to review and visualize what is going on with wound healing.
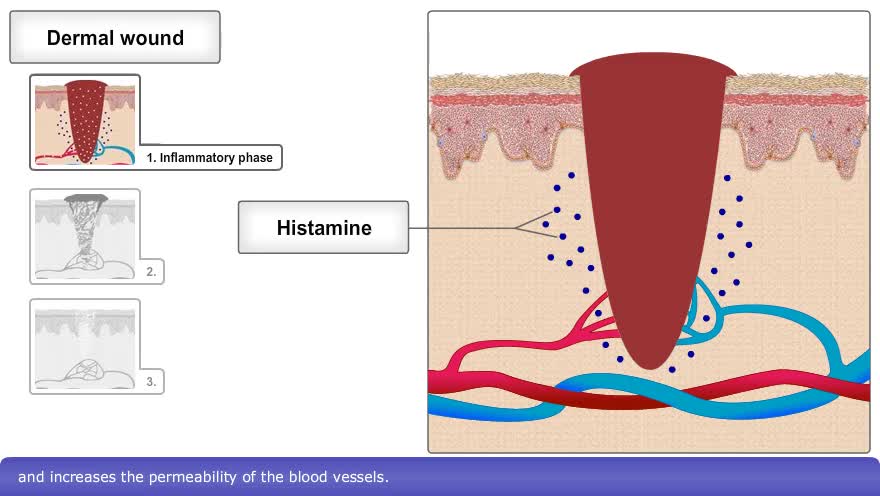
The skin consists of two basic layers, the epidermis, a superficial, thin layer composed of epithelial tissue, and the dermis, a deeper, thick layer composed primarily of connective tissue. When the skin is damaged, the type of healing process that occurs depends on the depth of the injury. An epidermal wound, such as a minor abrasion or minor burn, does not penetrate the dermis. Here, healing is a simple process in which surrounding basal epidermal cells multiply and migrate across the wound until it is covered. A dermal wound, however, penetrates the dermis and involves multiple tissue layers. The healing process is different and more complex than epidermal healing and occurs in three phases. The first phase involves hemostasis and inflammation. Here, fibrin and blood platelets form a loose blood clot to prevent further blood loss. The damaged tissue causes the release of histamine which triggers vasodilation and increases the permeability of the blood vessels. This, in turn, increases the delivery of white blood cells, which help remove microbes and foreign particles via phagocytosis. Two or three days later, the proliferation and migratory phase begins. In the initial portion of this phase, the clot exterior dries, forming a scab. Fibroblasts infiltrate the wound and secrete collagen to strengthen the clot. Fibroblasts also trigger the endothelial cells surrounding the wound to proliferate and injured blood vessels to start regrowing. These cells form a delicate mesh known as granulation tissue. The third and final phase is the maturation and remodeling phase, which may last between three weeks to six months. The scab sloughs off, collagen fibers become more organized, and fewer fibroblasts are present. The blood vessels are restored to normal. Finally, scar tissue forms by a process called fibrosis. The scar tissue differs from normal skin in that it has a denser arrangement of collagen fibers and reduced elasticity.
Wound Healing Definition
- Response to injury is proportional to the trauma
- Many internal and external factors impact healing
- Prolonged or delayed healing leads to scar formation, which can result in deformity and functional deficits
- The occupational therapist’s (or physical therapist’s) job is to promote optimal healing while preserving factors that contribute to function (ROM, joint integrity, muscle strength, neuromuscular control, etc.)
- Can be broken into 3 main phases
The response to the injury is proportional to the trauma. The bigger the injury, the more the body's going to respond. Many factors get in the way of how someone heals, which we will talk about. Delayed healing leads to more scar formation, which is the thing that gets in the way of function. Our job is to promote optimal healing while preserving factors that contribute to function. During the wound healing phase, we do not want to disrupt anything. We also need to keep in mind that we need them to be moving and not resting. We want their joints to be mobile and lubricated and maintain their neuromotor control and strength.
Phases of Wound Healing- Inflammatory Stage
- Begins immediately after injury
- Marked by an influx of white blood cells, vascularity, and swelling
- This phase facilitates rapid healing but can persist and tend to “over-heal,” which results in scarring (Gauglitz, et al., 2011; Lee & Jang, 2018)
- OT’s Main Role:
- Immobilizing & protecting affected joints
- Keep joints in antideformity positions
Let's talk about the phases of wound healing. The inflammatory stage begins right after an injury. There is blood flow, vascularization, swelling, and redness. This phase facilitates rapid healing. In a larger wound, it can persist and tend to over-heal, which results in scarring. Our job during this phase is to help immobilize during this phase. We do not want to be doing range of motion at this point. We want to protect the body and keep those joints in anti-deformity positions.
The position of comfort is the position of deformity in Figure 16. Unfortunately, if you are sick and not feeling well, you tend to curl up in a fetal position with flexion everywhere. Flexion is not where we function. We need to work against that position of comfort.
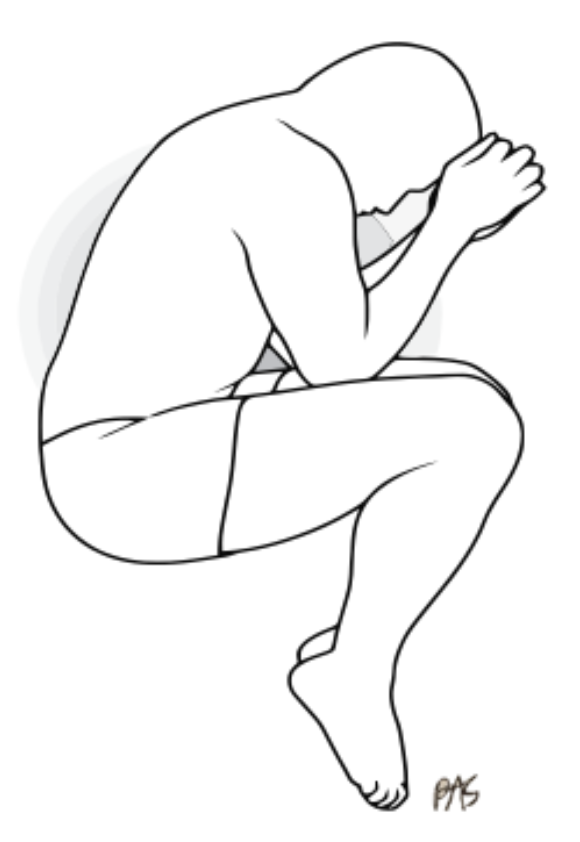
Figure 16. Fetal position.
Anti-deformity positioning is putting joints in extension (Figure 17).
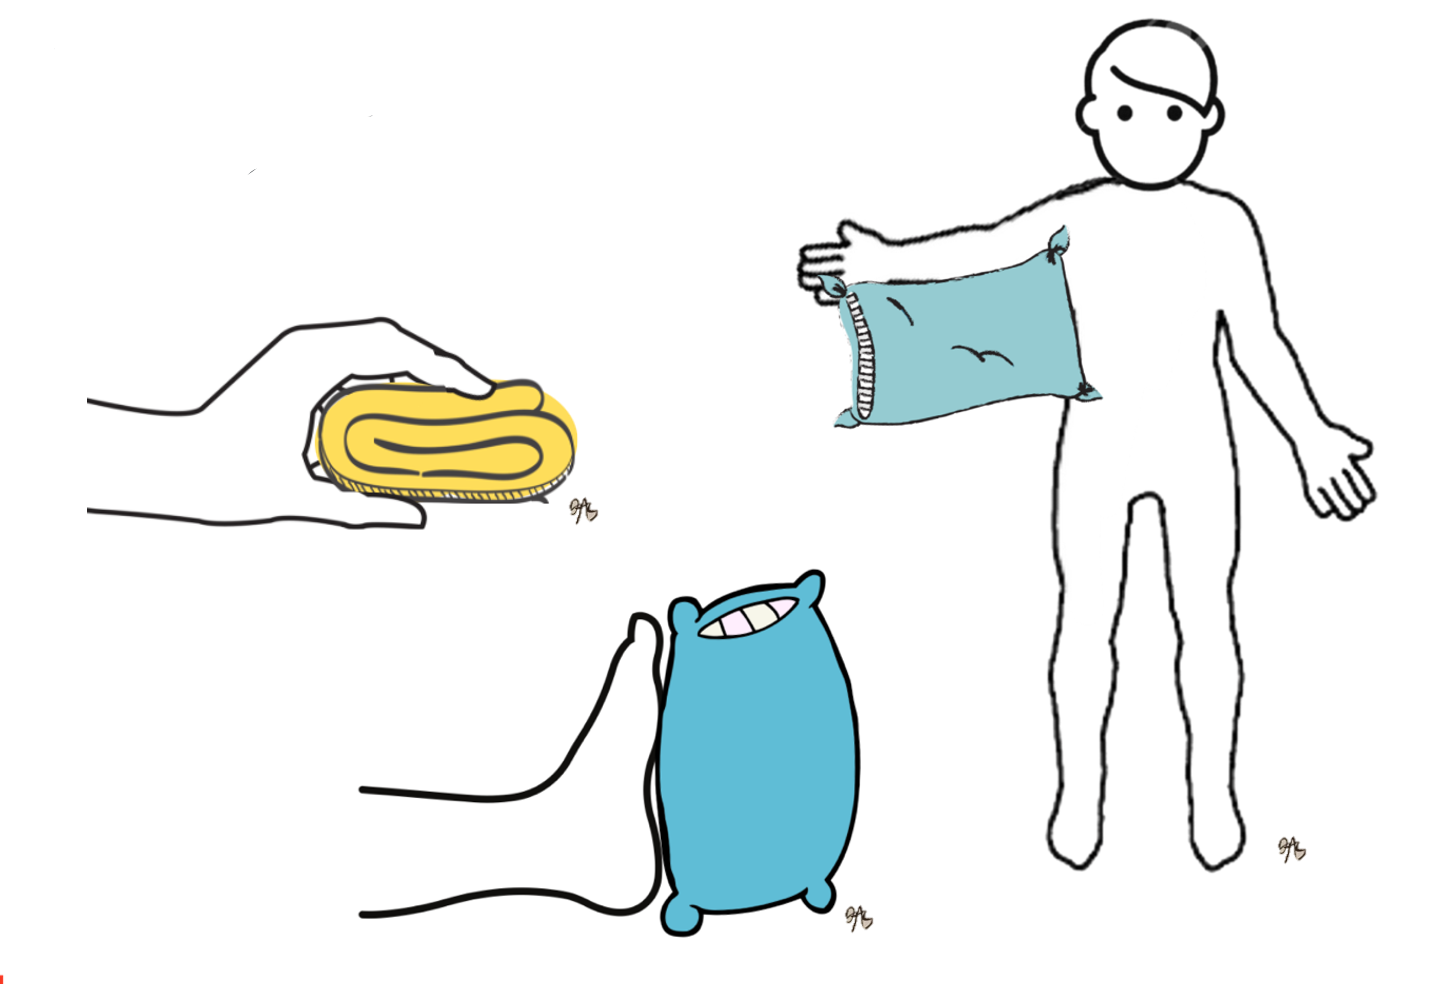
Figure 17. Antideformity positions.
For larger injuries, this is a lot of bed positioning. In smaller injuries, it might be a simple splint or wrap. Remember, the body wants to flex, but we need always to remember to preserve extension, regain flexion. Positioning can be a simple intervention like a pillow to keep their arm up in abduction or gauze wraps to keep the hand in a nice intrinsic plus position. Pillows or bolsters can help to maintain dorsiflexion.
Phases of Wound Healing- Fibroplasia & Proliferation
- Begins 4-5 days after injury, lasts 2-6 weeks
- This stage is marked by collagen synthesis & hypersynthesis (Tomasek et al., 2002)
- Wound healing begins with the appearance of granulation tissue
- OT’s Main Role:
- Weeks 1-3 - Immobilizing & protecting affected joints to allow for increased vascularization and protect new collagen deposits (Bouffard, et al., 2008)
- Weeks 3-6 - Progressive mobilization of joints to facilitate tissue growth and elongation as well as joint function
The second phase of wound healing is fibroplasia and proliferation. This begins after about five days and lasts over the next couple of weeks. During this phase, there is a rebuilding of collagen. Sometimes, there is even an overbuilding of collagen. This is also when granulation tissue shows up. This is the nice beefy red tissue that you see in Figure 18.
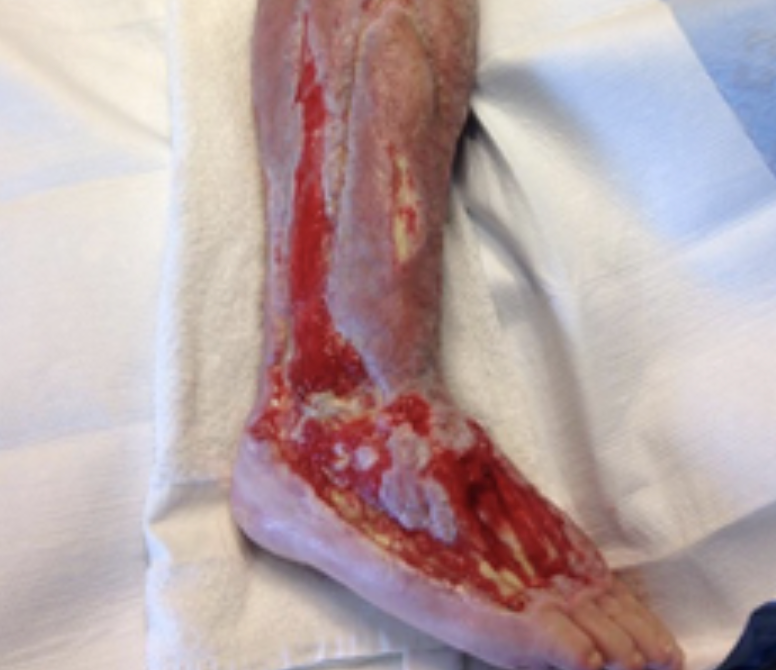
Figure 18. Granulation tissue.
I know it looks gross, but it is really healthy tissue. Structures that are going to bud new skin are forming during this time. It is also a nice healthy bed to accept a skin graft. Our job is to immobilize the affected joints to allow for vascularization to protect the new skin. As the weeks progress, we can then progressively mobilize the joints.
Phases of Wound Healing- Maturation & Remodeling
- Collagen fibers need assistance to reorganize; otherwise tend to bunch up and will line up along the lines of stress (Ghosh et al., 2020)
- Tensile strength of collagen steadily increases and can pull joints out of place – estimated 12 times that of normal skin
- Normal skin can stretch up to 50% of original length; active scars can extend 15% and mature scars only 4% (Parry et al., 2019)
- OT’s Main Role:
- Mobilizing joints
- Using pressure and stretch to match the increasing tensile strength
- Use of orthoses as needed to counteract tensile strength
In this last phase of maturation and remodeling, this is where we can really help. Collagen fibers need help reorganizing as they tend to overproduce themselves. They also tend to bunch up and line up along those lines of stress, generally the shortest distance between two points.
The tensile strength of collagen increases as the collagen forms, and it is strong enough to pull joints out of place. It is also estimated to be 12 times that of normal skin. Normal skin can stretch up to 50% of its original length. Thus, we can get it to about 150% of the original length. Active scars (red, ropy scars), on the other hand, can only extend another 15%. Mature scars can only stretch 4%. We want to maximize our time in that active scarring phase so you get as much extension as possible.
During the last phase, we want them up and moving. We need to be stretching and massaging the joints and scars. We want to use pressure and stretch to match that increasing tensile strength that the newly formed collagen fibers are putting out. This is where splinting, and pressure garments are crucial. To visualize this, you can see that the collagen fibers line up in a linear and organized fashion like a basket. In comparison, the scar tissue's collagen fibers look like a messy bird's nest (Figure 19).
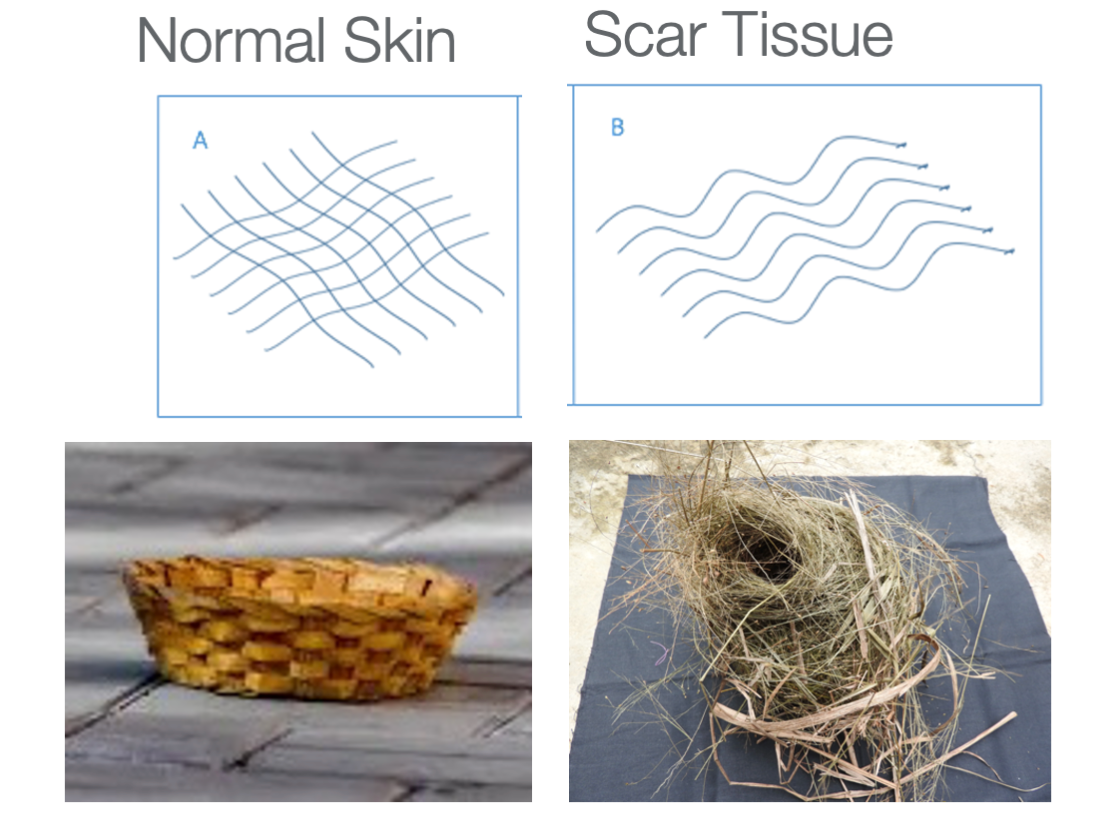
Figure 19. Collagen fibers
Our job as therapists is to tamp down the collagen fibers and push them into some organization. In Figure 20, we can see on a cellular level all the changes that are happening that are different from normal healing to when you are forming scars.

Figure 20. Wound healing over time.
In a normal wound like a cut, surgical incision, or scrape, there will be inflammation. This leads to the proliferation of new skin cells with remodeling. This is when fibroblasts are saying, "Nope, we're good. We do not need extra collagen." This is normal wound healing. In hypertrophic scarring, this is when a wound has been open a long time, a skin graft, or a chronic wound. There is a long inflammatory period with increased vascularization and swelling. Additionally, there is an amplified proliferation phase with an overproduction of collagen. The period where collagen production should be tamped down is reduced compared to the rest of the phases. In summary, with hypertrophic scarring, there is increased inflammation, increased and prolonged collagen production, and then the factors that cut down on collagen production are really quiet.
Who Develops Scars?
- Of all the contributing factors, time to wound healing is the best predictor
- If a wound heals within 2 weeks, it will scar minimally
- 14-21 days of wound healing time poses a risk for scarring
- 30% will form hypertrophic scars
- 21+ days of healing will likely lead to hypertrophic scarring, with healing time proportional to the extent of hypertrophy
- 78% will form hypertrophic scars
(Bloemen, 2009; Davoodi, 2008; Deitch, 1983; Lonie, Baker, & Teixeira, 2017; Staley, 1997)
Not everybody develops scars. The number one contributor to scar formation is the time it takes to heal. If it heals within two weeks, there is generally not going to have a whole lot of scarring. Between two weeks and three weeks, these are some of your 2nd-degree injuries. They pose a risk for scarring. Thirty percent of people who take 14 to 21 days to heal will form hypertrophic scars, and then over three weeks, 78% of people will form hypertrophic scars. It is also proportional. The amount of time it takes to heal is going to affect how amplified the scarring is.
- Scar outcome is highly dependent on genetics and race
- More likely to form visible scars
- Those with a history or with relatives with a history of scarring
- 1.5-4.5% of the general population will form hypertrophic scars at some point in their lives
- Those with increased pigment –
- Historically those of African, Asian, Middle-Eastern descent, etc.
- 4.5-16% of people of color will form hypertrophic scars
- 40-70% of people form hypertrophic scars following surgery
- Those with a history or with relatives with a history of scarring
(Alster, 2003; Bombaro, 2003, Deitch,1983; Esselman, 2006; Gauglitz, 2011)
Scar outcomes are also highly dependent on genetics and race. If there is some scarring in your family, then you are also more likely to scar. In the general population, 1.5 to 4.5% will form an abnormal scar at some point in their life. However, those with increased pigment are at much higher risk. It is the melanin in the skin that makes a big difference. Historically, people of African, Asian, and Middle Eastern descent (anybody with increased pigment) are at a much bigger risk. Compared to 1.5 to 4.5% of the general population, 4.5 to 16% of people of color will form abnormal hypertrophic scars. And for comparison, after surgery, 40 to 70% of people will form hypertrophic scars.
Factors That Delay Or Impede Healing
- Age – wound healing slows with age
- Nutrition – patients with burns and large skin injuries are hypermetabolic, need high caloric intake
- Tobacco use – causes vasoconstriction
- Alcohol use – attacks the immune system
Any of these factors that delay or impede healing are going to impede healing and potential scarring. The first factor is age. As we know, wound healing slows as you age. Other factors are nutrition, tobacco use, and alcohol use. These attack the immune system and cause your vessels to constrict, reducing healing.
Other Conditions
- Negative impact on wound healing
- Autoimmune disorders –
- Lupus
- Rheumatoid Arthritis
- Circulatory disorders –
- Raynaud’s, diabetes
- Sickle cell anemia
- Peripheral vascular disease
- Inflammatory disorders –
- Buerger’s
- Autoimmune disorders –
Other conditions may hurt wound healing. These include autoimmune disorders, lupus, rheumatoid arthritis, any circulatory disorder, Raynaud's, diabetes, sickle cell anemia, peripheral vascular disease, and then some inflammatory disorders. For example, Buerger's is a condition in which all the blood vessels are chronically inflamed. Any of these are going to delay healing. Again, delayed healing is what relates to worse scarring.
External Factors
- Radiation
- Decreased vascularization
- Steroid use
- Inhibits inflammatory response
- Edema
- Tissue congestion, “edema is glue”
- Infection
- Hypoxia, collagen breakdown
There can be some other external factors. These include radiation and steroid use. Edema is key because it can be like glue and make it harder to heal. Figure 21 shows pitting edema,
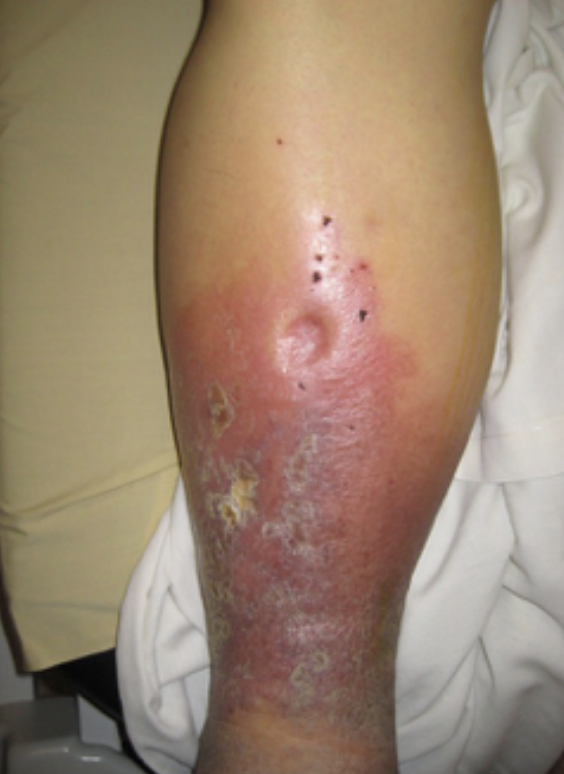
Figure 21. Pitting edema.
I am not sure if that person has had the tissue drained. If you can drain and massage it, you can move some of that fluid more proximally, which is good. If it is not being moved throughout the body, it does not allow new vascularization or oxygenation. Even if someone has chronic edema, moving the fluid throughout their body. Infection is also going to prevent oxygen from being in the wound and cause collagen breakdown.
Wound Vac Treatment
- Wound Vac treatment –
- Decreases edema
- Treats infection
- Maximizes granulation tissue health
- Good for poor circulation
- Good for chronic wounds
I am sure some of you have worked around or with a wound vac (Figure 22).

Figure 22. Wound vac.
There are two things that I can consider. A wound vac will help get my person to recover sooner to receive either a graft or some other kind of treatment. They put a sponge soaked in healthy fluid into this wound, and then the machine causes a negative pressure to improve circulation. It also can treat infection with that nice fluid to get some nice granulation tissue going. We might have to work around these or help people learn how to change their components, but it is a nice technology that has been helpful.
Active Hypertrophic Scarring
- Identified by changes in four characteristics of the skin:
- Vascularity
- Increases; may be red, pink, purple
- Height
- Increases; thick
- Pliability
- Decreases; firm
- Pigmentation
- Can either decrease (hypopigmented) or increase (hyperpigmented)
- Vascularity
What does it mean when I say active hypertrophic scarring? Active means it is still demonstrating cellular changes as compared to normal skin. Any time when you do not see any changes, the scar is considered mature. I know we do not have a microscope, so we cannot see that these changes are happening, but in general, the scar can change anywhere from about 6 to 18 months. Typically, it is around a year that that scar is still in its active phase and where we can make an impact.
Hypertrophic scarring can be identified by four changes in the skin: vascularity, height, pliability, and pigmentation. We can measure these, can use these to check outcomes, and these are the things that may interfere with appearance and function.
With scars, there is increased vascularization, and the scar is often red/pink color. It might even turn purple in a dependent area like a leg. The height of the scar will be increased with thick tissue from collagen hypersynthesis. The pliability of the skin decreases. Another way to look at it is that the firmness increases, but the ability to move decreases. Pigmentation can either decrease or increase; it widely varies. It is hard to predict where it is going to go. Often, you can see brown tones as it is healing.
Scar 1
Here is our first example in Figure 23.
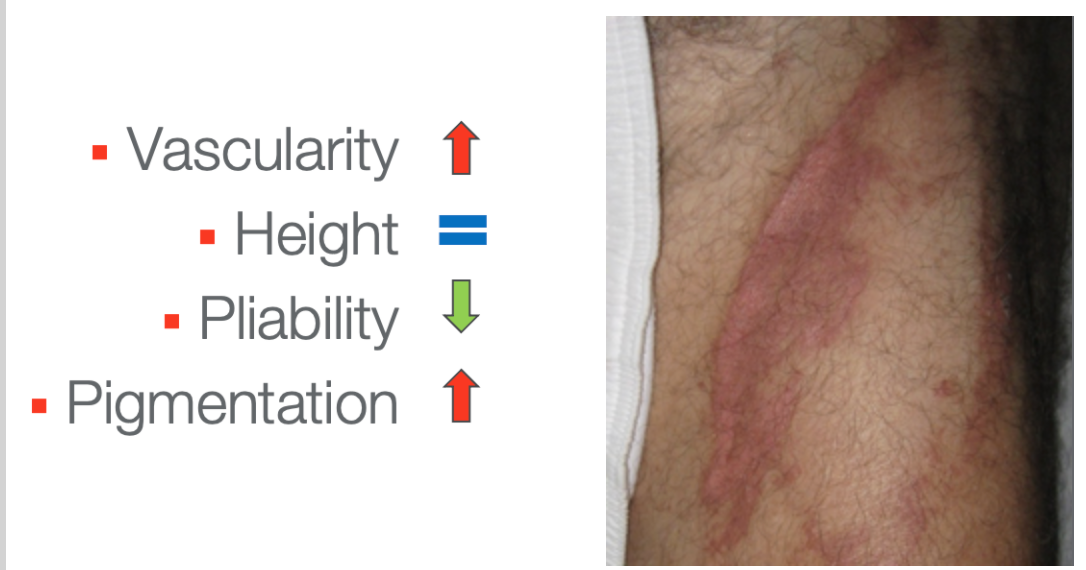
Figure 23. Scar example on a limb.
In this first example, you can see increased vascularity. I do not see a lot of scar height here. It is most likely less pliable. This looks like a pretty fresh scar. Lastly, for pigmentation, you can see increased brown tones around the edges.
Scar 2
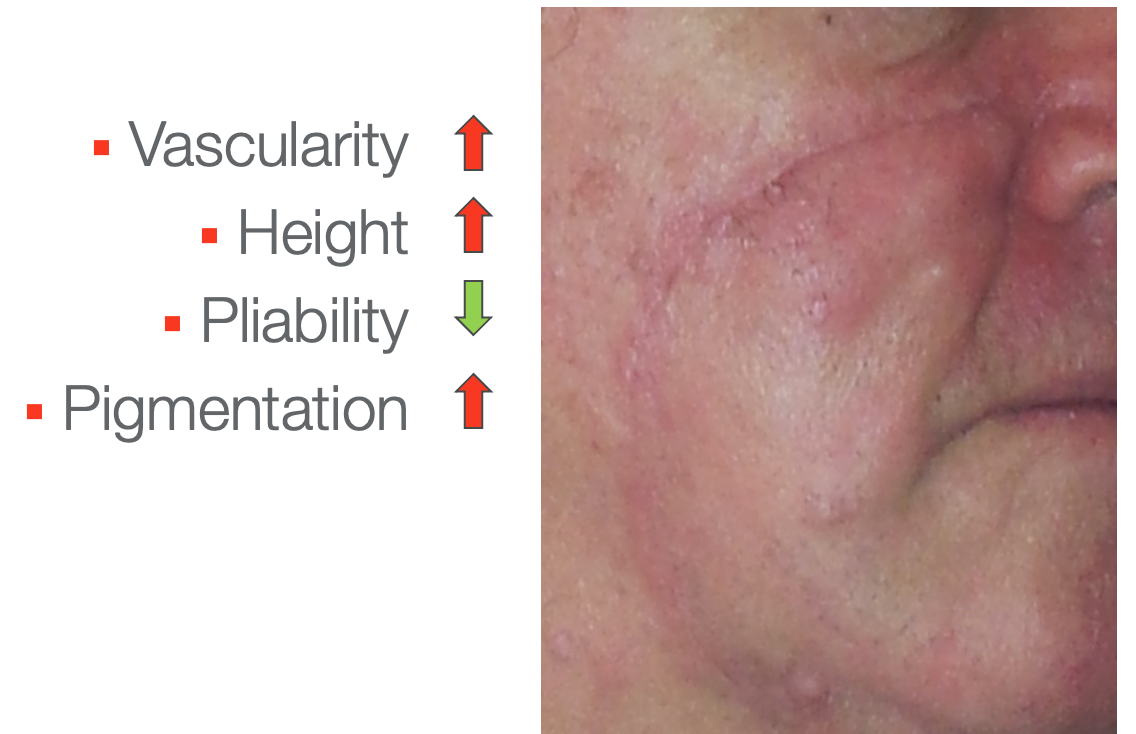
Figure 24. Scar example on a face.
In this facial scar, you can see that the vascularity is increased. You can also see a little bit of increased height. I would imagine if I felt it, it would be less pliable than the surrounding skin. There are also some increased brown tones.
Scar 3
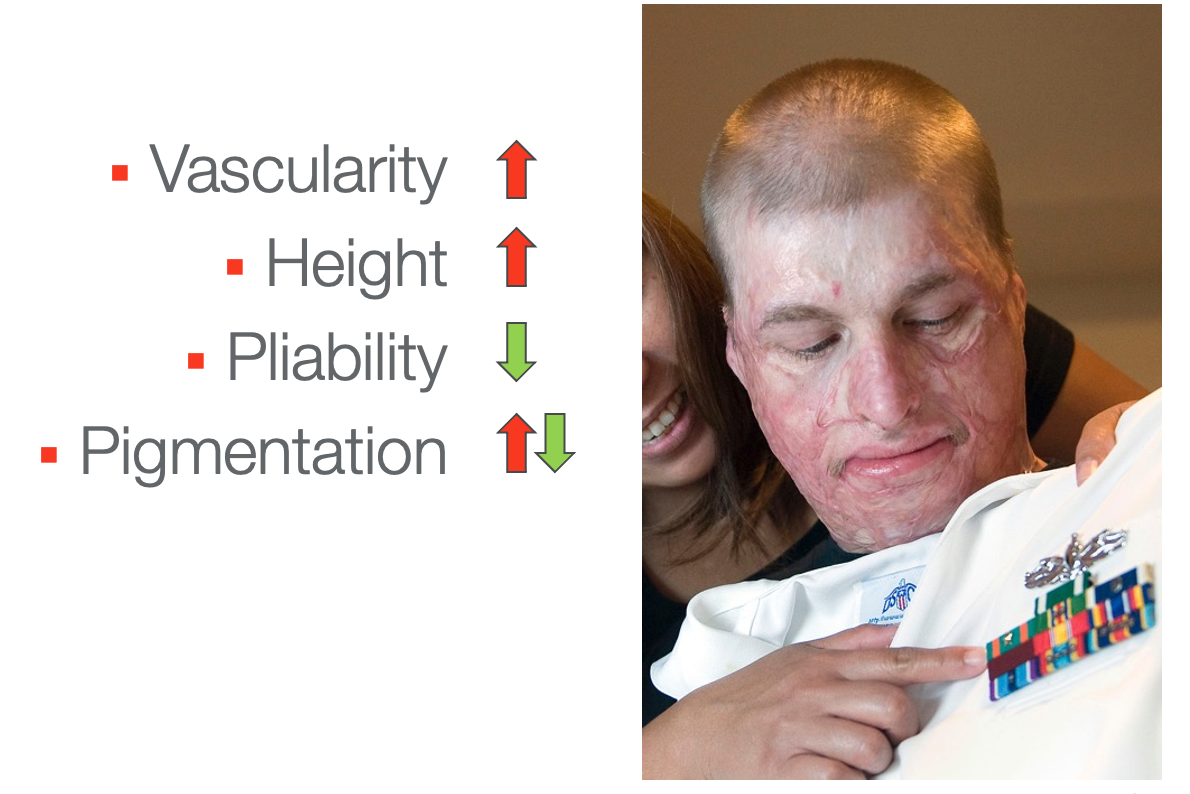
Figure 25. Facial graft scars.
This looks like an extensive facial graft which is probably at least three months post-injury. The vascularity is increased, and it is that nice pink phase. I would not call it red. There is significant height, probably at least a millimeter or two above the skin's surface, especially around the mouth. The pliability is very decreased. You can imagine what that would feel like if it was on your face. You can see there is some hypopigmentation where it is white, and the pigment is gone. He does have some areas of increased pigmentation where it's brown over his eye.
Scar 4
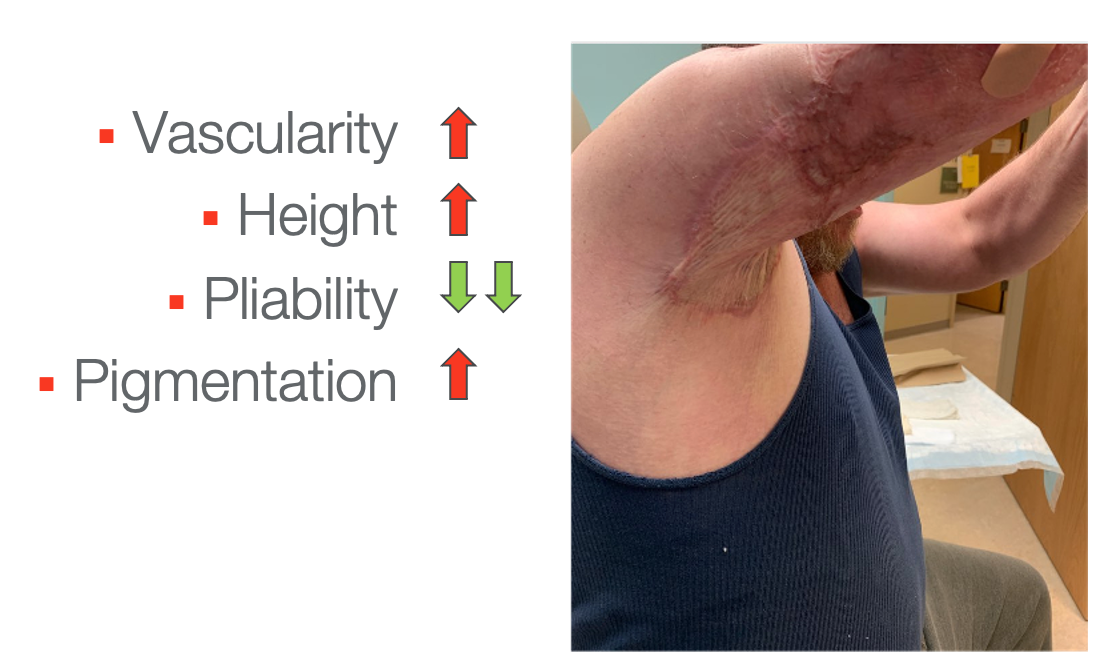
Figure 26. Scarring under the axilla.
Here is the last example. There is increased vascularity with the purple area and some increased height. There is also decreased pliability with the pulling at the axilla. It is roped along the line of stress. Lastly, there is increased pigmentation.
Keloid Scarring
- Hypertrophic scars ≠ keloids
- Keloids are scars that grow beyond the border of the initial wound boundary
- Fibroproliferative disorder resulting in extensive production of extracellular matrix and collagen (Grabowski, Pacana, & Chen, 2020)
- No good conservative interventions at this time
- Best interventions are a combination of steroid injections and laser treatments (Del Toro, Dedhia, & Tollefson, 2016)
Many times, people refer to hypertrophic scars as keloids, as seen in Figure 27.
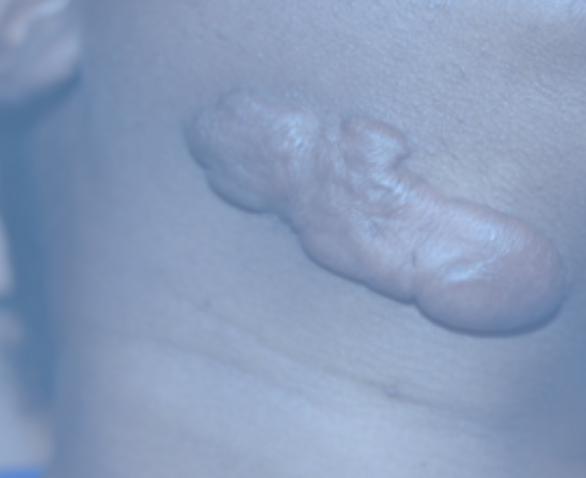
Figure 27. Keloid scar.
A bad scar is a hypertrophic scar, a scar that you can see that might be raised. Keloids are different. They grow beyond the boundary of the initial injury. They are also really bulbous scars. It is a completely different condition. And, it is not just an over-healing of the body. It is a fibroproliferative disorder resulting in extensive production of extracellular matrix and collagen. It has a genetic component and has a much higher incidence in people of color. Unfortunately, there are not a lot of good interventions. Interventions for hypertrophic scars do not work very well on keloids, even plastic surgery. For example, if you remove it and stitch it back up, you will create another scar on the body that wants to keloid. The best interventions at this time are a combination of steroid injections and laser treatments.
Why Does This Matter?
- The scar will contract until it meets an equal and opposite force
- Scar tissue is estimated to have 12 times the contractile strength of normal skin, which is clearly strong enough to pull features and joints out of place (Dewey, Richard, & Parry, 2011)
- Reported incidences of burn scar contracture: 38 - 54% (Oosterwijk et al., 2017)
The big thing is that tensile strength. Scar tissue is going to contract until it meets an equal and opposite force, so it's just going to pull, pull, pull, pull, pull, and like I said, it's 12 times stronger than normal skin. The reported incidences of burn scar contracture, so anyone with a burn injury is between 38 and 54%, so that's a lot.
Contractures Due to Uncontrolled Scar
- If a scar crosses a joint, it can limit range of motion and cause functional deficits, pain, and disfigurement
Here are some pictures of some contractures.
Palmar 1st Web
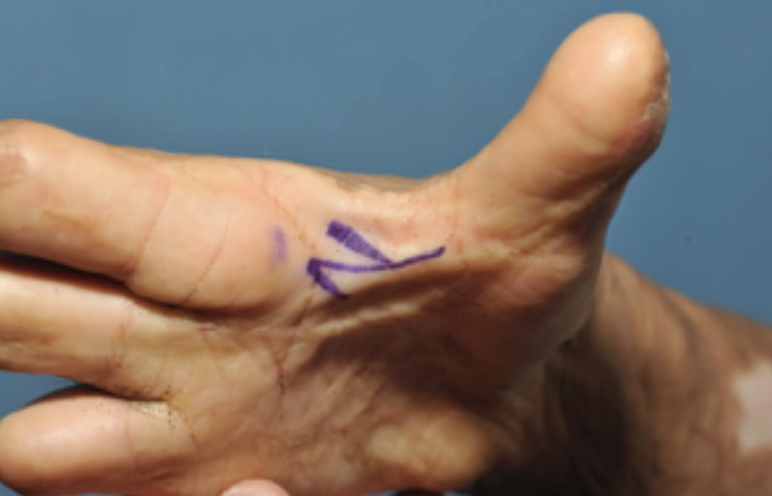
Figure 28. Contracture in the 1st web.
A contracture at the 1st web will get in the way of palmar extension, weight-bearing, and grabbing large things.
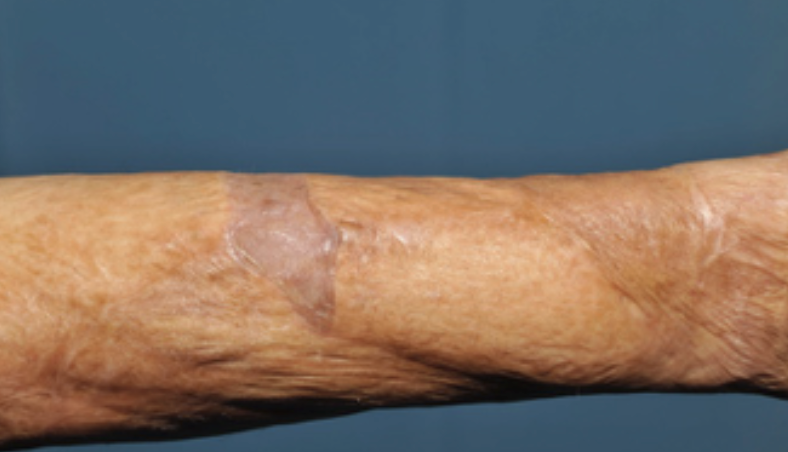
Figure 29. Forearm contracture.
When a scar is on a forearm, it can affect supination, pronation, and extension. You can see the scar pulling.
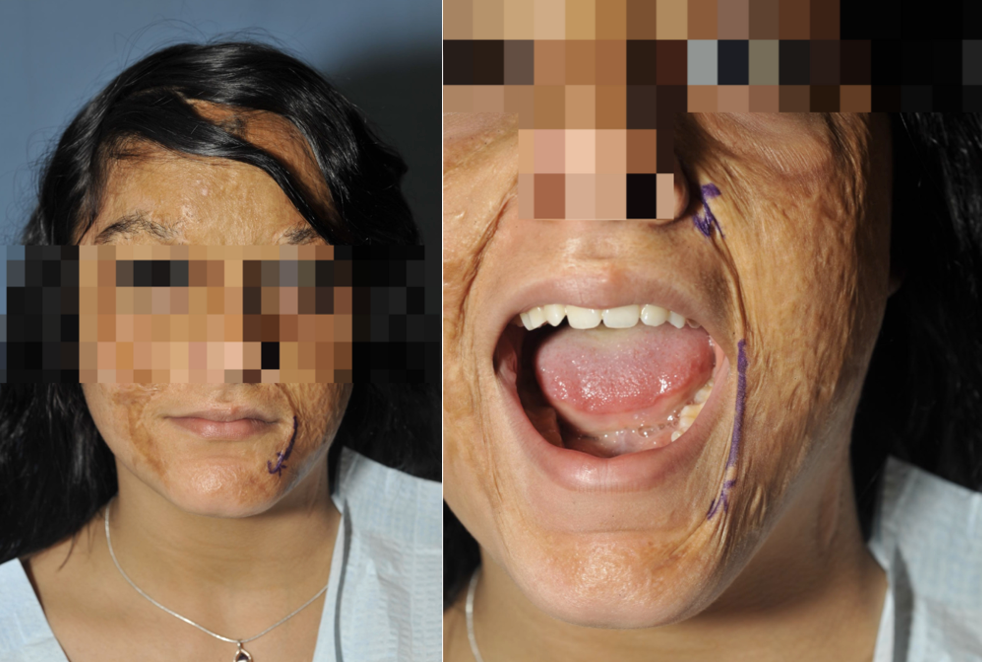
Figure 30. Facial graft and scarring.
This girl has a facial graft. You can see the contracture on the side of her mouth. When she opens her mouth, it pulls her eyes down. This is an extensive contracture, and I was to guess it was not treated.
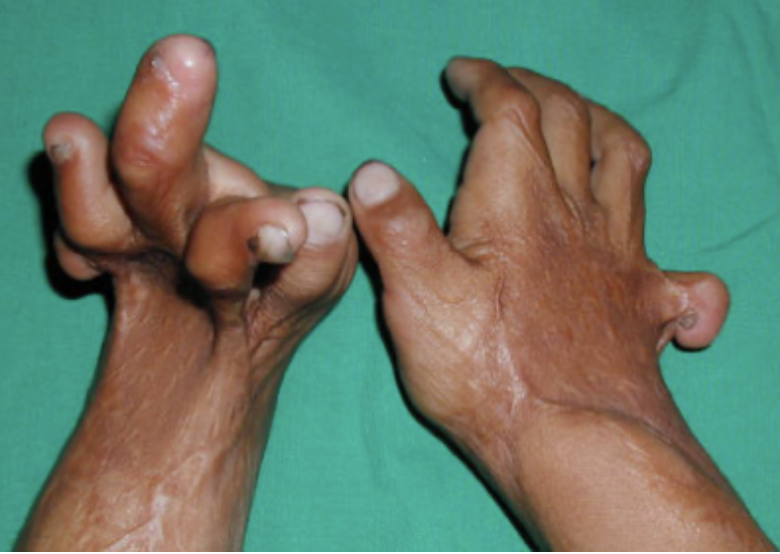
Figure 31. Contractures pulling finger joints out of place.
This image shows you how strong scar tissue is. It can pull any joint out of place.
Psychosocial Problems
- There are several psychosocial repercussions associated with visible, abnormal scarring (Spuiibroek et al., 2011)
- The importance of developing a healthy body image for successful participation in childhood occupations cannot be underestimated (Fauerbach et al., 2000)
There are psychosocial repercussions associated with visible, abnormal scarring and even not visible scarring. We call this the hidden burden (hidden scar). People have shame about abnormalities in their bodies. I have started to see more positive things coming from companies like Dove. They have started to show pictures of people with scars in advertising for their beauty products.
Active Hypertrophic Scarring, Cont.
- “Active” – still demonstrating cellular changes as compared to normal skin
- When no longer changing, considered “mature”
- However, while still making cellular changes, we have time to help shape these changes and improve the outcome of the scar
Again, when active hypertrophic scarring is still making changes, we can also make changes. This is when we would want to intervene.
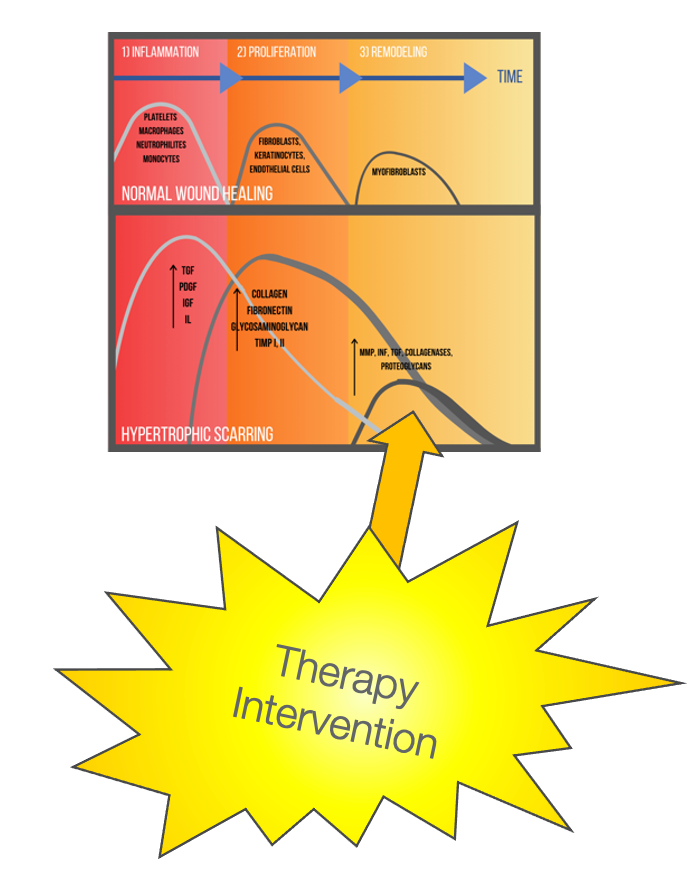
Figure 32. The best stage to intervene for scar management.
Best Treatment for Hypertrophic Scarring
- Prophylaxis
- Ensuring healing with good wound care (Finnerty et al., 2016)
- Preventing scars from becoming severe with early conservative treatment during the active phase (versus later surgical revision)
- Manual pressure from massage and pressure therapy
- Maintenance of range of motion through stretch and activity
The best treatment for hypertrophic scarring is prophylaxis. This is making sure that there is good healing and wound care. We also want to use manual pressure from massage and pressure therapy. Additionally, we want to maintain the client's range of motion through stretch and activity.
Massage
- The scar is constantly trying to contract
- Massage physically counteracts the contractile forces
- Pressure is applied with fingers, lubricated by alcohol-free massage cream
- Frequency: 2-3x/day, 5-10 minutes per area
- Duration: Until the scar matures; defined by being pale, soft, pliable, or stops responding to treatment
(Ault, Plaza, & Paratz, 2018; Cho, et al., 2014; Field, 1998; Roh, 2007; Roques, 2002)
Massage is a powerful tool. A scar is constantly trying to pull in. Massage physically counteracts those contractile forces on a cell by cell level. You apply pressure with your fingers using a nice cream, anything without alcohol. I have no brands of massage cream or any tips on that. For kids or patients with skin issues, we recommend Crisco. The cream does not matter. It is the massage from someone's hands that that pushes skin apart. The more you can massage the scar, the better. We recommend two to three times a day, 5 to 10 minutes an area. For older patients, we will try to pair it with activity to make it a habit. For example, whenever you watch this show, massage your scars. Babies are not going to tolerate 5 to 10 minutes per area. Perhaps, massaging an area for a minute every diaper change might work. You want to do this until the scarring plateaus and stops responding to treatment. This is generally about a year.
Pressure Therapy
- Helps reorganize hyperactive collagen fibers via mechanical pressure
- Functions by compressing the scarred areas of the body at a pressure roughly equivalent to capillary pressure
- Needed pressure can be achieved through a variety of off-the-shelf wraps and/or custom garments
Pressure therapy is the gold standard for scar management, especially for big ones like burns. It is applying pressure through a garment or a wrap to those hyperactive collagen fibers. It needs to be at a pressure roughly equivalent to capillary pressure or the pressure that your body is exerting outward. We need to have equal pressure to that centrally.
- Start simple and progress as needed
- If scars don’t respond, that’s an indication that increased pressure is needed
It can be achieved through off-the-shelf wraps and garments as well as custom garments.
Evidence-based Recommendations For Use of Pressure Therapy
- Works well to decrease scar height & redness
- Recommended for all wounds that take 14-21+ days to heal AND all skin grafts
- At a pressure of 20-30mmHg
- Used for 23 hours/day for ~12 months
- Replaced every 2-3 months to maintain the necessary pressure
(Sharp, Yakuboff, & Rothchild, 2016)
(Anzarut, 2009; Berman, 1998; Berman, 2008; Bloemen, 2009; Candy, 2010; Cheng, 2001; Davoodi, 2008; DeBruler, 2019; DeBruler, 2020; Deitch, 1983; Engrav, 2010; Esselman, 2006; Garcia-Velasco, 1978; Gauglitz, 2011; Haq, 1990; Harris, 2020; Kloti, 1979; Kloti, 1982; Latenser, 2002; Li, 2018; Li-Tsang, 2010; Monstrey, 2014; Mustoe, 2002; Niessen, 1999; Ogawa, 2010; Robson, 1992; Staley, 1997; Van den Kerckhove, 2005; Yamaguchi, 1986; Zhang, 2019)
There have been many nice systematic reviews. We are always gaining more evidence in this area, but the best evidence is that pressure therapy does an excellent job decreasing scar height and redness. It is not as good with the pigmentation as that is really hard to change. Pliability is going to be impacted more by stretch and massage.
Pressure therapy is recommended for all wounds that take 14 to 21 plus range to heal and all skin grafts. It needs to be at a pressure of 20 to 30 millimeters of mercury, which you can assess with various instruments. If you work in burns, a garment vendor could assist with that. Basically, you use a garment where you can fit a finger or two under, but it is tight. These are much tighter than like an Under Armour garment or something like that.
These need to be worn 23 hours a day for about a year. They can be off for bathing and massage only. This is compared to other garments like those used for lymphedema that can be off when an individual is off their feet. The reason for the long wearing schedule is that the scar is working 24 hours a day. We need to work against the scar as much as we can. Then, it has to be replaced every two to three months to maintain that pressure because the garments will lose pressure over time.
You can start with something simple, like a self-adherent wrap like Coban or ACE wrap, then move into custom garments or appliances as needed (Figure 33).
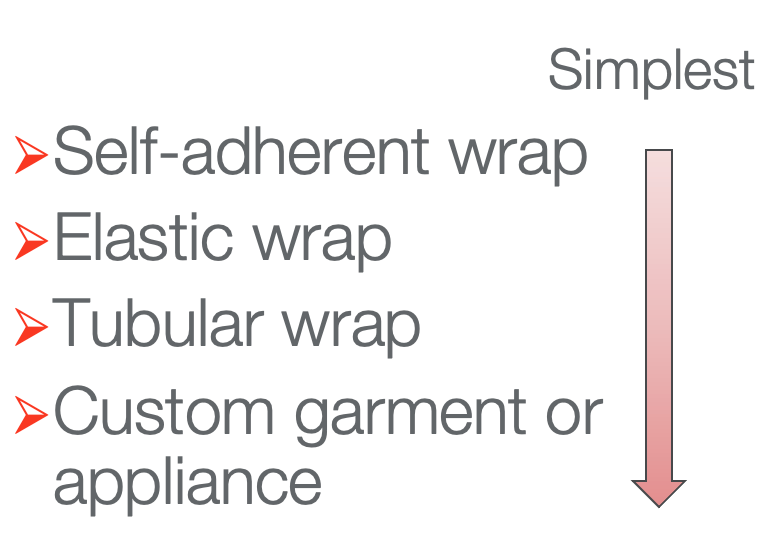
Figure 33. Pressure garment hierarchy.
Figure 34 shows some pressure garment examples.
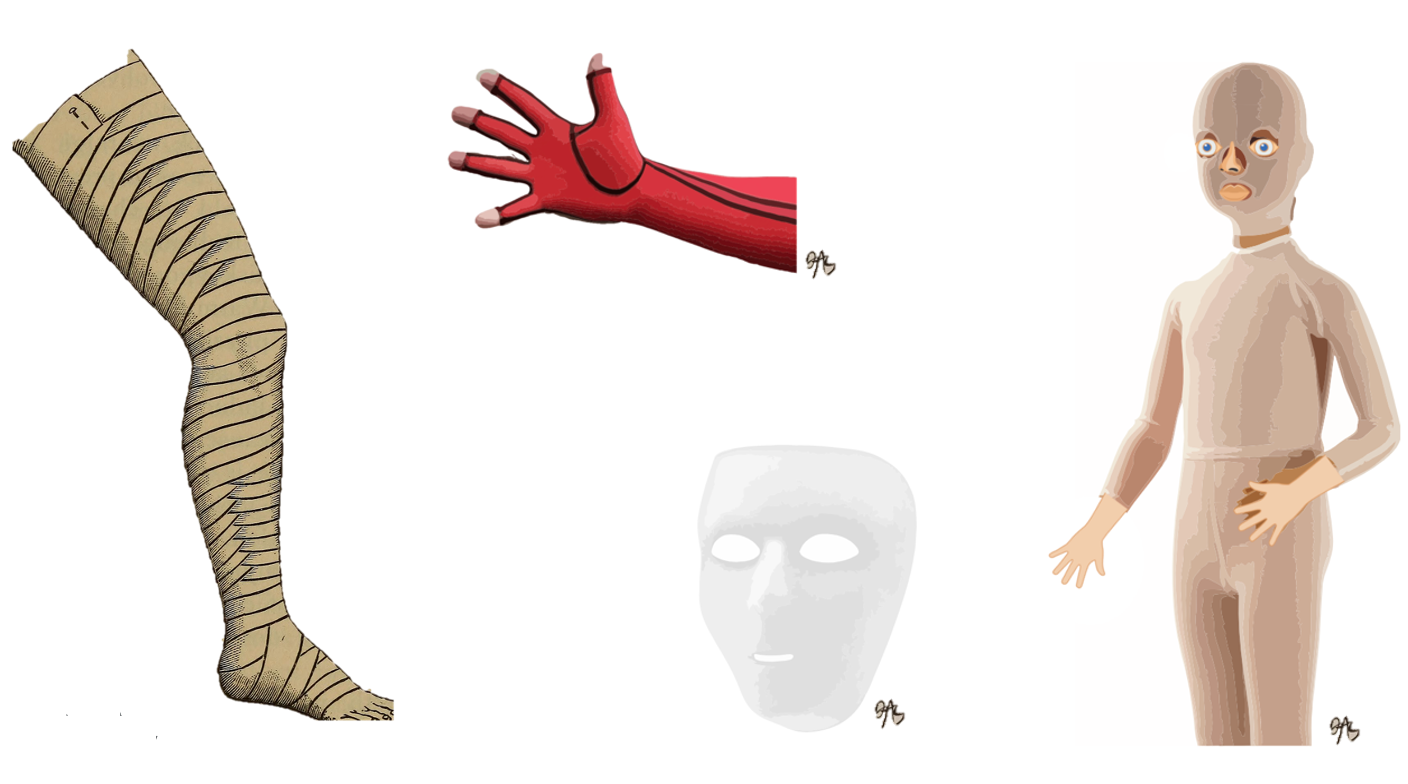
Figure 34. Pressures garment examples.
On the left, you can see a simple ACE wrap. You could wrap any limb in a nice figure-eight wrapping. You can also see examples of pressure garments. In general, these need to be custom-made and are needed for any large scar and/or a donor site. While they have fabric face masks, clear plastic custom-made face masks are used more often to see the person's face.
Increasing Pressure with Inserts
- To increase pressure when scars are hard to reach or are not responding, add inserts under the wrapping
- Start with the simplest and change as needed
- Inserts should be cut to slightly larger than the size of the scar
If you do not get enough pressure with these garments or the scar is not responding well, you can increase the pressure by putting materials in the garment. A hierarchy from simplest to more complex is shown in Figure 35.
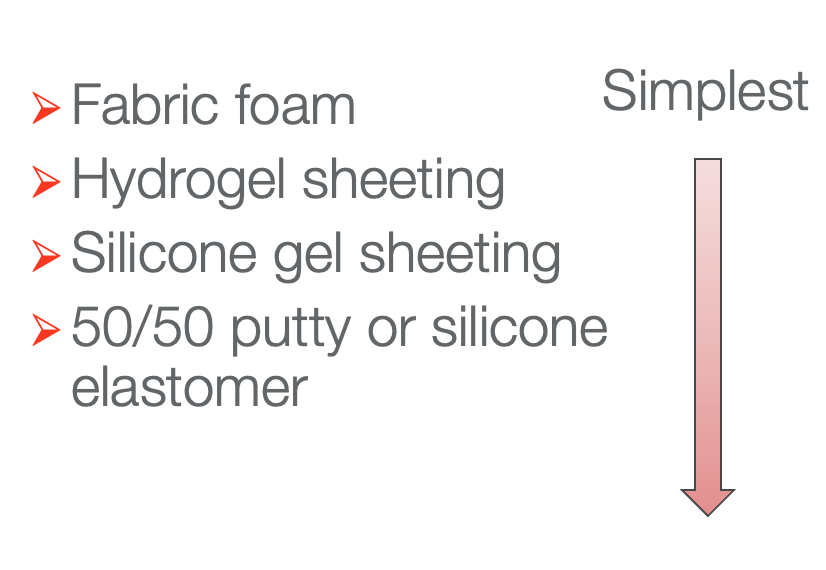
Figure 35. Hierarchy of materials to insert into pressure garments.
You start simple with something like Velfoam, and then you can move into a gel cast padding, a Hydrogel sheet, or silicone gel sheeting. You can also use putty or silicone elastomer to fill in concave areas (sternums, popliteal, axilla, etc.) with something to help increase the pressure.
Silicone
- Silicone gel can be used in sheet form to increase pressure to scars
- Also, some evidence that silicone topical gels and gel sheets help decrease scar height and increase scar pliability when used in combination with pressure therapy
- Mechanism of action is not fully understood
(Monstrey et al., 2014; Nedelec et al., 2015; Pruksapong, Burusapat, & Hongkarnjanakul, 2020; Wiseman et al., 2020)
Here is some more evidence recently about silicone. Silicone can be used to increase pressure under a garment. Additionally, there is some evidence that silicone itself has some properties that help collagen reorganize. Silicone, in combination with pressure therapy, can help to improve that scar height and pliability. Currently, they do not fully understand the mechanism by which the silicone is working.
Splinting
- For scars crossing a joint and limiting ROM
- The joint should be splinted in opposition to the scar contracture
- When?
- If active range is limited and passive range cannot be achieved within 1-2 minutes, night splinting should be initiated
- Progress to 24-hour splinting if night splinting does not work
- Advanced scar contractures should be treated with serial casting
(Parry et al., 2020; Oosterwijk et al., 2017)
If a scar crosses a joint and limits the range of motion, we can counteract that with stretching and a splint (Parry et al., 2020). Figure 36 details this.

Figure 36. Splinting for scars overview.
If the individual's range of motion is limited and you cannot stretch it to full range within a few minutes of a passive stretch, you can start with night splinting in whatever position you can get the joint. Then, we move up to 24 hours a day splinting if you are still not regaining that passive range. Something even more severe is serial casting. This is where you put those tissues on a stretch and keep them there for 24 hours a day.
Stretching and Activity
- Generally acceptable to resume normal activity 5-10 days after a wound is sustained or a graft is placed à defer to the physician for full orders
- Monitor for range of motion deficits and consult with scar specialist, if range is not regained with normal activity within 1-2 weeks
(Berman, 1998; Berman, 2008; Bloemen, 2009; Davoodi, 2008; Esselman, 2006; Gauglitz, 2011; Latenser, 2002; Mustoe, 2002; Niessen, 1999; Ogawa, 2009; Robson, 1992; Staley, 1997)
For stretching and activity, it is generally acceptable to resume normal activity within 5 to 10 days after the wound is closed. This is even true for a graft, but we have to defer to the physician for full orders. You have to monitor for range of motion deficits as you are going. Start with normal activity. If you start to see a loss of range, you will need to move into stretching. You want to stretch any scar that crosses a joint. If you cannot get that initial stretch within a few minutes, that is when you want to move into some splinting.
Range of Motion
- Passive range of motion