Introduction
I appreciate the time that you are taking out of your hectic schedules. I hope this information is helpful to you and especially to the clients that you serve. Today, we will be talking about wheelchair seating and focus on the areas of the trunk and the lower and upper extremities. I have other seating-related courses in the occupationaltherapy.com library like "Positioning the Pelvis." We often start with a mat examination. I provide education for Stealth Products, and they do make some seating components. However, I will be presenting this information as unbiased as possible. This learning event is not focused on a specific product or service but a variety of interventions.
Trunk
What We Will Be Covering
- Achieving and maintaining a neutral and upright trunk
- Kyphosis
- Lordosis
- Rotation
- Lateral Scoliosis
- Combined spinal asymmetries
We are going to talk about achieving and maintaining a neutral and upright trunk. Figure 1 shows our spinal column.
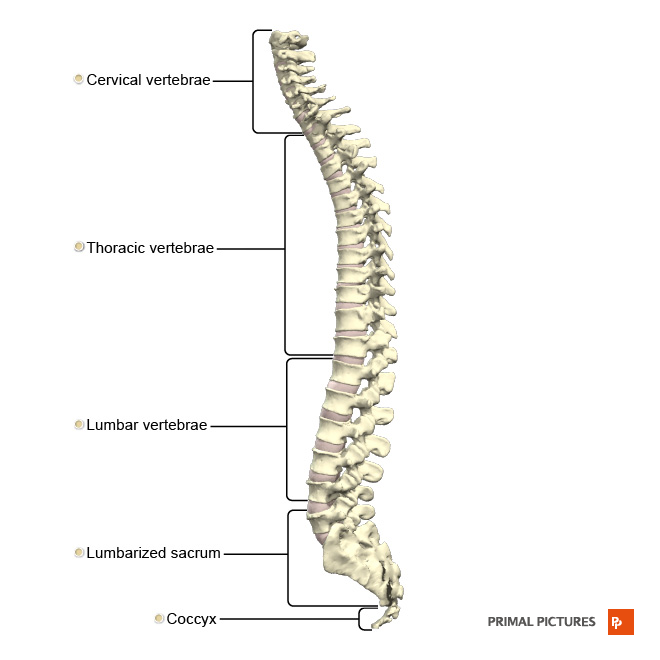
Figure 1. Spinal column.
We will specifically look at kyphosis, lordosis, rotation, lateral scoliosis, and a combination of these asymmetries.
Why Is This Important?
- The position of the trunk, and subsequently the head, is very dependent on the position of the pelvis
- Maintaining an upright trunk requires intrinsic muscle strength, balance, and stability
- If a client lacks intrinsic control, extrinsic supports are required
- Gravity has a profound influence on the trunk
We are supposed to sit with an upright trunk. Not only would our grandmas be proud of us, but there are also other clinical implications. The trunk is very dependent on our pelvis's position, and the head is very dependent upon the trunk position.
Vertebrae are all stacked on top of each other between the pelvis and the head, and it must have adequate support. Maintaining an upright trunk for most of us requires a certain degree of muscle work. We have intrinsic muscle control, which allows us to balance our flexors, extensors, and lateral muscles to be in an upright and aligned position. If the client lacks this intrinsic control due to muscle weakness, paralysis, or abnormal muscle tone, extrinsic supports may be required.
We need to remember that gravity has a profound influence on our bodies. As I get older, I am noticing that more and more, particularly in the trunk. Thus, we need to provide adequate support.
Positioning Strategies
- Not a cookbook approach
- Can’t really look at challenges in isolation
- Always keep in mind the possible causes and your goals
- Goals can be used as justifications for funding
- Positioning Chart
- www.atilange.com under Resources
- See handouts
Interventions are not as simple as opening up a cookbook. We cannot look at these challenges in isolation, but we have to look at the entire client. For this presentation, we are going to tease out some of these challenges and address them.
As we look at these particular seating challenges, like kyphosis, we need to keep in mind what might be causing an issue for a client and our goals. If we do not know what is causing a particular challenge, we may choose the wrong intervention. It is vital to dig down and figure out what is going on.
It is important to know why we are doing what we are doing so that the goals become our outcomes and the justification in our letter of medical necessity. Why are we fixing what we are fixing? Your handouts are a positioning chart and a PDF of this PowerPoint. The positioning chart is also available on my website under resources. It is meant to be a reference. You can look back at it either throughout the session or refer to it afterward.
A Word About Assessment
- We are not going into Seating Assessment today
- We are jumping into common seating challenges and interventions
- But… don’t forget that Mat Evaluation!
I do have a course on the mat assessment that I would encourage you to check out. We are jumping right into the seating challenges for this course, but the mat evaluation, as noted in Figure 2, is so important.
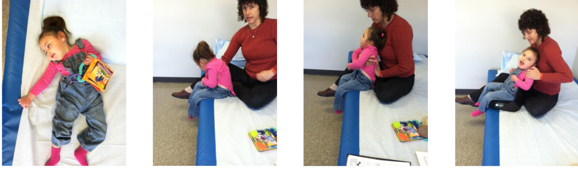
Figure 2. Example of a mat evaluation.
We need to see what the client looks like, supine with gravity eliminated and sitting on the edge of the mat table. I like to use my body to provide adequate support to see how the client looks against gravity. During this assessment, I can see what a client needs as far as support and angles.
Anatomy Review
- Trunk
- Spine
- Cervical C1-C7
- Thoracic T1-T12
- Lumbar L1-L5
- Rib cage
- Muscles
- Attached to the pelvis
- Attached to the skull
On the spine, there are three distinct zones: the cervical, thoracic, and lumbar vertebrae.
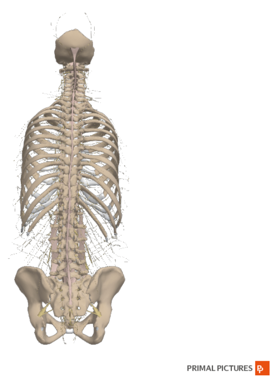
Figure 3. A rear view of the spinal cord.
We can see asymmetries and a lack of flexibility in any of those segments. The rib cage is attached to the thoracic vertebrae. The muscles pull on all those vertebrae and impact the rib cage. These are also connected to the pelvis and the skull. Again, it is a little tricky to look at the spine without considering the position of the pelvis and the head.
- Key multi-joint muscles that impact trunk position
- Hip Flexors – psoas (zo-is) major
- This muscle attaches to the femur at one end and all the lumbar and lowest thoracic vertebrae at the other
- Flexes and externally rotates the hip and stabilizes the lumbar spine with the abdominals
- If the range is limited, the psoas will pull the pelvis into an anterior tilt and the spine into lordosis. External rotation may also be present.
- Solution:
- Allow slight external rotation
- Stabilize pelvis
- Determine optimal seat to back angle on mat exam
Some key muscles impact the position of the trunk. What is tricky is that some of them are multi-joint muscles crossing more than one joint. This means that we have to consider both areas that the muscle crosses and how that could influence someone's position.
The hip flexors, the psoas major, attach to the femur at one end and then all the lumbar and lower thoracic vertebrae at the other. The muscle attaches to the trunk, goes over the pelvis, and attaches to the legs.
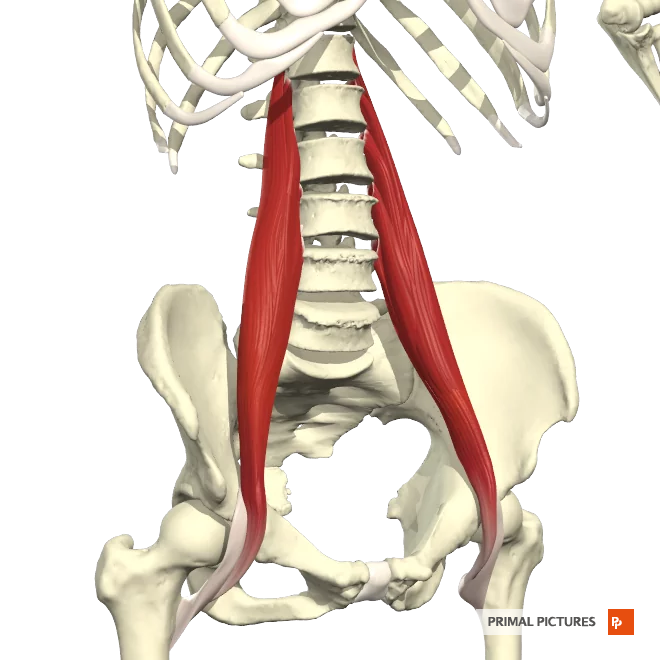
Figure 4. Psoas major muscles.
If that muscle is really tight, it will impact both the pelvis and the trunk's position. This muscle's job is to flex and externally rotate the hip and stabilize the lumbar spine along with the abdominal muscles. If the range of motion is limited or the muscle is tight, the muscle will pull the pelvis into an anterior tilt. With an anterior pelvic tilt, the spine will be drawn into lordosis. We might also see external rotation at the hips.
What do we do if we are dealing with a tight hip flexor? We might need to allow a little bit of external rotation within the seating system. This allows the legs to sit in a little bit of external rotation to correct the pelvis's position. We need to make sure we are stabilizing the pelvis to keep it neutral instead of drifting into that anterior pelvic tilt and lordosis. During the mat evaluation, we can determine what the optimal seat to back angle is so that we are not stretching this muscle.
Positioning Strategies: Trunk
- Forward Trunk Flexion - Kyphosis
- Trunk Extension – Lordosis
- Trunk Rotation
- Lateral Trunk Flexion - Scoliosis
There are four main strategies or challenges that we see at the trunk. We see a forward trunk flexion, also known as kyphosis, trunk extension, lordosis, trunk rotation, lateral trunk flexion, and scoliosis. Some of these can also occur together.
Relationship Between the Pelvis and the Trunk
- Posterior Pelvic Tilt---Kyphosis
If the pelvis is in a posterior pelvic tilt, which is very common in our clients, then the trunk will be in a kyphotic position in Figure 5.

Figure 5. A client with a posterior pelvic tilt and kyphosis.
These two things go together. If we are going to address kyphosis, we have to start attempting to get the pelvis in neutral.
- Anterior Pelvic Tilt---Lordosis
If the pelvis is in an anterior pelvic tilt, we will have lordosis of the trunk, as seen in Figure 6.
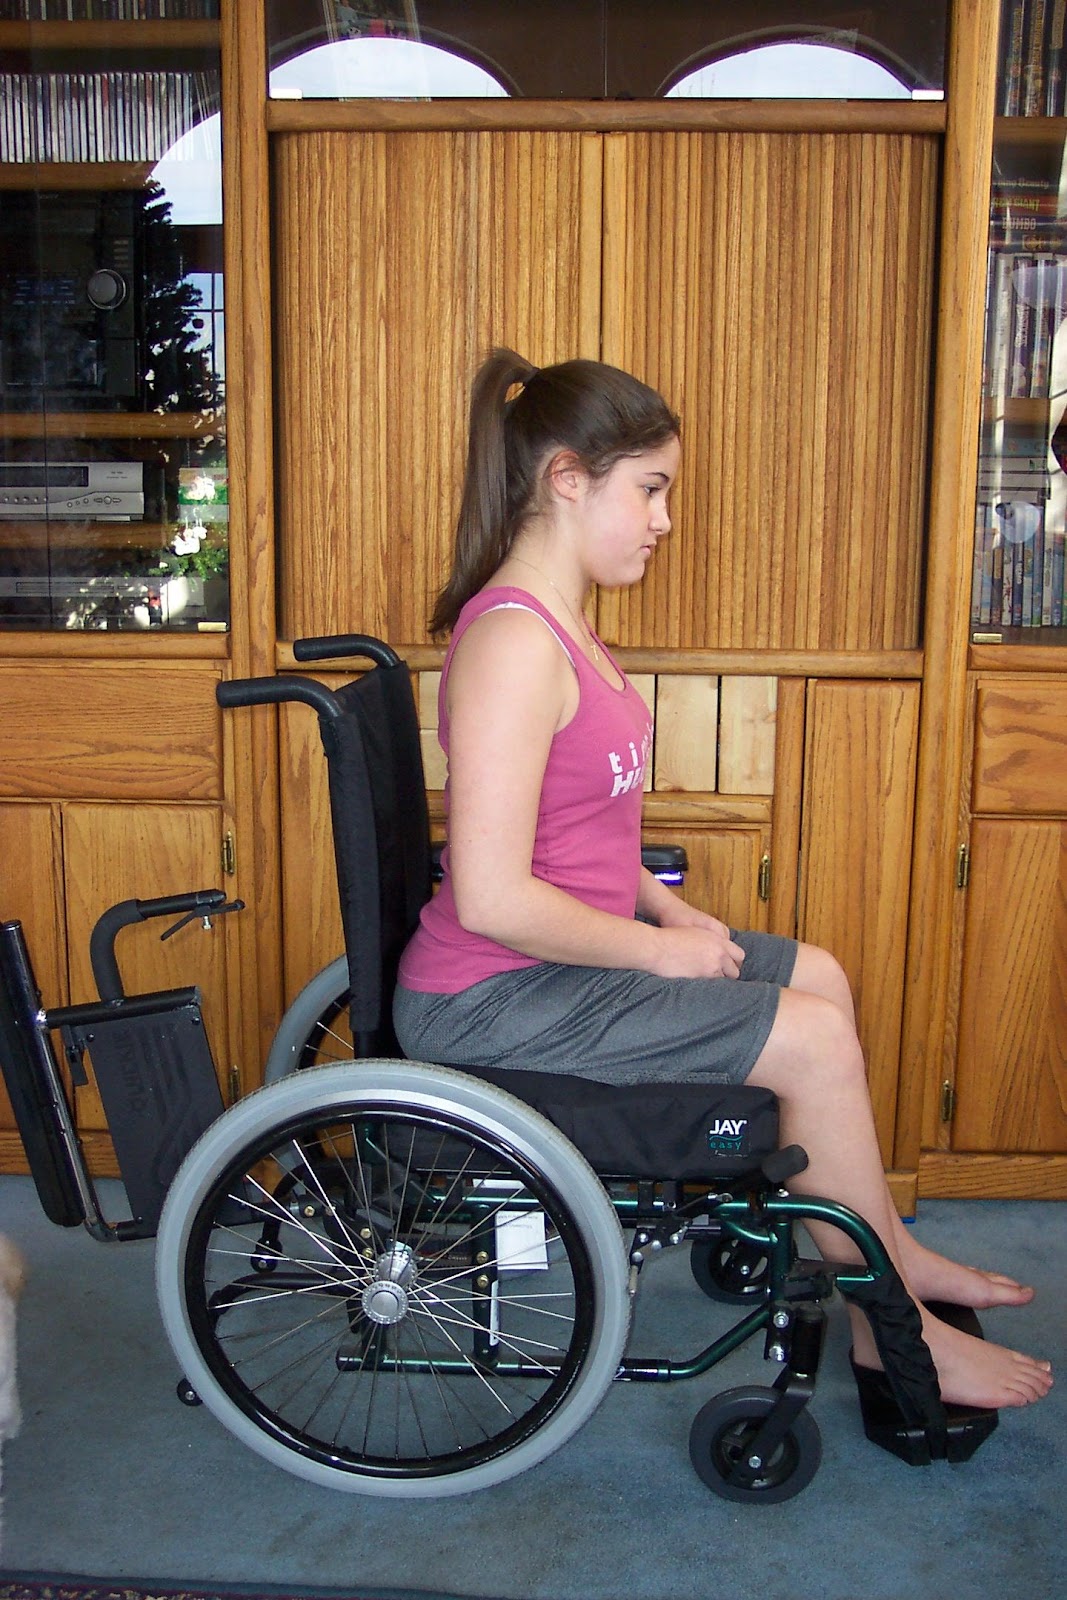
Figure 6. A client with an anterior pelvic tilt and lordosis
- Pelvic Rotation---Spinal Rotation
If we have a rotation at the pelvis, it is also very common to rotate at the spine (Figure 7).
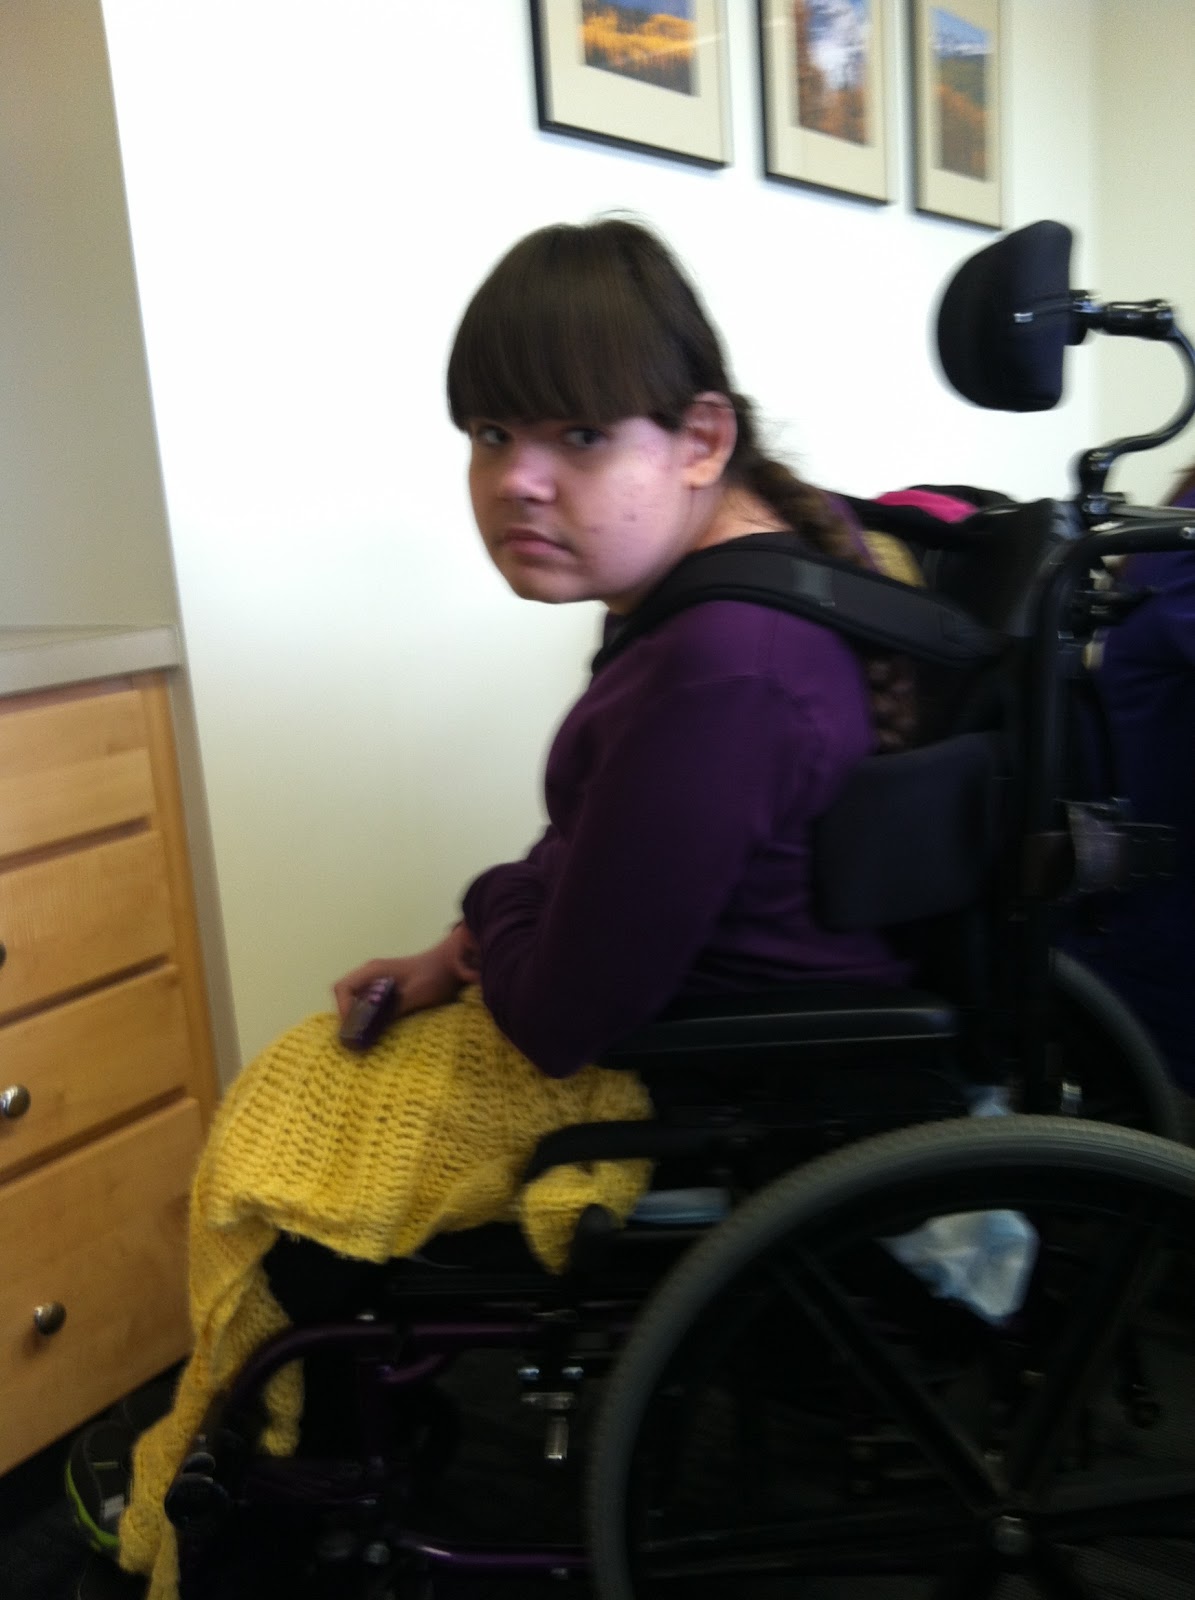
Figure 7. A client with a pelvic and spinal rotation.
The client may attempt to right themselves, but then we have a rotation that we may not be able to see. If we have a rotation of the pelvis, but the shoulders are facing forward, we know there is some rotation happening in the spine.
- Pelvic Obliquity---Lateral Scoliosis
And finally, if the pelvis is oblique, one side may be higher than the other. There may also be a lateral curvature of the spine or lateral scoliosis (Figure 8).
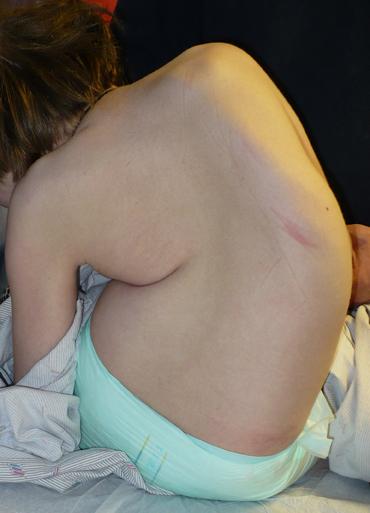
Figure 8. A client with pelvic obliquity and lateral scoliosis.
Flexible Vs. Fixed
- Spinal asymmetries may be flexible or reducible
- Client has a certain postural tendency
- This can be fully corrected to neutral by applying reasonable force and counterforce
Another thing to keep in mind when it comes to the trunk whether the disability is flexible or fixed. Sometimes we use the term reducible versus non-reducible. Flexible means that I can correct the client using my hands. It might take a lot of force. In Figure 9, this young man, Brett, is in a posterior pelvic tilt with kyphosis. By using my body, I can reduce that. However, you can see me really clenching my fist there. I am using a lot of energy to correct his pelvis and spine.
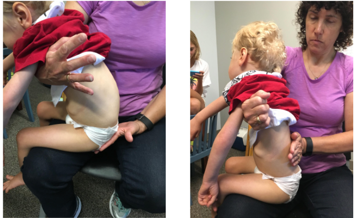
Figure 9. Correcting a flexible posture.
This child's posture is flexible or reducible, and I can reduce it to a neutral presentation. If it is fixed or non-reducible, I cannot correct all or some of the postural tendencies. Part of the reason that our field is moving towards the term "reducible" is that I used to document that I could not correct a poster as it was fixed. Then, their condition would worsen. Let's say they had a fixed kyphosis, but now the kyphosis is worse, and further seating intervention is required. The funding source would sometimes come back and say, "Wait a minute. You said it was fixed." We need to let funding sources know if something is fixed or non-reducible, it means that you cannot correct this person fully to neutral. It does not mean it cannot get worse. Unfortunately, it can, but it will not get better short of surgical intervention most of the time.
Partially Flexible
- Many times an asymmetry can be partially corrected toward neutral
- The goal of seating is to correct as much as possible toward neutral without undue force/pressure to prevent or minimize this from worsening
Many times an asymmetry can be partially corrected towards neutral; this is somewhat flexible or partially reducible. Our goal is to correct as much as possible towards neutral without undue force or pressure. We want to do so to prevent it from getting worse.
Fixed or Non-reducible
- A fixed or non-reducible asymmetry cannot be reduced toward neutral
- The goal of seating is to accommodate this asymmetry and maximize pressure distribution
- Non-reducible asymmetries can worsen but typically will not improve short of surgical intervention
If it is fixed or non-reducible, we cannot reduce this towards neutral. The goal now is to accommodate. At this point, we are not trying to correct it. This boy, in Figure 10, has a non-reducible asymmetry.

Figure 10. A boy with a fixed deformity.
You can imagine if this young man used a very flat back surface behind him, he would not make a lot of contact with it. We want to increase the amount of contact so that we would use custom-molded seating. Non-reducible asymmetries can worsen, but typically, they will not improve without surgery.
Combined Asymmetries
- These asymmetries can be seen at various levels of the spine
- These asymmetries can be seen in combination with one another
- i.e., lumbar lordosis, thoracic kyphosis, lateral scoliosis, and rotation
Now, these asymmetries can be seen at various levels of the spine. We can see kyphosis typically in the thoracic area and lordosis in the lumbar area. These can occur at a variety of levels and might be seen with each other. This young man has a combination of asymmetries, including lateral scoliosis, kyphosis, and lordosis. This will be more apparent in just a little bit when we look closer.
Trunk-Kyphosis
Description
- Kyphosis can be at various levels of the spine
- Kyphosis may be flexible, partially flexible, or fixed
- May be combined with neck hyperextension
Kyphosis can be seen again at various levels of the spine (Figure 11).

Figure 11. An example of kyphosis.
It can be flexible, partially flexible, or fixed. It is sometimes combined with neck hyperextension. The reason is that the person's head is forward because of kyphosis. They then need to lift their head to gaze straight ahead, breathe, swallow, or make eye contact with someone causing hyperextension.
Causes: Forward Trunk Flexion
- Possible Causes:
- Flexion at hips
- Flexion at thoracic area
- Flexion at shoulder girdle with gravitational pull downward
- May occur from increased or floppy tone, abdominal weakness, poor trunk control, weak back extensors
- Increased tone (i.e., hamstrings) pulling pelvis back into posterior tilt
- Posterior pelvic tilt
- Habitual seating in an attempt to increase stability
- Fixed kyphosis
- Sling-back
What causes this tendency towards a forward trunk flexion? It could be that there is flexion at the hips, and that is allowing or pulling the trunk into flexion. It could be that there is flexion at the thoracic area, and that is the definition of kyphosis. There could be flexion at the shoulder girdle, and gravity again is not always our friend. This could pull on the trunk, moving it forward. Some of our clients might have increased, or low tone in the trunk and either of these can lead to a kyphotic position. There might be an abdominal weakness, poor trunk control, or weak back extensors that allow this posture to occur. Increased tone, such as tone in the hamstrings, can impact the pelvis pulling it into a posterior tilt resulting in a kyphotic trunk.
Habitual seating can cause this in an attempt to increase stability. Often, we slide into a posterior pelvic tilt as it is a very stable position; however, it is not very functional. If you want to slide into that position now, you can see that it is hard to lift your arms and use them very functionally when you are in a posture pelvic tilt. Some clients do slide into this position to find stability. It is on us to provide stability in a better way. There could also be a loss of movement in the vertebrae, causing a fixed kyphosis. And then finally, the use of sling-back upholstery can cause this. Some of our lower-end chairs have this type of seating, especially if it is an older chair that is stretched out.
Interventions: Flexible
- Anterior trunk support
- Posterior trunk support
- Force and Counterforce
How do we address a kyphotic trunk? If it is flexible, we have a set of interventions, and if it is fixed, then we have another set of interventions. If it is flexible, we can use an anterior trunk support and posterior trunk supports. By doing so, we can provide force and counterforce. A lot of positioning has to do with this force and counterforce principle. This is where we place a force on the back of the posterior pelvis and then use an anterior trunk support.
Anterior Trunk Supports
- Chest strap
- Shoulder straps
- Shoulder retractors
- Butterfly style vests
- Abdominal supports
- TLSO
There is quite a variety of anterior trunk supports available, and they each have their own clinical indicators. First, we have a chest strap like this shown in the center. It just goes straight across the chest, and it is often used for clients who do not need a lot of support.
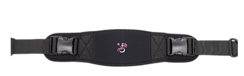
Figure 12. Chest strap by Stealth Products.
They just need something to keep them from tipping forward to a point where they may not be able to return to upright. Figure 13 shows a vest-style anterior trunk support.
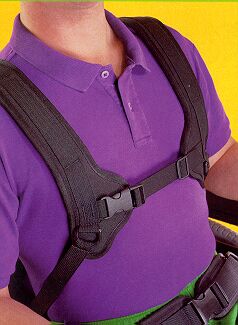
Figure 13. Vest-style anterior support by Bodypoint.
This looks more like you are wearing a backpack. Some clients may use orthotics like a TLSO to support the trunk, as in Figure 14.

Figure 14. A TLSO.
With a TLSO, we do not have to do as much in the seating system. Some people even use a shoulder retractor like this one in Figure 15.
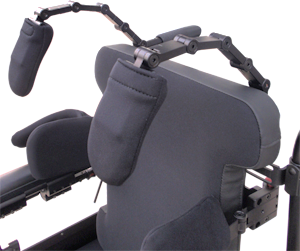
Figure 15. Shoulder retractor on a wheelchair.
They swing out of the way for transfers and sit in front of the client's pec area when in the wheelchair. There are even abdominal supports that provide circumferential support.
Anterior Trunk Support: Chest Straps
- Provides anterior thoracic support across the chest and does not cross the shoulders
- Prevents forward movement
- Does not prevent trunk flexion above strap
- Dynamic version allows movement forward and assist with return to upright
- Extends functional reach
Using an anterior trunk support is to facilitate an upright trunk and provide the stability that this client needs. Proximal stability and maintaining contact with the back is critical to function. Figure 16 shows a young man that is wearing a chest strap.
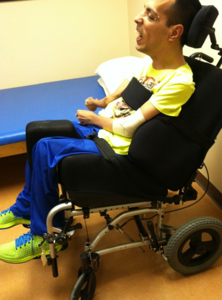
Figure 16. A client with a chest strap.
The chest strap provides support right across the center of the chest, and it does not cross the shoulders (Refer back to Figure 12). It might not always work so well with fully developed women or young women. We might have to look at a different type of support in those situations. The strap prevents forward movement. However, it does not prevent someone from flexing or curling their shoulders up over the chest strap. So if someone tends shoulder flexion, this can still occur. There is also a dynamic version of this. It allows the client to lean forward slightly to extend their functional reach, and then the dynamic, stretchy material will assist the client back to an upright posture.
- Clinical Applications
- Minimal anterior support is required to prevent the client from leaning forward to the point that independent return to upright is not possible
- May be needed for transportation or uneven terrain
If we have a client that only needs a little bit of support to prevent the client from leaning forward to the point where they lose control or lose the ability to return upright independently, then a chest strap could be indicated. It also may be needed for transportation, uneven terrain, or anything that might tip that client forward.
Anterior Trunk Support: Shoulder Straps
- H-Harness style
- Backpack style
- Y straps
We have three different styles of shoulder straps.
- H-Harness Style
- More contact
- Less likely to fall off shoulders
The H-harness style provides a little more contact than the backpack strap, which we will see in a minute. This is because of the shape. We have a little bit of a contour with a horizontal strap between. You can see this in Figures 17 and 18.
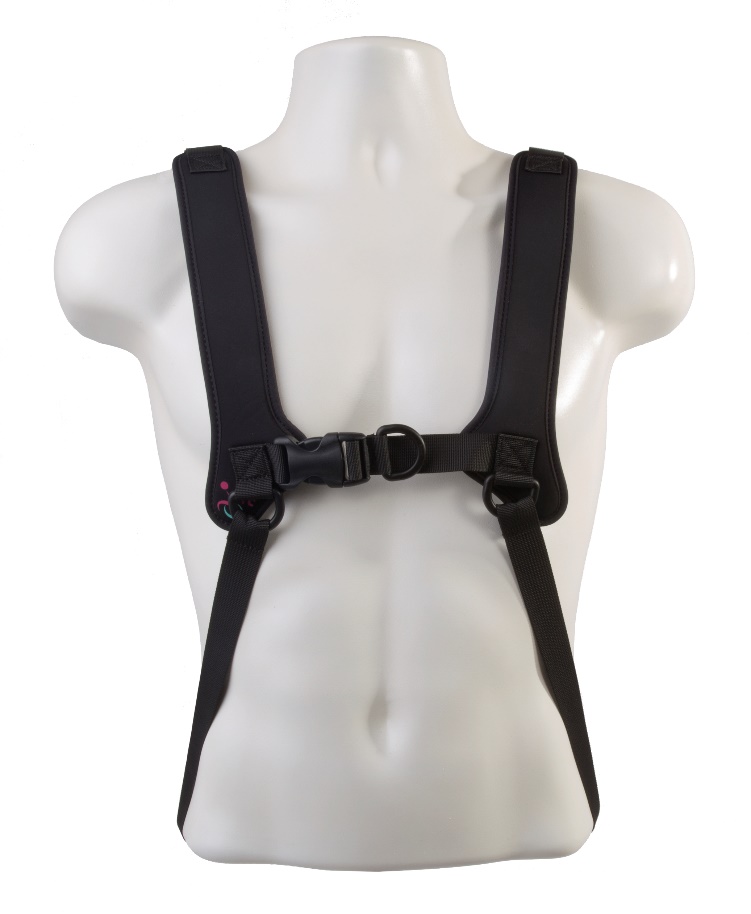
Figure 17. H-harness style strap by Stealth.
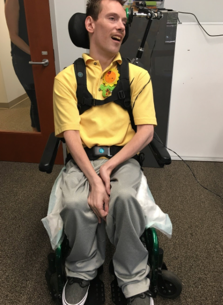
Figure 18. H-harness style strap by Bodypoint.
The horizontal strap prevents these from falling off of the shoulders.
Anterior Trunk Support: Backpack Style
- Work well for a women’s figure
- Less contact
- Better for shoulder retraction
- Can see clothes better
The backpack style literally looks like you are wearing a backpack. It provides a little more targeted support. It also tends to retract the scapulas a little more than the H strap but with less contact. This is very important to Julian because he is a big Bronco's fan, even though they are not doing well this year (Figure 19).
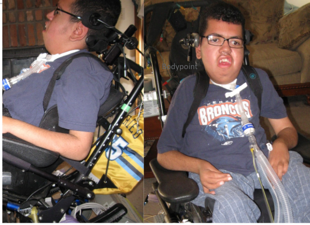
Figure 19. Backpack style support by Bodypoint.
Because of how this contours and fits against the anterior trunk, this usually works better for women. Figure 20 shows one by Stealth.
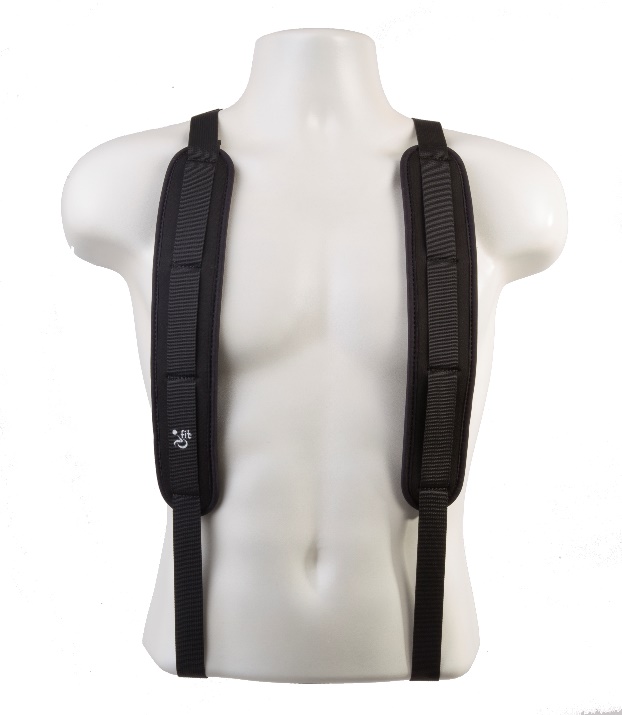
Figure 20. Backpack style support by Stealth.
Anterior Trunk Support: Shoulder Straps
- Clinical Applications:
- Targeted anterior thoracic support over the clavicles
- Promotes trunk extension and scapular retraction
- More upright trunk and improved head position
Shoulder straps provide targeted anterior thoracic support over the clavicles.
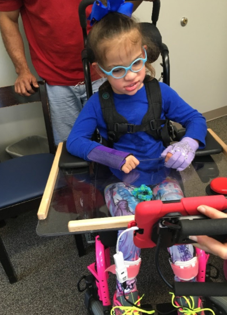
Figure 21. Shoulder straps by Bodypoint.
We do not want them to rub on the neck nor block the head of the humerus, limiting functional movement. We want it right in between. They promote both trunk extension and some scapular retraction. This can help a lot of our clients give them a more upright trunk, and as a result, improved head position.
Anterior Trunk Support: Y Straps
- Y Straps provide some anterior thoracic support
- Primarily designed to de-rotate the trunk
- Available in a dynamic version
- Clinical Applications:
- Shoulder straps can often limit trunk rotation
- If shoulder straps are inadequate, a Y Strap can be used
- Applies forces above and below the shoulder
Y straps are a uniquely shaped shoulder strap. They are designed to provide some anterior thoracic support, but primarily, they de-rotate the trunk. If someone has a rotated trunk with one shoulder forward, you can use this shoulder strap and put it just on the forward side. This Y strap is from Stealth Products (Figure 22).

Figure 22. Y strap from Stealth Products.
This can drive people nuts if they like symmetry, so I will usually put on two shoulder straps. But if that is not enough to de-rotate the trunk, we can use this because it attaches above and below the arm, crosses the clavicle, and then goes underneath the axilla. This allows a better area to pull on to de-rotate the trunk. It is also available in a dynamic version if we need to allow that person some movement from which they can then return to neutral. This can also be helpful if shoulder straps by themselves are not enough to limit trunk rotation. I do not use these very often, but I have had a few clients where this was really required.
Anterior Trunk Support: Shoulder Retractors
- Designed to encourage an upright trunk by “prompting” the client to extend when contacting the pad
- May be useful for clients who tend to “hang” on shoulder straps
Shoulder retractors are something that I really avoid using if I can make shoulder straps work. They look rather intrusive, and they can be a pain to use.
Figure 23. Shoulder retractors from Stealth Products.
You have to swing them out of the way certainly to do a transfer, but they do work well with some clients. Typically, I use this for a client who can sit up fairly well but tend to move towards that kyphotic posture. And if they feel that pad against them, it provides a prompt for them to sit back upright. It may be useful for clients who respond well to that prompt and usually hang on shoulder straps rather than respond with improved posture. I would definitely recommend that you try it with your client before you buy it.
Anterior Trunk Supports: Anterior Vests
- More anterior contact than other options
- Less retraction than shoulder straps
- Dynamic version allows movement forward and assist with return to upright
- Extends functional reach
- Various styles
- Increased contact area or
- Contoured style
We then have an anterior vest that is sometimes called a butterfly vest due to its shape. Several companies make these. These provide much more contact with the anterior trunk than shoulder straps but do not provide quite as much retraction because the pressure is so well-distributed. As such, there is not targeted control over the shoulders. There are dynamic versions of this as well.
There are different styles. In Figure 24, this is the option from Bodypoint.
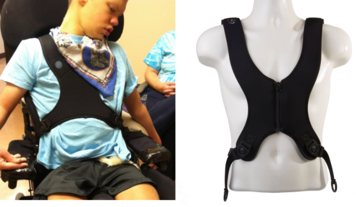
Figure 24. Anterior vest by Bodypoint.
Some cover a wider area, and some are more contoured. The more contoured ones are designed to match a woman's shape to spare breast tissue, as noted in this style by Stealth Products (Figure 25).

Figure 25. Anterior vest by Stealth Products.
I am not a big fan of vests, and I rarely use them. The reason is that no matter how well they are designed, the notch tends to move upward. And if someone is not careful or monitored, the straps get tighter and tighter. Before you know it, this top portion of the vest is way up here in the throat. There have been several people, mostly children on school buses, who have asphyxiated on these vests. Additionally, I find they do not provide targeted control. So, I tend to use shoulder straps the majority of the time.
- Clinical Applications:
- Facilitates upright trunk
- Provides stability
- Maintains client contact with the back
- Precautions:
- Make sure this isn’t positioned too high, as this can lead to choking
- Use with pelvic positioning belt, or client could slide down and choke
These can facilitate an upright trunk, provide stability, and maintain client contact with the back. But, you can see in Figure 26 that the top of the vest on this young lady is too high.
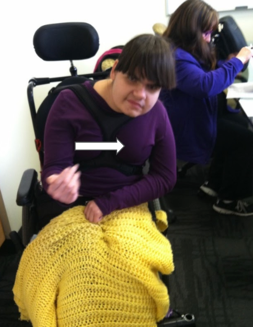
Figure 26. The anterior vest is too high.
We want to make sure it is not too high, and if you do not use an anterior vest with a pelvic positioning belt, the client could slide down.
With Anterior Trunk Supports: Abdominal Panels
- Abdominal Panel or Belly Binder
- Circumferential support
If someone is using anterior trunk supports, they need to have that pelvic belt on. This is an abdominal panel, and it is sometimes called a belly binder. It provides circumferential support. You can see it on the gentleman in Figure 27.
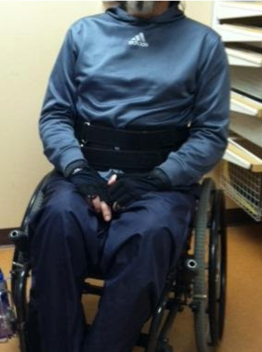
Figure 27. Abdominal panel by Aspen Seating.
The good thing about this support is that it provides a tremendous amount of stability without being very high up on the body if that is not what the client requires. This must cross the lower rib cage and the upper pelvis. We do not want this on soft tissue. We want to contact those bony areas as well. This is also great for reducing an anterior pelvic tilt and addressing lordosis. We will look at this again, but it is used primarily for a lower level kyphosis.
Combination Anterior Trunk and Pelvic Supports
- Some combination supports are available
- Often in Adaptive Strollers
- Similar to 5 point harness in car seats
- Due to the attachment between the trunk and pelvic supports, neither can really do its job
There are some combination supports that you might see out there in some catalogs or on adaptive strollers. It works similar to what you might see on some car seats where the shoulder strap and the pelvic belt are connected. Obviously, this not working too well for my friend Riley here.
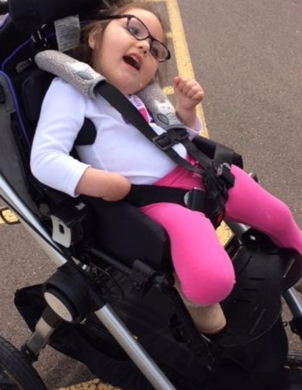
Figure 28. Combination anterior trunk and pelvic support.
The problem is that when we connect these two, neither of them can do their job very well. For wheelchair seating, it is important to keep the shoulder strap and the pelvic belt as two separate things. We do not want them to attach to each other as it is counterproductive.
Forward Trunk Flexion: Alex
- Alex is still hanging on his shoulder straps
- What to do?
- Hint: is his head over the pelvis?
- Find point of balance
- Determines seat to back angle
Figure 29 shows my friend Alex.
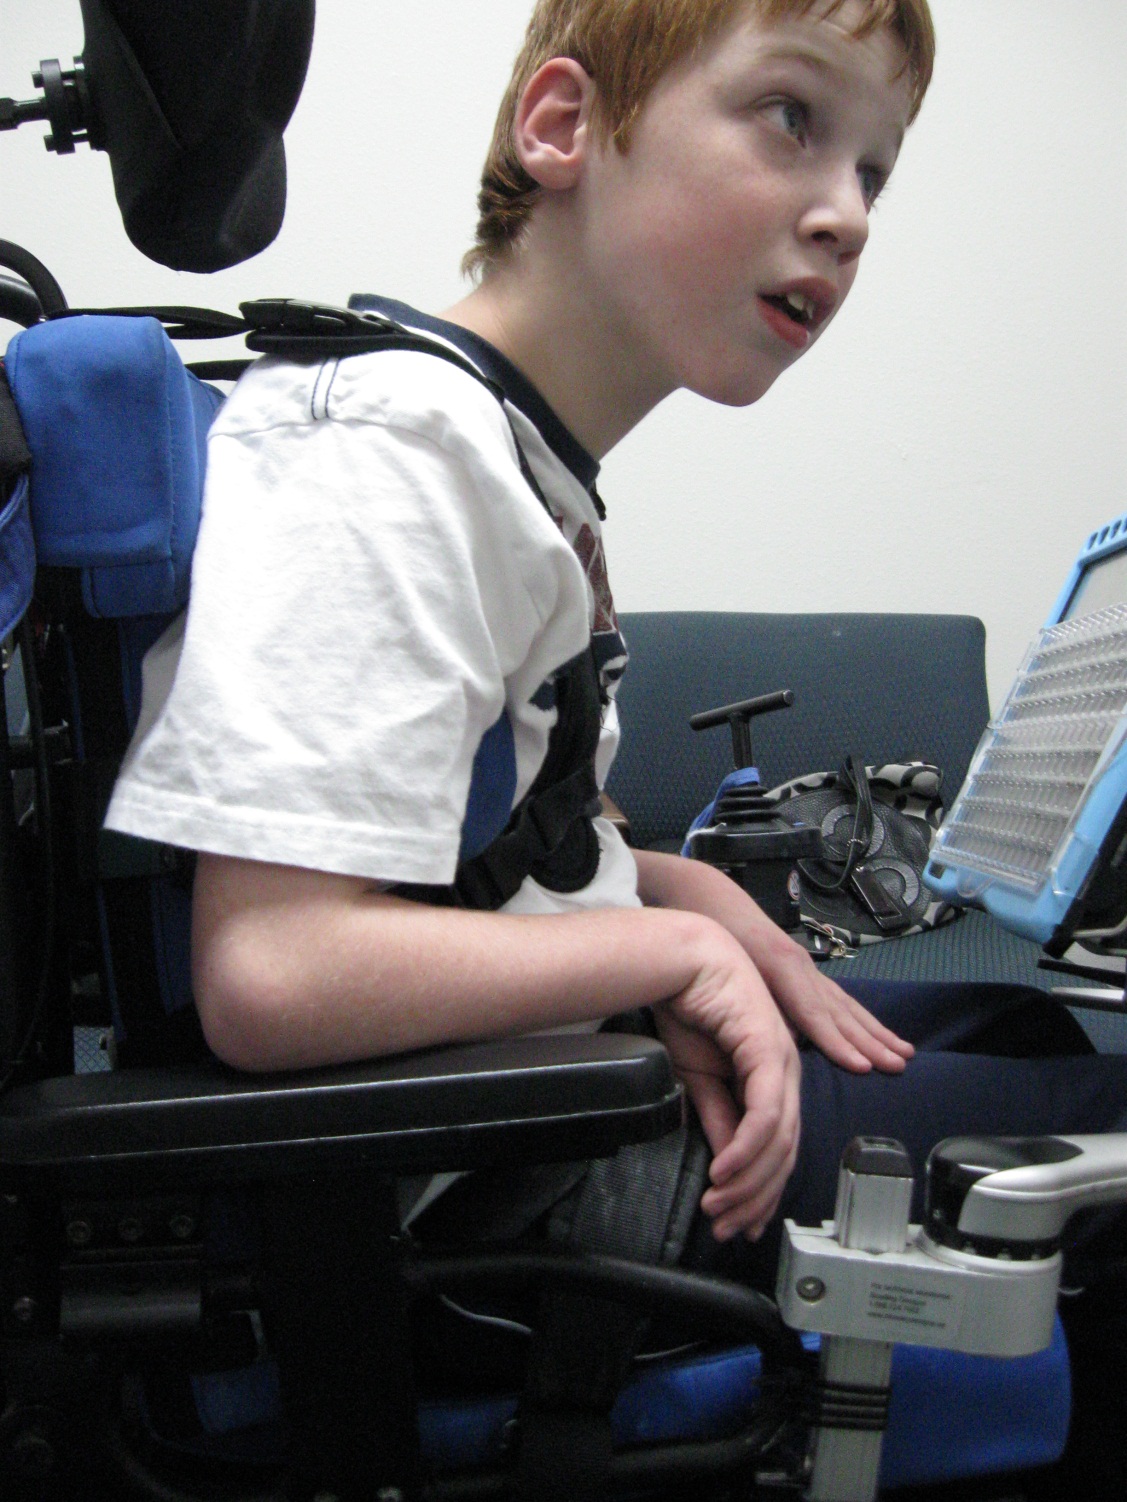
Figure 29. The client tends to lean into shoulder straps.
He tends to hang on his shoulder straps, and this is not what we want. We need to determine what needs to change. Is his head over his pelvis? No, as he is way forward. Even if we tighten these, we are not going to bring his head over his pelvis.
We need to find his point of balance. Even with people who do not have good head control, there is often a point where you can feel them starting to balance their head. This goes back to the mat assessment and determining the best seat to back angle. In Alex's case, we had to open up the seat to back angle, and then his shoulder straps were able to do their job. His head was also much more balanced.
Force/Counterforce: Posterior Trunk Support
- Correct posterior pelvic tilt
- Increase trunk extension with biangular back
Earlier, we talked more before about force and counterforce. Counterforce happens behind the client. If the client is in a sling-back upholstery and puts some type of chest support in front of them, it will probably not be too supportive. We need to provide firm support behind the client to combat this tendency towards kyphosis.
First, we need to correct any posterior pelvic tilt. I would again refer you to the course on positioning the pelvis. Then, we want to increase trunk extension. We can use a linear back like this one in Figure 30.
Figure 30. True Forming Back from Stealth Products.
We can also use an off the shelf back like the Jay Sure Fit (Figure 31).
Figure 31. Bi-angular Jay Sure Fit back.
It has this same shape. The lower portion goes to about the top of the pelvis. Then the upper portion extends just slightly beyond, usually about seven degrees, to tuck that pelvis in, keep it in a neutral tilt, and then allow some extension above that.
Fixed Forward Trunk Flexion
- Interventions:
- If fixed:
- *Open seat to back angle to match pelvis angle
- Contoured back to accommodate trunk
- Tilt seating system to allow upright head
- If fixed:
Our strategies are different if someone has a fixed kyphosis. A graphic of this is shown in Figure 32.

Figure 32. Graphic showing kyphosis and an opened back angle.
In the picture on the left, the head is way forward of the pelvis, and their gaze is downward. This person is looking at the floor or maybe their lap depending on how bad the kyphosis is. We could see this at any age, but this is super common in a long-term care setting. This is often a result of long time osteoporosis or osteoarthritis changes in the spine. In this case, we can either open the back enough that the head is either above or just behind the pelvis to accommodate this fixed kyphosis (as noted in the image on the right side). With the opened up back, the person is now looking forward. Obviously, this is very important. We could recommend a contoured back to accommodate this curvature. Finally, we could tilt the entire system to result in an upright head.
Fixed Kyphosis
- Tilt to balance head over pelvis
Figure 33 shows a gentleman that looks at his lap all the time.
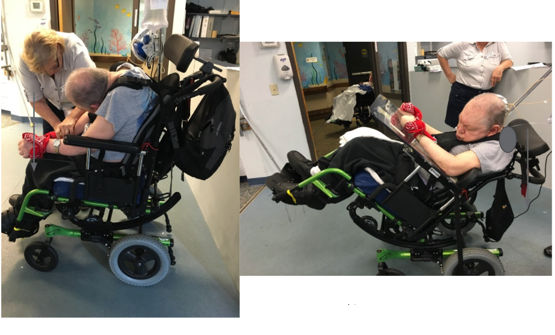
Figure 33. Using a tilt on a wheelchair to increase a client's head position.
You can imagine if you tried to lift his head, there would be a huge amount of neck hyperextension. This is a very unsafe position to swallow and could lead to aspiration. In the second picture, you can see that his head is behind his pelvis. Tilt, in combination with a slightly open seat to back angle, increased his position. Now, he can actually see people.
Forward Trunk Flexion: Goals
- Prevent spinal changes and subsequent pelvic changes
- Neutral alignment of trunk over pelvis
- If flexible, anatomical alignment
- Increase head control
- Trunk extension
- Pressure distribution
- Maintain good visual field
What are our goals of addressing forward trunk flexion? We want to prevent further changes to the spine and the pelvis by addressing this as soon as possible. With people who are still fairly symmetrical but have this tendency, we want to prevent these problems. It is on us to see these earlier tendencies for younger clients and jump in there before we get to this point. We want neutral alignment of the trunk over the pelvis if it is flexible. If it is fixed, then we need to accommodate that. We want to increase head control and promote trunk extension. We want pressure distribution, especially in those non-reducible curves where we may not have a lot of contact with the back. Finally, we want to maintain a good visual field as we sure do not want people looking at their laps.
Trunk: Lordosis
Definition
- Hyperextension of the lumbar area
- Often combined with anterior pelvic tilt
Lordosis is a hyperextension of the lumbar area, and my friend Anderson is showing his lordosis here. It is often combined with an anterior tilt of the pelvis.
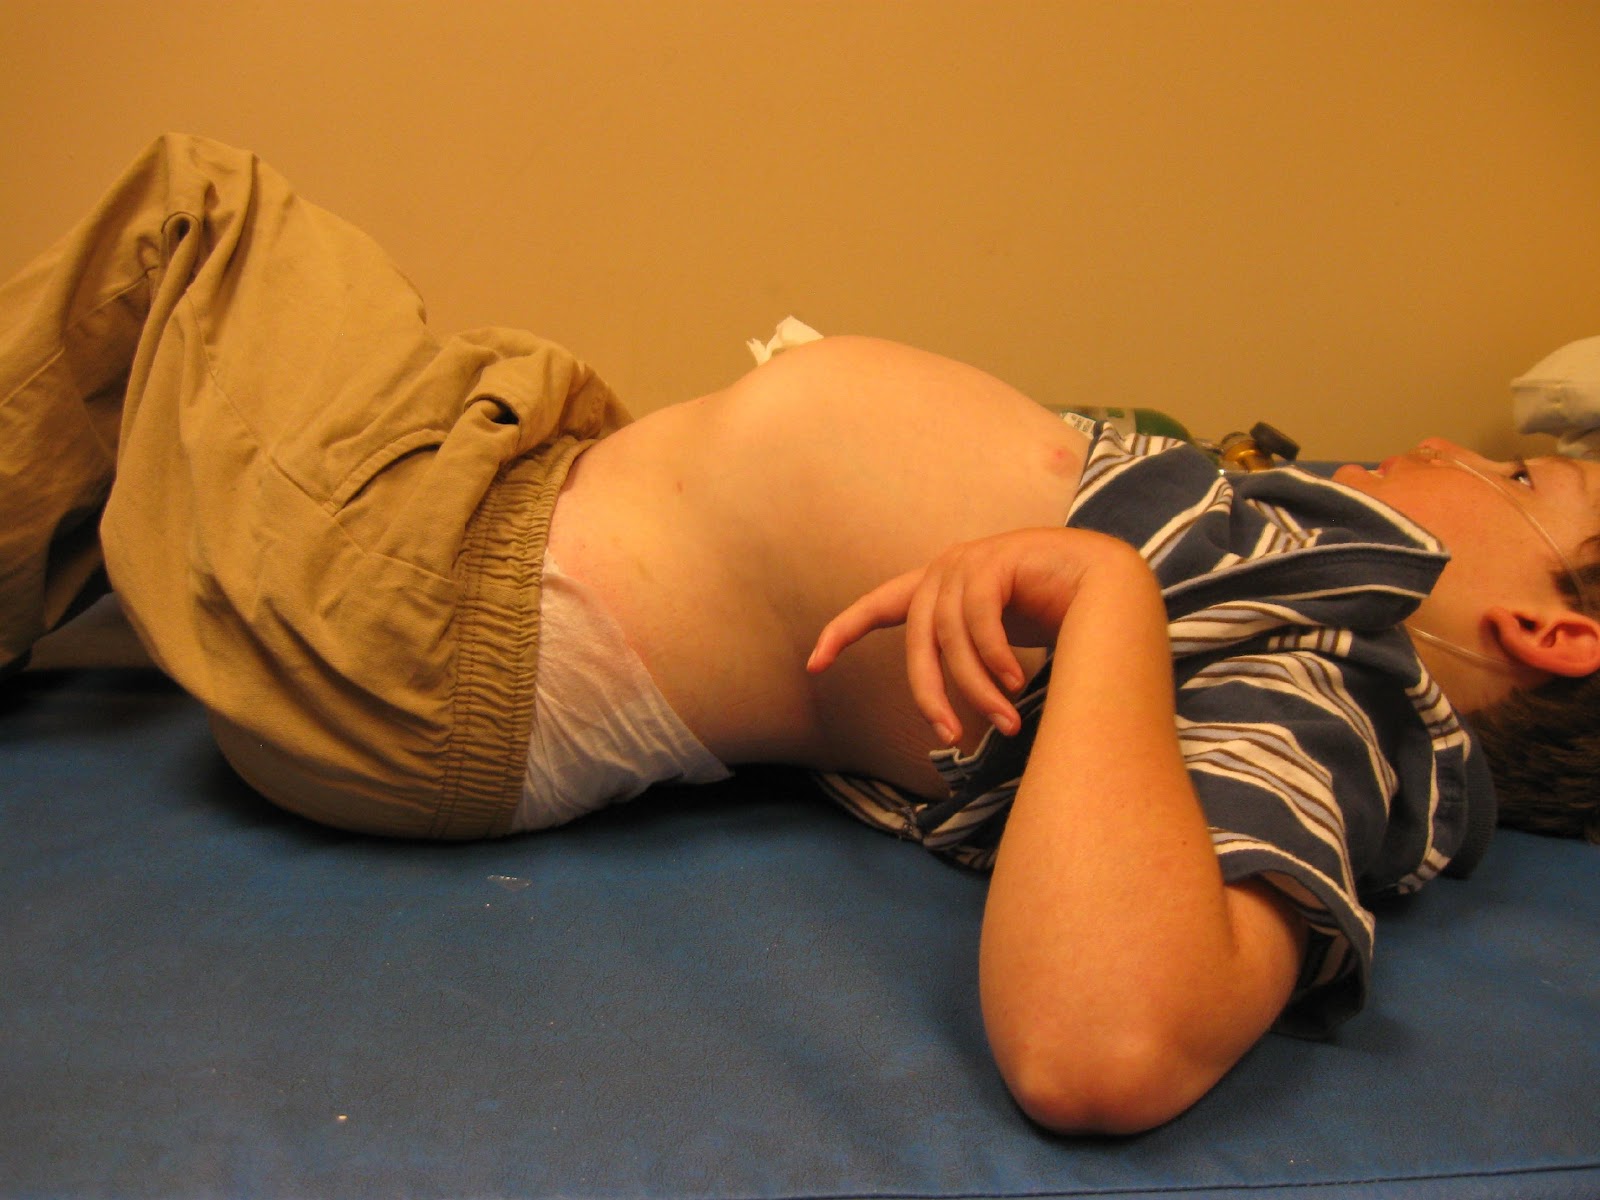
Figure 34. Increased lumbar lordosis in a client.
Possible Causes
- Tight hip flexors or over correction of tight hip flexors
- Increased tone pulling the pelvis forward into an anterior tilt
- Habitual posturing in an attempt to lean forward for functional activities
- “Fixing” pattern to extend trunk against gravity (e.g., in conjunction with shoulder retraction)
What causes lordosis? We talked earlier about those hip flexors and what happens when they are tight. If the hip flexors are tight, that can pull the pelvis into an anterior tilt. If you do not respect the hip flexors' limits and try to open a seat to back angle up more than the client has the range for, you can pull the pelvis into an anterior tilt. It could also be that there is an increased tone that is actively pulling the pelvis forward into an anterior tilt. As a result, the lumbar spine then gets pulled into lordosis. Some clients assume this posture out of habit because they are trying to lean forward for functional activities. Other clients tend to assume this pattern to extend the trunk. They may kick off some extension in their trunk by throwing their hands up, increasing the lordosis. Again, we need to provide adequate support so that the client does not feel obligated to do that.
Interventions: Flexible
Our strategies are different, whether this is flexible or fixed.
If flexible:
- Provide lower back support as needed
- Biangular back
- May need to change the seat to back angle
- Do not overcorrect limited hip flexion
- Pulls the pelvis into anterior tilt
May require anterior trunk support
If it is flexible, we need to look at force and counterforce. We need to provide lower back support as needed. We can use a bi-angular back, as shown in Figure 35.

Figure 35. A custom bi-angular back by Therafin.
We have an angle that provides support to the lordotic area. This is a tricky dance because we do not want to over-correct and push someone into more lordosis. However, if there is a huge gap between the back of the spine and the back of the seating system, many clients tend to pull away from that. We may need to fill gently in that space to give the muscles permission to relax against the back and not assume much lordosis. We may need to play around with the seat to back angle of the entire system to diminish this lordosis. It is essential not to overcorrect limited hip flexion because we will just pull that back in more lordosis. We may need to look at anterior trunk support, as shown in Figure 36, along with what we have already considered.
Figure 36. Anterior trunk support from Stealth Products.
We also talked about this belly binder (Figure 37). This can be very helpful in reducing lordosis. We are capturing the lower rib cage to the top of the pelvis and pulling all of that in.
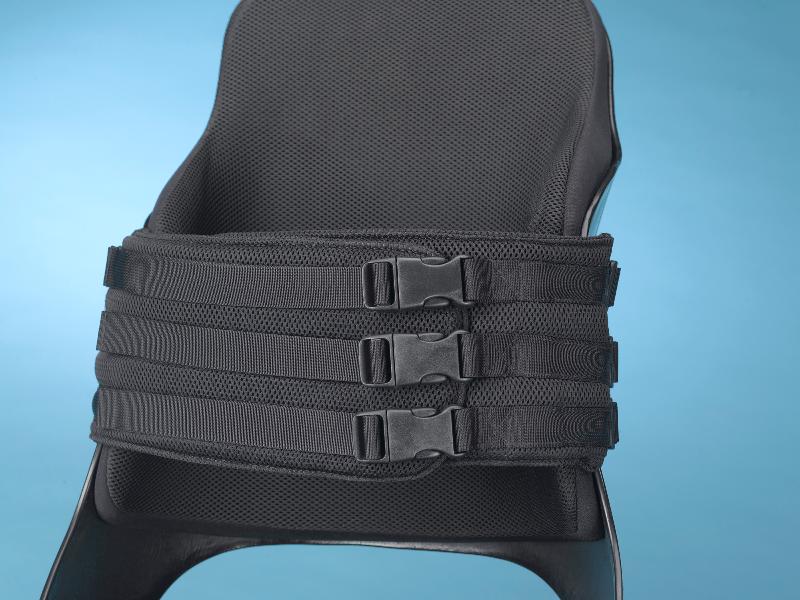
Figure 37. Belly binder from Aspen Seating.
Interventions: Fixed
- If fixed:
- Molded seating system to accommodate asymmetry and distribute pressure
If you are working with a client with a fixed lordosis, you will need to look at some type of molded seating, as shown in Figure 38.

Figure 38. Aspen Seating mold.
Fortunately, the final product does not look like this. This is the prototype that we use to capture their shape. We then scan the form and create the seat based on that. Molded seating can accommodate the unique body contours of an individual to distribute pressure. By distributing pressure and providing intimate contact, we hope to keep a very severe lordosis from increasing and provide good pressure distribution and comfort for the client.
- Goals:
- Neutral alignment of the trunk over the pelvis
- Pressure distribution
- Reduce subsequent shoulder retraction and fixing to allow function
- Reduce subsequent anterior pelvic tilt
Our goals are a neutral alignment of the trunk over the pelvis and good pressure distribution. We do not want the client to be touching the seating with the lower portion of their pelvis and their scapula. We need to have a good contact on the back. We want to reduce subsequent shoulder retraction and "fixing" that sometimes we see in clients trying to hang on to stay upright. We need to provide that support, so that does not happen. Lastly, we need to reduce any anterior pelvic tilt.
Trunk Rotation
Definition
- Often seen in combination with lateral flexion
- Often seen in combination with pelvic rotation
- Possible Causes:
- Pelvic rotation
- Lateral trunk flexion causes
My friend Lynette is showing us a lot of rotation in Figure 39.
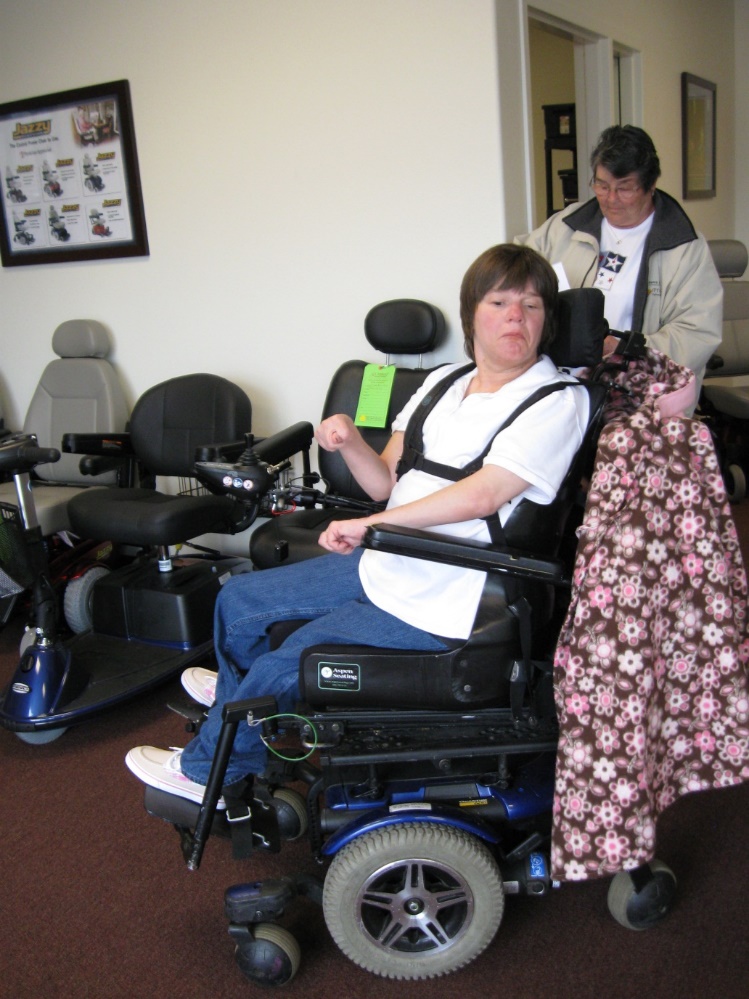
Figure 39. A client with increased trunk rotation.
Even though we are looking from the side, you can see both her shoulders just fine. She is absolutely turned to the side rather than facing forward. She also has pelvic rotation. Trunk rotation can be seen with other spinal issues. It also can be seen in combination with pelvic rotation.
Interventions: Flexible
- If flexible:
- Use anterior supports on forward side, if rotation is primarily from upper trunk
- Y-strap, if entire trunk is involved
If this is caused by pelvic rotation, first, we need to minimize that. Again, I would refer you to the Positioning the Pelvis course and particularly look at the pelvic rotation section. If we have corrected the pelvis's position and the trunk rotation is flexible, then we can use anterior trunk supports on the forward side. As I mentioned, people do not like asymmetry. You can use bilateral strapping options. However, if that is not enough and there is still rotation, the Y strap in Figure 40 may be the best option.
Figure 40. Y straps by Stealth Products.
We do not just want to pull back the shoulder, but we want to also de-rotate the trunk itself.
Intervention: Fixed
- If fixed:
- If the trunk is fixed in rotation, the primary goal is to allow the client to face forward
- This may require placing pelvis asymmetrically in seating system
- A molded back may be required to distribute pressure behind pelvis and trunk
If the trunk is fixed in rotation, there is no way to minimize this. Then, the primary goal changes. It is a more functional goal, and we want to make sure the client is facing forward. As we saw in that first picture with my friend Lynette, some people are so rotated that they are looking to the side all the time. To have a forward line of sight sometimes means that we place the pelvis asymmetrically in the seating system itself. In that case, a molded back may be required to distribute pressure between the pelvis and the trunk. Figure 41 shows Austin where his trunk is actually skewed towards the left.
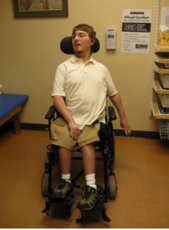
Figure 41. The trunk is skewed left due to asymmetrical posture.
He usually looks towards the left. He happens to be turning towards the right a bit here. We had to position his pelvis within a molded seat within his mobility base so that it was rotated to the side to allow him to face forward. We could not fully correct the pelvis or the rotation in his spine. Again, our goal changed from getting him symmetrical as possible to helping him to face forward. We needed to accommodate that position well and distribute the pressure.
Goals
- If flexible:
- Neutral alignment of the trunk over the pelvis
- Correct pelvic rotation
- If fixed:
- Pressure distribution
- Forward-facing posture
If flexible, our trunk rotation goals are again neutral alignment of the trunk over the pelvis and a correct pelvic rotation. If it is fixed, we want a forward-facing position with good pressure distribution behind the client. This may or may not require molded seating to fill in that space as we do not want the client only touching the back with one scapula. We want better contact than that.
Lateral Trunk Flexion
Definition
- Scoliosis may be C curve, S curve, and/or rotational
- Scoliosis may be flexible, partially flexible, or fixed
Lateral trunk flexion is our next area. Scoliosis may be a C curve, like we see here in Anderson in Figure 42, an S curve, or a rotational curve.
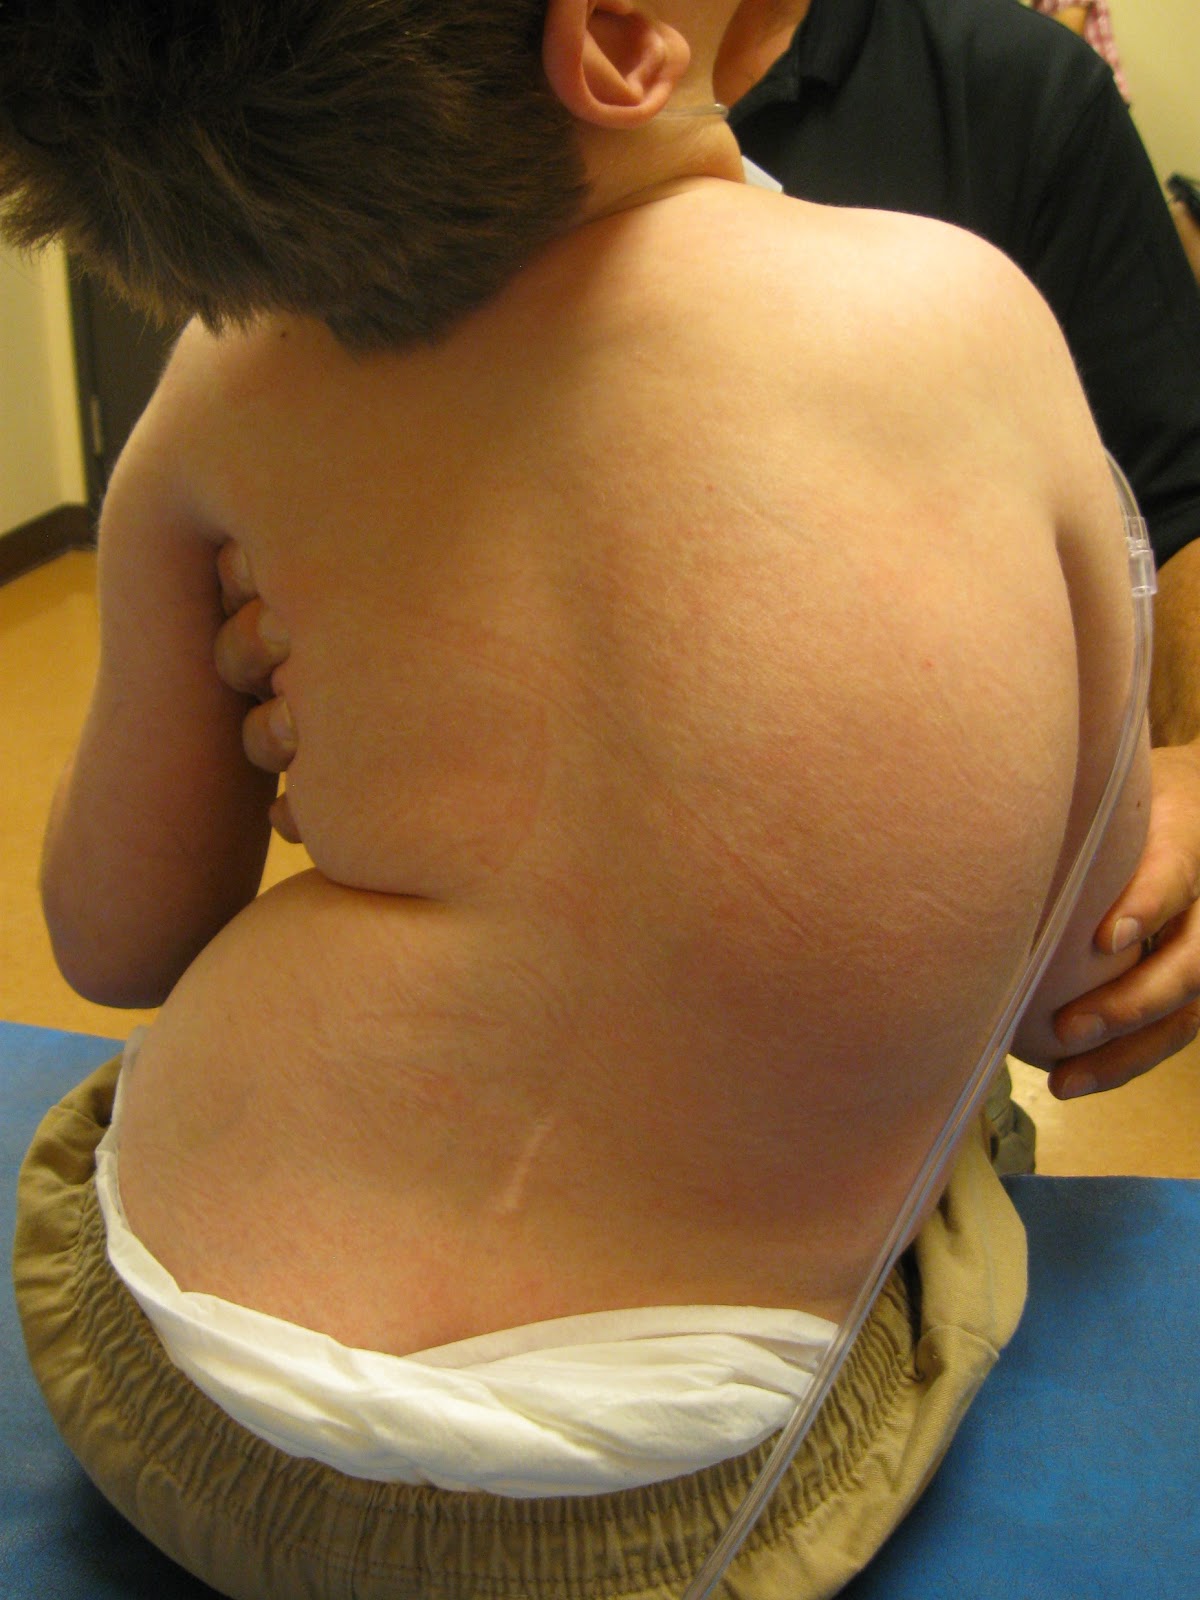
Figure 42. Lateral flexion with a C curve.
This can be flexible, partially flexible, or fixed. Curvature can start as a C curve, and then as we try to right our head, the C turns into an S.