Introduction
Welcome to Part 2 of the course, Examination and Assessment for the Upper Extremity. In Part 1, we reviewed subjective components and the screening assessments for the upper extremity. Today, we are going to talk a little bit more about some specific measurements, and then summarize all of the information.
Review of Course 1: Purpose
- Establish baselines
- Determine components to be addressed in treatment/establish a treatment plan
- Determine limitations
- Establish treatment goals
- Determine treatment results and outcomes
- Efficacy of treatment
As a quick review of the first part of this course, we talked about the purpose of an examination for the upper extremity patient. This is to establish a baseline for where you are starting with your treatment. You are going to determine the components that you want to address during treatment. You need to also determine the limitations there are for that individual. You need to be able to establish the treatment goals based on your evaluation. Finally, you need to be able to determine treatment results and outcomes and the efficacy of your treatment. You want to make sure that you are making a difference.
Examination Method Recommendations
- Accurate
- Standardized
- Reliable
- Reproducible
- Valid
- Meaningful to your outcome
Examination methods that we use need to be accurate, standardized, and reliable. They also need to be reproducible. They need to be not only reproducible from one test to the other but also from one therapist to another. In most of our busy clinics, it is not always the same therapist who gets to see and evaluate a patient. We want to make sure that we are using reproducible methods during our assessment and that they are valid. And most importantly, our examination needs to be meaningful to our outcome and goals. Today, we are going to talk about objective measurements. The two objective measurements that we addressed in the last course were edema and wound assessment, and now we are going to proceed with range of motion.
Objective Measurements- ROM
I try to follow the ASHT recommendations for range of motion assessments. I know that if I do that I am being consistent with other therapists.
- ASHT recommendations for ROM:
- “0” is neutral.
- “+” is hyperextension
- “-” is an extension deficit
- Measurements should be written as extension/flexion (e.g. -10/85).
- Volar/dorsal for fingers and wrist
- Hamilton and Lachenbruch ‘equal reliability between lateral and dorsal goniometer placement’
Neutral range of motion of the upper extremity when neutral is 0. If you have hyperextension at any joint, you should use a plus before that number. And, if you have an extension deficit that cannot get to zero, then you should use a minus before that number. You should write your measurements as extension over flexion. You should also measure volar or dorsal for fingers and wrist. There are exceptions to this. Some examples would be a very edematous joint or wounds. In the case of the wound, you can measure it laterally.
There was an older study in the Journal of Physical Therapy by Hamilton and Lachenbruch (1969) that showed that there was equal reliability between lateral and dorsal measurements if measured separately. For example, if you measure laterally or dorsally consistently, the measurements will be reliable. If you are going to make an exception and do a lateral measurement, then you should indicate that on your note. This is so that if another therapist is reassessing that same client, they will measure the same location.
There are a couple of different ways we can look at range of motion. In therapy, we focus a lot on the motion of a joint being directly related to function. There are multiple studies out there that describe how much motion is required in the wrist to be able to complete all of your daily activities. I encourage you to go out and find some of those articles for what the required motion for ADLs, and then what is normal motion.
Active Range of Motion (AROM)
- A muscle’s ability to move a joint
- Variations from person to person in what is considered “normal”
- Younger, not accurate: don’t hold the maximal
- Pay attention to the “arc of motion”
The first thing I typically look at is active range of motion. Active range of motion is the muscle's ability to move a joint. There are several things that can affect a person's active range of motion, and there are variations from person to person and what is considered normal. Over the years, I have shied away from using textbook normals for range of motion. I use more of what is required for function because very few people have a normal range of motion. Some may have hyperextensibility at the joints. While they may have limited motion, they are getting everything done. Another thing that is very important to point out is that I work with a younger population, about 8 years and younger. I cannot rely on active range of motion measurements as my guide normally. If you ask a young child to move their joint as far as they can, they may move it all of the way, or they may not. They may move it and then not hold it. It is very challenging to get an accurate active range of motion on younger individuals. You need to pay attention to the arc of motion in these cases. So, if they are lacking full extension but they have full flexion, that is what their arc of motion is. We will talk more about that in a minute. Arc of motion is something that is very important to understand, especially if there are different interventions like an orthosis to stretch a joint or a surgical intervention that they need.
AROM Limitations
- Adhesions
- Denervation
- Weakness
- Edema
- Subluxation, dislocation, or bowstringing of tendons
- Lack of tendon continuity or tendon attenuation
- Joint restrictions (articular or capsule)
Active range of motion limitations can be due to a multitude of things. I have put down some of the more common ones, but there are a couple of other ones that are important to understand as well. Limitations can be due to adhesions or the denervation of the muscles as it creates weakness. Edema can affect the amount of motion that a joint has because it takes up space in the joint. A joint can be subluxed, dislocated, or there could be bowstringing of tendons that affect active motion. There can also be a lack of tendon continuity or tendon attenuation, and that may be discovered when you are trying to determine active range of motion. There can also be joint restrictions.
Another thing that can restrict how much your patient will move for you is a fear of moving. If you have an acute post-operative patient or somebody who has just been taken out of a cast, their active range of motion can be significantly limited because they have not moved in weeks and they are now fearful. Pain is also something that can restrict active range of motion. Sometimes, they have pain when they move, while other times it is the fear of pain. They may be fearful of the pain that they had prior to being immobilized. Frequently, when I see patients, I am the one to take off their post-operative dressings or I see them the day their cast comes off. I do not measure active motion on that date because I know I am not going to get anywhere near an accurate measurement. Rather, I might describe what their functional motion is that day. Now, I want to go over some of the specific joints.
Thumb AROM- Composite Flexion
- The thumb has a highly mobile CMC joint with the saddle-shaped trapezium as its base
- Composite flexion: to base of the small finger
- This occurs in the frontal plane, parallel to the plane of the palm.
Thumb range of motion is pretty unique in that it has a highly mobile CMC joint with the saddle-shaped trapezium at its base. This allows a lot of motion at that digit. This movement is why we can do so much with our thumb and why it is so crucial for function. The first thing you can look for with thumb movement is composite flexion (Figure 1). This is flexion to the base of the small hand.
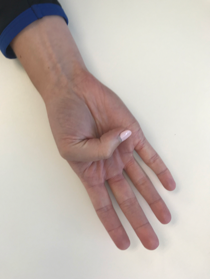
Figure 1. Example of thumb active movement.
This is different when I talk about opposition, and I will explain what the difference is shortly. If you are doing true composite flexion, the thumb goes across the frontal plane, parallel to the plane of the palm and touches the base of the small finger.
Thumb AROM- Radial Abduction
- Frontal plane: Parallel to the palm of the hand
Radial abduction is movement with the palm flat. It is parallel to the palm of the hand, and it is bringing the thumb out wide (Figure 2).
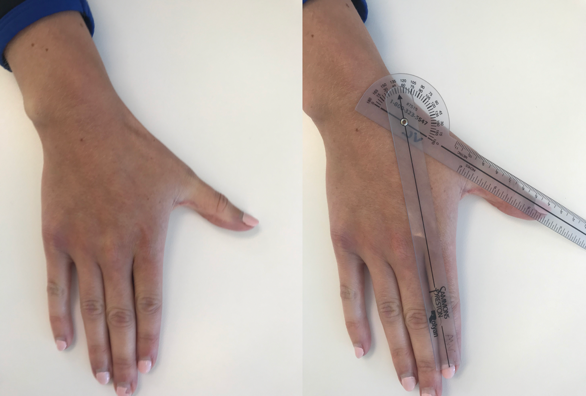
Figure 2. Example of radial abduction.
For this measurement, I like to look at one side as compared to the other. This movement is very important for grasping larger or cylindrical items. If you have a tight first webspace, you can be very limited in your ability to grasp larger items.
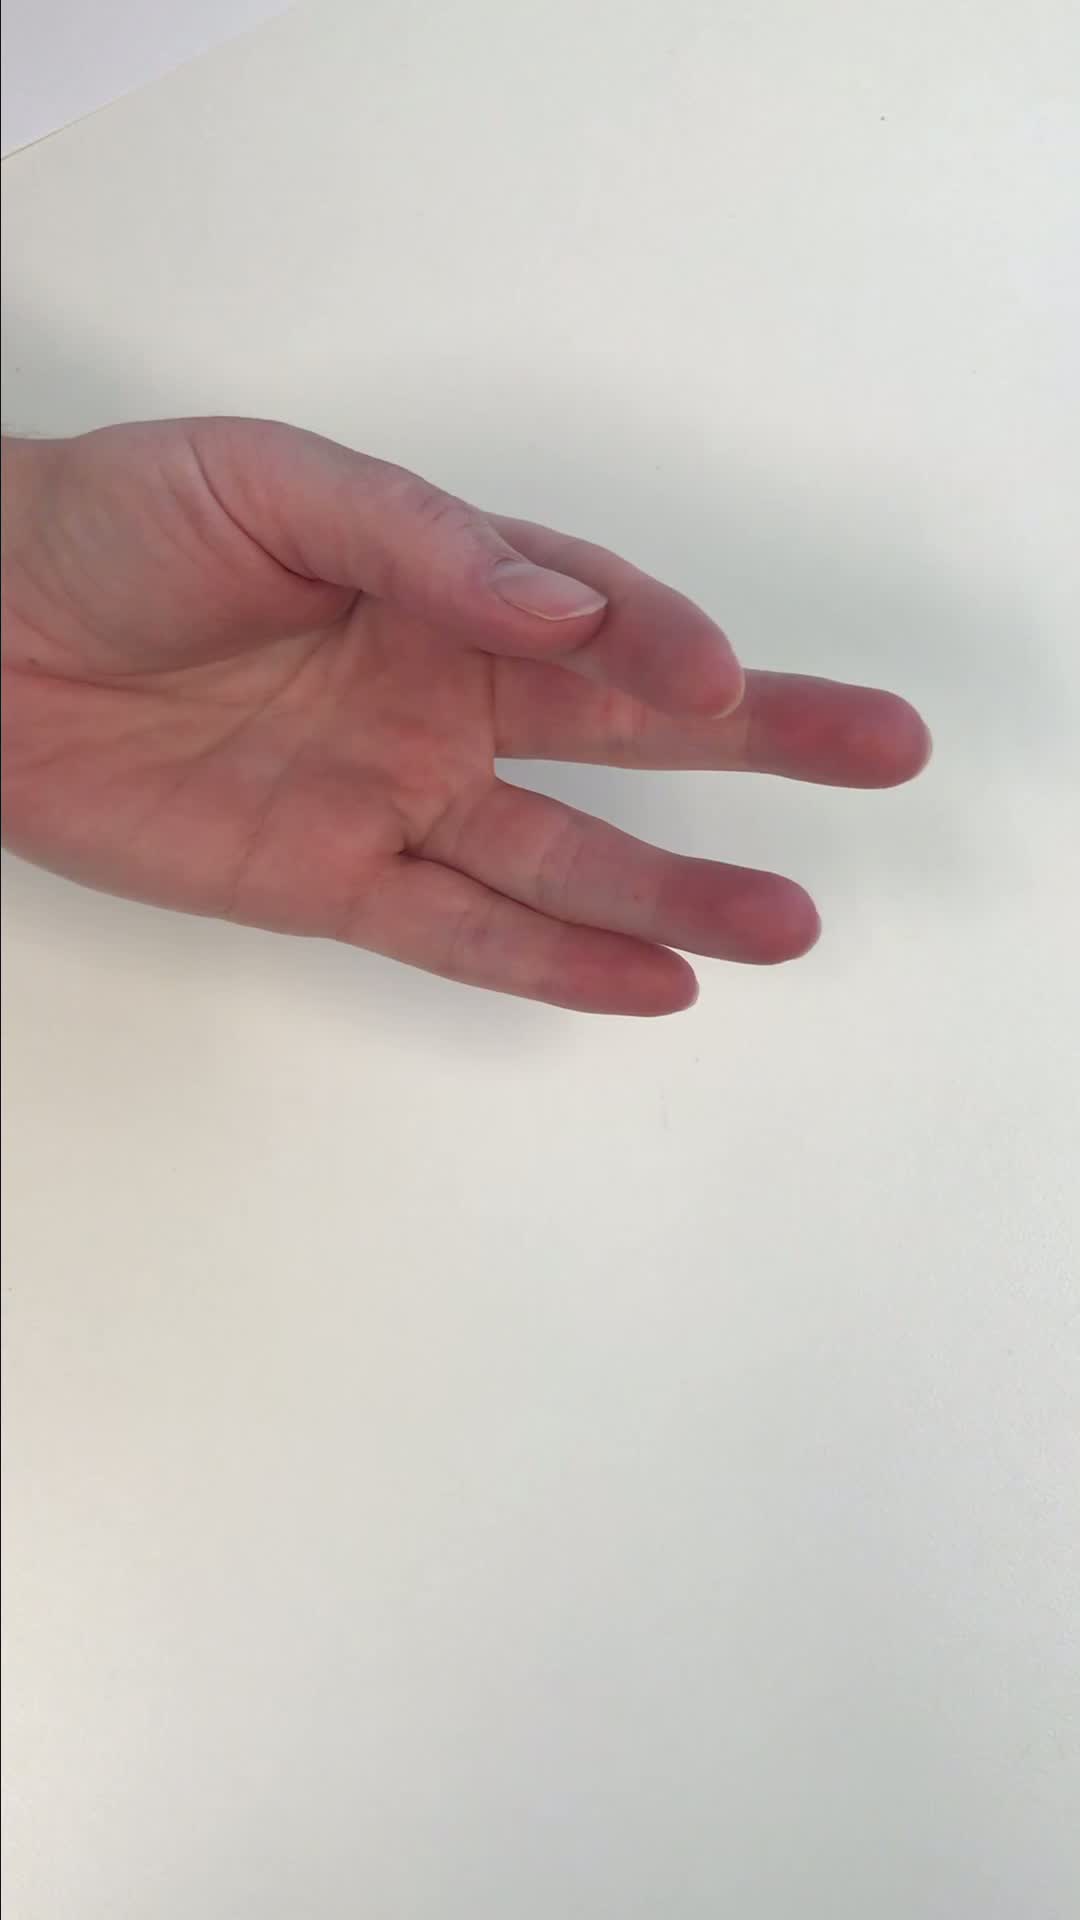
Thumb AROM- Palmar Abduction
- Sagittal plane: perpendicular to the palm
- Adduction returns the thumb to the palm.
In contrast, palmar abduction is in the sagittal plane, and it is perpendicular to the palm. An easy way to measure this is to have your client rest the ulnar side of their hand on a surface and move their thumb away from their palm (Figure 3).
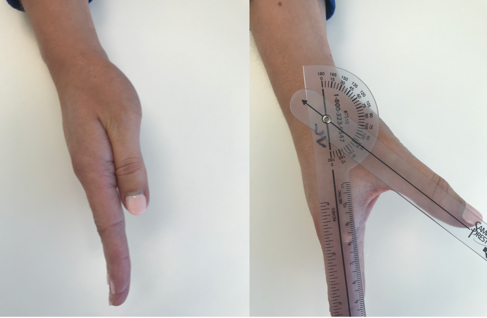
Figure 3. Example of palmar abduction.
With children, I ask them to make a "puppet hand." "We're going to make a puppet mouth." They understand what this means. Palmar or radial adduction bring the thumb back to the hand.
Thumb AROM- Opposition
- Opposition: composite abduction, rotation, and flexion
Opposition is a combined motion of composite abduction, rotation, and composite flexion (Figure 4).
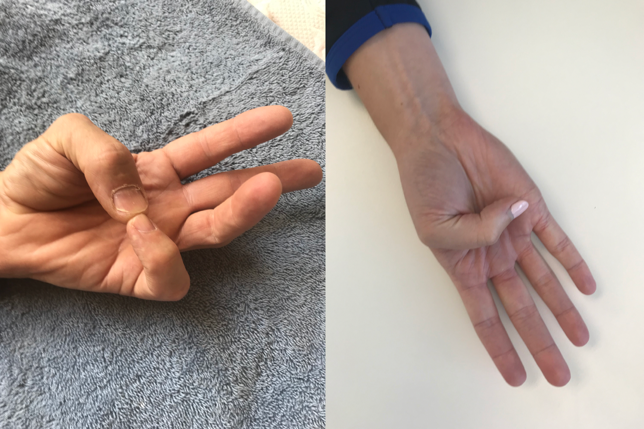
Figure 4. Example of opposition.
The difference between composite flexion and opposition is that you need to rotate that first metacarpal away from the palm (composite abduction) and bring it across the palm to then touch the 5th digit.
- Opposition measurement
- To the base of the small finger
- Ability to oppose each fingertip
- Kapandji opposition test
A tool that I use a lot is the Kapandji Opposition Test. This helps to define opposition. There are 10 landmarks on the hand (Figure 5). Clients have to go through and touch each landmark with their thumb prior to going to the next one.
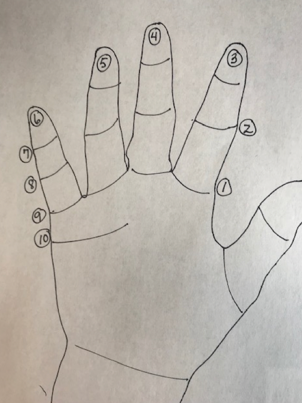
Figure 5. Opposition landmarks.
Thus, if they cannot complete number four, you do not go on to number five. You come up with an objective number for how much opposition that thumb has with combined motion.
Video 1- AROM
This is a demonstration of the Kapandji Opposition Test.
I usually demonstrate the test first for the individual, and then I ask them to go through the test and touch the different positions. This is how this is different from the composite flexion. I think opposition is a really important movement to assess in the thumb. There can be limitations from thumb injuries, arthritis, et cetera. I want to look at their ability to oppose their thumb because this movement is key to a lot of dexterity and in-hand manipulation tasks.
Landmarks with Assessment
"Landmarks with assessment" is one of the more functional methods of determining motion. If you want to look at composite finger flexion, you can define whether their fingertips touch the palm. Do they all touch the palm? And at this point, it does not matter where on the palm they touch.
- Fingertip to palm
- Measure in cm.
Fingertips to palm method is shown in Figure 6.
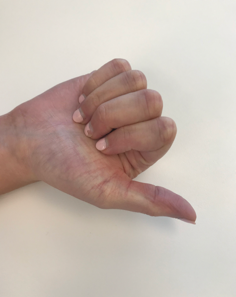
Figure 6. Example of fingertips to the palm.
Technically, if you have no restrictions in limitations, every fingertip should be able to touch the distal palmar crease with composite finger flexion, and that allows a full tight grasp. You measure this in centimeters. Most finger or wrist goniometers have a centimeter measuring ruler on them, or you can use a separate ruler.
- Fingertip to distal palmar crease (DPC)
You also want to measure from the base of the pulp of the fingers, not from the fingernail to the distal palmar crease (Figure 7).
Figure 7. Example of fingertips to the distal palmar crease.
You then measure the distance between them touching it or not touching it. These two measurements can be more meaningful when you are trying to quickly look at motion.
Total Active Movement (TAM)
- TAM = AROM of the MP, PIP, and DIP minus any extension deficits.
- Example:
- MP 0/90
- PIP -10/85
- DIP -5/55
- TAM = (90 + 85 + 55) – (10 + 5) = 215
- not accurate if the patient has hyper extensible joints.
- Example:
- Total passive motion (TPM) – same formula
Sometimes, you can look at total active motion of the finger if you want an objective number. Total active motion is great if you are going to graph some of these measurements or if you want to use them for research. It is a great number to use for that. However, it is not as functional of a measurement as it incorporates extensor lag. And, when a client does not have full motion, it is important to know that extension lag number.
For total active motion, you measure all three of the joints of the finger and add those numbers. Then, if there are any extensor lags, you add those two, and you subtract that from the total of deflection. You come up with a total number. However, if there is hyperextension, this is not an accurate number anymore. So, for any individuals with hyperextension or extensor lag, I would encourage you to use the actual joint measurements. Total passive motion is the same formula.
Tendon Integrity Through ROM
Once I have looked at a client's active range of motion, I might want to look at tendon glide or a more natural type of motion of the tendons if I am worried there is an attenuation problem or a gliding problem. I look at tendon integrity by viewing this tenodesis motion (Figure 8).
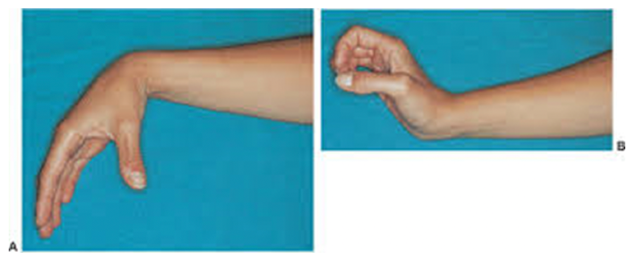
Figure 8. Tenodesis action.
You need to look for their fingers going into a relaxed flexed position with wrist extension and going into full extension with wrist flexion. If they have trouble relaxing and completing active wrist extension and flexion, I will manually move their wrists into extension and flexion as far as I can. If they are able to do this successfully (either actively or manually), I know that their tendon is gliding, and that is not the problem with their lack of motion if I have already determined that.
Once you have looked at the client's active range of motion, then I might assess their passive range of motion.
Passive Range of Motion (PROM)
- The ability of a joint to be moved through its normal arc of motion by means outside the body.
- Assesses the capacity of a joint, may be affected by:
- soft tissues
- joint incongruence
- scapular structures surrounding the joint.