Editor's note: This text-based course is a transcript of the webinar, 12 Ways to Progress Any PT or OT Exercise, Activity, or Movement, Part 2, presented by Andrea Salzman, MS, PT.
Learning Outcomes
- After this course, participants will be able to accurately identify six methods to progress any therapeutic activity as described in the webinar.
- After this course, participants will be able to compare and contrast two methods for incorporating a regional approach into patient care.
- After this course, participants will be able to compare and contrast methods for introducing developmental sequencing, altering the physical environment, and changing the velocity for task difficulty.
Introduction
Hello everyone. For those of you who were here last time, we discussed six ideas to progress therapeutic activities. Today, we will review those briefly and then discuss the next six.
A Lesson From the Past
- Marion had suffered through a stroke and was now receiving PT as a home health patient.
- But no matter what time of day I arrived on her doorstep, she would be in her nightgown, in bed. 10 a.m.? In bed. 2:00 p.m.? In bed.
- I finally pulled her husband aside to discuss my concerns over Marian’s mood, trying to feel my way towards whether she was falling into depression. He laughed and laughed and quickly filled me in.
- Every day, immediately after I called to warn her that I was on my way, Marion would hurdle the cat, climb the 8 stairs to her room, pull on her gown, and lie in bed. She was ‘playing possum,’ hoping this predator would go away.
- I was impressed she was participating in that much exercise to avoid doing any exercise, and quickly decided that I was up for the challenge! How could I bring therapy to Marion?
In my tenure at 10K Health, a home health agency my husband and I owned in the era before cell phones became ubiquitous, I encountered a memorable patient named Marion. She had suffered a stroke and required physical therapy, but there was a peculiar pattern I observed during my visits. No matter the time of day, Marion was consistently nestled in her bed, adorned in pajamas, which sparked my concern, hinting at the possibility of post-stroke depression.
Taking the initiative to address this with Marion's husband, I anticipated a serious conversation. To my surprise, his reaction was anything but solemn—he burst into laughter. It turned out that Marion was orchestrating an elaborate charade. Upon receiving my notification of arrival, she would swiftly ascend the stairs, slip into her nightgown, and lay in bed, feigning illness in an attempt to expedite my departure. It was a preemptive physical therapy, a clever ploy to sidestep the actual exercises.
Rather than being deterred, I found myself intrigued by Marion's tactics. This prompted me to transform the situation into a game. I devised a treatment plan centered around her bedroom, utilizing the bed as our makeshift exercise equipment. With no need for traditional weights or stair climbers, the bed became the focal point of our sessions. This experience underscored the joy I derive from therapy – the constant need to brainstorm inventive ideas, employ critical thinking, integrate elements from various disciplines, and tailor my approach to meet the distinct needs of each patient.
Today, let's collectively strive to conceive innovative ideas, infuse them with an element of enjoyment, stimulate our cognitive faculties, and address the specific needs of our patients. Here's to a form of therapy that transcends the mundane, injecting a touch of creativity into the healing process.
Fell's Methods of Progression
- A 2004 article in the Journal of Neurologic Physical Therapy changed how I did therapy.
- Fell introduced 13 methods to complicate or simplify exercises, tasks, or activities.
- These methods have stood the test of time and continue to be relevant.
- They provide PTs/OTs with a structured approach for exercise progression.
- They offer therapists a clear decision-making pathway for enhancing outcomes.
(Fell, 2004)
In part 1 of this series, I shared insights from a pivotal article that significantly influenced my approach to therapy. Although I came across it around 2008 or 2009, the article, published in the "Journal of Neurological Physical Therapy" in 2004, introduced 13 methods that revolutionized how I approached exercises, tasks, activities, and movements – the essential components of therapy.
The article has been a cornerstone in my professional journey, yet surprisingly, it hasn't garnered widespread recognition. I consider it a hidden gem that altered the trajectory of my therapy sessions. These methods, despite being two decades old, continue to stand the test of time. They provide a structured approach for both physical and occupational therapists, as well as other professionals, offering a clear decision-making path to progress exercises and enhance outcomes.
In my role as an educator at Aquatic Therapy University, I often emphasize the importance of evidence-based practices. However, I've observed a gap between literature and clinical application, especially when it comes to systematic reviews and meta-analyses. Many studies indicate that certain therapies are "as good as" others, but there's a lack of exploration beyond that statement.
To illustrate, I discussed a study comparing land and water exercises. While the researchers attempted to isolate the impact of water, they faced challenges in standardizing treatments week to week. This led to a rigid, non-therapeutic approach, focusing on repetitive exercises rather than individualized care.
The heart of my concern lies in the distinction between therapy and routine exercises. I argue that adhering strictly to predefined routines and progressions, such as the common practice of advancing reps and sets, doesn't align with the essence of therapy. Insurance companies even echo this sentiment, asserting that a natural progression easily devised by anyone does not meet the criteria for skilled therapy.
This seminar, along with its predecessor, aims to bridge this gap by offering documented methods for progressing exercises that go beyond the conventional reps and sets approach. I want to discuss these methods and explore how they can elevate the quality of our therapy sessions, fostering creativity and individualized care. Through this, I hope to spark a shift in how you approach your therapy sessions, making them more dynamic, engaging, and ultimately, more therapeutic.
Methods Discussed in Part 1
Method 1: Task Attention
- Progress an activity by reducing the ability to attend to a task.
- This technique is often called "dual-task processing" in therapy.
- Reducing a patient’s attention to a task can increase difficulty without changing the physical task.
- Older adults often have trouble with dual-task processing.
The first one is task attention, often associated with dual-task processing. This method revolves around introducing a cognitive layer to the existing physical task, effectively increasing the difficulty without altering the task itself. It's a subtle yet powerful way to progress exercises.
Imagine the starburst diagram, with various methods emanating from its center. Task attention stands out as a method that doesn't necessitate a change in the physical task. Instead, it involves adding a cognitive layer, diminishing the patient's ability to focus on the task at hand. This cognitive overlay, as I like to call it, serves as a valuable tool for progression.
In the literature, this concept is commonly referred to as dual-task processing. Older adults and individuals with neurological complications often struggle with this aspect. By incorporating a cognitive layer, therapists can effectively elevate the difficulty level of the exercise. It's a nuanced approach that highlights the interconnectedness of physical and cognitive elements in therapy.
For a comprehensive understanding of task attention and its application, I encourage you to revisit the details provided in part one of the webinars. The simplicity and versatility of this method make it an essential tool for therapists seeking to enhance the complexity of exercises without changing the core physical task.
Method 2: Feedback
- Gradually reduce the amount of feedback provided.
- Strong verbal encouragement is commonly used (think of your coach yelling at you as an athlete) as feedback, but there are many more options.
- Feedback can be verbal, gestural, visual, modeling, or physical.
- Reducing the amount of feedback is a simple way to progress.
Feedback involves manipulating the amount of feedback provided during exercises, whether by increasing or decreasing it. Reflecting on our experiences with demanding coaches in high school, we recognize the impact of feedback on performance. While it may not endear you to your coach, it does drive progress.
It's crucial to note that feedback extends beyond verbal communication. It encompasses gestures, visual cues, modeling for replication, and even physical touch to guide and provide input. The versatility of feedback as a tool in therapy lies in its ability to be tailored to individual preferences and learning styles.
Increasing feedback can offer additional guidance and support, especially for those who benefit from more explicit direction. On the other hand, decreasing feedback serves as a subtle way to elevate the difficulty level. This reduction challenges the patient to rely more on their intrinsic understanding and motor skills, fostering independence and self-correction.
Feedback, in its varied forms, proves to be a dynamic and adaptable method for therapists seeking to fine-tune the level of challenge in their sessions. Whether it's the encouraging shout of a coach or a subtle adjustment of hand placement, the strategic use of feedback contributes significantly to the progression of exercises.
Method 3: Assistance Given
- Change the Level of Assistance the Therapist Provides.
- There is a common tendency for therapists to provide excessive assistance. We do too many tasks for patients, hindering skill development.
- A gradual withdrawal of assistance will help exercise progression.
- Any assistance should enable patients to surpass current limitations.
- There is a right balance between facilitation and independence.
Moving on to the third method – assistance giving. While it may seem like a straightforward aspect of therapy, I emphasized it last week due to a common tendency among therapists to provide excessive assistance. Striking the right balance between ensuring safety and fostering autonomy is a delicate yet crucial aspect of this method.
The key lies in finding that sweet spot – providing enough assistance to guarantee safety and comprehension while gradually withdrawing support to encourage independence. This delicate dance between complete safety and autonomy is where therapists can make a significant impact on a patient's progress.
In therapy, the overarching goal is not merely maintaining the status quo but rather pushing individuals beyond their current limitations. I introduced the concept of Edgecraft, a term coined by Seth Godin, which involves pushing past natural boundaries to make a lasting impact. Applying this concept to therapy means identifying patients' natural limitations and tactfully pushing them just beyond those boundaries.
Failure, when managed within a controlled environment, can be a powerful catalyst for progress. While therapists never aim to be the cause of a patient's fall, introducing controlled situations where success and failure alternate can be a transformative approach. I expressed my fondness for unveiling failure in therapy sessions, emphasizing the profound impact of overcoming challenges.
Balancing facilitation and independence is an ongoing process, requiring therapists to gauge when to offer support and when to encourage self-reliance. This method underscores the intricate dance of assistance giving, where the ultimate aim is to guide individuals to surpass their own limitations and relish the triumphs that follow. For more detailed insights, I encourage you to revisit part one of the webinar.
Method 4: Supportive Device
- Reduce or eliminate dependence on walkers, canes, etc.
- There is a war between utter safety and skill. Supportive devices are simultaneously good and evil. They alter the patient’s natural balance and ambulation skills.
- Therapists must balance independence with safety in device withdrawal.
- Moving from a walker to a quad cane to a single-point cane requires motor learning. and practicing with the affected system.
Supportive devices, particularly walkers, sparked a passionate discussion in the previous webinar. I may have humorously referred to them as both good and evil, perhaps even dubbing them the devil. The essence of this discussion revolves around the trade-off individuals make when opting for a short-term sense of safety with a walker, potentially compromising long-term balance.
Using or removing supportive devices serves as a powerful method for therapists to adjust the difficulty level of exercises. It's a delicate balance, understanding when to introduce or eliminate these devices to enhance the therapeutic experience. Walkers, for instance, can provide immediate stability but might contribute to long-term issues with balance.
Whether you're navigating the complexities of walkers or exploring other supportive devices, remember that their inclusion or exclusion significantly influences the difficulty and effectiveness of therapeutic exercises. It's a nuanced aspect of therapy that requires careful evaluation and consideration for the individual's long-term well-being.
Method 5: Components of Movement
- Break Activities into Natural Components of Movement.
- The transfer process can be divided into coherent components.
- Start with simple repetitions of basic components or smaller task ranges.
- The practice can evolve to become complex and multifaceted.
Avoid artificial treatment approaches. Don’t use part-task training for movements that don't naturally break down.
Method five delves into breaking down movements into component parts and natural component movement parts. In the previous session, we explored how this approach, particularly in transfer training, allows therapists to deconstruct complex movements into individual components. Instead of repeatedly practicing the entire transfer, therapists can identify specific stumbling points and focus on isolated practice for more targeted improvement.
For instance, therapists can break down the process if a patient struggles with the transfer due to inadequate forward movement. They may emphasize the crucial step of getting forward enough to put the buttocks on stretch, mimicking the stance of a powerlifter. Therapists can enhance the transfer movement by isolating and addressing this specific component.
This method, often referred to as part-task training, emphasizes breaking down activities into naturally occurring components. The key is ensuring that the components are interconnected and form a cohesive part of the whole movement. This approach streamlines the therapeutic process, allowing for more effective and efficient training tailored to the individual's needs.
So, as therapists explore breaking down movements into component parts, the focus is on natural part tasks that contribute meaningfully to the overall function. This method underscores the importance of thoughtful deconstruction to address specific challenges within a movement, optimizing therapeutic outcomes. For a detailed exploration of this method, I recommend revisiting the comprehensive discussion provided in part one of the webinars.
Method 6: Variability
- Introduce Variability
- Initiate instruction with constant repetition, then move toward blocked repetition.
- Random repetition training is necessary to make movements natural and acquire skills.
The final method we explored in the previous session was variability, a concept I find particularly intriguing due to its profound neurological implications. When I refer to neurological changes, I'm not solely focusing on conditions like dystonia or Parkinsonian gait freezing. Instead, I'm fascinated by how introducing variability can alter the neurological processes underlying a task.
A favorite exercise of mine to illustrate this is swaying. I have patients stand with their legs far apart, swaying back and forth. Rather than a short duration, we might spend five minutes on this seemingly simple task. The magic lies in introducing variability – altering the timing, amplitude, and weight distribution and shifting the focus between the center, toes, and heels. This variability transforms a basic task into a complex and engaging exercise.
Understanding the progression of variability is crucial. Beginning with constant repetition allows individuals to grasp the basics. Moving on to blocked repetition involves practicing specific task components separately before combining them. Finally, random repetition, essential for skill acquisition, involves stringing together various movement patterns in a less predictable sequence.
Now, let's delve into the methods that weren't covered previously in part 1, exploring how they can further enrich and diversify your therapeutic approach.
Method 7: Regional Focus or Approach
- Alter emphasis to focus on one element of movement.
- Incorporating regional focus is a valuable tool in therapy. It enhances exercise diversity, challenges patients effectively, and contributes to their overall rehabilitation and functional gains.
- Diversifies Training: Regional focus adds variety, preventing monotony and plateaus in exercises.
- Targeted Improvements: Allows specific muscle groups and movements to be targeted and refined.
- Patient Engagement: Keeps patients actively engaged by introducing novelty and mental challenges.
- Progressive Rehabilitation: Tailors exercises to patient needs, fostering rehabilitation progress.
- Incorporating regional focus is a valuable tool in therapy. It enhances exercise diversity, challenges patients effectively, and contributes to their overall rehabilitation and functional gains.
Method number seven is what we call a regional focus or approach. The intent here is to alter the emphasis on one element of a task, allowing for focused attention and refinement. This concept crystallized for me during a marathon, where I encouraged my friend to concentrate on specific elements of her gait to overcome a challenging hill, like pushing off with her gastrocs or lifting her knees higher.
In this approach, you take a repetitive task and introduce a regional focus, directing attention to a particular aspect. For instance, during a bilateral PNF pattern, you might have individuals contract their abdominal muscles, emphasizing spine rounding and opening. Alternatively, the focus could shift to the internal and external rotation of the shoulder or scapular retraction. The key is maintaining the same movement while directing attention to different components.
The rationale behind this approach is to combat our natural tendency to fall into a comfortable, automated state when tasks become familiar. By introducing regional focuses, therapists keep patients actively engaged in the movement, preventing them from slipping into a passive, less attentive state.
This method diversifies training, targets specific improvements, and fosters patient and therapist engagement. It's a valuable tool for progression and can be easily documented for reference and analysis. So, as you integrate regional focuses into your therapy sessions, consider the nuanced enhancements they can bring to your approach.
Sample Interaction Scenario: Adding A Regional Approach to the Berg Balance Test
- Location: Therapy Gym
- Basic interaction: The patient is run through the Berg Assessment to determine “weak spots” in balance and gait.
- Adding a Regional Approach: After you have assessed the elements of the Berg that are problematic, you can start to play along the edges.
- Forward reach
- Looking over shoulder
- Turning in a circle, etc.
(Salzman, 2018)
One way that I try is to apply a regional focus to the Berg Balance Test.
Using the Berg as a “Regional Approach” Training Tool
- There are dozens of reliable and validated tools available to assess balance and mobility across the continuum of function:
- Berg Balance Scale,
- Performance-Oriented Mobility Assessment,
- Dynamic Gait Index,
- Timed Up and Go, etc.
- These tools are important when assessing balance and gait impairment, but they can be tweaked to provide a specialized training moment.
- Although the Berg was designed as a testing tool, it is also possible to use the 14 elements of the Berg to create “point-specific” balance challenges.
- There are 14 discrete “balance” assessments performed during the Berg (sitting balance, standing balance, turning, etc).
- Many of these elements lend themselves easily to tweaking with a regional approach.
(Ajmal et al., 2021)
The first time I started thinking about the Berg Balance Test as something beyond a mere test was when I realized that its components encompassed various ways people lose their balance. This revelation led me to conceptualize the Berg as an assessment tool and a set of challenges to be tackled and improved upon. Rather than viewing it solely for evaluation, I decided to hang hooks on the 14 different ways people lose balance, transforming it into a targeted intervention.
Consider a scenario where you run a patient through the Berg, identifying weak spots in their balance and gait. Following the assessment, you can incorporate a regional approach by honing in on the specific challenges they faced. Let's take, for example, issues with forward reach, looking over their shoulder, and turning in circles.
While I'll demonstrate various components of the Berg in a therapeutic setting, you'd tailor the intervention to the areas where the patient struggles the most. For those not utilizing the Berg, substitute with other reliable and validated testing tools that assess balance and mobility. This approach allows you to turn any assessment into a specialized training moment, offering a more skilled level of intervention. So, whether it's the Berg or an alternative, seize the opportunity to provide focused and tailored challenges for your patients.
Using the Berg as a “Regional Approach” Training Tool: Sit Unsupported
- Sit Unsupported. Have the patient sit in a chair. Begin to add balance challenges while remaining seated.
- Can he sit with both legs touching the floor?
- One leg only?
- No legs?
- How about with his arms lifted off the armrests?
- While sitting on the edge?
- Can he lean to one side?
- With his eyes closed?
- The simple act of sitting in an unstable chair may be challenging enough. If it is not, focus on a specific region.
Figure 1 shows somebody sitting in their chair, and it's time to get up.

Figure 1. The client sitting in a chair.
The seemingly straightforward act of sitting in a chair can be an excellent starting point for therapeutic intervention. To enrich this basic position, we'll explore various challenges to identify areas that may require attention.
Begin by assessing if the individual can sit with their back away from the chair without relying on the backrest. Progress by evaluating if they can maintain this position with both legs touching the floor—a relatively stable posture. Now, introduce complexities: can they smoothly lift one leg in a long arc or march in place while sitting? This demands enhanced abdominal control.
Shift the focus to upper body engagement by lifting their arms off the armrest, eliminating a source of support. Encourage sitting on the very edge of the chair without slumping against the backrest. Introduce the concept of "sneak a cheek," where they lean to one side, engaging the quadratus lumborum, lifting one buttock off the chair slightly. This challenges lateral stability and core strength.
Experiment further by having them close their eyes while sitting on the edge of the chair. Observe any weaving or slumping behaviors, which can unveil additional balance issues. The simple act of sitting becomes a comprehensive assessment, revealing potential areas of difficulty and guiding your therapeutic approach.
For an aquatic setting, consider adapting these challenges by having the individual sit on a bench or pool stairs. Alternatively, create a dynamic environment by having them sit on the end of your knees in shallower water, allowing you to manipulate the support base beneath them. This adaptive approach expands the possibilities for therapeutic engagement and progression.
Using the Berg as a “Regional Approach” Training Tool: Rise From a Chair
- Rise From a Chair. Now that you have exhausted all the sitting tasks you could conceive, move on to rising from that chair.
- Attempt to stand up from the chair using both arms.
- Then use one arm only.
- Then use no arms.
- How about rising while sitting back "deep" in the chair instead of on the edge?
- Can he rise without using momentum?
- With only one try?
- With eyes closed?
- Can he pause and reverse direction on his way up?
The next one is rising from a chair, as shown in Figure 2.
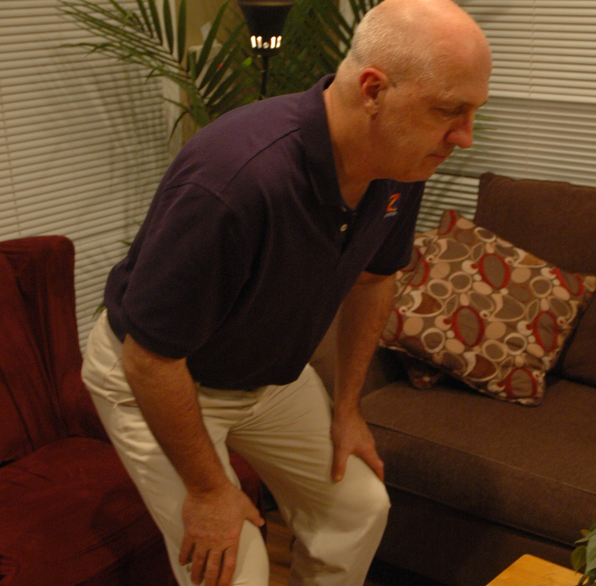
Figure 2. The client rising from a chair.
Moving from sitting to standing introduces new challenges and opportunities for a regional approach. Begin by observing their natural movement from sitting to standing. Identify any asymmetries, reliance on specific limbs, or ineffective use of momentum. This initial assessment will guide the development of your regional focus.
If there's excessive reliance on one arm, initiate exercises to test variations. Can they stand up without using the right arm? Progress to attempts without either arm for a more challenging engagement. Explore the depth of the chair – can they rise without leaning back deeply into the chair? Address the issue of momentum – can they stand without using momentum or relying on a count (like one, two, then rise)?
Count the attempts it takes for them to stand. Evaluate if they tend to fall back once standing. Introduce the challenge of standing with closed eyes to assess their stability in this transition.
An intriguing variation is to incorporate sudden changes. Prompt them to stand and then, before fully rising, instruct them to reverse or switch. This can be done through verbal cues like "freeze," "reverse," or a combination of both. Encourage controlled reversals, preventing them from collapsing back into the chair. These dynamic elements add layers to the exercise and demand increased cognitive engagement, further refining their movement patterns.
Using the Berg as a “Regional Approach” Training Tool: Initial Standing Balance
- Initial Standing Balance. Now that your patient is standing, make sure his legs are not resting against the chair.
- Can he stand with weight equally distributed on both legs?
- Can he stand unsupported (no hands)?
- Can he shift his weight from side to side without loss of balance?
- Can he tighten his gluteals and shift his weight onto his forefoot without rising onto his toes?
- Can he contract his abdominal muscles and pull in his belly button without changing his center of mass?
- Can he perform as well with his eyes closed?
Initial standing balance is shown in Figure 3.
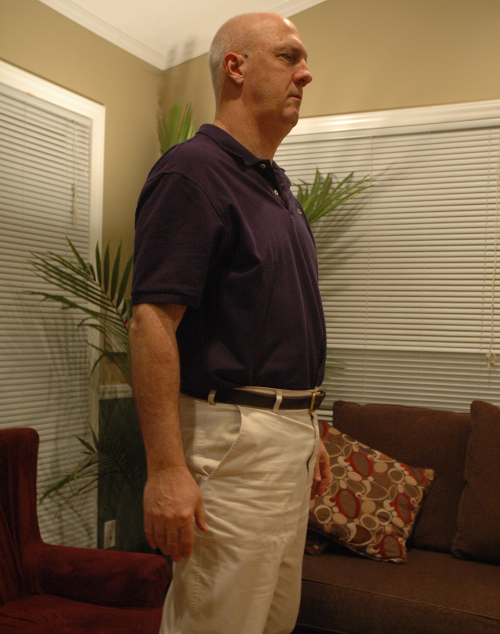
Figure 3. The client rising from a chair.
Exploring the initial standing balance involves testing various aspects of stability. Begin by assessing if the individual can maintain weight distribution evenly between both legs. This is foundational for stable standing. Progress to standing unsupported without relying on external support, like hands on a surface.
Next, evaluate their ability to shift weight laterally without compromising balance. Can they smoothly transition from side to side? Introduce challenges such as tightening the gluteal muscles while maintaining a stable stance. Emphasize the importance of avoiding rising onto the toes during this action.
Explore weight shifts to the forefoot and rear foot. Can they shift their weight forward without rising onto their toes? Similarly, can they move their weight backward without compromising stability? Encourage engagement of abdominal muscles without altering the center of mass – a crucial skill for maintaining balance during various activities.
To intensify the challenge, consider incorporating the element of closed eyes during these exercises. This demands physical stability and enhances proprioceptive awareness and reliance on other sensory inputs.
Using the Berg as a “Regional Approach” Training Tool: Transfer From Chair to Chair
- Transfer From Chair to Chair. Can your patient transfer from one chair to another? Or from a bench (with no arms) to a chair? Have him perform this task without your advice, and watch how much he makes use of external props.
- Does he use excessive push-off with his hands?
- Does he lean his calves against the chair for balance?
- Does he plop down into the second chair instead of gracefully lowering himself?
- Does he lunge forward and make a desperate grab for the second chair?
- If you move the chairs further apart, can he perform a stand, pivot turn, and then sit, or does he have to perform a step or two to get to the chair?
- Can he move from chair to chair while holding something in his hands?
Next, are they able to transfer from chair to chair or surface to surface by themselves?
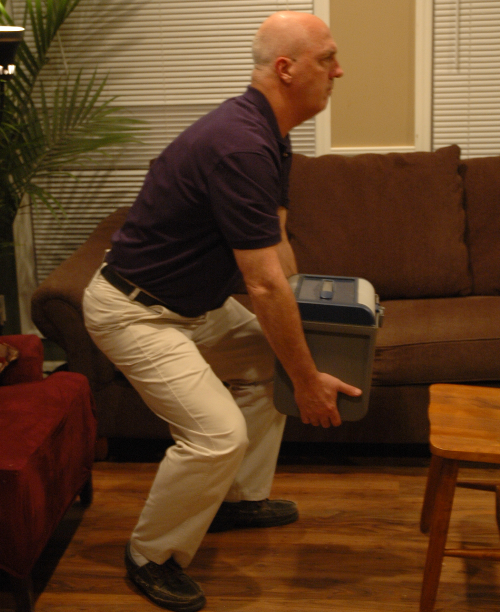
Figure 4. The client practicing transfers while carrying an item.
Assessing the transfer from one chair to another is crucial for understanding an individual's movement patterns and potential challenges. Encourage them to initially perform the task without your assistance to observe their natural approach. Resist the temptation to intervene immediately, as this may alter their movements.
Watch for signs of excessive reliance on hands for push-off. Some individuals may lean their calves against the chair for added stability, while others might display a less controlled descent, plopping into the second chair. Observe if there's any tendency to lunge forward, making a desperate grab for the second chair, as this indicates potential balance issues.
Experiment with chair placement. Increase the distance between the chairs to evaluate their ability to perform a stand pivot turn and sit without needing to step forward. This challenges their balance and mobility, providing valuable insights into their capabilities.
Consider introducing objects into their hands during the transfer, simulating real-life scenarios where they may carry items. This can reveal specific challenges related to balance and coordination during functional activities.
Using the Berg as a “Regional Approach” Training Tool: Reaching Forward
- Reach Forward. From a standing position, with legs comfortably placed shoulder-width apart, have your patient reach forward as far as possible, maintaining his arm parallel to the floor.
- How far can he reach?
- With your cues, can he go further?
- Place an object outside his reach as a goal (and don’t allow him to use it as a balance prop if he reaches it). Move the object from directly in front of him to one side and then the other.
- Can your patient hold his extended position for 10 seconds?
- With his feet together?
- With both arms extending at the same time?
From a standing position, with their legs comfortably placed shoulder-width apart, you want to have them reach forward as far as possible, maintaining their arms parallel to the floor. An example is shown in Figure 5.
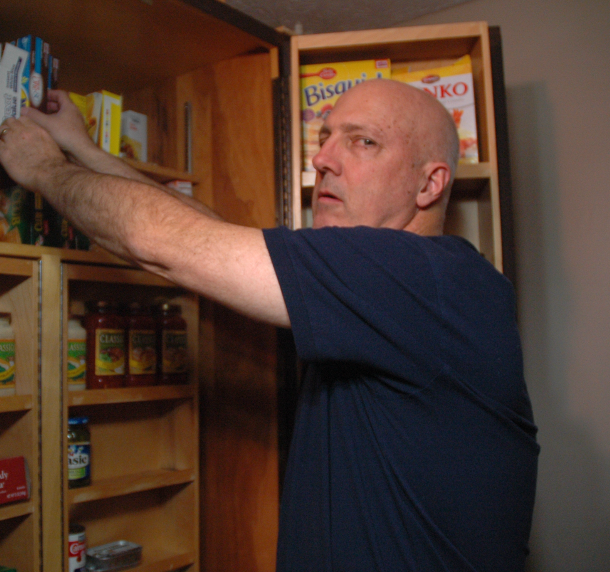
Figure 5. Client reaching while in a standing position.
Assessing functional reach is crucial for understanding an individual's ability to extend their arms and maintain stability during reaching tasks. In a traditional test using a yardstick, prompt them to reach forward comfortably as far as they can. Encourage them gently by suggesting they might reach a bit farther if appropriate.
To simulate real-life scenarios, introduce functional goals. Place an object in front of them, such as a target or item, and challenge them to reach for it to the right, left, and center without leaning on it. Gradually move the target farther away to assess their range and control.
Evaluate their capacity to hold the reached position for 10 seconds. While initiating a reach might be manageable, sustaining the posture becomes more challenging and provides insights into their balance and stability during static tasks. This approach allows for a more comprehensive assessment of functional reach beyond the traditional test.
Using the Berg as a “Regional Approach” Training Tool: Pick Up an Object
- Pick Up an Object. Place a lightweight, easy-to-grasp object on the floor (such as a slipper). Have your patient sight the object and pick it up with different lift techniques.
- Try a golfer's lift.
- Now try a squat lift.
- Place variable objects across the floor and do a timed trial of picking them up.
- Alternate the side used to pick up the items.
- Graduate to smaller or flatter items that are harder to pick up.
The next task is finding an object and picking it up with different lifting techniques (Figure 6).
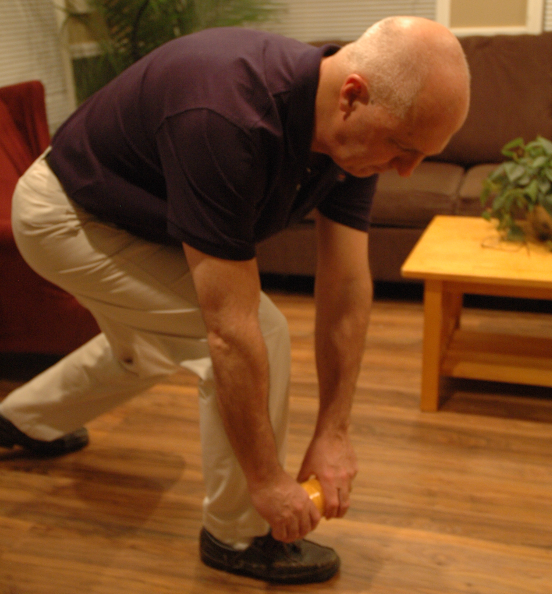
Figure 6. Client picking up items.
The golfer's lift is valuable for assessing and improving balance and strength. By contracting the abdominal muscles and maintaining a neutral spine, individuals can extend one leg backward while reaching down with one hand to lift a light object, like a golf ball. This exercise challenges the core and stability.
Another variation is the squat lift, where the legs are positioned wide open, and the individual squats down into the center. This utilizes abdominal strength and provides an effective workout.
You can set up challenges across a room or in a specific environment to add more complexity and functional relevance. Place objects at a distance, time them and observe how long they can navigate and pick up items. This approach introduces elements of task-oriented training and helps assess their ability to perform functional activities.
Additionally, you can progress by using smaller or flatter objects closer to the ground, making the task more challenging and enhancing their overall mobility and strength. This method integrates a functional and dynamic aspect into the assessment and training process.
Using the Berg as a “Regional Approach” Training Tool: Look Behind Each Shoulder
- Look Behind Each Shoulder. With your patient standing with his legs comfortably apart, run through these drills.
- Have him turn his head, shoulders, and trunk toward the left.
- Have him sight on the wall throughout the turn and tell you what he sees as he turns his head.
- Ask him to tell you when he has turned as far as he can manage.
- Now, what item can he just see out of the corner of his eye?
- How long can he hold this position? Five seconds?
- Repeat in the opposite direction.
- Now put legs in a narrower stance and repeat the drill.
Client looking behind each shoulder is shown in Figure 7.
Figure 7. Client looking over each shoulder.
This exercise involves a more nuanced approach to head and trunk rotation, incorporating cognitive elements and challenging proprioception. Instead of a simple turn of the head, ask the individual to turn their head, shoulder, and trunk towards a specific direction while maintaining sight on a designated wall. As they turn, prompt them to name and describe things they see in their field of vision, adding a cognitive component to the movement.
For example, if they turn to the left, have them describe items on the left side, such as a lamp, a bush, a painting, or a barn. Encourage them to look at different levels – up at the ceiling or down at the floor – and report what they observe during the rotation.
To further challenge proprioception, close their eyes after the rotation and ask them to recall and verbalize what they were "seeing" even with their eyes closed. This engages cognitive functions and helps assess their awareness of their body's position in space.
By incorporating these variations, you can better understand their ability to perform rotational movements while multitasking and how well they integrate visual and proprioceptive information.
Using the Berg as a “Regional Approach” Training Tool: Turn in Full Circle
- Turn in Full Circle. Have your patient perform a turn.
- Without telling him, count how many steps it takes.
- Repeat to the left.
- Now tell him how many steps you counted and ask him to re-attempt the right turn with one fewer step.
- Now the left.
- Progress to turns with two, three, and four fewer steps.
- Can he keep his turning radius small or does he circumscribe a large area?
- Ask him to attempt to "pivot around a circle the size of a chair."
- Reduce or enlarge the circle to give new balance challenges.
Client is turning in a full circle in Figure 8.
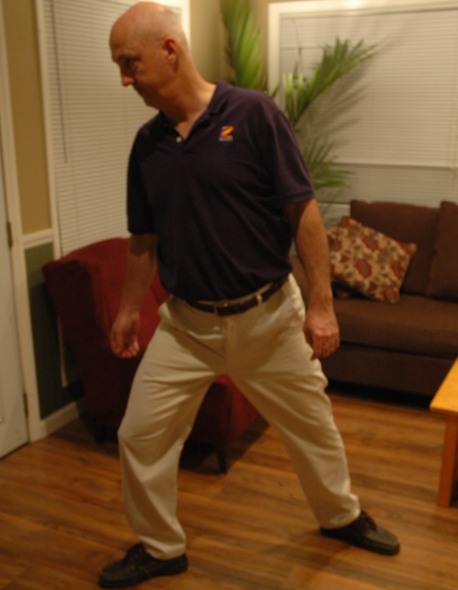
Figure 8. Client turning in a full circle.
Turning in a circle can reveal distinct patterns and challenges in an individual's movement. To assess this, ask the person to perform a full turn in one direction and discreetly count the number of steps it takes. Without disclosing the count, instruct them to turn in the opposite direction and again count the steps. Now, inform them of the step count for both directions.
Next, introduce a challenge by asking them to modify the number of steps. For instance, if it initially took eight steps to the right, request them to attempt it in seven steps. This prompts a conscious alteration in their movement pattern. Observe how they adapt – whether they successfully adjust the steps, overshoot, or struggle due to the modified target.
Repeat the process in the opposite direction, gradually working towards reducing the step count. Pay attention to their ability to pivot and maintain a smooth, controlled turn. Analyze if the radius of their turning circle remains consistent or if there are variations.
This exercise provides insights into their flexibility in adapting movement patterns, highlighting potential asymmetries, challenges in pivoting, and the ability to modulate steps consciously. It also aids in identifying compensatory strategies that individuals may adopt when faced with specific movement demands.
Using the Berg as a “Regional Approach” Training Tool: Alternate Toe Taps
- Alternate Toe Taps. Stand at the bottom of a step or stairs. The goal is to see how rapidly your patient can perform this drill.
- Have the patient lift one leg and tap the step (but not stand on it). Remove the foot from the step, place it back down, and then repeat the process with the opposite foot.
- Can he perform eight taps in 20 seconds? In 30 or 60 seconds?
- Does he sway and use his arms? Attempt the drill with his arms held stiffly by his sides.
- If your patient is a master at this task, repeat it with patterns (high, low, wide, narrow).
Figure 9 shows toe taps on a box.
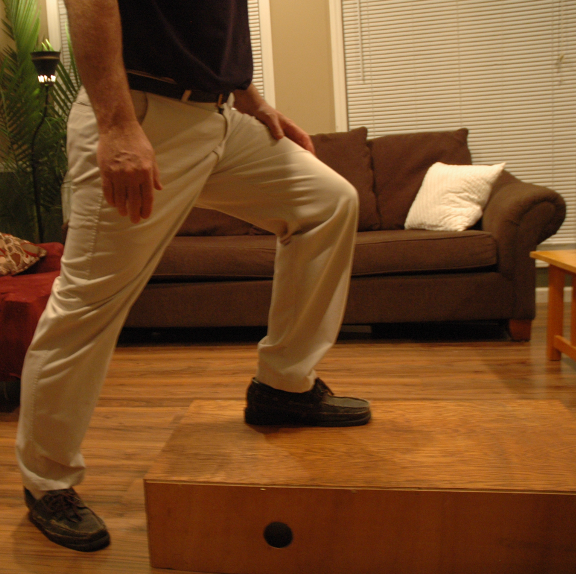
Figure 9. Client doing toe taps on a box.
The Berg Balance Test, designed as a test, can be deconstructed to identify specific challenges and regions of weakness in a patient's balance. To address Clement's question about the validity of the standardized test, it's crucial to clarify that the breakdown into partial functions, as presented here, is not intended to replace the standardized test itself. Instead, it serves as an adjunct to delve deeper into the specific elements contributing to an individual's balance issues.
After conducting the Berg test and obtaining an initial score, the focus shifts to Edgecraft – a term used to describe the intentional exploration of balance limits. This involves utilizing a regional approach to identify failure points and understand how the patient responds to variations. Edgecraft involves creating tasks or challenges related to the components of the Berg test that an individual struggled with during the initial assessment.
For instance, in the context of the Berg stepping task, you can have the person lift one leg, tap a step without bearing weight on it, and then return the foot to the ground. The emphasis here is on motor planning, tapping, and repositioning the foot without relying on the step for support. This approach allows for a more nuanced understanding of the patient's abilities and challenges, facilitating targeted interventions.
Importantly, this Edgecraft approach is separate from the standardized test and serves as a valuable tool for therapeutic interventions. It adds a playful and exploratory dimension to therapy, enabling a deeper understanding of the patient's balance and providing insights for tailored rehabilitation strategies.
Using the Berg as a “Regional Approach” Training Tool: Maintain Tandem Stance
- Maintain Tandem Stance. Have your patient place one foot directly in front of the toes of the other (like he is walking a tightrope). Have him stand with weight equally distributed on both feet.
- Can he hold the position, and for how long?
- Does he flail his arms about?
- Can he hold them by his sides?
- Repeat with the other foot in front.
- It is harder to stand in a tandem stance than it is to "walk a line," but by all means, incorporate tandem walking into the program.
The tandem stance, shown in Figure 10, is like the tightrope stance. You can use dollar store noodles in the pool. Cut it in half and then have them try and tandem stand on it.
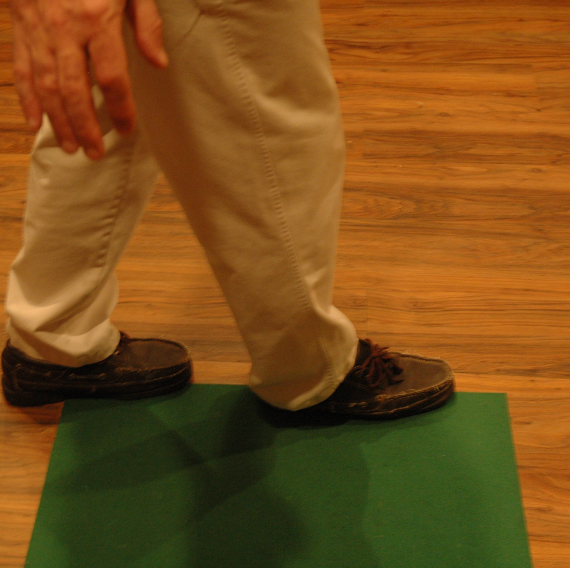
Figure 10. Client doing a tandem stance.
It's fascinating how these simple tasks can reveal so much about an individual's balance and stability. Encouraging individuals to shift their weight in a tandem stance by evoking the sensation of being a little tipsy is an engaging way to assess their limits and capabilities. It adds a dynamic element to the assessment and provides valuable insights into their proprioception and ability to control their body in various positions.
The pirate ship at Dollywood is a great way to illustrate the challenge of tandem stance. It vividly captures the unpredictable and sometimes unsettling nature of weight shifts in that stance. Incorporating different arm positions and observing their preferred leg emphasizes the importance of assessing balance in various conditions to comprehensively understand an individual's abilities and challenges.
The restriction on falling forward in tandem stance compared to tandem walking indeed adds another layer of difficulty. It's not just about moving forward but maintaining a stable position without the safety net of forward movement. These nuances in assessment provide valuable information for tailoring interventions and exercises to improve balance and stability.
Using the Berg as a “Regional Approach” Training Tool: Single Limb Stance
- Single Limb Stance
- Stand on one leg and time his efforts. Repeat on the other side. Add all the flourishes we've discussed to make it harder—closed eyes, head turned, looking over shoulder, and so forth.
- You've just mastered using a regional approach with 1 balance “test”.
- But wait, there are so many more functional tasks out there!
Single limb stance is in Figure 11.
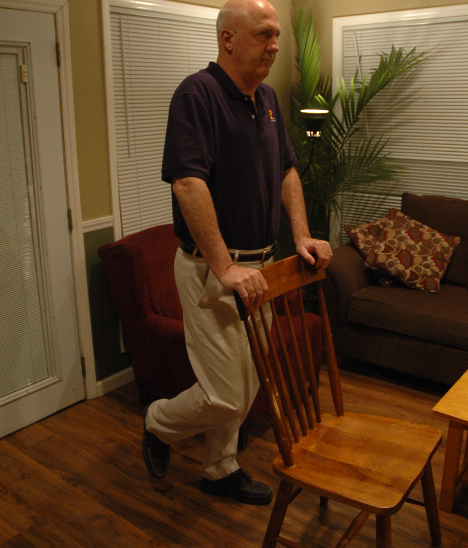
Figure 11. Client doing a single limb stance.
This task is standing on one leg and then repeating on the other. You can have them close their eyes to add a cognitive overlay and have them look over their shoulder.
Other Tasks to add a “Regional Approach”
- Carrying a weighted pan between kitchen counters
- Pouring water from a jug into a cup
- Carrying weight in a luggage bag up/down 3-stairs
- Carrying groceries through a door, up and down a 3-stair platform, and lifting groceries on a counter
- Transferring laundry from a washer to a dryer
- Transferring laundry from a dryer to a counter
- Putting on and taking off a jacket
- Floor sweeping
- Vacuuming
- Making a bed
- Climbing stairs
- Getting down and up from the floor
- Opening a door
- Putting a hook-and-loop strap over a shoe
- Picking up scarves from the floor
- Functional reach
Here are a few more tasks that another article listed as ways that you can add regional approaches. Figure 12 shows tasks such as putting things in a dryer and putting on a jacket.
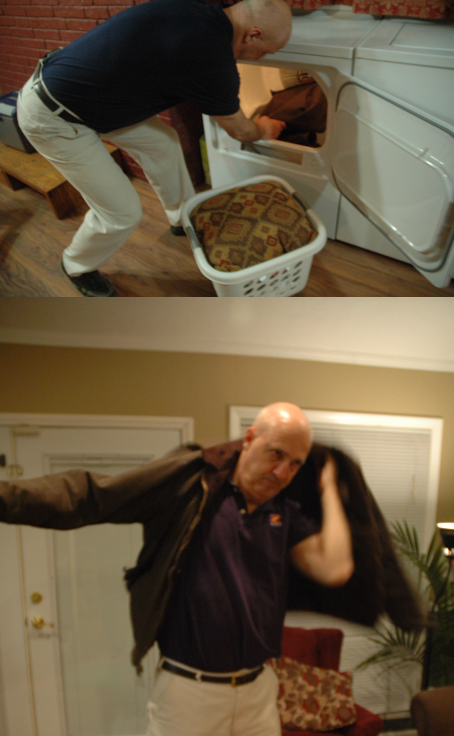
Figure 12. Client putting clothes in a dryer and putting on a jacket.
Let's dive into the practical side of things. I want to share how you can integrate a regional approach into daily tasks and activities. Take, for example, moving a weighted pan between kitchen counters. It's not just about the motion; it's about observing their stability, weight shifting, and coordination. Pouring water from a jug into a cup or carrying a luggage bag up and down steps adds a dynamic element, assessing their ability to maintain balance during practical movements.
Think about carrying groceries – not just through a door but up and down steps. Lifting groceries onto the counter mimics real-life scenarios. It's not just about the weight; it's about how they handle the load, shift their weight, and maintain stability. Even transferring laundry from the washer to the dryer becomes an opportunity to assess balance, coordination, and motor planning.
Folding laundry, putting on and taking off a jacket, sweeping the floor, or vacuuming – each task is a chance to explore different aspects of their balance and functional movement. Making a bed involves bending, reaching, and weight shifting. Climbing up and down stairs is more than just ascending and descending; it's about observing their gait, balance, and confidence.
Home health scenarios offer unique opportunities. Getting in and out of the tub or on and off the floor becomes a task-oriented approach to balance training. It's about preparing them for situations they're likely to encounter daily.
We've covered eight methods in total, including what we discussed earlier. These approaches take a task, break it down, and assess which elements pose a challenge. It's about targeting those specific elements, creating a dynamic, personalized intervention beyond standardized tests. Remember, each daily activity is an opportunity for therapeutic exploration and improvement.
Method 9: Developmental Sequence
- Progress the patient through sequential developmental stages.
- Look at crawling. As the earliest quadruped movement mastered by most humans, crawling is a fascinating subject as it has been shown to be related to:
- spatial concepts,
- eye-hand coordination,
- vestibular processing,
- balance and equilibrium,
- spatial awareness,
- tactile input,
- kinesthetic awareness, and
- social maturation
(Li et al., 2023)
A developmental sequencing approach involves guiding individuals through the traditional steps of human development, considering how they mastered different movements as they grew. One fascinating aspect often explored is crawling. Whether commando crawling or hands-and-knees crawling, it has proven to be an early quadruped movement with significant implications.
Crawling has been linked to various aspects such as spatial concepts, eye-hand coordination, vestibular processing, balance and equilibrium, spatial awareness, tactile input, kinesthetic awareness, and social maturation. The literature has even delved into connections between ADHD and the absence of a crawling phase in childhood. Some children, for instance, might skip crawling and move straight to cruising or walking.
Interestingly, there's research suggesting that reintroducing crawling-like movements, even in older individuals, can yield benefits. Instead of framing it as crawling, you can use terms like ladder drills. Set up a ladder on the ground and have them move with hands and feet in an asymmetric rhythmic pattern, fostering similar benefits as crawling.
It's disheartening to hear about the challenges faced in the home health setting, where time constraints and paperwork can hinder the delivery of thorough and meaningful therapy. However, there are strategies to navigate this. For instance, encouraging open communication with therapists and expressing the specific areas the patient and family wish to focus on can help tailor the treatment toward meaningful goals. Creating a collaborative environment where goals are clear and both parties are engaged can significantly affect the quality of care provided. Remember, therapists are more likely to align with patient and family goals when they are clearly communicated and actively involved in decision-making.
Sample Interaction Scenario: Adding Developmental Sequencing to Bed Mobility
- Location: Lying down in bed.
- Basic interaction: The patient gets in and out of bed using a technique that he routinely uses.
- Adding Developmental Sequencing: After you have assessed the elements of bed mobility that are problematic, you can start to play along the edges. Find all the holes… and practice filling them. Take the patient from:
- Prone to
- Prone press up, to
- Quadruped, to
- Kneeling, to
- Tall Kneel (and so on)
(Wiggermann et al., 2019)
Here is an example with the client Marion, who's lying in bed, looking skeptical about our upcoming bed mobility exercises. I tell her, "Today, we will work on bed mobility. Ready?" She gives me a look, but I proceed.
I start by having Marion roll over onto her side. It's not the smoothest move, so I make a mental note that side-lying needs some attention. But instead of stopping there, I decide to incorporate a developmental sequencing approach.
I tell Marion, "Let's break this down. First, practice lifting your upper body while lying on your stomach." We work on that until she's more comfortable. Then, we add lifting one leg at a time, mimicking a crawling motion. After practice, I say, "Now, transition to hands and knees. Can you get on your hands and knees in bed?" We focus on stability in that position.
Once she's confident there, I suggest, "Let's try kneeling on the bed." We work on moving from hands and knees to kneeling, refining her balance and control. Finally, I say, "Alright, Marion, let's apply what we practiced to rolling over onto your side." Surprisingly, it's much smoother this time. We've deconstructed the movement and tackled specific challenges, and now Marion is rolling over with greater ease.
Taking a seemingly simple bed mobility task, identifying challenges, and using developmental sequencing have improved Marion's ability and made the therapy session more engaging and purposeful. Despite her initial skepticism, Marion is now appreciative of the process.
Using Developmental Sequencing to Progress Bed Mobility
- In my early career as a hospital-based physical therapist, I recall walking into the room of a frail elderly woman lying in a small wad inside the ‘V’ of her inclined bed and thinking, “Holy cow, Alice, that looks terrible. Why don’t you move?”
- Alas — she couldn’t. She was stuck there, at the mercy of scheduled treatments and chance passers-by. There is even a name for it – patient migration – or the amount of movement toward the foot of the bed when the head of the bed is elevated.
- The truth is bed mobility is no simple task. Gravity partners with friction; maliciously, they conspire in concert with bedding to make it a fait accompli that patients in beds in the hospital, skilled nursing, and even their own homes end up in an undignified lump.
(Wiggermann et al., 2019)
Thorough chart reviews ensure patient safety. It's a setting where time with patients can feel limited, and the fear of making mistakes is real.
For example, patient migration refers to the movement toward the foot of the bed when the head of the bed is elevated. It's a complex interplay of gravity, friction, and bedding conspiring to create discomfort and inconvenience for patients. Studies have explored ways to minimize this issue, but the reality is that bed mobility is a multifaceted challenge.
In hospital settings, teaching patients competent bed mobility becomes crucial. Helping them understand how to navigate and reposition themselves within the bed can significantly enhance their comfort and well-being. Despite the limitations in time and the ever-present challenges of gravity and friction, empowering patients with bed mobility skills remains a valuable aspect of hospital-based care.
- Physical and occupational therapists do well when they think of the lowly bed as a piece of rehab equipment.
- Bed-based exercises are nothing but functional and can be a fantastic workout for balance and fall prevention.
- Even patients who are too weak to be seen out of bed can be gently guided through some of the easier drills with good results.
- It is possible to use the bed to generate quality episodes of mobility, perhaps even attempting early developmental movements like crawling.
(Dumuids-Vernet et al., 2023)
Physical therapists, occupational therapists, physical therapist assistants, and certified occupational therapy assistants excel when they recognize the potential of using the bed as a valuable piece of rehabilitation equipment. Bed-based exercises are inherently functional and offer an excellent opportunity for balance improvement and fall prevention. This approach extends to patients who may be too weak for outside bed activities, allowing for gentle yet effective drills.
Incorporating bed-based exercises can lead to meaningful improvements in mobility and even progress toward developmental positions like crawling. Even the depicted scenario, with the patient engaged in bed-based activities, represents a significant step forward in rehabilitation and functional enhancement. Figure 13 shows a client laying prone in bed.

Figure 13. Client laying prone in bed during bed mobility.
I recall a patient I treated who had severe kyphosis upon arrival. I wanted to address her back issues, but she needed to be in a prone position for effective treatment. However, achieving that required gathering numerous pillows to support her. It felt like a scene from "The Princess and the Pea," with her lying atop a mound of pillows to get into the right position. This challenge highlights one of the advantages of aquatic therapy. In the pool, we can position patients on their backs in a prone-like manner by utilizing buoyancy. This allows us to effectively access and address their back issues while they remain supine. Now, let's discuss how we can apply these principles to the case of the gentleman we're focusing on.
Using Developmental Sequencing to Progress Bed Mobility: Part 1
- Part 1: Arm reach and trunk lift. This drill helps teach the act of lifting and turning the trunk for the initial moment of rising from the bed.
- The patient’s starting position is supine in bed.
- Cue the patient to reach forward and across the midline to the opposite side of the bed (towards the “exit” side of the bed).
- Provide a physical target by placing a hand 2’ above the umbilicus and slowly moving it towards the exit side.
(Alexander et al., 2001)
When you break down the act of getting out of bed into steps, these are the pieces that must happen for you to successfully do bed mobility. Figure 14 shows a client reaching up their left arm and lifting their trunk (Figure 14).
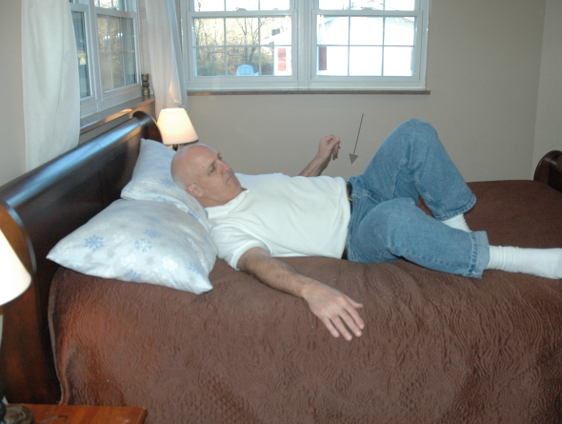
Figure 14. Client initiating a trunk lift for bed mobility.
Encouraging the patient to actively participate in bed mobility can be a crucial component of rehabilitation. Consider a scenario where a patient struggles with lifting their left arm and turning the trunk during the initial attempt to rise from the bed. If reaching over is a challenge, you can implement targeted exercises. Instruct the patient to lift the left arm towards the exit side of the bed, providing cues and possibly using a physical target. Utilizing pads similar to those used in boxing or tai chi creates a reachable target that requires various arm positions for tapping. By placing the target at different heights and positions, the patient engages in a diverse range of movements, activating different muscle combinations for reaching high, reaching across, and more. Gradually moving the target further to the right can initiate the necessary trunk roll while promoting muscle coordination.
Using Developmental Sequencing to Progress Bed Mobility: Part 2
- Part 2: Lateral leg movement, single leg. This drill is designed to teach the ability to laterally shift the lower extremities towards the exit side of the pool.
- Cue the patient to move one leg toward the side of the bed necessary to get out of bed.
- Then move the other leg towards the side of the bed necessary to get out of bed.
- Repeat, moving the legs back and forth.
(Alexander et al., 2001)
The next thing they must do is move their leg to the side, as shown in Figure 15.
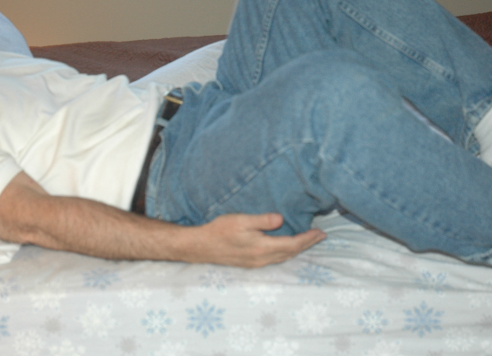
Figure 15. Client moving their lead leg toward the side of the bed.
Implementing a drill that focuses on moving one leg at a time can enhance lateral shifting of the lower extremities towards the exit side of the bed. Guide the patient to shift one leg towards the side of the bed required for exiting and then return it. Encourage a rhythmic pattern where each leg moves towards and away from the exit side. This exercise helps assess potential issues, such as sliding due to friction or inadequate engagement of core muscles. If friction becomes a hindrance, it indicates a challenge in activating the abdominal muscles to lift the leg sideways. Conduct diagnostic therapy during the drill, closely observing their movements and addressing any incorrect execution. Repeat the drill to reinforce proper technique and address identified issues.
Using Developmental Sequencing to Progress Bed Mobility: Part 3
- Part 3: Unilateral heel raise. This drill teaches the patient to elevate the legs as will be necessary to move them across the bed surface without encountering friction.
- Have the patient place one leg in a hook lying (knee flexed and foot on the bed).
- Elevate the opposite leg into a straight leg raise, rising 4-6 inches from the bed.
- Repeat the drill with the other side.
(Alexander et al., 2001)
Next, you will have them do a unilateral heel raise (Figure 16).
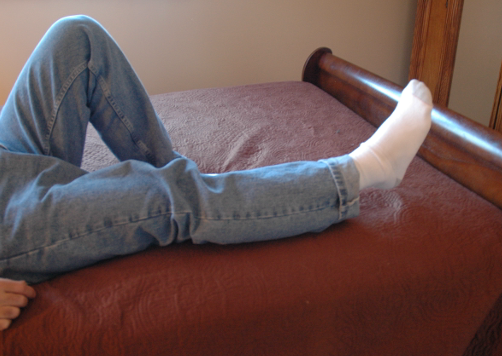
Figure 16. Client doing a unilateral heel raise in bed.
Instruct the patient to lift one leg off the bed instead of skittering it alongside to evaluate core engagement and leg lifting ability. This challenges their core muscles and provides insights into their ability to control leg movements independently. During this exercise, the patient can stabilize by keeping the opposite leg in a hook lying position—knee flexed with the foot on the bed. Gradually increase the height of leg lifts, starting with two inches and progressing to higher elevations. Observe their performance closely, ensuring proper engagement. Repeat the exercise on the other leg to assess overall symmetry and control.
Using Developmental Sequencing to Progress Bed Mobility: Part 4
- Part 4: Roll to side lying. One of the limiting factors in bed mobility is the inability to roll the pelvis.
- Have the patient place one leg in hook lying (knee flexed and foot on the bed).
- Place the other leg in hook lying.
- Cue rolling of the pelvis by encouraging bearing down on the foot.
- Repeat the drill with the other side.
(Alexander et al., 2001)
The next movement is rolling. This is putting them in a hook lying position where both knees are bent up, and you will have them roll their pelvis side to side, as seen in Figure 17.
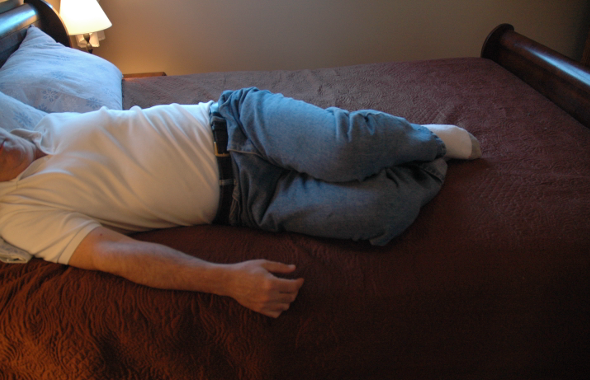
Figure 17. Client rolling with both knees bent.
A highly effective position involves decoupling the spine and pelvis. In hook lying, position the legs far apart with feet on the bed to encourage significant internal hip rotation. Alternatively, bring the feet together, positioning the knees close for increased lumbar rotation and reduced hip movement. This allows tailored assessment of lumbar and hip rotation capabilities. Instruct the patient to lie on their back in hook lying, place one leg in hook lying, and then the other leg. Guide pelvic rolling by encouraging a downward force on the foot. Repeat the exercise in both directions, noting any asymmetry or limitations in rolling. Observe their preferred side for getting out of bed, as it can provide insights into their rolling capabilities.
Using Developmental Sequencing to Progress Bed Mobility: Part 5
- Part 5: Bridging. This task can help patients understand the simultaneous use of arms and legs for lifting the buttock and trunk off the bed.
- Cue the patient to place both legs up into hook lying (flexed hips and knees).
- Instruct the patient to place hands by hips and to use both upper and lower extremity muscles to lift the buttock off the bed.
- Work towards a 3-second hold.
(Alexander et al., 2001)
Bridging can be seen in Figure 18. This movement is crucial in hospital beds.
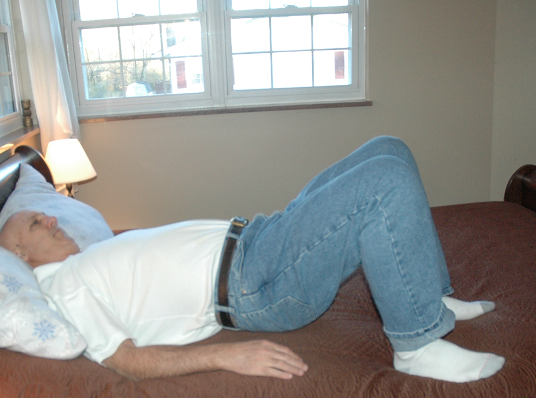
Figure 18. Client bridging in bed.
Moving further in bed requires the ability to bridge, lifting the buttocks and trunk simultaneously. Patients often overlook the importance of using their arms to aid in lifting their buttocks off the bed. Instruct them to place both legs in hook lying, position their hands by the hips, and use both arms and legs to push down into the bed for elevation. Focus on achieving a brief hold and progressively extend the duration. Moving in bed involves a sequence of exercises, and this stage marks a crucial transition. Spending time practicing and refining this movement is essential as it forms the foundation for subsequent activities. Patients may develop favorites among these exercises, giving them a sense of engagement and enjoyment during the sessions.
Using Developmental Sequencing to Progress Bed Mobility: Parts 6a and 6b
- Part 6a: Trunk elevation by upper extremity extension. The purpose of this drill is to teach the patient to use the triceps and other upper extremity muscles to push the trunk up into a sitting position. After rolling the pelvis towards the exit side of the bed, the patient should be cued to place the hand in contact with the bed and extend the elbow in order to lift the trunk off the bed.
- Part 6b: Alternative drill: Instruct the patient to lie side-lying in a fetal position (hips and knees flexed), facing towards the exit side of the bed, with feet near the edge of the bed. Cue the patient to push down with the elbow and hand, which are contacting the bed, until rising to a seated position with the legs dangling over the bed’s edge.
(Alexander et al., 2001)
Trunk elevation by upper extremity extension is shown in Figure 19.
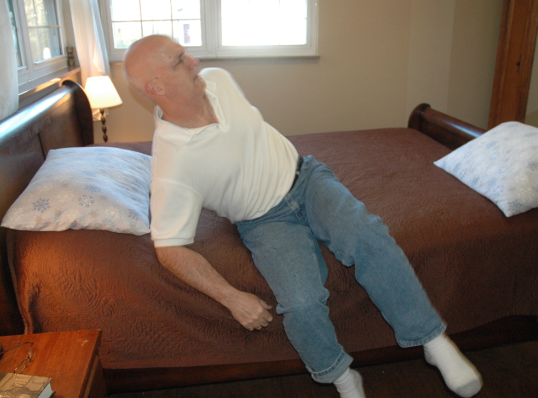
Figure 19. Client demonstrating trunk elevation by using upper extremity extension.
The purpose of the drill is to teach patients to use their triceps and upper extremity muscles to push the trunk into a sitting position after rolling the pelvis to the exit side of the bed. Alternatively, if they struggle with this, they can lie in a fetal position facing the exit side and push down with the elbow and hand contacting the bed to rise up. Dropping the legs off the edge of the bed can counterweight and assist in pulling the trunk up.
Recognizing the challenges in this transition, practicing this exercise is crucial as research indicates it's a common point of difficulty for many individuals. Making these exercises enjoyable and engaging can enhance the therapeutic experience. Naming the movements creatively, like associating them with yoga poses such as Warrior One, Warrior Two, and Warrior Three, can empower patients and provide a sense of accomplishment and progress.
Using Developmental Sequencing to Progress Bed Mobility: Part 7
- Part 7: Weight on hip and hold. Once sitting on the edge of the bed, it is important for patients to be able to retain their balance even while their weight is shifted from side to side.
- Place the patient in sitting on the edge of the bed and arms folded across the chest (to prevent the substitution of upper extremity work for core work).
- From this seated position, cue the patient to shift weight as far as possible onto one hip, lifting the opposite hip and balancing.
- Repeat on the other hip.
- Work towards a goal of a sustained 3-second hold in this “off-balance” position.
(Alexander et al., 2001)
Lastly, they're sitting at the edge of the bed while retaining their balance (Figure 20).
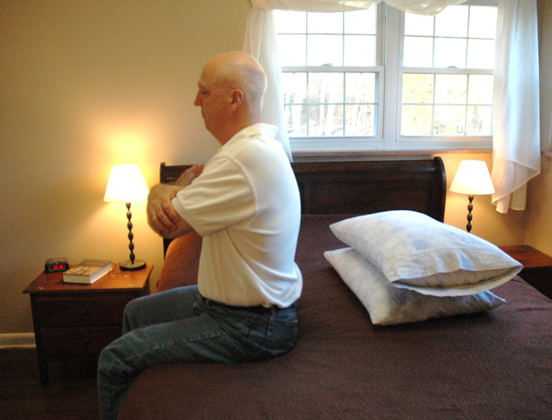
Figure 20. Client maintaining their balance at the edge of the bed.
You can incorporate variations by changing arm positions, such as having their arms down, up, or folded across their chest. Shifting their weight to the right and left adds further challenge and variability. Finally, before delving into more enjoyable aspects, you'll bring together all the elements practiced so far.
Using Developmental Sequencing to Progress Bed Mobility: Part 8
- Part 8: Whole movement of supine to sit. Now that this task has been broken down and practiced in its parts, it is possible to attempt the entire task as a whole.
- Position the patient in supine.
- Cue the patient to use the previously practiced elements to rise from supine to sitting, using the edge of the bed or railing if available.
- Add variations as necessary to provide a challenge. For instance, have the patient roll across to the OTHER side and sit up.
(Alexander et al., 2001)
In Figure 21, they will then move from supine to sit.
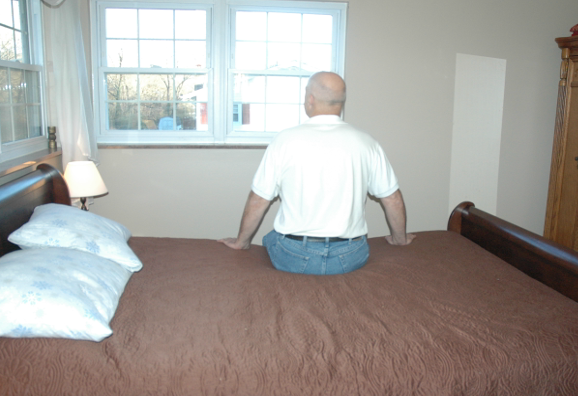
Figure 21. Client sitting at the edge of the bed after moving from supine to sitting.
After mastering the sequence in one direction, challenge them further by attempting the same series of movements in the opposite direction. This adds complexity and engages different muscle groups, enhancing their overall mobility and control.
Using Developmental Sequencing to Progress Bed Mobility: Tick Tocks
Figure 22 shows what I call "Tick Tocks."
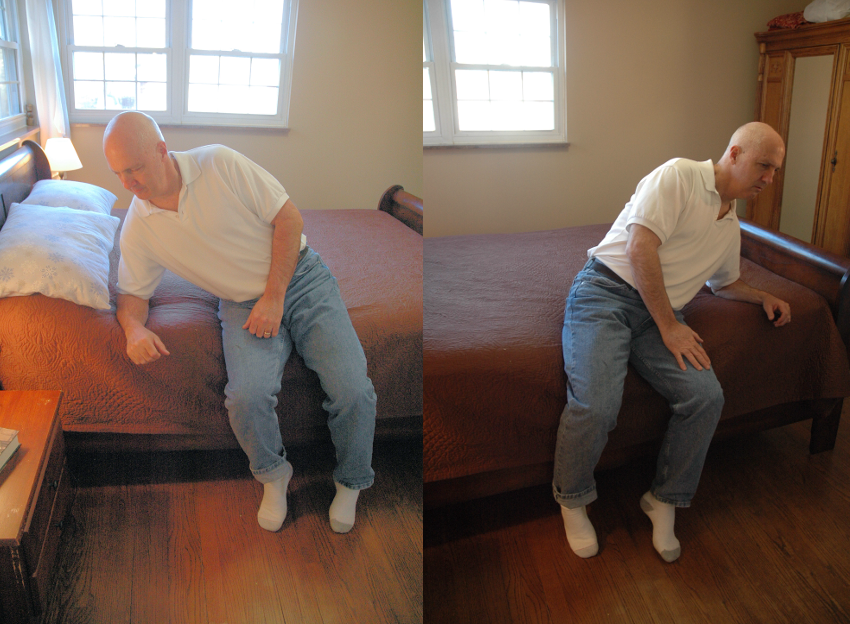
Figure 22. Client doing tick tocks sitting on the side of the bed.
Tick tocks are sitting on the edge of the bed and leaning all the way over onto one elbow and then all the way up and over to the other elbow. Each repetition can be progressively challenging by extending the reach to the side. Targets, whether visual or physical, are introduced to guide the movement. Additionally, you can incorporate a regional approach by varying how they use their arms during the exercise, promoting trunk engagement instead of relying on the arms for support. Tick Tocks provide a dynamic way to improve mobility and stability.
Using Developmental Sequencing to Progress Bed Mobility: The Wave
Figure 23 shows a client doing "the wave."
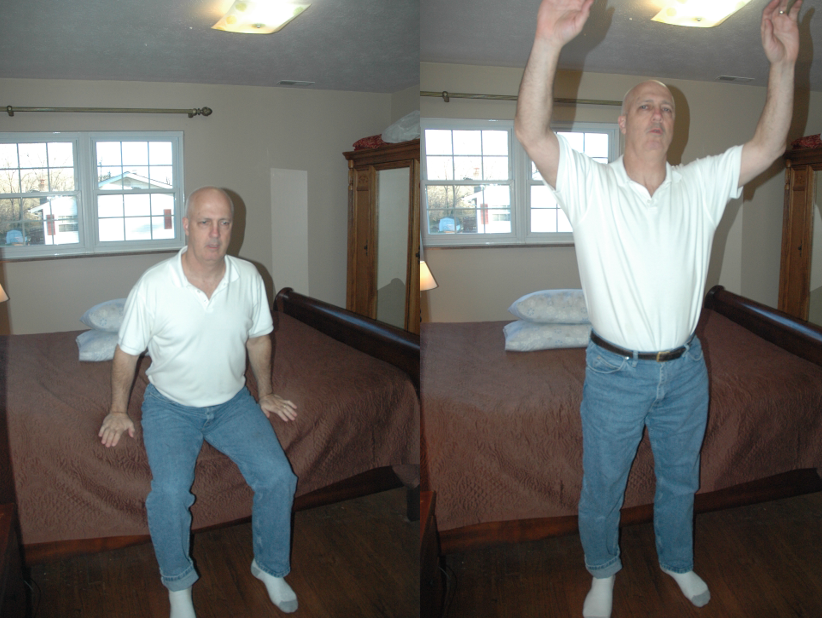
Figure 23. Client doing the wave while standing by the edge of the bed.
The Wave exercise involves creating a fun and engaging atmosphere by having individuals sit on the mat in a triangular formation. One person initiates a stand-up with a powerful, guttural exhale, followed by the next person and so on in a continuous wave-like motion. Each participant aims to stand up immediately as soon as the preceding person's buttocks touch the mat. The exercise not only promotes strength and coordination but also adds an element of enthusiasm and camaraderie. The Wave becomes a lively and entertaining activity, creating a memorable and enjoyable experience for participants and onlookers alike.
Using Developmental Sequencing to Progress Bed Mobility: Mock Sit-ups
You can do mock sit-ups, as seen in Figure 24.
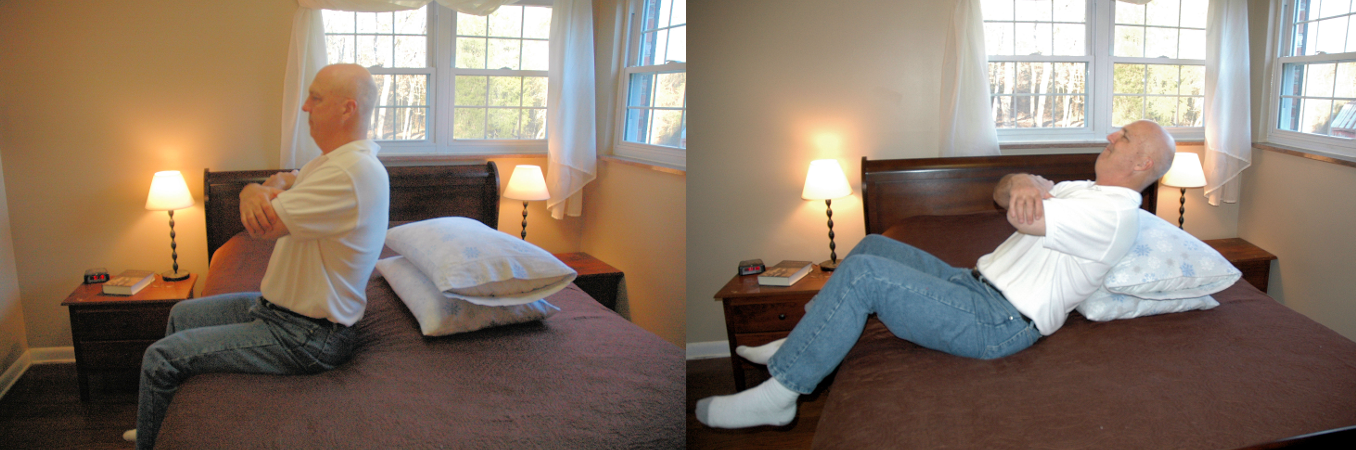
Figure 24. Client doing mock sit-ups.
This exercise involves leaning backward while maintaining proper posture and keeping the chin and chest lifted. The individual is encouraged to go back as far as they can until they feel a slight oscillation moment, at which point they pause and return to an upright position. It is important to prevent them from rolling into a ball, as maintaining an open chest ensures the engagement of the abdominal muscles rather than relying on hip flexors. Additional support, such as pillows or hands placed at the knees, can be used to assist with balance. The goal is to challenge and strengthen the abdominal muscles in a controlled manner.
Using Developmental Sequencing to Progress Bed Mobility: Pillow Boxing
Pillow boxing can be seen in Figure 25. You can also use boxing gloves.
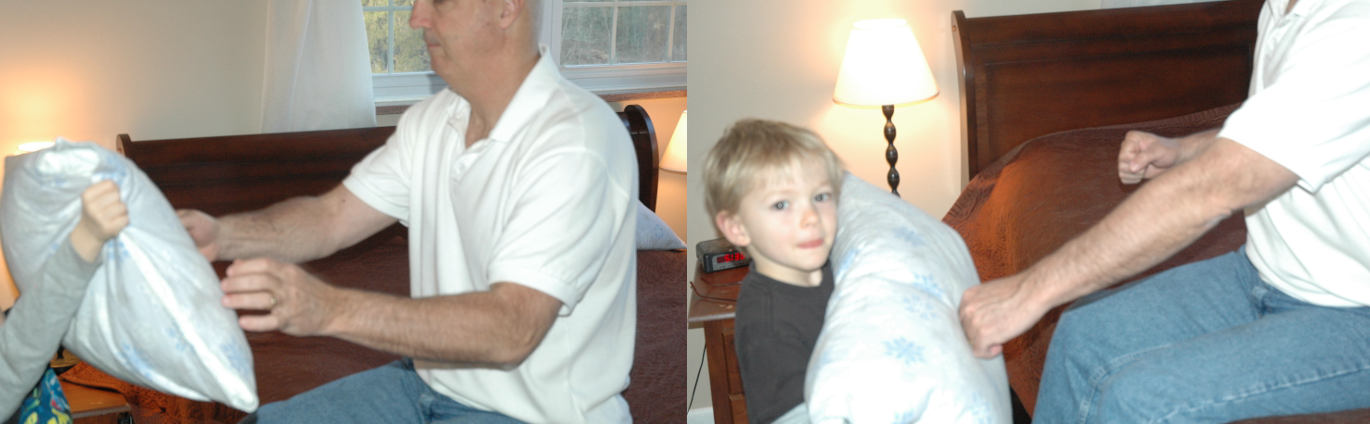
Figure 25. Client "boxing" against a pillow.
In this exercise, known as "pillow boxing," targets such as pillows are strategically placed, and the individual is instructed to hit them with specific variations. Targets may include hitting in the front, upper regions, or executing double taps. Variability is introduced with instructions like "up thrust," "bilateral" (using both hands), or "push me away." The therapist may place a pillow against themselves to enhance the challenge, providing resistance. Pillow boxing serves as an engaging and enjoyable activity for individuals while promoting upper extremity strength and control.
Using Developmental Sequencing to Progress Bed Mobility: Around the World
"Around the World" can be seen in Figure 26.

Figure 26. Client moving around the bed for "around the world."
In the "Around the World" exercise, the individual stands up while keeping their buttocks close to the bed, moving around the perimeter of the bed. After completing one round, they sit down and travel in the opposite direction. This exercise is timed to assess and track bed mobility and overall functional movement progress.
Using Developmental Sequencing to Progress Bed Mobility: Timed Escape
Timed escape from under the covers is seen in Figure 27.
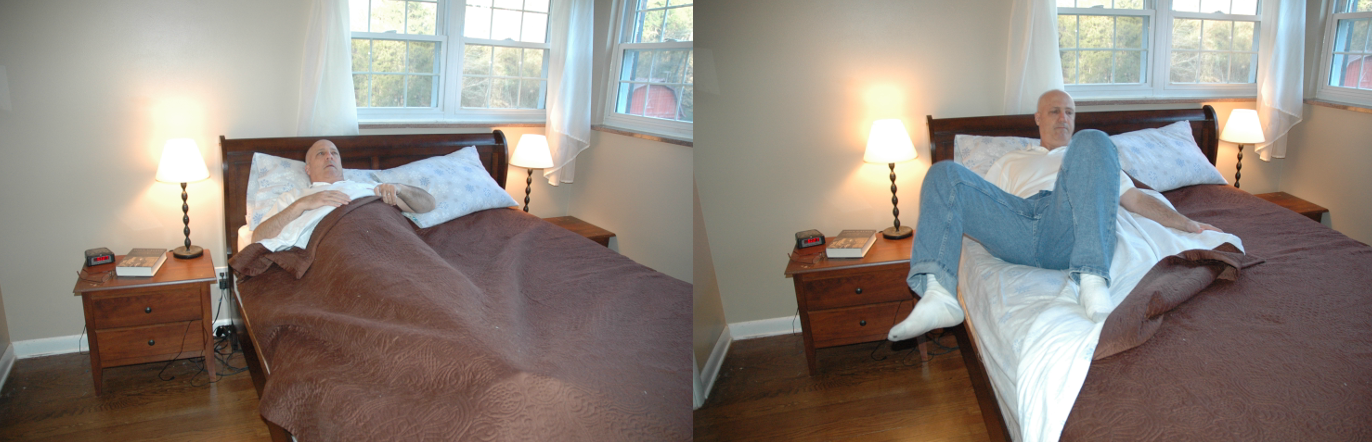
Figure 27. Client "escaping" from bed covers.
The "On Your Mark, Get Set, Go" exercise involves timing the individual as they put on and take off bed covers. This activity aims to engage and motivate the person by turning it into a challenge. The goal is to track improvements in the time it takes to perform these tasks, fostering a sense of accomplishment and encouraging participation in functional activities.
Using Developmental Sequencing to Progress Bed Mobility: Clocks (Head at 12, Head at 1, Head at 2)
This is "clock" or bed scooting (Figure 28).
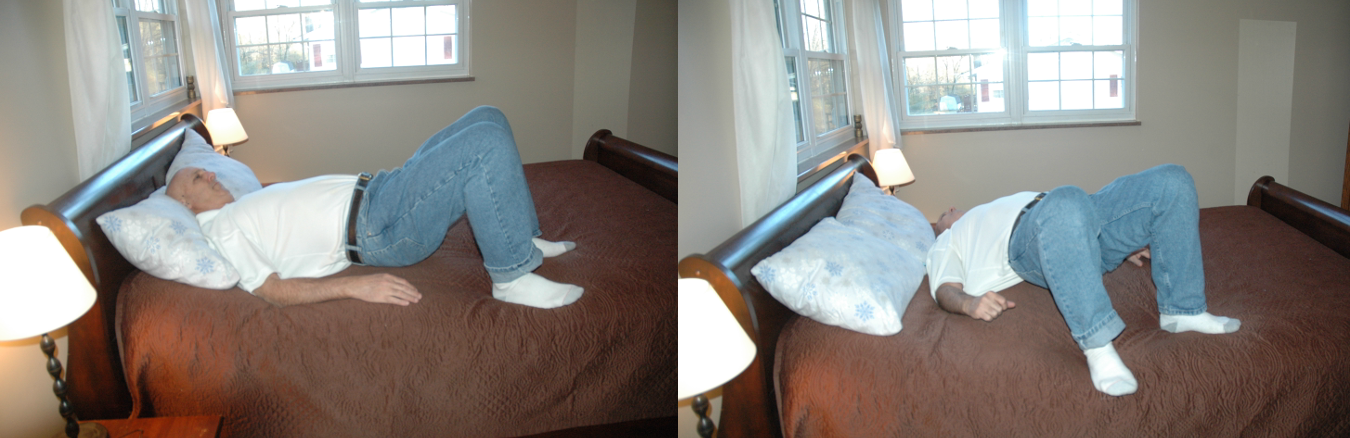
Figure 28. Client scooting around like a clock in bed.
This activity involves bridging and scooting, challenging individuals to move from one end of the bed to the other and back without sitting up. It adds a dynamic element to bed mobility exercises, engaging various muscles and promoting coordination. This task focuses on strengthening the core and lower body while improving bed mobility skills.
Using Developmental Sequencing to Progress Bed Mobility: Superman Drills
Figure 29 shows Superman drills. Obviously, they have to be able to get into a prone position, and then you can take it a step further.
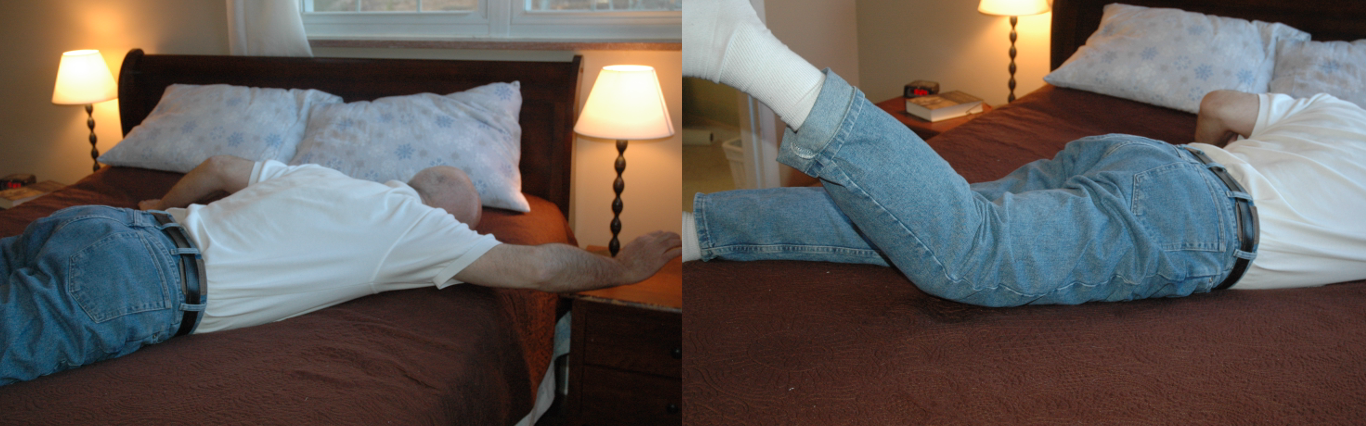
Figure 29. Client doing Superman drills in bed.
These developmental positions, such as the four-point position and transitioning from a press-up, focus on assessing and improving a person's ability to move between different postures. Providing support and guidance, such as placing hands on either side of the pelvis, helps individuals work on rocking back or transitioning smoothly. These exercises aim to enhance stability, coordination, and mobility in various positions.
Using Developmental Sequencing to Progress Bed Mobility: 4-Point
You can then help them hinge into a four-point position, as shown in Figure 30.
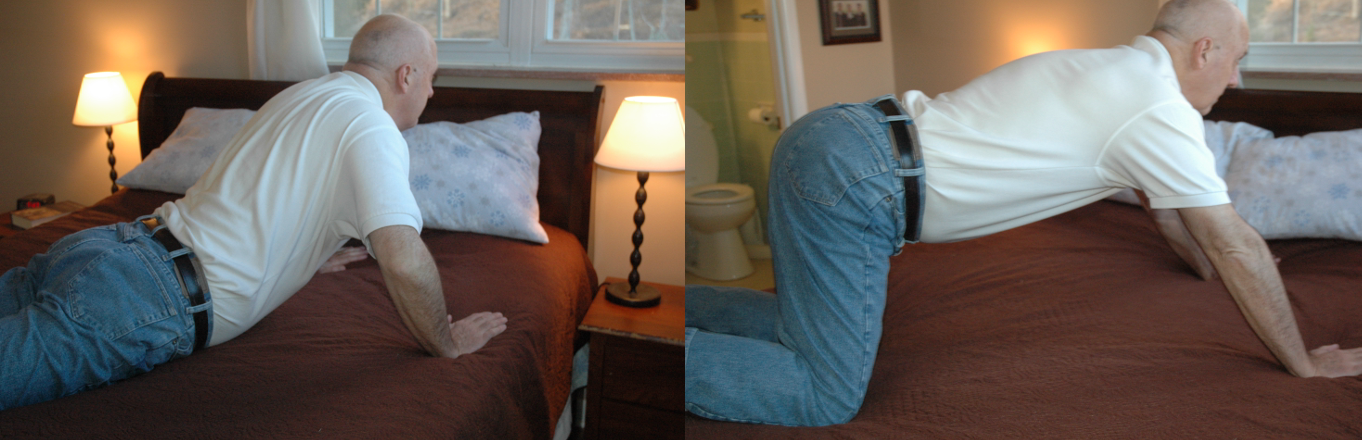
Figure 30. Client hinging into a 4-point position from a prone position.
Method 11: Environmental Modification
- Alter the environment surrounding the patient.
- Environmental changes offer a powerful tool for elevating exercise complexity and adapting to diverse conditions. It promotes adaptability, strengthens patient skills, and bridges the gap between therapy and real-world functionality.
- Progressive Challenge: Environmental changes introduce varying levels of difficulty, ensuring exercise progression.
- Real-World Relevance: Prepares patients for daily life challenges where environments can be unpredictable.
- Enhanced Skill Transfer: The adaptability developed in different conditions may lead to better performance in everyday activities.
One way to change the environment is to introduce obstacles or challenges within the patient's daily surroundings. For example, you could place obstacles in their path, requiring them to navigate around objects while maintaining balance. This simulates real-world scenarios where individuals encounter various challenges in their environment. Additionally, you can modify the height or stability of surfaces they interact with, encouraging adaptation and enhancing their ability to perform tasks in different conditions.
By altering the environment, you create a dynamic and unpredictable setting that challenges patients to adapt their movements and responses. This approach makes therapy more engaging and facilitates the transfer of skills learned in a controlled setting to the challenges they may face in their everyday lives.
Using Sensory Stimuli to Progress Focus and Attention in Aquatics
- Visual Stimulation: The pool area can be equipped with colorful underwater LED lights, bubble walls, and projected patterns on the pool floor. These visual stimuli capture the child's attention and encourage them to engage with their surroundings.
- Auditory Stimulation: The quiet versus load auditory experience that occurs with immersion can help the child stay focused and attuned to the water environment.
- Tactile and Proprioceptive Sensation: The child interacts with different textures, such as textured pool walls, floating sensory toys, and tactile water jets. These tactile experiences enhance sensory perception and body awareness.
- Vestibular Stimulation: Water movements, like gentle waves or whirlpools, offer a vestibular challenge, encouraging focus and attention.
(Parthiban & Johnson Preamkumar, 2019)
We can use sensory stimulation to progress focus and attention in aquatics. Figure 31 shows an example. If you don't work in the pool, you can problem-solve this for different environments.
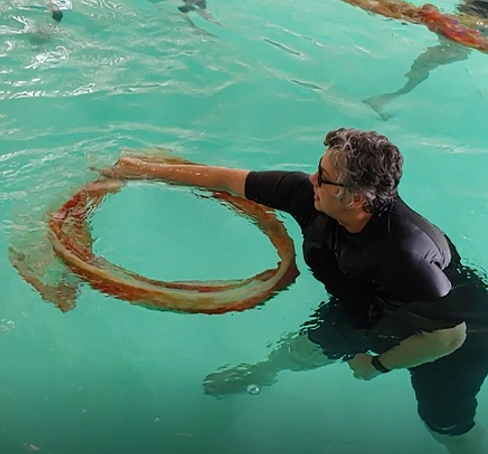
Figure 31. Client doing an activity in the pool.
In the pool, altering the environment can involve introducing various sensory stimuli and challenges. You mentioned the use of colorful lighting, bubble walls, projected patterns, and paintings to create a visually stimulating environment. Underwater exploration with goggles, tactile sensations from the water, and resistance from hair can offer diverse sensory experiences. Sounds, such as water jets and other aquatic noises, contribute to the auditory dimension, though adjustments may be needed for individuals with sensory processing issues.
On land, environmental modifications might include adjusting the surface stability or introducing obstacles to challenge balance and coordination. You can vary the terrain, use uneven surfaces, and incorporate tools or props to add complexity to the exercises. For example, walking on different textures like sand or gravel can enhance proprioceptive feedback and challenge stability.
Providing opportunities for controlled risk-taking within a supportive therapeutic context is essential in both settings. This can include tasks that challenge balance or coordination, pushing individuals beyond their comfort zones while ensuring safety and support. The goal is to bridge the gap between therapy exercises and real-world functionality by replicating dynamic, unpredictable scenarios.
- Be Aware of Ear Position Relative to Water, Especially When Performing Rapid Movements.
- Be aware of how much vestibular input is provided during aquatic techniques like Watsu and the Bad Ragaz Ring Method techniques.
- Integrate Singing, Humming, Chants
- Integrate play with water instruments (such as a trumpet that blows bubbles). Pair familiar songs with predictable motor skills or tasks.
- Provide Joint Input
- Provide intermittent joint and tactile input during activities and always prior to entering the pool.
Figure 32 shows different pool activities.
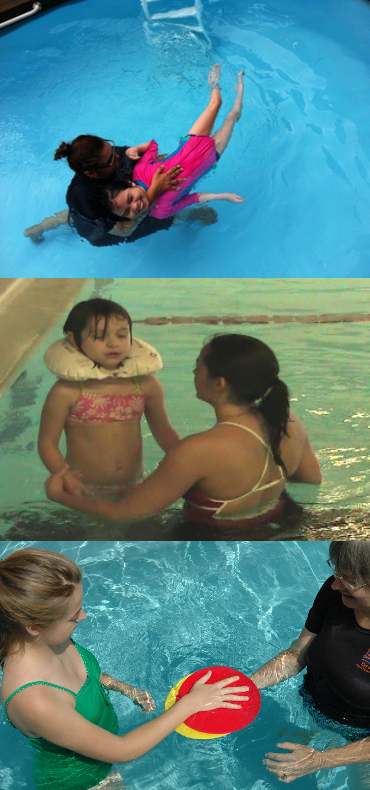
Figure 32. Different pool activities.
The concept of incorporating different planes of motion and creating acceleration and deceleration in the water, especially in techniques like the Bad Ragaz Ring Method and Watsu®, is a fascinating approach. Being mindful of the stimulation of semi-circular canals through varied movements is crucial for understanding the impact on the vestibular system.
Introducing auditory stimuli like singing, humming, or chanting is a creative way to alter the environment. The idea of associating a particular song with a specific activity to prime synaptic connections is intriguing and aligns with the notion of creating a sensory-rich context for movements.
Shifting the depth in the pool or modifying body positioning on land to manipulate joint input provides a dynamic way to adjust the challenge level. The ability to vary weight distribution, alter angles, and introduce challenges contributes to making therapeutic exercises more engaging and enjoyable.
- Create Challenges.
- Use unusual items to create never-ending challenges, like trying to keep the bubble in a level in the center of the level.
- Immerse Ears
- Submerge ears for a calming effect on the nervous system. Couple this with slow rhythmic swaying for a lowered overall arousal.
- Use Watering Can / Paint Brush / Sponges / Jets
- Use a watering can for dripping sensation, perform brushing prior to sessions, or use sponges, car wash mitts, paint rollers, and other tools in water. Position the patient next to the water jet to overwhelm the sensory system to get it to shut down.
Other pool activities are shown in Figure 33, like keeping the bubble in the middle of the level.

Figure 33. Other pool activities.
The Chopped Challenge analogy is fantastic for illustrating how therapy can be approached with creativity and adaptability. It's like taking various elements and figuring out how to create something functional and enjoyable out of them, much like the chefs do with their ingredients on the "Chopped" show. This approach adds an element of fun and problem-solving to therapy, making it more engaging for the individuals involved.
Reducing sound in the pool is a clever strategy, especially for those with sensory processing issues. The combination of pressure underwater and the absence of external sound can create a calming environment, allowing individuals to focus on movements and activities more effectively. Using water-friendly tools like paintbrushes and sponges adds another layer of sensory input and engagement to the therapeutic experience.
The incorporation of everyday tasks like pouring a glass of water or carrying objects adds a functional aspect to therapy, aligning with real-world challenges. It's a holistic approach that goes beyond traditional exercises, making therapy more relevant and meaningful to individuals' daily lives.
- Wrap in Bath Blankets / Towels / Binders / Wet Suits
- Drape the torso and limbs with wet towels to increase positional awareness. Use abdominal binders when a patient requires additional pressure to the core. Use wet suits for patients who cannot tolerate colder temperatures.
- Introduce Different Textures
- Have the child feel various tactile brushes, sponges, cloths, etc. Then have him/her close eyes and try to guess which one the therapist is providing input to the child with.
- Move to Shallower/Deeper Water
- Immersion in water reduces a patient’s weight-bearing input which may decrease his proprioceptive cues. It will also alter compressive forces on lower extremity joints and the spine.
Figure 34 shows some other pool ideas.
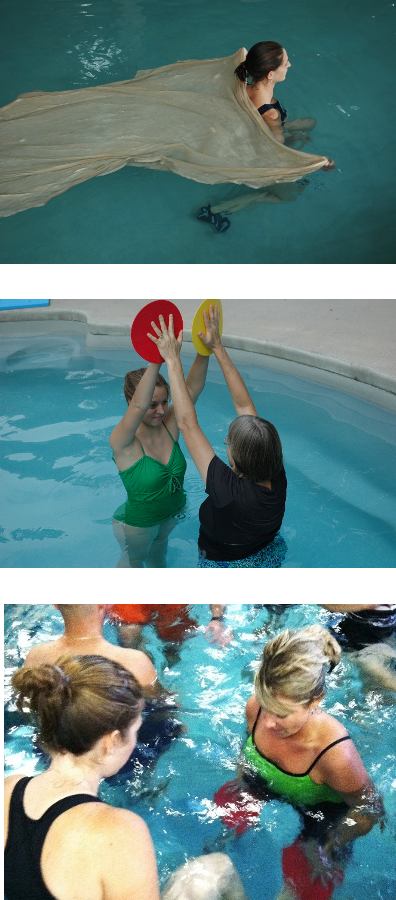
Figure 34. Other pool ideas.
Using bath blankets or water-friendly fabrics like sarongs in the pool is a brilliant idea. The weight of wet fabric provides additional resistance, creating a sensory experience for individuals in the water. This can enhance proprioception and contribute to a more engaging therapy session.
Incorporating dressing drills in the pool is a creative way to work on functional activities. It adds a real-world context to therapy, allowing me to practice tasks like putting on different textures of clothing while experiencing the resistance and buoyancy of the water. While post-COVID precautions have limited certain activities, my adaptability and focus on minimizing contamination risk, demonstrate the flexibility needed in the current environment.
The ability to adjust the depth of the water provides another layer of environmental modification. Shifting between shallower and deeper water levels allows for a range of challenges and variations in therapy exercises, catering to individual needs and goals.
This approach emphasizes the importance of sensory input, adaptability, and real-world relevance in aquatic therapy.
Method 12-13: Velocity (and Amplitude)
- Alter the velocity of movement. Alter the amplitude of movement.
- Altering the velocity (speed) and amplitude of movement can be powerful tools to achieve specific training effects.
- Tailoring movements to an individual's specific needs is essential for optimal training effects.
- A well-designed exercise program can use variations in velocity and amplitude to address patient goals, from rehabilitation to athletic performance.
- By understanding the interplay between velocity and amplitude, therapists can create tailored movement progressions that optimize training effects for their patients.
The last thing we will talk about is method 12 and bonus 13, which is amplitude, is a very powerful tool both on land and in water. You can alter the velocity of movements and alter the amplitude of movements.
Method 12: Velocity
- Slow and Controlled Movements:
- Ideal for early-stage rehabilitation or for patients with limited mobility.
- Benefits include improved stability, motor control, and reduced risk of injury.
- Moderate Speed:
- Suitable for building strength and endurance.
- Enables the body to adapt to increased resistance and stress.
- Fast and Explosive Movements:
- Used for enhancing power, speed, and coordination.
- Important for athletes or advanced patients looking to regain functional performance.
(Cengizel, 2020)
Changing the speed of movements plays a crucial role in tailoring training effects to an individual's needs. The velocity of movement significantly influences the training effect obtained, and designing a program that matches specific velocities and amplitudes is key. Whether the goal is improving basic functional movements or enhancing athletic performance, understanding the nuance between velocity and amplitude is essential.
Contrary to common belief, slower and more controlled movements are not necessarily easier. They force the body to engage in specific muscle patterning and refine movement patterns. I recall my own experience learning racquetball, where self-taught, fast-paced playing reached a plateau until a coach introduced the importance of slow and controlled movements for skill development. Although challenging and frustrating, these deliberate, slow movements laid the foundation for improved performance.
When working with stroke survivors or individuals facing movement challenges, allowing them to execute movements incorrectly without guidance hinders progress. Emphasizing slow, controlled movements initially helps build the foundation for strength and endurance, paving the way for more complex activities. Plyometrics and bursts of power become the final components in the progression, enhancing overall functional capacity. This approach ensures a comprehensive and effective training program, addressing each stage of movement development.
Bonus Method 13: Amplitude
- Reduced Range of Motion (ROM):
- Useful in cases of pain, injury, or restricted joint mobility.
- Promotes motor learning and improves muscle control.
- Full Range of Motion:
- Targets overall flexibility and functional movement.
- Effective for increasing joint mobility and muscle length.
- Increased Range of Motion:
- Important for athletes or advanced patients seeking high levels of joint mobility.
- Can improve overall performance and functional abilities.
Here is an example of amplitude. Imagine doing a serratus punch where I do a virtual push-up, and the computer screen is the ground. I push out to see my range of motion and how long my arm is. I then contract further, and my serratus anterior takes my scapula and rolls it around the rib cage. It presses it into the rib cage to get the last little oomph out of it. That is the amplitude of my movement. It is like doing a half pushup and a full pushup, and then a pushup where I do that last little bit where I get this scapular protraction out of it. I can do things at the beginning with a very small amplitude of movement. Then, I can do full range of motion, which is the speed of motion.
Consider a scenario where the objective is to enhance an individual's strength through isometric contractions. Research indicates that contracting in a specific position yields strength within a limited angular range—approximately five degrees in either direction. Functional strength gains diminish beyond 10 or 20 degrees from the contracted position. Isometric strengthening, while valuable in the initial stages of rehabilitation to activate actin-myosin cross-bridges and engage Golgi tendon organs, cannot be a singular focus. It necessitates progression into full-range movements.
When individuals, especially those experiencing pain, instinctively curtail their amplitude of movement, a strategic and gradual approach becomes crucial. For instance, consider someone who has had a stroke and maintains their arm in a sling position. When proposing therapeutic interventions, trust is paramount. I establish an understanding, assuring them that I will cease upon their request, fostering a collaborative relationship.
Contrary to forceful actions, my approach to addressing sling posture is methodical. Instead of immediately addressing external rotation or elevation, I start by placing my hands on the individual's back. With gentle fingertip movements around the pec minor insertion near the coracoid process, I initiate a progressive sequence, subtly enhancing the range of motion. This method aims to alleviate discomfort and introduce a controlled dissociation by engaging the scapula.
Continuing beneath the armpits, I employ techniques such as lifting and gentle manipulation, gradually expanding the amplitude. Placing the heel of my hand on the scapula, I induce a forward movement, opening up the chest and gradually increasing the range of scapular motion. This approach proves effective in addressing the intricacies of the scapula's 17 muscles.
In cases where glenohumeral joint and capsular restrictions are apparent, prioritizing scapular mobility before addressing elevation proves to be a strategic move. Allowing the scapula to move freely alleviates potential pain points before delving into elevation maneuvers. This principle is particularly relevant when working with clients in aquatic therapy, where achieving elevation of the distal end while ensuring proper seating of the humeral head in the glenoid fossa is crucial.
A gradual process of loosening up the entire complex is initiated to facilitate the desired elevation and seating. Incorporating Feldenkrais-inspired movements, such as having individuals lie in bed and gently glide their hands together sidelying, allows for a nuanced approach to improving range of motion. This holistic strategy underscores the significance of addressing scapular mobility as a foundational step towards comprehensive rehabilitation, emphasizing controlled amplitude throughout the therapeutic process.
Sample Interaction Scenario: Adding Velocity and Amplitude Changes to Gait
- Location: Gait training
- Basic interaction: The patient walks at the same self-selected speed.
- Adding Velocity and Amplitude Changes: After you have assessed the patient’s preferred gait speed and pattern, start playing around the edges.
- Slow motion walk (6 Million Dollar Man)
- Freeze frame walking
- Obstacle course walking
- Side-step progression with variations in steppage
- Tandem walking
- Circuit training for gait variability
- Metronome-paced walking
- Slope and incline walking
- Mirror gait training
- Frankensteins, butt kickers, high knees
(Wiggermann, 2019)
Incorporating variations in velocity and amplitude can be instrumental in enhancing gait training. Introducing dynamic changes can offer diversified benefits instead of solely relying on the conventional approach of walking at a self-selected speed. Here are several techniques to play around with velocity and amplitude during gait training:
Million dollar man walking involves a slower form of walking characterized by deliberate, measured steps – a nostalgic reference for some.
Freeze frame walking introduces pauses during walking, requiring individuals to stop abruptly while maintaining control over their center of mass.
Obstacle course walking challenges individuals to navigate through an obstacle course, testing balance and adaptability during gait.
Side steps progression incorporates sidestepping into the routine, a particularly effective method for addressing balance issues.
Tandem walking encourages walking in a straight line with one foot placed directly in front of the other, emphasizing stability and control.
Circuit training integrates varied exercises within the walking routine, providing a comprehensive approach to gait enhancement.
Metronomes can be utilized to pace individuals during walking, particularly beneficial for conditions like Parkinson's to prevent freezing.
Walking on slopes introduces walking on slopes to challenge muscle engagement and adaptability in different terrains.
Mirror gait training is a mimicry-based training where the individual mirrors the gait pattern of the therapist, promoting synchronization and coordination.
Sports Medicine Techniques challenge gait with unconventional methods like butt kickers, high knees, and Frankensteins, typically associated with sports training. Often overlooked for certain patient demographics, these exercises can offer substantial gains, especially for those with limited mobility.
It's crucial to recognize that even seemingly advanced or athletic techniques can be adapted for diverse patient populations, including those recovering from hip replacements or individuals prone to falls. In fact, the slower the baseline gait, the more pronounced the improvements can be. Tailoring gait training to individual needs and gradually introducing these dynamic variations can contribute significantly to overall progress and functional gains.
Using Velocity and Amplitude Changes to Progress Gait Training
- One of the easiest ways to determine if something is awry with an individual’s overall “fitness for independent living” is to test his walking speed.
- The walking speed test consists of exactly what its name specifies – patients are measured on the speed with which they can walk a specific distance.
- Its simplicity and ease of use have made it a popular test for assessing everything from functional status to the need for rehabilitation.
(Stringhini et al., 2018)
The significance of amplitude and velocity in gait training, particularly with walking speed, has been a transformative perspective shift for me, influenced by insightful articles. One of the most straightforward yet revealing assessments of overall fitness for independent living is the Walking Speed test. Despite its simplicity, this test is often overlooked, and its prognostic value is substantial.
The Walking Speed test involves measuring how quickly an individual can walk a certain distance. Numerous studies have prognostically linked walking speed to various outcomes, suggesting its relevance in assessing one's ability to live independently. The correlation is evident in studies that indicate specific walking speed thresholds: if an individual cannot cover a certain distance within a designated timeframe, it may signal the need for assisted care. In some cases, it could determine whether someone can function as a community ambulator or is limited to household ambulation.
- Therapists have coined the phrase ‘the 6th vital sign’ as a useful way to describe the powerfully predictive nature of walking speed.
- Authors have gone so far as to compare it to the blood pressure test in its versatility, predictive capabilities, and ease of administration.
- It’s hard to imagine another test that can be completed in under 2 minutes in almost all settings which can give as much information as the measurement of walking speed.
- When evaluating the standards of a test, it is useful to look at the safety, cost-effectiveness, ease of use, and ease of interpretation. A walking speed test marks off all of these boxes.
(Fritz, & Lusardi, 2009; Salzman, 2017)
Walking speed is referred to as the sixth vital sign, joining the ranks of traditional measurements such as heart rate, respiratory rate, blood pressure, and oxygen saturation. This paradigm shift recognizes its versatility, predictive capabilities, and ease of administration, making it a pivotal metric in physical rehabilitation.
The comparability of walking speed to the blood pressure test highlights its significance. The test is versatile and holds predictive value akin to other vital signs. Its administration is remarkably efficient, typically requiring less than two minutes, and can be conducted in various settings, including poolside, gyms, homes, or driveways. All that's needed are two cones and a stopwatch or a phone.
To ensure accurate assessments, standards are crucial. Age and gender-mandated benchmarks provide a comparative framework, allowing practitioners to interpret results and determine an individual's standing, such as being at the 50th percentile, indicating a moderate risk of additional rehabilitation.
- Walking speed is a great predictor of future health. Elderly people with slow walking speed were at a higher risk for future disabilities than their counterparts.
- Improving your patient’s performance on the walking speed test can also improve overall results in rehabilitation.
- A study on the effects of increasing walking speed times in post-stroke rehabilitation showed that the capacity for distance walking (such as that needed for community ambulation) was enhanced when walking speed increased.
- This goes to show that measuring walking speed over short distances is an easy way to gauge progress in bigger tasks like long-distance walking.
(Salzman, 2017)
Numerous studies have delved into the implications of slow walking speed, revealing its profound predictive value for future health outcomes. Among the elderly, a slow walking speed is associated with an elevated risk of future disabilities. The dynamic nature of walking speed is particularly noteworthy in rehabilitation, where enhancing this metric can catalyze overall progress.
A study focusing on a post-stroke population demonstrated that increasing walking speed alone, even without explicitly practicing distance, translated into individuals becoming community ambulators. This underscores the simplicity and effectiveness of using walking speed as a gauge of progress in rehabilitation.
The Walking Speed test involves a straightforward setup using two cones, designating specific zones for acceleration and deceleration. This uncomplicated yet strategic arrangement allows for a quick and efficient assessment of walking speed, making it a valuable tool for monitoring and guiding rehabilitation progress.
- Not only does walking speed provide valuable information about mobility and disease progression, but the speed at which you walk is associated with cognition.
- When researchers looked into the relationship between cognitive function and walking speed, they found that walking speed and cognition ran parallel to each other.
- Whenever they found less decrease in walking speed over time, they also found less decrease in cognitive function.
(Salzman, 2017)
The connection between walking speed and cognitive function is a noteworthy aspect that goes beyond its implications for independent living and rehabilitation. Studies have elucidated a parallel relationship between walking speed and cognition, suggesting that changes in one may correspond to changes in the other.
The correlation underscores the intertwined nature of physical and cognitive well-being. Observing a decline in walking speed might serve as an early indicator prompting individuals to address cognitive health. The adage "as goes your walking speed, so goes your mind" encapsulates the essence of this relationship.
In instances where individuals manage to maintain or improve their walking speed over time, researchers have noted a corresponding preservation or lessening decline in cognitive function. This finding underscores the potential bidirectional influence between physical mobility and cognitive health.
Recognizing the interplay between walking speed and cognitive function emphasizes the holistic nature of health maintenance. It encourages a proactive approach, prompting individuals to address changes in walking speed as an integral aspect of cognitive well-being. This insight reinforces the importance of maintaining an active and engaged lifestyle for physical and cognitive vitality.
- Fritz and Lusardi charted out an inexpensive way to perform the walk test in most locations.
- All that is needed is a 20-meter stretch of straight path. Although the test itself is timed for 10 meters, there should be a 5-meter ‘ramp-up zone’ and 5-meter ‘deceleration zone’ before and after the testing area.
- The patient is cued to walk at a comfortable speed and continue walking until reaching the end of the 20 meters.
- Timing begins the moment the first limb crosses the testing line and ends the moment the first limb leaves it.
- The deceleration zone prevents the patient from slowing down to ‘stop on a dime’ at the end of the test strip and thus skewing the test.
(Fritz & Lusardi, 2009; Salzman, 2017)
To perform the walking speed test inexpensively in most locations, you only need a straight 20-meter path. The test covers a 10-meter distance, but including a ramp-up zone and a deceleration zone is crucial. This strategic setup prevents individuals from stopping suddenly, ensuring a more accurate assessment of walking speed.
Here's how to conduct the test:
Preparation: Identify a straight path of at least 20 meters with two cones marking the start and end points.
Instructions: Instruct the patient to walk at a comfortable speed.
Timing: Start the stopwatch as the patient passes the first cone and stop it as they pass the second cone. The patient should continue walking for an additional five meters beyond the second cone before stopping.
This setup, including the deceleration zone, enhances the reliability of the test by preventing abrupt slowdowns. The straightforward design makes it feasible to conduct the walking speed test in various settings, promoting accessibility and ease of implementation.
Method 10: Work
- Alter the distance moved or force expended to progress the work performed.
- “Work" is typically defined as a measure of energy transfer that occurs when an object is moved over a distance by an external force.
- Think of it as the measure of the energy expended during physical activities.
- It is calculated by multiplying the force applied to move an object (or body part) by the distance over which that force is applied.
- Work is essential for understanding and quantifying the effort and energy involved in therapeutic exercises, functional movements, and activities of daily living.
(Mendes, 2018)
Work involves altering the distance moved or the force expended to advance the work performed. In its essence, work is commonly defined as a measure of energy transfer occurring when an object is moved over a distance by an external force. This can be conceptualized as the measure of energy expended in the process. The calculation of work is straightforward – it is the result of multiplying the force applied by the distance over which it moves.
While the fundamental concept of work is clear, it is often approached regarding METs (metabolic equivalents). METs express the energy expenditure of an activity in relation to the energy expended at rest. This framework allows for a standardized understanding of the metabolic demands associated with different activities, aiding in quantifying and comparing work across various physical endeavors.
METs (Metabolic Equivalents)
- METs (Metabolic Equivalents) are related to work in physical therapy as they provide a way to measure and compare the energy expenditure or metabolic cost of various physical activities. METs are a useful tool in therapy for several reasons:
Quantifying Energy Expenditure: METs help in quantifying the energy expenditure associated with different exercises and activities. This information is valuable when designing exercise programs for their patients.
Prescription of Exercise Intensity: Therapists can use MET values to prescribe exercise intensity. By matching a patient's current fitness level to an appropriate MET level, therapists can ensure that exercises are challenging enough to promote progress without causing excessive strain.
Monitoring Progress: METs can be used to track a patient's progress over time. By comparing the MET level of a particular activity before and after a course of physical therapy, therapists can assess improvements in fitness and functional capacity.
Safety and Optimization: METs are used to ensure that patients exercise at a safe and appropriate level for their current condition. By understanding MET values, therapists can optimize exercise regimens to suit individual needs.
Functional Assessment: METs can be used in functional assessments to determine a patient's ability to perform various activities of daily living. This helps therapists design rehabilitation programs tailored to specific functional goals.
Educational Tool: Therapists can educate their patients about the energy expenditure of various activities in METs. This information can empower patients as they better understand the physical demands of their exercises and activities.
In the realm of cardiopulmonary rehabilitation, METs play a significant role. They serve as a valuable metric for quantifying energy expenditure, allowing for precise prescription of exercise intensity. This approach enables the monitoring of progress, ensuring individuals operate at a safe and optimized level during rehabilitation. Additionally, METs serve as a functional assessment tool, providing insights into individuals' capabilities.
Moreover, METs extend beyond rehabilitation as an educational tool. They facilitate discussions on activity levels and energy demands, offering practical insights. For instance, when advising on activities, you can highlight that gardening requires much higher METs than light household tasks like dusting. This educative aspect enhances individuals' understanding of the energy costs associated with different activities, empowering them to make informed choices about their physical exertion levels.
- Sitting at Rest: 1 MET - This represents the energy expenditure when sitting quietly, such as reading or watching TV.
- Standing: 1.5 METs - Simply standing without any additional activity.
- Walking Slowly: 2 METs - Walking at a slow pace, typically less than 2 miles per hour.
- Walking Briskly: 3 METs - Walking at a faster pace, around 3 to 4 miles per hour.
- Climbing Stairs: 4-6 METs - Climbing stairs involves variable energy expenditure depending on speed and the number of stairs climbed.
- Cooking: 2-3 METs - Preparing meals, which includes standing, chopping, and light movements.
- Light Housework: 2-3 METs - Activities like dusting, sweeping, or making the bed.
- Gardening: 3-4 METs - Gardening activities, such as digging and weeding, can be moderate to heavy in intensity.
- Bicycling: 4-7 METs - Riding a bike, with the MET value varying depending on speed and terrain.
- Swimming: 7 METs - Swimming laps at a moderate pace. The MET value can vary depending on the stroke and intensity.
Here is a list of basic METs. It goes all the way from sitting at rest to doing something like swimming. As you can see by the energy demands, people should not swim after a heart attack.
Using the Clock Concept to Increase Work
- Clock Concept. Clock Visualization: Imagine your arm movement as a clock face, where 12 o'clock is directly in front of you, 3 o'clock is to your side, 6 o'clock is behind you, and 9 o'clock is to the other side.
- Exercise Variations:
- Front Raises (12 o'clock): Lift a weight in front of you, targeting the front shoulder and upper chest muscles.
- Lateral Raises (3 o'clock and 9 o'clock): Lift the weight to the side, targeting the lateral deltoid muscles.
- Rear Delt Flyes (6 o'clock): Bend forward slightly and lift the weight behind you to work the rear deltoid and upper back muscles.
- Diagonal Raises (1:30 and 10:30): Lift the weight in a diagonal direction, targeting both front and lateral deltoid muscles.
(Alguacil-Diego, 2023)
Here is an example using the clock concept to increase work with people. They can visualize a clock while doing an activity like lunges. They can lunge to the front at 12, three, six, and nine.
Using the Elevator Concept to Increase Work
- Elevator Concept. Using the concept of an elevator and "floors" for a squat exercise is a creative way to add variation and challenge to your squat routine. By imagining ascending or descending through different "floors", you can modify your squat pattern.
- Squat Exercise Variations:
- Ground Floor Squat: Begin with a basic squat by bending your knees and lowering your body.
- Basement Squat: Squat deeper, engaging your glutes and hamstrings more.
- Intermediate Floors: Perform squat pulses, holding the squat position for a few seconds at various "floors" within your squat descent.
- Top Floor Squat: At the highest point in your squat, do a calf raise to work your calf muscles.
Another strategy to enhance work is the elevator concept. Imagine performing squats, transitioning from a ground floor squat to a deep squat resembling the basement and ascending to intermediate floors. This method adds a layer of challenge and progression to exercises like squats, creating a dynamic workout experience.
This leads us to the final point – increasing endurance through training. Endurance, a cornerstone in fitness, relies on duration, intensity, and frequency adjustments. The synergy of these three elements forms the foundation for elevating endurance levels. This multifaceted approach requires minimal adjustments but yields significant benefits, making it a fundamental aspect of fitness training.
Method 8: Endurance
- Increase endurance with training.
- These three things factor into the endurance training triangle.
Duration: Increasing exercise duration gradually challenges the aerobic system, improving cardiovascular fitness and stamina.
Intensity: Adjusting exercise intensity allows for more efficient oxygen utilization and the development of muscle endurance.
Frequency: Properly spaced workouts promote recovery and long-term endurance gains.
Method 8: Benefits of Optimizing Endurance Training
- Improved Cardiovascular Health: Longer durations and varying intensities promote better heart health.
- Enhanced Muscle Endurance: Adjusting intensity challenges muscles to adapt and endure longer.
- Injury Prevention: Varied frequency helps prevent overuse injuries and promotes recovery.
- Sustainable Progress: Balancing the training triangle ensures steady, long-term improvements in endurance.
Sample Interaction Scenario: Adding Endurance Training Cues to Pool Calisthenics
- Location: In Pool, Chest-Deep Water
- Basic interaction: The patient walks laps in the pool
- Adding Endurance Training: Water walking quickly loses its skilled nature without creativity. Additionally, it is difficult to get patients to maintain the intensity of exercise without constant cueing. Add one of these endurance training elements to solve both problems.
- Do the 4-Walls Drills.
- Do a Pyramid Drill.
- Try to Build-a-Move.
(Thorson et al., 2020; Thorson et al., 2022)
Using Endurance Drills to Progress Calisthenics
- 4-Walls Drill. The 4 Walls Drill Concept was developed by Andrea Salzman, PT, (Aquatic Therapy University), to address both the cognitive and physical impairments associated with Parkinsonism and other neurological disorders.
- During this drill, the participant is assigned 4 different tasks, with each task being performed facing one of 4 walls.
- The participant is asked to recall which task is assigned to each direction and then perform it, with cues given as needed depending upon the individual's cognitive level.
- This drill can be advanced in multiple ways: increasing repetitions, timed drills, changing directions, adding a cognitive component, and moving to more shallow water to suggest a few.
Using Endurance Prompts to Add Endurance
- 4-Walls Drill. The objectives of this study were to determine the feasibility of the 4-walls drill for individuals with Parkinsons and evaluate the effect of an aquatic therapy (AT) intervention on land-based gait speed.
- The 4-walls drill is a safe and feasible intervention.
- The results did not show a statistically significant improvement in land-based gait speed or aquatic outcome measures.
- One subject continued to receive AT for an additional 5 visits and demonstrated continued improvement across all aquatic outcome measures.
Using Endurance Prompts to Add Endurance
- Pyramid Choreography. Patients can be taught to exercise with a pyramid approach.
- Patients are taught a series of exercises, beginning with 16 reps of each exercise, dropping to 8 reps, then down to 4 reps, down to 2 reps, and finally decreasing to 1 rep of each.
- With pyramid choreography, at least 2 exercises are alternated (16 reps of exercise #1, 16 of exercise #2, 8 of exercise #1, 8 of exercise #2, and so on).
- As the reps drop, the intensity tends to increase. Each time a new exercise is done, it “resets” the intensity meter and refreshes the effort.
- Pyramid choreography can be coupled with the 4-Walls drill if you only want the patient to perform a single exercise. After performing 16 reps, the patient is cued to turn and begin again. After turning to all 4 walls, the reps are dropped to 8…. And so on.
Expanding on the concept of pool calisthenics, incorporating training cues can enhance the effectiveness of exercises. Utilizing the elevator concept and incorporating walking laps in the pool provide a foundation for dynamic aquatic workouts. By adding specific cues, individuals can manipulate the intensity and engagement level of these exercises, tailoring the experience to their fitness goals.
This is just the tip of the iceberg, and in future webinars, I'll delve deeper into additional ideas and strategies to optimize pool calisthenics, ensuring a comprehensive and varied approach to aquatic fitness.
Bringing it All Together: Methods
- All 6 of these methods of enrichment have their devoted followers, as do the 6 that were presented in Part 1 of this training. But none of them can stand alone as the answer.
- Learning about and using these methods of progression will provide a very valuable service to patients, families, and communities and open the door to professional attainment and satisfaction.
- And a therapist who continues to love to experiment with good ideas is one who will be a better therapist the next day.
(Salzman, 2017)
Thanks for your time today. In summary, utilize all the methods discussed for a holistic approach, fostering professional growth and satisfaction. Experimenting with diverse ideas makes for a continually improving therapist.
Questions and Answers
How do you document the progression and make it measurable?
First, perform a standardized test and record the initial score. Identify three areas of weakness and document specific interventions aimed at improvement. Focus on enhancing skills rather than merely noting seconds or repetitions. Track how the intervention addresses their weaknesses and progresses them.
Do you list the test as a goal following interventions?
Yes, the goal is often an improvement on tests. Highlight the patient's initial score, identify areas of concern, and emphasize interventions targeting those specific weaknesses. Retesting is crucial to demonstrate progress and justify continued skilled services.
How do you use these techniques for bedbound patients but face challenges with OASIS assessments?
Acknowledging the frustration, the solution is complex. Recognize time constraints and focus on educating family members or caregivers to continue exercises post-therapy. While challenging, it's crucial to make the most of the limited time and work towards sustainable progress.
How do you switch between concentric and eccentric control with resistance? Is this enough, or would you integrate functional patterns?
While incorporating resistance is beneficial, the emphasis should be on integrating functional patterns. Address specific functional challenges, such as turning in bed, to ensure the exercises directly contribute to improving the patient's daily activities.
Can you expand on using aquatic exercises for baseball players?
Aquatic exercises are valuable for baseball players, especially catchers. The pool allows controlled resistance and challenges speed, enhancing strength and power. It's an excellent environment for rehabilitating athletes, safely emphasizing power moves and eccentric elongation.
References
Ajmaal, H., Sharif, F., Shakeel, H., Waqas, M., & Imran, M. (2021). Berg Balance Scale as a clinical screening tool to check fall risk among healthy geriatric community. Rawal Medical Journal, 46(1), 209-209.
Alguacil-Diego, I. M., Cuesta-Gómez, A., Pont, D., Carrillo, J., Espinosa, P., Sánchez-Urán, M. A., & Ferre, M. (2023). A novel active device for shoulder rotation based on force control. Sensors, 23(13), 6158.
Alexander, N. B., Galecki, A. T., Grenier, M. L., Nyquist, L. V., Hofmeyer, M. R., Grunawalt, J. C., ... & Fry‐Welch, D. (2001). Task‐specific resistance training to improve the ability of activities of daily living–impaired older adults to rise from a bed and from a chair. Journal of the American Geriatrics Society, 49(11), 1418-1427.
Breidenbach, F., Sargent, E., & Failla, M. (2020). Rehabilitation of shoulder injuries in basketball. Basketball Sports Medicine and Science, 687-700.
Cengizel, E. (2020). The relationship between speed and isokinetic knee strength in female volleyball players. African Educational Research Journal, 8(2), 406-409.
Dumuids-Vernet, M. V., Forma, V., Provasi, J., Anderson, D. I., Hinnekens, E., Soyez, E., ... & Barbu-Roth, M. (2023). Stimulating the motor development of very premature infants: effects of early crawling training on a mini-skateboard. Frontiers in Pediatrics, 11, 1198016.
Fell, D. W. (2004). Progressing therapeutic intervention in patients with neuromuscular disorders: A framework to assist clinical decision making. Journal of Neurologic Physical Therapy, 28(1), 35.
Fritz, S., & Lusardi, M. (2009). White paper: “Walking speed: the sixth vital sign”. Journal of Geriatric Physical Therapy, 32(2), 2-5.
Li, C., Chen, X., Zhang, X., Chen, X., & Wu, D. (2023). Muscle synergy analysis of eight inter-limb coordination modes during human hands-knees crawling movement. Frontiers in Neuroscience, 17, 1135646.
Mendes, M. D. A., Da Silva, I., Ramires, V., Reichert, F., Martins, R., Ferreira, R., & Tomasi, E. (2018). Metabolic equivalent of task (METs) thresholds as an indicator of physical activity intensity. PloS one, 13(7), e0200701.
Parthiban, M., & Johnson Preamkumar, S. (2019). Effect of aqua therapy exercises on behavior: Hyperactivity & impulsivity among person with ADHD. International Journal of Physiology, Nutrition and Physical Education, 4(2), 447-448.
Rastgar Koutenaei, F., Noorizadeh Dehkordi, S., Amini, M., & ShahAli, S. (2023). Effect of Swiss ball stabilization training on trunk control, abdominal muscle thickness, balance, and motor skills of children with spastic cerebral palsy: A randomized, superiority trial. Archives of physical medicine and rehabilitation, 104(11), 1755–1766. https://doi.org/10.1016/j.apmr.2023.05.011
Salzman, AL.(2017). Is walking speed really the 6th vital sign? The Walking Speed Test. Retrieved from https://www.ausmed.com/cpd/articles/walking-speedl
Salzman, AL. (2019). 13 ways to progress any exercise, task or activity. Water-Based Interventions for Musculoskeletal Disorders conference. Aquatic Therapy University; Oak Ridge, TN.
Stringhini, S., Carmeli, C., Jokela, M., Avendaño, M., McCrory, C., d’Errico, A., ... & Delpierre, C. (2018). Socioeconomic status, non-communicable disease risk factors, and walking speed in older adults: multi-cohort population based study. BJM, 360, k1046.
Thorson, C. L., Brown, P. S., & Hogan, B. E. (2020). Use of the 4 walls drill concept to address gait speed in the Parkinson's Population. In The Journal of Aquatic Physical Therapy, 28(1), 16-17.
Thorson, C. L., Hogan, B. E., & Brown, P. S. (2022). Aquatic therapy intervention, including the 4-walls drill, for persons with Hoehn and Yahr Stage IV Parkinson's Disease: A retrospective data analysis. The Journal of Aquatic Physical Therapy, 30(1), 2-7.
Wiggermann, N., Rempel, K., Zerhusen, R. M., Pelo, T., & Mann, N. (2019). Human-centered design process for a hospital bed: promoting patient safety and ease of use. Ergonomics in Design, 27(2), 4-12.
Citation
Salzman, A. (2024). 12 ways to progress any PT or OT exercise, activity, or movement, part 2. OccupationalTherapy.com, Article 5688. Available at www.occupationaltherapy.com