Overview
- Why complete vision screens in the acute care setting?
- Visual Considerations for the Acute Care Population
- Basic Eye Anatomy
- Vision Screening
- Acute Care Intervention
- Referrals
We are going to start with why we should be doing vision screens in the acute care setting and some visual considerations for the acute care population. We will review some basic eye anatomy and go over the vision screening options. We will also touch base on some acute care interventions you can do, as well as referrals.
Why Complete Vision Screens in the Acute Care Setting?
- Many medical conditions can impact the visual system
- E.g. Stroke, traumatic brain injury, neurodegenerative diseases
- Comorbid conditions occur frequently in combination with vision loss that impacts daily ADL/IADL performance 13
- E.g. MS, diabetes, HTN, heart problems, stroke, hearing loss, depression, joint symptoms
- Aging and normal visual changes 1
- Low vision impairment
Why should we be completing vision screens in the acute care setting? There are many medical conditions that can impact the visual system, and some of the obvious ones include stroke, traumatic brain injury and neurodegenerative diseases. These diagnoses will trigger an OT to do a visual screen during the evaluation, but there are also comorbid conditions that occur frequently in combination with vision loss that will impact daily ADL and IADL performance. Some of those I have listed above include MS, diabetes, hypertension, heart problems, and depression. Comorbid and chronic conditions require more coordinated care to manage medically, but the patient also needs to have good self-management skills for these conditions. For example, individuals need to manage their medication regimens and function optimally within ADLs. These are things we often assess in the acute care setting. You need to be aware that comorbid conditions can increase the complexity of vision loss as it relates to function. You also need to know about aging and normal visual changes that occur. We will talk about that in a little bit, as well as low vision impairment. Low vision conditions are not always listed prominently in the medical chart so this is just another layer to consider when you are working with adults in the acute care setting.
- Vision impairment impacts many daily activities of living
- Reading
- Writing
- Interacting with and gathering information from the environment
- Safe mobility
- Medication management
- Grooming
- If not screened properly, visual deficits can be misinterpreted in an OT evaluation, possibly resulting in an invalid assessment, faulty clinical reasoning, and ineffective treatment.10
Vision impairment impacts many activities of daily living and the ones I have listed above are just a few ADLs in the acute care setting. Vision impairment can impact a much wider range than this. For patients in the hospital, there is quite a bit of information that they need to be able to manage. For example, when I am talking about reading, I am not necessarily thinking about leisure reading and books and magazines but rather functional reading like hospital menus, room phone numbers, hospital documentation, and discharge paperwork and recommendations. While it may not happen as often in the hospital, some people like to take notes about their care, write notes to family to coordinate for discharge, and sign documents. Interacting with and gathering information from the environment and safe mobility are other areas to consider. It is important that the patient can orient to their environment. Do they know where they are? Can they tell their family how to find them in the hospital? Can they get back to their room if they go for a walk? Can they navigate obstacles safely? Medication management is another important piece. Patients are often prescribed new medications while they are in the hospital. While they are not typically in charge of administering their own medications, they do make important health decisions in that setting. Can they read the documents that they are being given about these new medications? Do they understand the provider recommendations and medicine adjustments that are being made? They also need to be able to complete basic ADLs like grooming, getting dressed, and things like that. The takeaway is that if we are not screening properly, visual deficits can be misinterpreted in an OT evaluation, possibly resulting in an invalid assessment, faulty clinical reasoning, and ineffective treatment. We might label a patient as having a cognitive impairment when they actually have a visual impairment, and if you are trying to administer a cognitive assessment that requires reading but you do not screen vision first, your results could be pretty inaccurate. Patients can also be mislabeled as having behavioral issues. We might call them unmotivated or clumsy when it is just an underlying visual impairment. Though there are plenty of acute care challenges, like resources and time, a quick vision screen really should be part of every OT evaluation.
- Preparing the patient for discharge to the next level of care
- Specific follow-up referrals
- Early intervention in a hospital setting to maximize patient progression of daily activities and safe mobility
Finally, we are thinking about these aspects of discharge for the acute care setting. Where are they going? What kind of referral are we making based off of our evaluation? If somebody is going to go back to the community right away, what specific followup referrals are we making? And then, depending on how long they are in the acute care hospital, early intervention is going to help maximize the progression of their daily ADLs and safe mobility. Having all of the information we need is going to be really important.
Visual Considerations for the Acute Care Population
- Normal Age-Related Changes
- Post-Stroke Visual Impairment
- Low Vision
We will now talk about some visual considerations for this acute care population including normal age-related vision changes, post-stroke visual impairment, and low vision.
Normal Age-Related Changes1,11
- Loss of accommodation
- Slower dark adaptation
- Light scatter in the eye and increased difficulty with glare
- Dry eyes
- Decreased contrast sensitivity
- Changes in color perception
We are going to start to see some of these visual changes in adults around the ages of 41 to 60, but not all people will experience the same changes. One is the loss of accommodation. Accommodation is the mechanism by which the eye changes focus from distance to near images and this occurs because the lens of our eye changes shape. As we age, we lose flexibility in the lens and it makes it more difficult to focus at near distances. This is called presbyopia. Patients often need reading glasses. We have slower dark adaptation as our rod cell sensitivity decreases as we age, and we often need more light for daily activities. There can be light scatter in the eye and increased difficulty with glare as we get older. There can be dry eyes. The tear glands will produce fewer tears which can make eyes dry and itchy. You can get decreased contrast sensitivity and changes in color perception. The lens of the eye may start to discolor making it difficult to distinguish between certain color shades. These are just some of the typical changes that can occur.
Post-Stroke Visual Impairments6
- Ocular motility problems
- strabismus
- cranial nerve palsies
- gaze palsies
- vergence abnormalities
- nystagmus
- Visual field impairment (peripheral or central)
- Visual inattention
- Prevalence of acute post-stroke visual impairment averages 65%
This list was taken from a recent systematic literature review cited at the end of this presentation. While each category of visual impairment varied in prevalence based on the various studies included, the overall average of post-acute visual impairment was 65%, which is pretty high. This can include things like ocular motility problems, visual field impairment, both peripheral and central, and visual inattention. The point of this is to emphasize how important visual screening is for this commonly treated population.
Low Vision13,15
- Vision impairment that cannot be corrected by glasses, contact lenses, medical or surgical intervention
- Common diagnoses causing low vision:
- Glaucoma
- Age-related macular degeneration
- Diabetic retinopathy
- Cataracts
- Demyelinating disease (multiple sclerosis)
Low vision is vision impairment that cannot be corrected by glasses, contact lenses, or medical or surgical intervention. Common diagnoses that cause low vision can include glaucoma, age-related macular degeneration, diabetic retinopathy, cataracts, and demyelinating diseases like multiple sclerosis. While these low vision diagnoses are not often a primary diagnosis for hospital admission, they may greatly impact your functional evaluation with a patient. If you know a patient has a low vision impairment, this can alter the way you treat them or how you interpret their functional ADL performance, especially if that patient already uses compensatory strategies to maximize the use of their vision.
Low Vision Impairments
- Reduced acuity
- Reduced visual field
- Contrast sensitivity impairment
- Glare sensitivity
- Prevalence and incidence of low vision and legal blindness expected double over the next three decades in people ages 45 and older 4
These are some impairments you may see when you come across a patient with low vision: reduced acuity, reduced visual field, both centrally and peripherally, contrast sensitivity impairment, and glare sensitivity. The Journal of American Medical Association Ophthalmology did a recent study, also cited at the end of this presentation, that indicates that the prevalence and incidence of low vision and legal blindness is expected to double over the next three decades in people ages 45 and older. This is another thing to think about when you are working with this population in the hospital.
World Health Organization Classification of Visual Impairment2
I have included the World Health Organization Classification of Visual Impairment in Figure 1.
20/30 to 20/60 | Near-normal vision |
20/70 to 20/160 | Moderate low vision |
20/200 or worse | Severe low vision |
20/500 to 20/1000 | Profound low vision |
Less than 20/1000 | Total low vision |
No light perception | Total blindness |
Figure 1. Classifications of visual impairment.
This is based on the vision in the better eye with the best possible glasses correction. As you can see, up to 20/60 is near normal vision, and then this chart breaks down into subcategories beyond that. The last category is total blindness where there is no light perception. In the U.S., legal blindness is defined as a corrected vision of 2200 in the better-seeing eye. This is misleading language because the patient may still have usable vision and not be completely blind. Low vision is often misunderstood because the impairment can be so variable, and there are many ways in which a patient with low vision can use their vision functionally. In the hospital setting, if a patient has low vision, you just want to make sure that they have all of the necessary devices that they use for reading or distance because that will make a huge difference in how they operate functionally.
Eye Anatomy
Let's go over some basic eye anatomy in Figure 2.
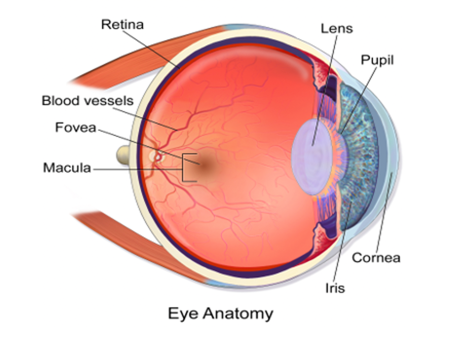
Figure 2. Basic eye anatomy.
There are three outer layers to the eye. The outermost layer is called the sclera. It is the white part of the eye, and it has an extension, the cornea. The cornea allows light to enter the eye, and it directs that light back towards the retina. There is a middle layer, called the uvea, and it is a vascular layer that provides nutrients to the retina. It contains the ciliary body, the iris, and the choroid. The ciliary body is an extension of the iris, and it secretes a transparent fluid called the aqueous humor into the eye. The ciliary body also contains a muscle that controls the shape of the lens during accommodation. If you go to the innermost layer of the eye, that is the retina. It contains several layers including one with photoreceptors, which have cone and rod cells. Rod cells provide peripheral vision and night vision. They are more abundant than cone cells, and cone cells provide detailed vision and color vision. The center of the retina is called the macula, and its center point is called the fovea. The fovea has the highest concentration of cone cells and visual acuity declines steeply as you move outward towards the retinal periphery. Behind the iris is the lens of the eye which focuses incoming light rays onto the fovea. At the very back of the eye, you have the optic nerve. This nerve carries the impulses formed by the retina to the vision centers of the brain via electrical impulses. Interestingly, our visual blind spot is the absence of photoreceptors on the part of the retina where the optic nerve exits the eye.
Visual Screening Considerations
- Typical age-related changes
- Patient report of baseline visual ability vs. current visual complaints
- Functional observations during OT evaluation and during each portion of visual screen
You want to consider the typical age-related changes we just talked about. You also want to know the patient's report of baseline visual ability versus their current visual complaints. It is important to make functional observations during the OT evaluation and then during each portion of the visual screen. It is important to then triangulate your data. You are going to combine what you are observing within the ADLs or very basic mobility tasks with observations on the visual screen. For example, if you notice certain behaviors like bumping into furniture edges on the right side when you are helping a patient move around the room as they bump into furniture edges on the right side, you want to keep that in mind as you start the visual screen. You may notice similar difficulties as you dive a little deeper. One observation does not give you a full picture. You want to continue assessing and combining information to create a functional picture of the patient.
Vision Screen
- Ocular history and interview
- Eye alignment
- Ocular motility (fixations, saccades, pursuits)
- Convergence
- Visual Field (central and peripheral)
- Visual acuity (near, distance)
- Contrast sensitivity
A vision screen includes an ocular history and interview, eye alignment, ocular motility (fixations, saccades, and pursuits), convergence, visual field (both central and peripheral), visual acuity (both near and distance), and then contrast sensitivity.
Visual History and Interview
- Complete chart review for current and past medical history
- Questions:
- When was your last eye exam? Ask about previous eye surgeries or significant ocular history
- Do you wear eyeglasses or use magnifiers?
- What do you use them for?
- Are they here in the hospital?
- Ask if the patient has noticed any visual changes since medical status change
- If there is a specific visual diagnosis, ask if they understand the diagnosis.
- ADL related impacts of vision change
Of course, everything starts with a chart review. You are going to take note of the current and past medical history. You are going to ask them a bunch of questions. When was your last eye exam? Have you had any previous eye surgeries or significant ocular history? At this point, they may tell you they have a low vision diagnosis. You want to ask about any eyewear or magnifiers that they may use. If they do have those things, what do they use them for? Are they used for reading or for seeing far away? Do they have those devices with them in the hospital? You want to ask if the patient has noticed any visual changes since this new medical status change that brought them into the hospital. If they have a specific visual diagnosis, you can ask them about that and if they understand what that means. You can provide education at this point as well. Or, you can ask if they have noticed any ADL-related impacts of the visual change. Some people have difficulty describing visual changes specifically and they may associate vision change with certain activities like difficulty reading or they might say they are having trouble with eye-hand coordination tasks, like reaching for items on their bedside table. If the family is present, I would ask them about any observed behaviors they have noticed. Sometimes, they can have a wealth of knowledge. You can also use these questions to gauge a patient's level of awareness by asking these questions before you screen. Do they know that they have visual changes? How is this impacting you?
Eye Alignment
- Hirschberg Technique
- The patient fixates on a target at eye level.
- Hold a penlight directly in front of the patient at about 12 inches.
- Observe the reflection of the light on the corneas of both eyes.
- If the eyes are aligned, the corneal reflections should match in location.
Normal alignment of the eyes is required for coordinated function, general visual processing, and the perception of a single image. Eye misalignment is called strabismus. There are six muscles attached to each eye that help them move. Injury to any of these muscles or nerves can cause a misalignment. If a patient does have a misalignment, you may notice the patient closing one eye or turning their head to reduce those visual symptoms. To test for this, we are going to use the Hirschberg Technique. We are going to have the patient fixate on a target at eye level, you hold a penlight directly in front of the patient at about 12 inches, and you are going to observe the reflection of the light on the corneas of both of their eyes. If the eyes are aligned, the corneal reflection should match in location.
Ocular Motility
Visual fixation.
- Screen procedure
- Hold a target at the patient’s midline and then to the left and right of midline at approximately 16-20 inches from the patient
- The patient should be able to maintain fixation for 10 seconds at each location without observable movement of the eyes or head
Poor visual fixation may give the impression that the patient is inattentive or impulsive. The function of visual fixation is to hold the image of a stationary object on the fovea by minimizing ocular drifts. If you recall, the fovea is the center of the macula and it has the highest concentration of cone cells for detailed vision. To screen for this, you are going to hold a target at a patient's midline and then to the left and the right of midline, at approximately 16 to 20 inches from the patient. The patient should be able to maintain fixation for 10 seconds at each location without any observable movement of the eyes or the head. A commonly observed disorder of fixation is nystagmus which is an involuntary rhythmic oscillation of one or both eyes.
Saccades.
- Screening procedure:
- Hold two pencils vertically 14-16” from eyes and 8” apart from each other. Using an uneven rhythm, ask the client to look at one target and then the other for a total of 5 sets.
- Expected findings: Quick, accurate eye movements to target for five sets. No under- or overshooting of the target. No movement of the head
Saccades are eye movements that enable us to redirect our line of sight so that the point of interest stimulates the fovea. Ideally, the saccade will take one eye movement to reach and stop directly on the target of interest. We use saccadic eye movements for things like reading. To screen for this, we are going to hold two pencils vertically about 14 to 16 inches from the patient's eyes and eight inches apart from each other. You can have colorful eraser tips on the end of the pencils for something more interesting to look at, but you are going to use an uneven rhythm asking the client to look at one target and then the other for a total of five sets. We would expect that the patient will have quick, accurate eye movements to each target for the five full sets without any under or overshooting of the target and minimal movement of the head. Undershooting is a commonly observed inaccuracy, whereas overshooting is much less common.
Smooth pursuit eye movements.
- Tests all 6 eye muscles that move the eye (four rectus muscles: superior, inferior, lateral and medial; two oblique muscles: inferior and superior) by having the patient track in the pattern of the letter H
- Screen procedure:
- While following a target at 12-14” from the face, the patient is instructed to:
- “look to the left,” then instruct patient to look up and down while looking in that direction
- “look to the right,” then instruct the patient to look up and down while looking in that direction
Smooth pursuits are movements that allow us to keep a smoothly moving target steady on the retina. They are the motor expression of attention and they require voluntary involvement. In this particular case, we will have the patient track in a pattern of a letter H. This is going to test all six of the eye muscles that move the eyes. You are going to have them follow a target at about 12 to 14 inches from their face, and you are going to instruct them to look left and then up and down while looking in that direction and then shift over to the right and look up and down in that direction. You want to observe the patient's eyes during the screen. The eyes should move an equal distance in each direction. The corneal reflection should match. This is probably going to be a little more obvious if you are using a penlight to test, if you are facing a window, or if you have good light in the room. The eyes should also stay on target with minimal jerking. Typically you will see deficits in pursuits and saccades that are similar.
- Scoring – non-standardized
- Intact: The patient is able to direct her gaze in all directions as requested.
- Impaired: The patient will be unable to direct her gaze in one or more directions requested. Specify which movements are impaired.
- Unable to perform
The scoring for this is non-standardized so you can call it intact if the patient is able to direct their gaze in all directions as requested. Impaired means the patient will be unable to direct her gaze in one or more of the directions requested and you can document which direction that is. Then, you can say unable to perform.
Symptoms of ocular motility problems.
- Excessive head movement
- Frequent loss of place
- Skips lines while reading
- Poor attention span
- Difficulty with activities of daily living that require a frequent change in fixation and accurate eye movements (driving, reading, writing)
Here are some symptoms. If a patient does have ocular motility problems, you may notice excessive head movement, frequent loss of place, skipping lines while reading, poor attention span, and then difficulties with ADLs that require a frequent change in fixation and accurate eye movements like driving, reading, and writing.
Convergence
- Screen Procedure
- Start with fixation target 20 inches from the patient’s face
- Move target towards the patient’s nose, ask them to report when the target doubles, and record this distance
- Observe the patient’s eye movements while screening
- After the patient reports doubling of the target, slowly bring target away from the patient’s face and record when the target becomes single
- Repeat several times to note fatigue
- The patient should be able to converge and recover within 6 inches of the bridge of the nose. Refer if outside this range.
The vergence system aligns the eyes to maintain binocular fixation and vision. It is a simultaneous movement of both eyes in opposite directions and this consists of convergence. This is eye rotation towards each other to look at a close object, and then divergence, when the eyes rotate away from each other, to look at a distant object. To screen for this, we are going to start with a fixation target 20 inches from the patient's face. You are going to slowly move that target towards the patient's nose and you are going to ask them to report when they see double then record that distance. You definitely want to watch the patient's eyes while you are doing this screening. After the patient reports a doubling of the target, you are going to slowly bring it back away and then record when that target becomes single again. You want to repeat this several times to note fatigue. The patient should be able to converge and recover within six inches of the bridge of the nose and you are going to refer if it is outside of this range. Limitations in convergence are not typically functionally significant unless the patient is unable to converge the eyes and maintain convergence at the five to six-inch range for several seconds. The inability to do this will make near tasks, like reading, very difficult. The patient may make a complaint about reading before you even get started. Then, convergence insufficiency is a commonly observed problem following CVA or TBI. In this condition, the eyes have a tendency to drift outward when being used for near work like reading, but they work well together for viewing distantly.
Confrontation Field Screenings
- This screen is only for gross, peripheral visual field loss
- This screening may not be sensitive with some patients and it is possible to miss a significant visual field loss with this procedure
- If the results of this screen are negative, but that patient displays behavior indicative of field loss, a referral is still recommended.
- Note: the patient should have good fixation ability, concentration, and attention for screening.
This is a screen for gross, peripheral visual field only. This screen may not be sensitive for some patients, and it is entirely possible to miss a very big visual field loss using this procedure. If that happens and your screening results are negative but the patient is displaying behavior that is indicative of field loss, you should definitely still refer them. The patient should have good fixation ability, concentration, and attention when you are screening this. Normal monocular field division is 50 degrees superiorly, 50 degrees nasally, 60 degrees inferiorly and 90 degrees temporarily.
- Equipment: A target (white sphere mounted on a small dowel rod/wand)
- Sit directly opposite the patient, about 20 inches away.
- Make sure the client is looking directly at your nose as you move the target from the 12 o’clock position. They should report when they first see the target. Move clockwise to the 2, 4, 6, 8, and 10 o’clock positions.
- Compare your visual field to the patient’s visual field as you screen. If they can’t see the target as soon as you can, it indicates a problem.
When we are testing this, you use a target. It could be the same pencil with the colorful eraser cap from before or a dowel with the little sphere on the end. You are going to sit directly opposite the patient about 20 inches away, and you are going to make sure that they are looking directly at your nose as you move the target down from the 12 o'clock position. They should report when they first see that target. From there, you are going to move clockwise to the two, four, six, eight, and 10 o'clock positions and do the same testing. You are going to compare your visual field to the patient's field. If they cannot see the target as soon as you can, that indicates there may be a problem. This description may seem a little vague, but I left it that way intentionally as I was preparing for this talk. There is conflicting information about screening monocularly versus binocularly. There was an argument made that OTs focus on function, and since most people operate binocularly, we should test binocularly. I have never done that myself but I definitely wanted to leave the option open, especially when you are considering the acute care setting and time constraints for OT evaluations. If you do decide to test monocularly, you cover the patient's right eye and you cover your left eye so that you can compare visual fields. Then, you are going to do the opposite to test the other eye.
Face Fields Macular Scotoma Screen.
- Screening for central visual field impairment
- Test distance: approximately 60 cm and at the patient’s eye level
- Each eye tested separately and then together
- The patient should fixate on OT’s nose and identify parts of the target (OT’s face) that are blurry, missing or distorted.
- Can describe the reported impairment by quadrant
I included this screening option because central visual field deficits are common in low vision impairment and post-stroke visual impairment. Central vision impairment can impact contrast sensitivity, a patient's ability to read, their ability to use eye-hand coordination effectively and to see facial expressions. For these reasons, I wanted to include this piece. You are going to test at approximately 60 centimeters and at a patient's eye level. This is between 23 and 24 inches away. You are going to test each eye separately and then together. The target, in this case, is the OT's face. You make sure they are not shifting their gaze around. You then ask them to identify parts of your face that are blurry, missing, or distorted. You can definitely describe this by quadrant to make it easier. You will notice the impact of this once you screen acuity. The patients may miss half of the letters on the text acuity chart. This can give you a better idea of what is going with their visual fields if you do the central screening as well.
Functional symptoms of visual field deficits.
- Walking: trouble seeing steps or curbs, shortened or uncertain stride, poor balance, tendency to walk next to the wall and hold on with hands, the patient does not turn head as frequently, bumps into objects
- Leaves food on half of plate
- Reading: very difficult, misreads words, reads slowly, reads inaccurately, difficulty with page navigation, cannot stay on the line
- ADL: Difficulty locating items
Thinks to look for are trouble walking and trouble seeing steps or curves. They may have a shortened or uncertain stride, poor balance, and tend to walk next to the wall and hold onto it with their hands. They will not turn their head as frequently if they have a peripheral field loss, and they will bump into objects. They may leave food on half of their plate. Reading will be very difficult. They may misread words, read very slowly, inaccurately, and have trouble navigating a page or staying on the line. And then with ADLs, they can have difficulty locating items amongst many other difficulties. You will definitely notice that they will have decreased visual scanning, especially if the patient is not aware of the field loss initially. You might cue a patient to grab an item from the counter, and they may only scan to one side. Or, they will assume they can see the whole counter and tell you that the item is not there. Screening for vision first may actually help you interpret some of these functional observations that you are making when you get them up and try to engage them in ADLs.
Near and Distance Acuity
- Visual acuity defined:
- The resolution power of the eye
- A measurement of the detail that the fovea (center of the macula) can decipher
- The level of detail with which a person can see objects
- Near acuity: distance within arm’s length
- deficits will affect reading, writing and other activities requiring “close work”
- Distance acuity: > arm’s length, typically 20’
- deficits can affect the patient’s depth perception, spatial judgment, and facial recognition
It is defined as the resolution power of the eye and the measurement of the detail that the fovea. The fovea, or the center of the macula, can decipher the level of detail of which a person can see objects. Near acuity is typically a distance within an arm's length. Deficits will affect reading, writing, and other activities requiring close work. Distance acuity is typically greater than an arm's length, around 20 feet, and deficits with distance acuity can affect the patient's depth perception, spatial judgment, and facial recognition.
Screening distance visual acuity.
- Commonly measured with a Snellen chart
- Procedure:
- Post chart on the wall and have patient stand 20’ away
- Test each eye separately and then both eyes together
- Recorded acuity is either:
- The lowest line that the patient can read more than half of the letters, but not all of them
- All the letters on a line, plus a few letters (less than half) on the next line
The most commonly used chart is the Snellen chart. Before I go any further, I just want to clarify that the figures and letters on acuity charts are called optotypes, and I am going to use this word moving forward. The Snellen chart, though it is very popular, actually only has one optotype at the 2200 line. So, it is really not a sensitive chart for the low vision patient, and low vision charts can go up to 21,000. Do not assume just because the patient cannot see that 2200 optotype, that they are unable to do other functional things. Their inability to read a letter at that size does not indicate the level of functional vision they may have. When I say functional vision, that describes how the person functions in vision-related activities. This tells us about the patient's quality of vision and gives the OT a better understanding of how the patient is able to use their vision for activities like reading, mobility, and ADLs. Visual function actually describes how the eye functions, so it tells us the patient's quantity of vision based on their acuities and field findings. I wanted to talk about the Snellen chart as everyone is very familiar with it, but the low vision therapist in me just needed to caution everyone about not being able to read that top line does not mean they cannot see anything.
If we are using a Snellen chart, you are going to post it on a wall and have that patient stand 20 feet away. You are going to test each eye separately and then both together. The recorded acuity is either the lowest line that the patient can read, more than half the letters but not all of them, or all of the letters on the line are read, plus a few, usually less than half, on the next line. If the patient can read to the 20/40 line but only three of the five letters, you would chart 20/40 minus two. If they can read the full 20/40 line and then two optotypes on the next line, you would chart 20/40 plus two.
- Score recorded as a fraction:
- Numerator: Patient testing distance (in feet) from the chart
_________________________________________________
Denominator: The distance at which the letter being viewed could be identified by a patient with normal visual acuity
- Expected results: The patient is able to read without squinting or turning head. Refer if 20/40 or worse.
It is recorded as a fraction. The numerator is the testing distance in feet from the chart, and then the denominator is the distance at which the letter being viewed could be identified by a patient with normal visual acuity. For example, the 20/40 line indicates that the line the patient read correctly, at 20 feet away, can be read by a person with normal vision from 40 feet away. When you are screening distance acuity, you want to make sure that the patient is able to read without squinting or turning their head, and you are going to refer them if their acuity is 20/40 or worse.
Screening near visual acuity.
- Near vision acuity cards have more precise measurements compared to functional screening options
- Functionally, use a newspaper or magazine held at 14-16 inches from eyes. Point to 6 individual letters and ask the patient to identify them.
- Test each eye then both together
- Expected results: minimum 5/6 letters correct, no squinting or turning head.
Near vision acuity cards have more precise measurements as compared to functional screening options. However, I am going to discuss a functional screen as I want to consider the constraints of the acute care setting. I realize that time and limited resources may impact what an OT carries around with them throughout a day. Thus, a functional option may be a reasonable option. Though, I will also speak generally about near acuity cards in a moment.
If you are going to screen functionally, you can use a newspaper or a magazine that is held at about 14 to 16 inches from the patient's eyes. You are going to point to six individual letters and ask the patient to identify them. You can test each eye separately and then both together. The expected results would be that they can read a minimum of five out of six letters correctly without squinting or turning their heads. It is also important to document the distance that the patient is holding the card or the newspaper ad, especially if it is different than a standard 16-inch working distance. For example, if the patient has to hold the chart or a newspaper about eight inches from their face to read, that is a significant thing. You definitely want to indicate that in your documentation.
If you are using a near acuity chart, with more precise measurements, you may notice that the measurements along each line may be listed in M units. These are based on a meter system. Oftentimes, these metric visual acuity charts have a Snellen equivalent listed. A 1M unit has a Snellen equivalent to 20/50 as an example. This equivalent score is only valid, though, if the appropriate testing distance is used. But for reference purposes, a 1M size letter is equivalent in size to newspaper print. 2M letters are equivalent in size to large print books, about 16-point font. This is why the functional assessment of near acuity is done with newspaper print because that is typically the size we want patients to be able to read.
Visual acuity reminders.
- Use appropriate correction for testing distance
- Basic procedures regardless of chart used:
- Must test at the appropriate distance for the specific chart used
- Adequate chart illumination required
- The patient must be able to provide a reliable answer
- Modifiable screening options:
- Number of optotypes shown during screen
- Method of patient response e.g. forced choice, matching
- Length of screening
Here are some reminders of visual acuity since I did not go precisely through all the different steps of a particular chart. You want to use the appropriate correction for whatever testing distance or chart you are using. If the patient wears reading glasses, you want to make sure they have those glasses on when you are testing near acuity. The same for distance acuity if they have a distance prescription. If the patient is getting their prescription brought to them later in the day because they did not plan to come to the hospital, I would recommend holding on the visual screen because this evaluation is only going to tell you what they can see without a prescription. But, if the prescription is broken or lost due to whatever accident brought them to the hospital, it may still be beneficial to complete the visual acuity screen so you know how to modify print material for them or apply compensatory strategies until they can see the appropriate provider and get a new prescription.
The following are basic procedures that you want to use regardless of the chart you use. Always make sure you are testing them at the appropriate distance for the specific chart. You are going to make sure you have adequate chart illumination so that the light is evenly displayed across the chart. Then, you want to make sure that that patient can provide a reliable answer because that will certainly mess up your results if you are not quite sure that they understand what you are asking them to do.
There are, however, some modifiable screening options that you can do. For example, you can modify the number of optotypes that you show during a screen. If a patient is having a really hard time tracking across a line or cannot figure out where you are pointing on a line, you can block the lines above and below that so that they can be directed more accurately. You can change the method of the patient response by using a forced choice or matching. Sometimes, I will photocopy part of the chart and use the really large images as a way for the patient to use a matching option. You can also modify the length of the screening if the patient fatigues easily or has other medical issues that interfere with their ability to participate in one sitting.
Contrast Sensitivity
- Definition: Ability to detect or distinguish objects as they decrease in contrast from their backgrounds
- Contrast impairment can exist despite normal performance on traditional acuity tests
- ADL impact:
- Difficulty reading poorly contrasted print like newspaper
- Mobility: difficulty seeing curb edges and the last step of carpeted stairs
- Difficulty recognizing facial expressions
- Recommend using a chart to measure, such as the LEA NUMBERS® Low Contrast Screener
By definition, this is the ability to detect or distinguish objects as they decrease in contrast from their backgrounds. Contrast impairment can exist despite normal performance on a traditional acuity test. Those acuity charts are high contrast, black and white, so they do not always pick up on contrast impairment. The ADL impact of contrast sensitivity impairment can be pretty significant. This can be seen as difficulty reading poorly contrasted materials like newspapers, food labels, or maybe some of the materials in the hospital that are on multicolored papers. Mobility-wise, you are going to see a difficulty with curb edges and the last step of carpeted stairs. They may have difficulty recognizing facial expressions. Sometimes patients will complain of dim or foggy vision if they have contrast sensitivity impairment. They may be really light-sensitive or be very particular about lighting conditions.
In contrast, sensitivity impairment usually occurs secondary to a variety of eye conditions and eye disease. There is not a classification of contrast sensitivity disorders. I recommend using a chart to measure contrast sensitivity, like the LEA NUMBERS Low Contrast Screener. You can also certainly do things in the room to assess whether or not they are able to see contrast well. An example is having them pour water into a clear glass within an inch of the rim. It is hard to tease out, especially if they are having a bunch of other visual issues. A chart is probably the easiest way to go if you have that option.
Acute Care Interventions
- Lighting
- Contrast Strategies
- Clutter reduction/Organization
- Sensory Substitution
- Visual Scanning and Mobility
- Written Communication
- Education
We can talk about some acute care intervention options. We are going to go over lighting and contrast strategies, clutter reduction and organization, sensory substitution, visual scanning and mobility, written communication, and education. And because this is a back-to-the-basics talk, these are generalist intervention recommendations. We are not going to get too far down the rabbit holes of different treatment options.
Lighting
- Reading light vs overhead light
- Task lighting needed for reading, writing, or eating
- Fluorescent light can cause glare which can increase patient distractibility or cause headache
- Manage room shades or curtains to limit light or increase light as needed for the patient
Earlier, we talked about normal age-related changes of light scatter and glare sensitivity, but there are many other visual conditions that can be positively impacted by illumination adjustments. One example would be macular degeneration. If a patient has a central scotoma that is not very dense, additional light when they are reading can make a very big difference functionally for them. It will depend on your hospital setting but sometimes there are specific reading light options available. Task lighting is usually within an arm's length and can help with reading, writing, and eating. If you can manipulate light in their room, it can make it easier for the patient to do basic daily activities. Fluorescent light can cause glare which can increase a patient's distractibility or cause a headache. You can also manage lighting conditions for the patient by adjusting the room shades or the curtains to either limit or increase light as needed. If a patient is uncertain about the benefit of light, you can demonstrate how their reading ability changes with and without a light. If you have a chart that you are using, you can always have them practice reading with just the overhead light on and then add a closer light to kind of show them objectively how their vision can improve. One additional trick I have used is using a smartphone flashlight. This can help a patient who is not within reach of a reading light or they are not in the direct line of lighting for any in-room option. You can show them how to turn on their phone light.
Contrast Strategies
- Contrast tape on the edges of adaptive equipment to increase visibility
- If teaching a patient how to use a sock aid, place a solid color towel on the floor to increase visual contrast.
- Contrast tape on call light or remote control
- Contrast for various braces
- Adhere dark-colored felt to the end of the strap or contrasting loops to the end of the straps so the patient can locate the ends more easily.
- Bold lined paper and bold black felt tip pen
Contrast tape on the edges of adaptive equipment can help increase visibility. It can be electrical tape (blue, red, or purple). It is not really special tape, but rather anything that can provide contrast to whatever you are trying to adapt. You can tape the edge of the sock aid so they can find that end more easily when they are trying to apply the sock. You can throw a solid color towel on the floor to increase some contrast against the sock aid as they put it on the floor. Contrast tape works well on call lights or remote controls. You only want to mark important buttons. You do not want to mark everything because that is not terribly helpful. You also want to make sure that the patient is helping decide what buttons to mark since they are the ones that are going to use it. You may have a grand idea about which buttons are important, but the patient might have other ideas. You can use contrast for various braces/orthotics. This is kind of a generic statement about orthotics but often times there is almost no contrast on them. It is either a solid black with black straps or solid white with white straps at least in my experience. You can use different colors on the straps so it stands out for the patient. Bold lined paper and bold black felt tip pens can be helpful if you are going to jot down notes for the patient or show them how to maximize their handwriting. You want to stick to high contrast black and white.
Clutter Reduction and Organization
- Clock method for meals; have someone describe the location of the food in terms of a clock
- Keep bedside table clutter-free and organized with only necessary items for patient
- Organize grooming supplies at the sink with patient input and remove unnecessary hospital supplies
You can use the clock method for meals. Someone can describe to the patient the location of their food on the plate in terms of a clock to help them stay organized while they are eating. Keeping the bedside table clutter-free and organized with only necessary items for the patient is also important. The bedside table sometimes becomes a dumping ground for everything in the room so as much as you can keep it organized will help the patient be a little more visually efficient. Similarly, you could do a treatment session where you help them organize supplies at the sink to help them with their routines in the mornings.
Sensory Substitution
- Use a finger as a guide when applying toothpaste to brush or directly put toothpaste into the mouth
- Feeling for the tag of the clothing
- Rubber band or ponytail holders around grooming supplies – number system
- Velcro taped to remote control, room call light or bed controls
- Place the pitcher spout to the cup edge before pouring
If the visual impairment is significant enough, it may help to teach the patient how to use other sensations to gather information and navigate during ADLs. Many of the ones I have listed here are tactile-based, but you can certainly dive a little deeper than the ones I have listed. An example would be showing them how to use their finger as a guide when applying toothpaste to the brush. So like aligning their finger to the bristles and touching the edge of the toothpaste container to it as they apply it, or more simply, just put the toothpaste directly into their mouth. Have them practice feeling for the tags of clothing so they can orient their clothing. Using the rubber band or ponytail holders around grooming supplies like a number system. For example, if the patient has shampoo and conditioner and they cannot read the bottle, a single rubber band could represent shampoo and two bands could represent conditioner. You can also do something similar with Velcro for the remote controls of the room, call lights, or bed controls. Instead of it standing out color-wise, they can feel for that material. Another tactile technique can be used when pouring coffee. You can teach them how to touch the spout to the edge of the cup before pouring.
Visual Scanning and Mobility
- Education on visual field screening result
- Train the patient to use an organized search pattern, especially when locating items for ADL routine
- Lighthouse technique
- Mobility + visual scanning
- Have patient locate static objects within the impaired visual field
- Progress to complex environments for the patient to practice timing their movement and interaction within dynamic environments
I always start with education on the results of the visual field screen because that can certainly normalize a patient's functional difficulties. They may not be able to verbalize to you what exactly has changed but they know that they are knocking things over or they cannot find things. Explain to them what you are noticing when you do the screen. This can go a long way to normalize that experience and provide education. An organized scan pattern can increase their efficiency when they are searching visually. Our peripheral field actually acts as a warning system so we are not always accustomed to scanning the environment, especially when it is intact. We tend to take it for granted but we gather quite a bit of information when our fields are intact. One intervention is called the lighthouse technique. This addresses visual inattention and visual scanning and I included it as a resource at the end of this presentation. I have used this even without the patient having a visual and attention problem to fully scan the periphery. For mobility and visual scanning, you can grade the progression from simple environments with static objects to more complex environments. The patient has to practice the timing of their movement and interaction within dynamic environments. An example of scanning for static objects is putting Post-It notes with large letters using high contrast on the wall and then having the patient spell out words by locating each letter card. They are getting feedback on their accuracy and then finding the boundaries of their visual fields. For dynamic training, they can do a pathfinding task to practice maneuvering in the main area of the hospital.
Written Communication
- Use sans serif fonts if typing instructions to the patient
- Larger text for written discharge recommendations
- Refer to text acuity results for approximate print size
- (1M X 8= 8-point font; 2M X 8 = 16 point font)
- Increase spacing between lines
- Do not use colum