Editor’s note: This text-based course is a transcript of the webinar, Post-Mastectomy and/or Axillary Node Dissection Rehabilitation Protocol, presented by Abi Roxana Guerra, PT, DPT, CLT-ALM, Board Certified Clinical Specialist in Oncologic Physical Therapy.
Learning Outcomes
- After this course, participants will be able to list at least three evaluation outcome measures to utilize for assessment and progression of treatment.
- After this course, participants will be able to list at least three precautions used when prescribing exercises to patients post-mastectomy and/or axillary node dissection.
- After this course, participants will be able to list at least three common signs and symptoms of lymphedema for the purpose of early identification, prevention, and treatment followed by techniques to improve fluid drainage.
About Me
Hello everyone! I want to talk a little bit about myself because I feel like it is essential and to let you guys know why this course even came about.

Figure 1. Images of the author.
Above you can see my parents. They have been fantastic and supportive throughout my journey, and I am thankful to God for their lives. I did my fourth clinical rotation at MD Anderson, and that is where my spark for oncology started. You can see "EP," which stands for Eagle Pass, Texas, a small border town in the bottom right. The closest big city is San Antonio, and growing up, we would have to drive two and a half hours to seek specialized medical care. I knew I wanted to go back home and serve this underserved region during PT school. The middle image is the front page of our finished protocol at Uvalde Memorial Hospital. Uvalde is about an hour away from Eagle Pass, but all the underserved cities surround it. I get to serve people from Eagle Pass and the surrounding areas.
Background and Purpose
- The purpose of this presentation is to offer therapists and patients a guide to confidently engage in treatment protocols specific to post-mastectomy and/or axillary node dissection.
- This educational guide covers:
- range of motion exercises
- self-care/ADLs
- energy conservation and cancer-related fatigue
- outcomes measures
- warning signs to prevent infection, lymphedema, and contractures.
- It is important to note that this protocol serves as a guide for patient-specific outcomes. Each patient should have an individualized plan of care with goals and treatment specific to their impairments and needs.
This presentation offers a guide to confidently engage in treatment protocols specific to post-mastectomy and/or axillary lymph node dissection. This guide will cover a lot of information such as range of motion exercises, self-care, ADLs, energy conservation, cancer-related fatigue protocols, outcome measures, and warning signs to prevent infection, lymphedema, or contractures. This protocol serves as a guide, but each patient will require specific things based on their impairments.
Anatomy
Pectoralis Major
- Pectoralis Major:
- Origin:
- Clavicular head-anterior surface of medial half of clavicle (17)
- Sternocostal head: anterior surface of sternum, superior six costal cartilages, and aponeurosis of external oblique muscle (17)
- Insertion:
- Lateral lip of intertubercular groove of humerus (17)
- Main Action:
- Adducts and medially rotates humerus; draws scapula anteriorly and inferiorly (17)
- Acting alone: clavicular head flexes the humerus, and the sternocostal head extends it from the flexed position (17)
- Origin:
I want to quickly review some anatomy, starting with the pectoralis major (Figure 2).
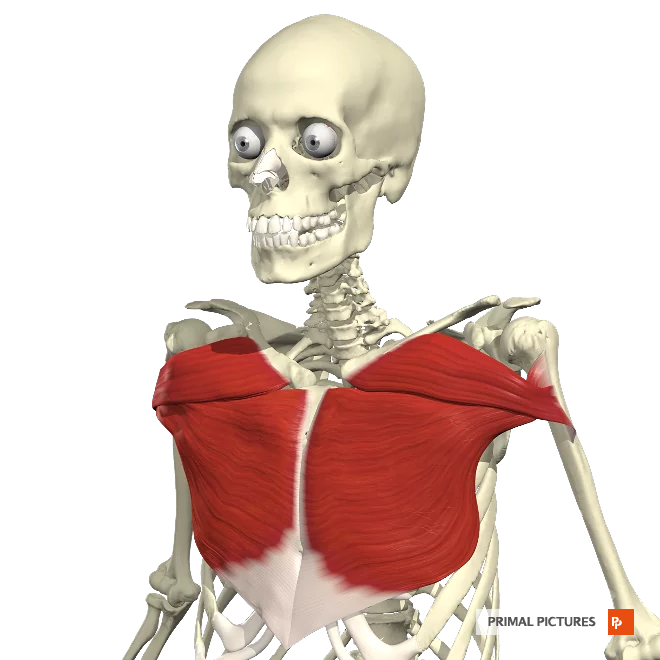
Figure 2. Anatomical image of the pectoralis major.
The pectoralis major originates at the clavicular head, and the anterior surface of the medial half of the clavicle, and the sternocostal head originates on the anterior surface of the sternum, superior six costal cartilages, and aponeurosis of the external oblique muscle. It inserts at the lateral lip of the intertubercular groove of the humerus.
The pectoralis major adducts and mediately rotates the humerus and draws the scapula anteriorly and inferiorly. When it acts alone, the clavicular head flexes the humerus, and the sternal costal head extends it from the flexed position.
Pectoralis Minor
- Pectoralis Minor:
- Origin:
- 3rd to 5th ribs near their costal cartilages (17)
- Insertion:
- Medial border and superior surface of the coracoid process of the scapula (17)
- Main Action:
- Stabilizes scapula by drawing it inferiorly and anteriorly against the thoracic wall (17)
The pectoralis minor originates at the third and fifth ribs near their costal cartilages, as you can see in Figure 3.

Figure 3. Anatomical image of the pectoralis minor.
Insertion is at the medial border and superior surface of the corticoid process of the scapula. The main action is stabilizing the scapula by drawing it inferiorly and anteriorly against the thoracic wall.
What is a Mastectomy?
- A mastectomy is a surgical procedure to remove all breast tissue from a breast.
- A mastectomy may be performed to treat or prevent breast cancer.
- When breast tissue is conserved to remove a tumor, that is called a lumpectomy.
- There are multiple types of mastectomies.
A mastectomy is a surgical procedure to remove all breast tissue from a breast. Figure 4 is an illustration of a right post-mastectomy.
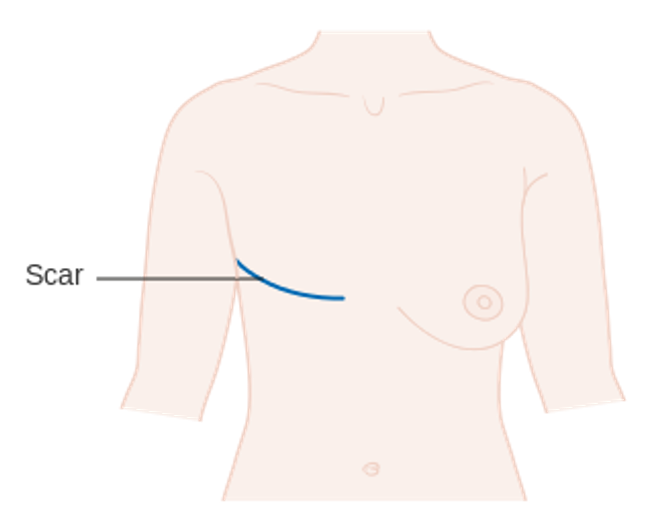
Figure 4. Illustration of a post-mastectomy (Image: Cancer Research UK uploader, CC BY-SA 4.0 via Wikimedia Commons).
A common question is, "Do you do this when you have cancer in the breast or do it to prevent cancer?" This procedure is done for both reasons. For example, a client with right breast cancer may choose to have her left breast removed as a preventative measure. This would be called a double mastectomy. When a tumor is removed but breast tissue is retained, that is called a lumpectomy. We will not be covering lumpectomy today.
Comparison of Breast Cancer Operations
Types of Mastectomies
- Simple/total mastectomy-breast tissue, fascia (pectoralis major), nipple-areolar complex, larger skin ellipse (16)
NOTE: Patients with early-stage breast cancer may be candidates for immediate breast cancer reconstruction if they have a mastectomy. If chosen to proceed with reconstruction, women can undergo:
- Skin-sparking mastectomy-breast tissue, fascia, nipple-areolar complex, and an ellipse of surrounding skin (leaves skin envelope for reconstruction)(16)
- Nipple-sparing mastectomy-breast tissue, fascia (leaves skin envelope with nipple for reconstruction)(16)
There are multiple types of mastectomies, as noted in Figure 5.
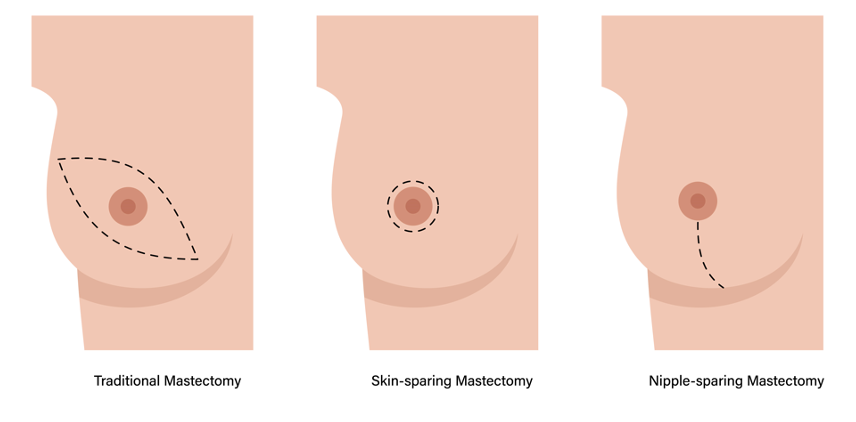
Figure 5. Examples of different types of mastectomies.
A simple, total mastectomy includes breast tissue, the fascia of the pec major, the nipple-areolar complex, and the larger skin ellipse. This is represented in the image on the left. Patients with early-stage breast cancer may be candidates for immediate breast cancer reconstruction if they have a mastectomy. Suppose they have chosen to proceed with breast reconstruction. In that case, they can undergo the two following mastectomies, which is a skin-sparing mastectomy (in the middle), which includes the breast tissue, the fascia, the nipple-areolar complex, and the ellipse of surrounding skin. Still, it leaves a skin envelope for reconstruction. A nipple-sparing mastectomy on the far right includes the breast tissue, the fascia, a skin envelope, and a nipple for reconstruction.
Radical Mastectomies
- Modified Radical Mastectomy- breast tissue, fascia, nipple-areolar complex, skin, levels I and II axillary lymph nodes (16)
- Radical Mastectomy- breast tissue, fascia, nipple-areolar complex, skin, levels I, II, and III axillary lymph nodes, pectoralis major and minor muscles (16)
- NOTE: We will cover the simple mastectomy and modified radical mastectomy today.
- The skin-sparing and nipple-sparing mastectomy could lead to immediate breast reconstruction with other precautions.
- We will not be covering breast reconstruction surgeries today.
- The modified radical mastectomy will be referred to as a mastectomy with axillary lymph node dissection.
A modified radical mastectomy includes the breast tissue, the fascia that we just talked about, the nipple-areolar complex, and the skin. What differs are levels I and II axillary lymph nodes. If you look at Figure 6, you can see what each includes. We will be covering a simple mastectomy, the first one I described. The only difference between a simple mastectomy and a modified radical mastectomy is that the latter includes the axillary lymph nodes in the name. A radical mastectomy consists of the breast tissue, the fascia, the nipple-areolar complex, the skin, levels I, II, and III of the axillary lymph nodes, and the pec major and minor muscles. This is a surgery I have not seen in a very long time as it was more common years ago. Surgeons realized that they were still getting the same or even good results by doing a modified radical mastectomy instead.
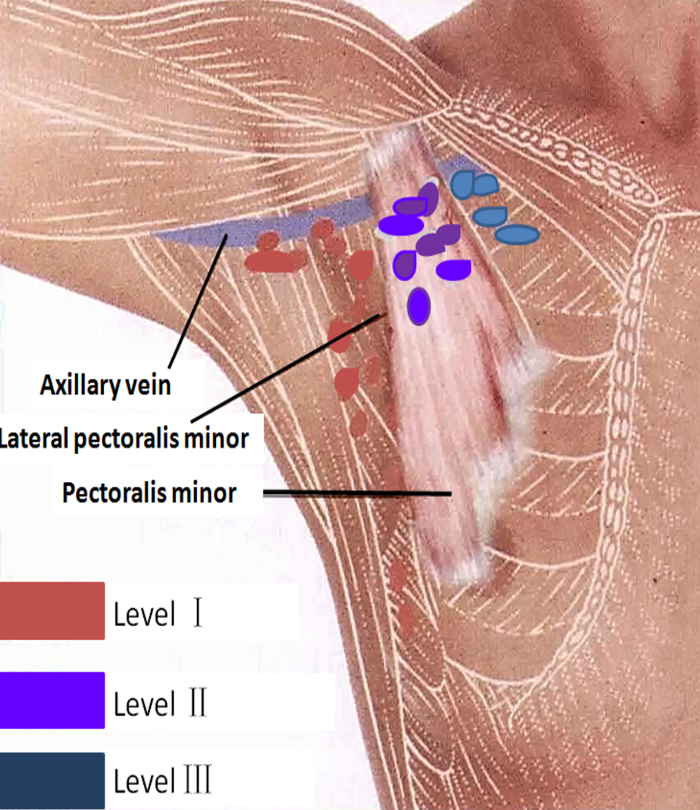
Figure 6. Modified radical mastectomy. Image: CCBY 4.0 Imaging Lymphatic System in Breast Cancer Patients with Magnetic Resonance Lymphangiography - Scientific Figure on ResearchGate.
In a modified procedure, they do not remove the third level of the axillary lymph nodes or the pec major or minor. As I mentioned, we will be covering the simple mastectomy and modified radical mastectomy today. The skin-sparing, nipple-sparing mastectomies (for immediate breast reconstruction), and other breast reconstruction like the DIEP (deep inferior epigastric perforators) or the lat flap require different precautions, so I will not be covering those. So, we will only be covering the simple mastectomy and the modified radical mastectomy today. And the modified radical mastectomy will be referred to as a mastectomy with axillary lymph node dissection.
What is an Axillary Lymph Node Dissection (ALND)?
- A traditional axillary lymph node dissection usually removes nodes in levels I and II.
- In this procedure, anywhere from about 10 to 30 lymph nodes are removed from the area under the arm (axilla) and checked for cancer spread.
- For women with invasive breast cancer, the procedure usually occurs in the same operation as a mastectomy.
- If you have a lumpectomy, the lymph node dissection may occur at the same time or in a later operation.
- NOTE: The protocol does not cover sentinel node dissection. Sentinel lymph node dissection is an alternative to traditional axillary node dissection. The patient may get an axillary node dissection after a sentinel node dissection.
A traditional axillary lymph node dissection usually removes nodes in levels I and II, and removal of level III is rare. In this procedure, anywhere from about 10 to 30 lymph nodes are removed from the area under the arm, in the axilla, and checked for cancer spread. For women with invasive breast cancer, the procedure is performed simultaneously as the mastectomy. If you have a lumpectomy, the lymph node dissection may occur at the same time or sometimes at a later date. It is important to note that the protocol does not cover sentinel node dissection.
What is a Sentinel Lymph Node Dissection (SLND)?
- The procedure is based on the idea that the lymphatic drainage within the breast is uniform and constant and that the first node(s) that drain the primary tumor will reflect the status of the remaining axillary nodes.
- The goal of the procedure is to limit the amount of surgery needed, but in some cases, more surgery may be needed after a sentinel node dissection.
- Use of intradermal or intraparenchymal injection of a radiolabeled isotope (technetium sulfur colloid) and/or a vital blue node.
- Any node that is found to be “hot” with the use of a gamma probe, or visualized as “blue” is considered to be a sentinel lymph node (SLN).
- The surgical risks remain lower in SLND than those following an ALND. The lymphedema risk of SLNB is 3-7% vs. up to 20% of ALND. (4)
- The median number of SLNs removed is 2 per axilla. (5)
A sentinel lymph node dissection (SLND) is an alternative to traditional axillary lymph node dissection. Patients may get an axillary lymph node dissection even after a sentinel node dissection. The procedure is based on the idea that the lymphatic drainage within the breast is uniform and constant and that the first nodes that drain the primary tumor will reflect the status of the remaining axillary nodes. The goal of this procedure is to limit the amount of surgery that is required. However, in some cases, more surgery may be needed after sentinel node dissection if they see cancer in the sentinel nodes.
They use an intradermal or intraparenchymal injection of a radiolabeled isotope and/or a vital blue node for this procedure. Any node that is found to be "hot" using a gamma probe will be visualized as blue. The surgical risk is lower in sentinel lymph node dissection than in an axillary lymph node dissection. And the lymphedema risk for a sentinel node dissection is three to 7% versus an axillary lymph node dissection of up to 20%.
Most people want to go more conservative first with the SLND. Usually, the median number of sentinel lymph nodes removed is two per axilla versus a 10 to 30 that we discussed for the axillary lymph node dissection.
Axillary Web Syndrome
Description
- AWS is a common side effect following breast cancer surgery with axillary lymph node dissection.2
- This condition involves the development of connective tissue or scarring under the axilla that could be painful and limit range of motion.
- AWS most commonly develops between 2-8 weeks post breast cancer surgery, however, can occur months to years later. (13)
- One study had a prevalence of AWS of 50% at 18 months.14 Another study had a 51% incidence in the 8 weeks following surgery. (15)
- AWS had not been frequently diagnosed because providers and patients were unfamiliar with signs and symptoms. (1)
- Additionally, providers who were knowledgeable about AWS did not refer patients for therapy because they were unaware of treatment options therapy could offer. (1)
Axillary lymph nodes syndrome is a common side effect following breast cancer surgery with axillary lymph node dissection. It involves the development of connective tissue or scarring under the axilla that could be painful and limit range of motion. It most commonly develops between two to eight weeks post breast cancer surgery; however, it could occur months to years later. It is essential to know what it is, what it feels like, or what the patient is feeling. One study saw a prevalence of axillary web syndrome of 50% at 18 months. Another study saw 51 incidents in eight weeks following surgery.
Axillary web syndrome is not frequently diagnosed because providers and patients are unfamiliar with the symptoms. And, the providers who were knowledgeable about it did not know what therapists could even do to help these patients out.
Presentation
- Presents as a tight, ~1 mm wide, linear singular or multiple cords in subcutaneous tissues of the ipsilateral axilla. (1)
- The cords could extend down the medial or medial-palmar ipsilateral upper arm or along the lateral edge of the ipsilateral chest wall.
- The cords could also be seen in the medial upper arm with extension into the antecubital fossa.
- The cord becomes visible and/or palpable when the arm is fully extended (elbow straightened) and then abducted.
- One study suggests that in 50% of patients the cord is not visible; therefore, palpation is required. (12)
- “Breaking” a cord does not have any negative effects such as swelling. (1)
- “Breaking” a cord can indicate an immediate increase in range of motion and tends to be maintained.
It presents as a tight one-millimeter wide linear singular or multiple cords in the subcutaneous tissues of the ipsilateral axilla where the axillary lymph node dissection was performed. The cords could extend down to the medial or medial-palmer ipsilateral upper arm or along the lateral edge of the ipsilateral chest wall. The cords could also be seen in the upper arm with extension into the antecubital fossa.
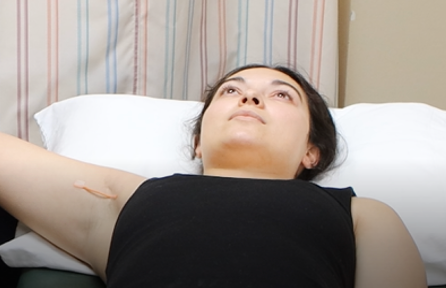
Figure 7. Example of axillary web syndrome.
The cord becomes visible and palpable when the arm is fully extended with the elbow straightened. You will see a video on viewing these cords in a second. One study suggested that the cord is not visible in about 50% of patients, so it is important to palpate it.
Breaking a cord does not have any adverse effects such as swelling, and it is a good thing. Usually, the client says, "Wow, I can move my arm so much better."
Treatment
- Active range of motion exercises
- Gentle manual techniques are recommended.
- Soft tissue mobilization
- Myofascial release
- Cord manipulation
- Stretching
- It has been theorized that AWS cord development could be associated with lymphangiogenesis; therefore, aggressive manual techniques may not be appropriate.2
- In the adult, lymphangiogenesis only takes place during certain pathological conditions such as inflammation, tissue repair, and tumor growth. (18,19)
- Under pathological conditioning, a major contribution has been established for the proliferation and sprouting of new vessels from preexisting lymphatic vessels. (20, 21)
- Manual lymph drainage
- Scar release manipulation and massage of adhesions
How do we treat axillary web syndrome? One treatment is active range of motion exercises that we will review later in this course. Another thing is gentle manual techniques. Additionally, you can use soft tissue mobilization, myofascial release, cord manipulation, and stretching. All of these have to be gentle. It has been theorized that axillary web syndrome cord development could be associated with lymphangiogenesis. Therefore, aggressive manual techniques may not be appropriate.
In adults, lymphangiogenesis only occurs during certain pathological conditions such as inflammation, tissue repair, and tumor growth. After surgery, there is inflammation while the tissues are trying to repair, and lymphangiogenesis occurs. Under pathological conditioning, a major contribution has been established for the proliferation and sprouting of new vessels from the preexisting lymphatic vessels. Typically, when they remove axillary lymph nodes, they stop them from working, and the system has to work harder. So, if new vessels are sprouting, do we want to crush them? No, we want the proliferation and sprouting of new vessels. Thus, we do not want to do anything harsh to stop that proliferation. I have had good results with gentle manual techniques, and it is also important to do manual lymph drainage (if you are a CLT), scar release manipulation, and adhesion massage.
AWS Video
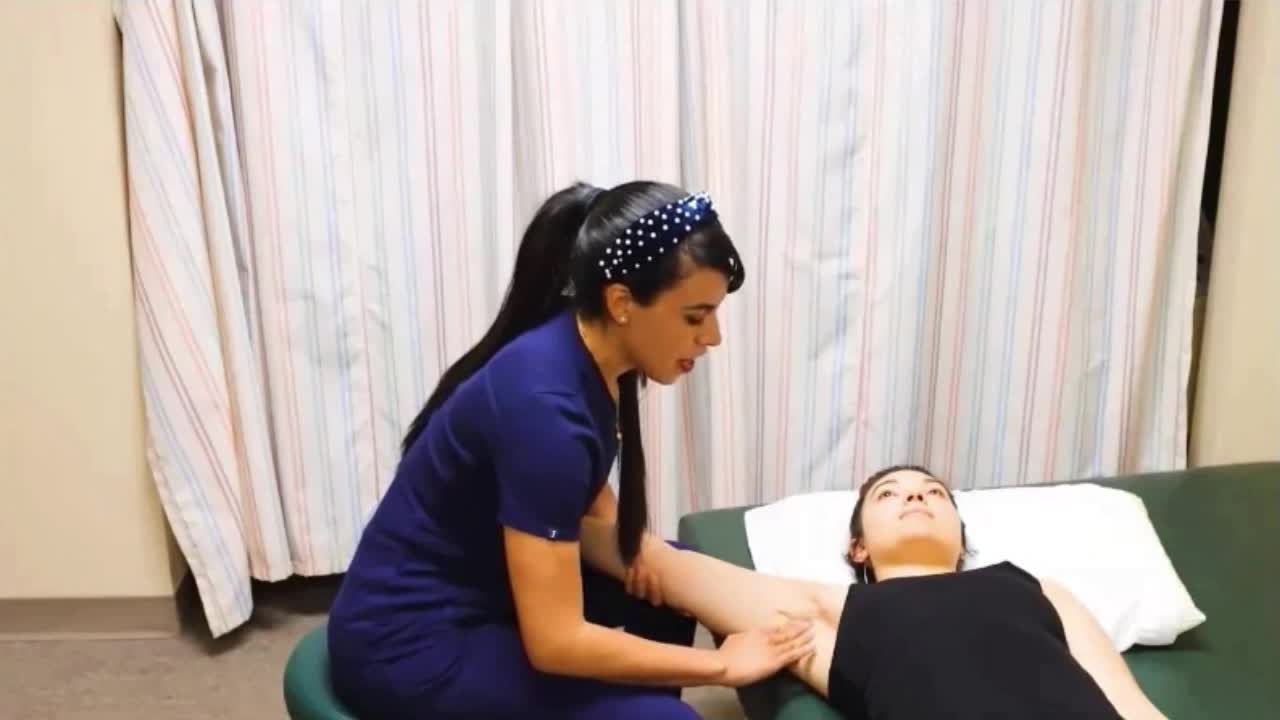
Okay, guys, we just finished talking about axillary web syndrome. So cords are about one millimeter wide in diameter. That's the average. So how do we find them? The first thing we're going to do is extend the patient's elbow and take them into shoulder abduction. So once we are there, we actually see a cord here. But first, I want to talk about why it is essential to be in this position. So the moment when I flex the patient's elbow, we can see that the cord's tension has decreased. However, when I extend the patient's elbow, the tension is greater. So it is extremely important that we're in this position to find them. Now, my cord is definitely visible. However, a study demonstrated that 50% of cords could not be visibly seen. So what are we going to do? We are going to palpate. So how do I palpate? Typically, I perform cross friction around the axilla to find any of those one-millimeter and diameter cords. I found mine. So let's get to stretching it. So the first thing I do is I bring the patient's arm up. I usually handle the patient's arm and they're a lot more comfortable because, at times, they don't fully stretch on their own. So now they're much more comfortable because I am holding the arm. Now, I'm slowly going to bring the patient's arm down, and I'm applying some pressure to that cord. I'm going to ask the patient to take a nice deep breath here. Good, and once she relaxes, I'm going to go ahead and bring it into a greater stretch. When I'm here, then I begin to perform a light cross friction on that cord, and I ask the patient to keep taking nice deep breaths. Now, it's extremely important that we are not doing any aggressive manual techniques. It has been theorized that there is a lymphangiogenesis component, and therefore, we want to be gentle with our cross friction because we do not want to cause any trauma to our lymphatic system. Thank you, guys.
Scar Massage
- Prior to, assist the patient in performing desensitization of scar
- May be the first time the patient has touched their scar
- When the scar is healed, perform for the patient first
- Include patient in the treatment of scar massage
- Identify if the patient is struggling with body issues
- Encourage hygiene of scar
- Scar mobilizations
- Circles
- Horizontal
- Vertical
Scar massage helps with desensitization. I have had patients that have never even looked at their scars. I usually take my clients into a room, dim the lights, and have nice, calming classical music. I ask them if they have ever seen or touched their scars before. I like to know this before I start touching their scars. Have a conversation about it and be mindful because, for some of them, it is the first time they see their body without their breast tissue. You want to let them know how important it is to desensitize that scar.
When the scars heal, perform desensitization for the patient first and include them. Some may say, "I don't want to touch it." Slowly, get them comfortable. Sometimes I perform the scar tissue massage and use their hand to guide them. I ask permission first. You want to identify if the patient is struggling with body issues. They have gone through trauma and surgery, but they also change their identity. It would be best to encourage hygiene of the scar as some clients are nervous about getting any water around it. After four to six weeks, as that scar is healing, we need to show them how to care for the scar.
We want to do circles and horizontal and vertical strokes for scar tissue mobilization.
Early Surveillance
Why is it important?
- Breast cancer-related lymphedema affects about 21% of patients who have breast cancer and results in substantial burdens:
- Physical
- Functional
- Psychosocial
- Financial (8,9)
- Clinical guidelines and statements from the United States, the United Kingdom, and Australia advise that there is a need to develop early detection and intervention programs. (9-11)
- Stout and colleagues proposed a prospective surveillance model of care for breast cancer rehabilitation that includes lymphedema surveillance and early intervention. (3)
- The current model for patients with breast cancer focuses on the treatment of the disease at the time impairments are noticed with possible delays from insurance approvals, referral to PT/OT, etc.
Breast cancer-related lymphedema affects about 21% of breast cancer patients and results in substantial burdens. Physically, their arm may no longer look like their other arm. They may also have functional, psychosocial, and financial burdens.
Clinical guidelines from the US, UK, and Australia advise the need to develop an early detection and intervention program. Stout and colleagues proposed a prospective surveillance model of care for breast cancer rehab, including lymphedema surveillance and early intervention. The current model for patients with breast cancer focuses on the treatment of the disease at the time impairments are noticed with possible delays from insurance approvals, referral to PT/OT, et cetera. Many times when a patient goes to the medical oncologist, as an example, they may say, "My arm feels a little heavy." The doctor is focused on cancer and may miss these comments. If we are part of the patient's care from early on, we can see any impairments in real-time.
What is early surveillance?
- Early surveillance includes pre-operative evaluation and education on the continuum of care to focus on the patients’ physical and functional well-being prior to the start of cancer care. (3)
- A form of early surveillance is A Prospective Surveillance Model for Physical Rehabilitation for Women with Breast Cancer.
- It includes:
- Pre-operative Rehabilitation, Early Post-Operative Rehabilitation, and Ongoing surveillance. (3)
- Impairment identification and management
- Upper Extremity and Trunk
- Pain
- Fatigue
- Function
- Weight (3)
Early surveillance includes a pre-op evaluation and education on the continuum of care to focus on the patient's physical and functional well-being prior to the start of their cancer care. For example, your patient may be scheduled for an axillary lymph node dissection. Before surgery, we can do some outcome measures, take measurements of their range of motion, and assess function and fatigue. Then, after surgery, we can identify any impairments in real-time, including upper extremity and trunk assessment, pain, fatigue, function, and weight.
Why a Prospective Surveillance Model (PSM)?
- To promote surveillance for common physical impairments and functional limitations associated with breast cancer treatment. (3)
- To provide education to reduce risk or prevent adverse events and facilitate early identification of physical impairments and limitations. (3)
- To introduce rehabilitation and exercise interventions when physical impairments are identified. (3)
- To promote/support physical activity, exercise, and weight-management behaviors through the trajectory of disease treatment and survivorship. (3)
- NOTE: If impairments are detected, initiate an appropriate rehabilitation program; otherwise, continue internal surveillance.
We want to look for common physical impairments and functional limitations associated with breast cancer treatment and provide education to reduce the risk or prevent adverse effects and facilitate them early on. We also want to introduce rehab and exercise intervention when physical impairments are identified. And finally, we want to promote and support physical activity, exercise, and weight management behaviors throughout the trajectory, other disease treatment, and survivorship. If impairments are detected, you will initiate an appropriate rehab program. Otherwise, you continue with internal surveillance.
Again, we are talking about pre-op, post-op, and throughout. For example, if they are still doing well with their education and exercise program after post-op, but they say their arm is heavy, you would start them on a rehab program. Almost everyone that comes to me post-op usually goes through the program. I serve a primarily Hispanic population that, for the most part, believes that when you are sick, you rest. This is the thought process I have been trying to change. Many clients think that they should not move their arms. A patient told me, "I cannot move my arm." And I said, "Okay, have you been trying to?" She replied, "My mom had the same surgery, and you're supposed to rest and not do anything."
Benefits of PSM
- Addresses impairments in real-time
- Educate the patient on possible adverse effects
- Inform of signs and symptoms of lymphedema to get treatment early when it is reversible (Stage 0-1) vs. not reversible (Stage 2-3)
- Establish an exercise program to reduce cancer-related fatigue with further cancer treatment such as chemotherapy
- Reduce the risk of inactivity as some cultures believe being sick requires rest
- Improves ability to return to a prior level of activity
- Women in the early surveillance group received lymphedema care significantly earlier than those in the traditional referral group. (6)
A prospective surveillance model addresses impairments in real-time. You also educate the patient on possible adverse effects, and they know what to expect. We will go through bits and parts of the protocol throughout this course today. I have had clients go to their primary care physician and say, "I need to see Abi because she told me I need to do this if I felt that my arm is feeling heavy. I need to go because I want to make sure I'm not developing lymphedema." If you educate them on the signs and symptoms of lymphedema, they can get treatment early. This is important because lymphedema stages zero and one are reversible, whereas stages two and three are not.
Another thing with lymphedema is that it can be financially burdensome to buy a glove or a sleeve. I am in an area where many do not have the finances to purchase these garments. Thus, this treatment is less costly if we can tackle issues early on when reversible.
Establishing an exercise program to reduce cancer-related fatigue and fatigue from treatment such as radiation and chemotherapy is also essential. We want to reduce inactivity. Again, I have seen in the Hispanic culture that they feel they need to rest. An exercise program lets them know, "You can get back to what you were doing and even go to the gym." I had a client also say, "I'm never going to be able to lift weights again. That was my passion." I replied, "Who said?" We want them to return to their previous level. Women in the early surveillance group receive lymphedema care earlier than those in the traditional referral group.
It has been such a blessing to be in a rural area because rural means there are fewer doctors, and we are all part of that cancer team. The doctors have been educated about early surveillance, so they immediately refer the patients to us. If you can build a relationship with doctors, I encourage you to do so.
We want to improve the client's quality of life and get them back to doing what they want. And most of the time, if they are losing their functional mobility, the doctor may want to slow down treatment. However, if they are doing better due to early intervention, they will respond better to their treatments, not be as tired, et cetera. Talk to your doctors to get these clients post-op, if not before.
Evaluation
Initial Evaluation: Subjective
- What type of surgery
- Initial date of surgery
- Will they have other surgeries, i.e., ALND, breast reconstruction, etc.?
- Will they receive chemotherapy and/or radiation
- Did their surgeon give them any precautions
- Medical history- specifically oncology history
- Will they have a breast reconstruction
What are some questions to ask during an initial evaluation? You want to know what type of surgery they had, the date, other surgeries, mastectomy versus axillary lymph node dissection, plan for reconstructive surgery, etc. Many clients do not even know they can get breast reconstruction. They must know their options, the cancer treatments (chemotherapy and/or radiation), and if there are any precautions. You also want to know their medical history, specifically oncology history.
Initial Evaluation: Objective
- Health-Related Quality of Life
- Functional Assessment of Cancer Therapy-Breast (FACT-B+4) (4)
- Ferrans and Powers Quality of Life Index-Cancer Version (4)
- Cancer Related Fatigue
- Brief Fatigue Inventory (4)
- Functional Assessment of Cancer Therapy- Breast Cancer Subscale (4)
- Multidimensional Fatigue Symptom Inventory Short Form (4)
- Strength and Muscular Endurance
- Handgrip strength and handheld dynamometry (3)
- Manual muscle test and with a one-repetition maximum (2B)
Note: Ratings
- 4 Highly Recommended
- 3 Recommended for clinical use
- 2B Unable to Recommend at this time
- 2A Unable to Recommend at this time.
Inscore, E., and Litterini, A. (2019). Oncology EDGE Taskforce Annotated Bibliography (Updated August 2019).
Here is a list of objective outcome measures. You can see the ratings at the bottom. The first category included health-related quality of life outcomes. As occupational therapists, you are focused on daily occupations, and both of these measures are rated a four and are highly recommended. Many outcome measures are available, but not all of them are free. The Functional Assessment of Cancer Therapy-Breast (FACT-B+4) and the Ferrans and Powers Quality of Life Index-Cancer Version are readily available. I love the Ferrans and Powers Quality of Life Index as it has two pages of questions asking, "Are you satisfied? Or, "How important is 'XYZ' to you?" For example, I may ask, "How important is your family support?" Let's say they said a five. Then I ask how satisfied they are. They may answer one for this one. As you can see, the Ferrans allow you to see what is truly important for them and how satisfied they are. It is also exciting to see after therapy if this number changes. When you add up all of their answers, they get a score of 170 for importance and 180 for satisfaction. This shows that their satisfaction has improved in the important areas meaning their quality of life has improved.
Cancer-related fatigue can be assessed using the Brief Fatigue Inventory, Functional Assessment of Cancer Therapy-Breast Cancer Subscale, or Multidimensional Fatigue Symptom Inventory-Short Form. Strength and muscular endurance can be evaluated via grip strength and a handheld dynamometer. A manual muscle test with a one-repetition maximum cannot be recommended at this time per the rating. I typically do not even use MMT as many patients have metastatic breast cancer, and there is a contraindication for using MMT.
- Secondary Lymphedema
- Circumferential measurement (4)
- Water displacement (4)
- Bioelectrical Impedance Spectroscopy (BIS) (4)
- Upper Extremity Function
- Disabilities of the Arm, Shoulder, and Hand Questionnaire(4)
- Shoulder Pain and Disability Index (4)
- Shoulder Rating Questionnaire (4)
- Penn Shoulder Score (4)
Note: Ratings
- 4 Highly Recommended
- 3 Recommended for clinical use
- 2B Unable to Recommend at this time
- 2A Unable to Recommend at this time.
Inscore, E., and Litterini, A. (2019). Oncology EDGE Taskforce Annotated Bibliography (Updated August 2019).
For secondary lymphedema, we use circumferential measurement. If you have no idea how to do that, I have a video of that in a little bit. There are also water displacement and Bioelectrical Impedance Spectroscopy (BIS). When I was at MD Anderson, we used BIS, but it was costly. If you do not have access to this equipment, circumferential measurement is highly recommended. We will go a little bit more in-depth on how you can do that with your patients in a little bit.
The Disabilities of the Arm, Shoulder, and Hand Questionnaire (DASH), the SPADI (Shoulder Pain and Disability Index), the Shoulder Rating Questionnaire, and the Penn Shoulder Score are all highly recommended. Now, objective findings in goal. The SPADI asks questions like, "How much difficulty do you have with...?" The DASH is excellent; however, if the arm where they had the mastectomy and axillary lymph node dissection is not their dominant arm, it is hard to get the score to coincide with how much difficulty they are having.
Objective Findings in Goals
- SPADI- How much difficulty do you have?
- Washing hair
- Washing back
- Putting on an undershirt or jumper
- Putting on a shirt that buttons down the front
- Putting on your pants
- Placing an object on a high shelf
- Carrying a heavy object of 10 pounds
- Removing something from your back pocket
- One of AOTA’s Top 5 Choosing Wisely Recommendations includes: Don’t provide intervention activities that are non-purposeful. (22)
- Purposeful activities-tasks that are part of daily routine and hold meaning. (22)
The SPADI shows their ability to do different tasks, and it is a great outcome measure that I like to use.
One of AOTA's Top 5 Choosing Wisely Recommendations says, "Don't provide intervention activities that are non-purposeful." You want to use purposeful activities and tasks that are part of the client's daily routine and hold meaning. The SPADI asks questions about specific activities so that you can implement this in treatment. The SPADI is a phenomenal outcome measure that I always include for this particular population.
Circumferential (Girth) Measurement Video
Okay, guys. Now we're going to go into girth measurement. What you will need first is a body marker or eyeliner. You'll also need a pen, of course, to document. Now, this is an Excel sheet that we created here that has patient-we do not use patient names-but we use our V numbers to establish who the patient is. At the bottom, we have affected limbs, whether it's the right, left, or both. So you can circle which limb you will be working with as well as diagnoses as we typically use the sheet for lower extremity and upper extremity. Then, we have the date below that so every time they come, we can constantly be seeing the difference each time. Additionally, you will need a measuring tape. Just a reminder, measurements are done in centimeters and not inches. So make sure your measuring tape has centimeters.
Okay, guys, we're going to get started on those girth measurements. So in my sheet already filled out all the patient information and also circled which limb is the affected limb. Typically on evaluation, I do measure both arms, but for time's sake, we're only going to measure the affected arm. Now, everybody measures arms differently. Some people say four centimeters because when they get their garments they want, every four centimeters. Some people say every 10. I'm a huge fan of inter-rater and intra-rater reliability. Therefore, I found that measuring every five centimeters is perfect. Everyone can count by fives easily whereas sometimes by fours or by six or by seven can be a little bit confusing. Now we see that our patient has a tank on. I always ensure that if I'm measuring the patient has a tank or a sports bra, because if they're unable to help you while you're measuring, you can apply the tape below their tank or sports bra. So I'm going to have our patient bring their left arm up. Now, typically with my sheet, I start measurements on the ulnar styloid process. We want to make sure that we have a point of contact every time we start, and for me, it's the ulnar styloid process. Now, it's a big surface, so you want to ensure that whoever you're working with, you guys are on the same page that you're starting either above it, on it, or below it. Some patients might have larger ulnar styloid processes, so I don't recommend placing that right in the middle because that's going to be hard to tell, especially if they're swelling. I typically do below their ulnar styloid process and ensure that the people that work with me continuously do the exact same thing. Now, if you wanted to also address the lymphatic leg area, I do write that at the very bottom because I know my number one is always at the ulnar styloid process.
Now, I'm going to go ahead and start. So I palpate for that ulnar styloid process. And I actually already made a mark. So right there is my starting location. I see it, and now I'm going to grab my tape. So I'm going to place my zero- make sure you know what measuring tape you have because sometimes people think that the tip is zero- however, you need to find the actual zero and bring it up. Now, you always want to make sure that that arm is consistently the same. You don't want-I'm going to place the tape under-so you guys can actually see this. If the patient bends at the elbow, go ahead and bend, you see the difference in the tape. So I always have my patient completely extend at the elbow, so that there's no extra tension, everything is there, and I'm already at zero. So I am going to start marking. I typically do not measure right above because, for me, like I said, inter-rater reliability, I always do laterally. And like I said, some patients can help you, so I place my tape under their thighs. So here I go. We already did zero. I'm going five, 10, 15, 20, 25, 30, 35, 40, and 45. You want to make sure that you at least get very close to two fingers below the armpit. And actually, that measurement is pretty close where I finished off to those two fingers of that armpit. And then, of course, once those lines are made, so we have one, two, three, four, five, six, seven, eight, nine, 10. I'm going to go ahead and start with the girth measurements. Now, I'm going to place a tape under the patient's arm. One of the things I do recommend is that you do not chokehold that patient. You want to have the exact same tension each time, so just slightly lay it over, and then you write down your number. You do want to make sure you have a good placement of your sheet of where you need to go, and then you start measuring and you just scoot it over and keep going. And that is how I do girth measurements.
And before we pause, if you want to do that lymphatic lake area, that's going to be right here. So like I said previously, I actually write down at the bottom of the sheet that I am measuring the lymphatic lake area. I have the patient close her fingers when I measure (to ensure inter-rater reliability). I do, of course, place the tape under and lay it over. And for this patient, it is 16.6 centimeters. Thank you, guys.
Key Points for Measurements
- A patient identifier for a measurement sheet
- Name, initials, or visit number (V#)
- Ensure therapists in your clinic have the same starting point
- Ex. Below or above ulnar styloid process
- Have your patient wear a tank, surgical bra, or sports bra
- >2 cm infers a significant difference
- Refer out to Certified Lymphedema Therapist (CLT) if not a CLT
We use a patient identifier for the measurement sheet as we cannot put the client's name. If your clinic allows that, that is perfectly fine. We usually also use a visit number so that I can easily pull them up in the system. It is also crucial with many therapists involved that all use the same starting point for measurements like above or below the styloid process.
I like to have the client wear a tank or a sports bra so that you can get correct measurements. Greater than two centimeters infers a significant difference, and you will need to refer the client out to a certified lymphedema therapist if you are not a CLT yourself. The first time you evaluate a client, you measure both arms to have a baseline. Then, every time a patient comes in, you measure the affected arm.
Treatment Exercises
Post-surgical exercises with drains versus no with drains can be seen in Figure 8.
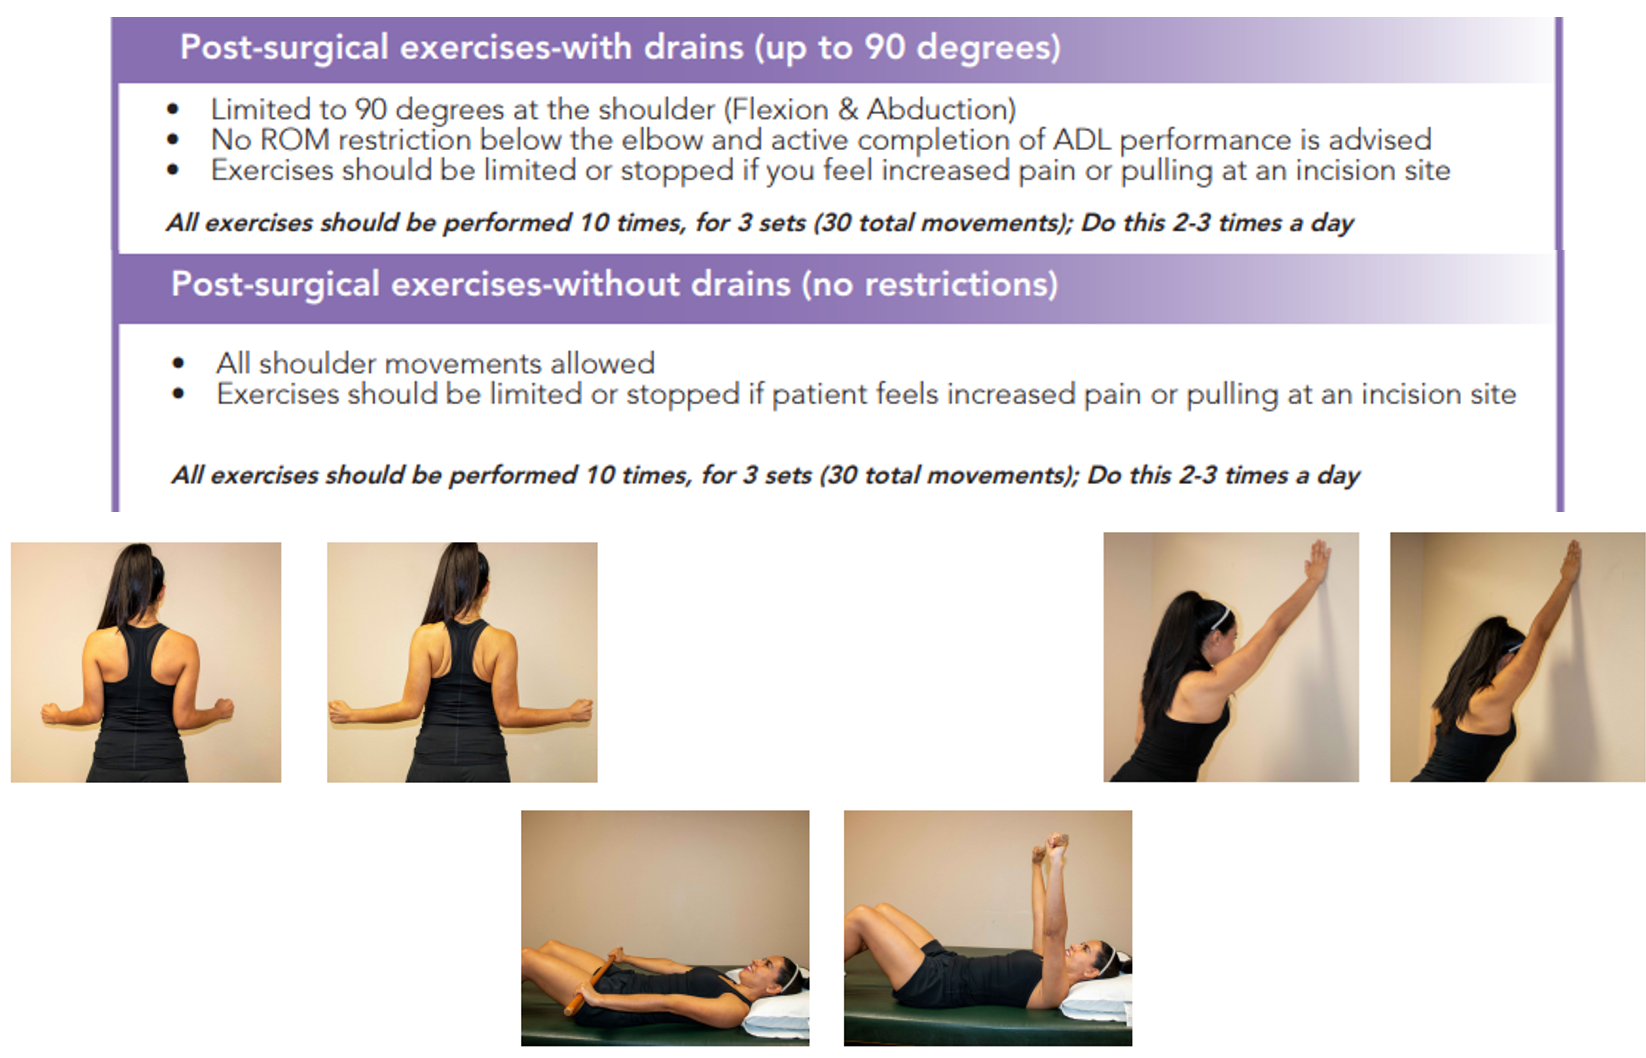
Figure 8. Post-surgical exercises. Click here for an enlarged view.
When a client comes into the clinic with drains, I limit them to 90 degrees of flexion and abduction, and there are no restrictions on anything below the elbow. And I allow them to complete all their ADLs. Exercises should be stopped if they feel increased pain or extreme pulling at the incision site. In our protocol, I have the patients perform each of these exercises ten times, for three sets, and do it at least two to three times daily. With drains, we are going up to 90 degrees with flexion and abduction, and anything below the elbow is free, with no restrictions.
Once they have no drains, all movement is allowed at the shoulder. However, we still need to be mindful of their pain and the pulling at the incision site. They should do all of the exercises, ten times, two to three times a day.
Treatment Video
We will go into a video demonstration of all of the phases.

Now we're going to go into our treatment exercise. There will be four phases with stretches and exercises included. We do not progress through each phase until one is fully accomplished as best to the ability. For example, we do not go into strengthening if we have not accomplished full range of motion and standing. So, each phase is going to be different for our patient A to patient B. So it is up to you to see how the patient is progressing. So here we go, guys, let's get ready for four phases.
Okay, guys, we're starting on Phase I, and this is when the patient has drains. And even if the patient didn't have drains, I'd still like you to do not the part with the wand exactly that we're going to do right now, but what comes after, and I'll explain more. So, first, I have a patient on their back with their legs straight so we can get more motion. Our restriction, our precaution is to 90 degrees so we are going through 90 degrees of flexion. After that, we are going to turn our hand, place it on the wand and go into shoulder abduction. This might be a little bit harder as it is causing increased stretch at the pec because the patient is lying down. So our precaution is still 90 degrees so only allowing the patient to go 90. And now, our next ones are going to be sitting up. We're standing up. We're going to pause.
Okay, guys. So we know for good shoulder mobility, we need to have great scapular mobility, right- for that optimal shoulder, mobility is what I meant. Now, if the patient, I'm going to turn around, if the patient does not have drains, we still want them to go through this phase as far as scapular mobility. So we're cueing the patient into scapular retraction, elevation, and depression. I have the patient say, "I don't know." And down, and what we could add too, I'm going to scoot back a little bit, is protraction as well. And if we want to get really fancy with it, we do those shoulder circles. Now, what is very common for patients is that their upper trap is very, very tight. I'm going to turn around. So, we want to make sure that they have good lateral flexion with that cervical movement. So we have them perform that. If we want to get a little bit more of levator, we turn into the armpit. Now, as the patient is doing this, I do instruct for a little bit of scapular depression so they can get a greater stretch. So, even if your patient does not have drains, we do want to ensure that the patient has great scapular mobility for that optimal shoulder function. Thank you, guys.
Okay, guys, we're going into our second phase. Your patient no longer has drains, or maybe you performed the first phase when they didn't have drains, but now we have full capacity to go full range of motion. So just for demonstration purposes, we're going to start in supine again, and we're going to tell the patient to go into full flexion. Maybe at this point, your patient might not even go full flexion, but try to have them go as far as you can. They might feel a little bit of a stretch in the pec minor. We also instruct the patient same as before into that shoulder abduction. I like to cue the patient if you're doing this in a bigger mat to keep their hand on the mat, and they'll feel greater stretch in their pecs. Now, once they have mastered the work with the wand, I'm going to remove this wand, and we're going to go into full range of motion with our arms. I like to do this, and I'm going to scoot over because I'm not going to fit on my left side. But the snow angels is probably one of my favorite things to incorporate because usually that pec major and minor are extremely tight. So I have the patient keep those hands on the ground to go into that full stretch. So by this phase, I'm having them do the snow angels as well as a T so they can get a deeper stretch in that pec major. I also have them going into an X to get a little bit more of pec minor. And obviously, I'd have them do this about 10 times for each thing, at least three sets. If this is not enough, we're going to pause and get a foam.
Okay guys, we are still on that second phase. So we've done active range of motion in supine. Now, if the patient isn't feeling much of a stretch, I add the half foam roll. So I'm on it right now. And just to reiterate, keeping those hands on the ground is a cue that I give 'cause a lot of times when people are tight, they're here, and they're like, "I don't feel anything." And of course, I also have them perform the T, trying to aim to get their hands on the floor as well as the T. Now, if this is still too easy, you can go ahead and add a full foam roll. Now in that second phase, I'm going to pause to remove the half foam roll.
Okay, guys, in this second phase, I'm also introducing one of my favorite stretches and also the patient's favorite stretch. It's called the crocodile. That's what I like to call it or the open book. So the patient is on their side, and they're going to go, try to go as far back as they can so they're following their arm. Now, as the patient continues to progress, they'll start to allow their hand to go down to the floor, and they'll be like, "I made it!" So this is also another stretch I like to incorporate in this phase. Thanks, guys.
Okay, guys, just an overview of Phase II. We did active-assisted range of motion with the wand. We also did active range of motion in supine. Additionally, we added a couple stretches such as the snow angel, the T, and the X. If that's not enough of a stretch, you can add a half foam roll. We also did the crocodile. Finally, I will not demonstrate, as you guys all know this, but we do progress to standing active range of motion. Now why I like to go supine and standing is because at times patients compensate. And when they're standing, they're actually not performing that good scapular mobility or they're so tight that they're really forcing their arms to come up. Now, when they're doing all these supine, it allows for that full range of motion a little bit easier. They're not as tight and so it becomes easier to perform those exercises in standing.
Okay, guys, we're moving on to Phase III, which is the resistive exercise. Now, we do not move to phase III if the patient has not fully been able to perform active range of motion. So we need to make sure that they have full active range of motion throughout before we progress through that strengthening phase, that resistive exercise. Now I'm just going to demonstrate with my right arm. I have the patient go into that shoulder flexion. I've divided my band in half. So the patient can perform to both arms. We also do that shoulder abduction as we've done before, but now adding the resistance. I typically cue the patient at a nice speed coming up, coming down nice and slow for that eccentric strengthening. Now, we also do a bicep curl like a hammer curl here. So if I want, you can grab a little lower, and we go ahead and do you that hammer curl. Now, another thing too is the hardest thing is that overhead press. So coming up and coming down nice and slow. Good, so now we release that band. We've done that bicep curl. We've done that shoulder flexion, abduction, and overhead press. I also have the patients go into that horizontal abduction and adduction. Also, we talked a lot about that scapular mobility doing that external rotation with that scapular retraction. One of my favorites too, the row, making sure they are squeezing that shoulder blade and pulling back. If they cannot do this independently, they can put this on a knob of a door, shut the door, and then go ahead and do it. And finally, if they really want to get their tricep, I'm going to turn and extend. And that is Phase III of resistive exercise.
Okay, guys, we're going into our fourth and final phase. Now don't get confused. We are still using those arms, but now we're going to incorporate those legs. One of the things that I have as a goal is to make sure that the patient can lift something off of the ground safely with good body mechanics, as well as placing things overhead with good body mechanics as well. So, we're placing the kettlebell at the bottom. One of the things I want the patients to do is demonstrate good lifting from the ground, almost like a deadlift. So guess what? We go through a deadlift, and I instruct them like they're sitting in a chair and thrusting up. Another thing is I have them perform that scapular retraction, and we go into those lunges. So in this phase, we're definitely including that lower extremity strengthening. I do like to show the difference between a deadlift with the knees bent and a "good morning." So I'm going to turn to my side. I have a patient relaxed fully, scapular retracted, and stick out the back. So also demonstrating the difference between that good morning and deadlift. Finally, we are doing that overhead press. Why is this so important? The overhead press is important, 'cause most patients told me, "It's really hard for me to put my plate in the microwave." So I take them into the shoulder press or overhead press here, and sometimes I combine the movements. I have them drop off the weight, they picked it up, change the grip, scapular retract, and lift overhead. And I do this in an area where they really have to reach overhead. And finally, I didn't demonstrate, but we all know this, the push-up. I always start off at the wall and slowly progress into a modified on their knees to a full if that's what they can. So that is Phase IV, really incorporating that lower extremity and upward extremity to reduce any injuries to their arms, their back, and obviously, getting that strength back in their legs to return to daily activity. Thank you.
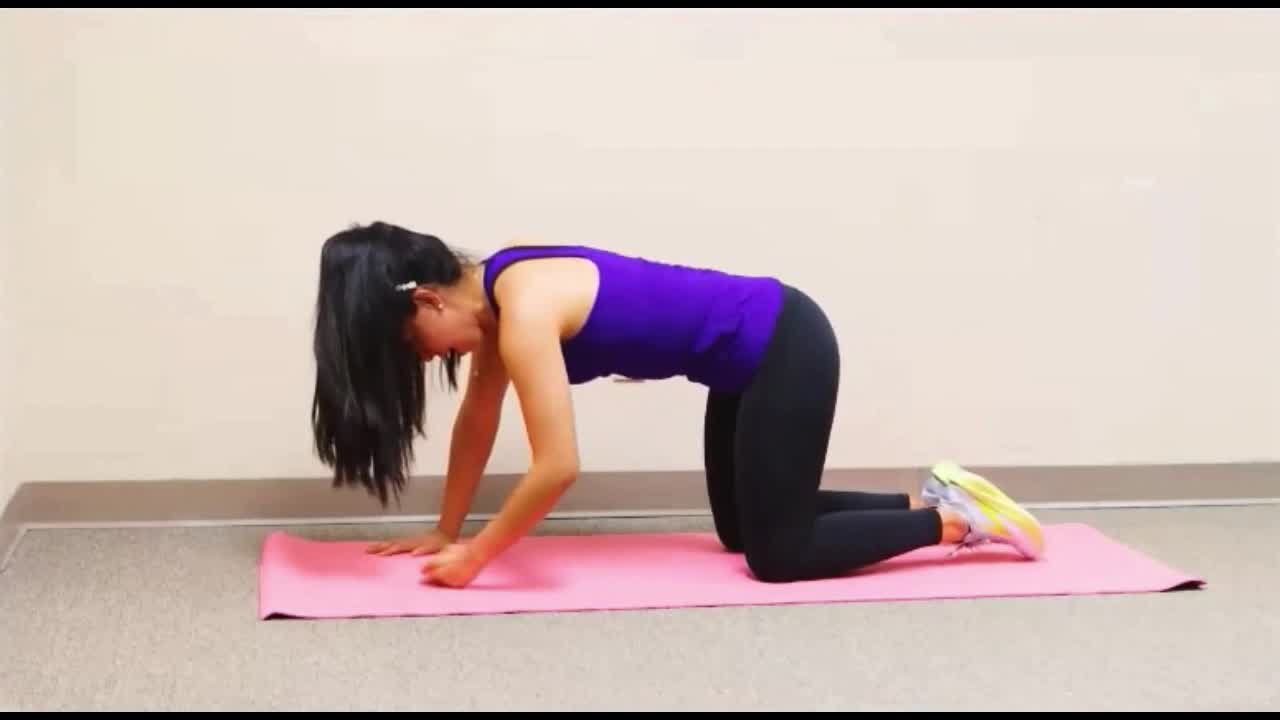
Okay, guys, we're going to start in our stretching series. Some of these stretches we do throughout the third to fourth phase progressing to that fourth phase when we are completely prone, because that's one of the scariest things that patients tell me is, "I'm really scared to lay on my scars." So we're going to start on all fours, and that's getting close to being prone. So I have the patients going to camel and cow. Now, with this variation, obviously, we do a little bit more of these, but for time's sake, then going into child's pose. From here, I have the patient go into all fours, and we want to do this rhythmically, so now, we're going to go into threading the needle, getting that posterior stretch and thoracic mobility. And, of course, you would do this to both sides. Now, what I would also include is a rotation to get some of that pec stretch. And I have the patients look at their arms. So we could do it to both sides, eventually leading to being completely on our stomachs, and I'm going to move my hair out of the way here, hands to the side. So this is one of the things by the fourth phase, the patient is nervous about, but they're finally there, and I have them progressed to modified cobra, and eventually into full cobra. As I'm doing these movements, I have the patient in like a lighter setting with classical music so they are nice and relaxed as they are performing all of these stretches. Thank you, guys.
Phases of Exercise
- Phase I- Drains present
- Up to 90 degrees shoulder flexion/abduction
- Scapular mobility
- Cervical mobility
- Phase II- No drains present
- No ROM restrictions, full shoulder ROM
- Scapular mobility
- Stretches
- Phase III- Resistive Exercise
- Standing resistance band work
- Stretches on all fours
- Phase IV- Total body Exercise
- Incorporation of lower and upper body strengthening
- Prone stretches
That was all the phases of exercise. I will go into four different phases now.
Phase 1. The first phase is with patients with their drains present.
Figure 9. Shoulder flexion with a wand.
Even if they come to the clinic without drains, I want to introduce all of these because, for that optimal shoulder mobility, we need good scapular mobility as well. I incorporate these exercises first. The second phase is with no drains in place.
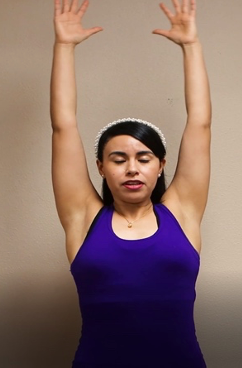
Figure 10. Shoulder flexion in standing.
I always start with the wand. Like I said in that video, it often gives patients the comfort that they can stop or help with their other arm, helping that affected arm go a little farther. That was not a straight elbow in the picture. I was just trying to show you guys there. Of course, you are still going through the scapular mobility exercises and stretches.
In the third phase, the resistive exercise is introduced with theraband (Figure 11).
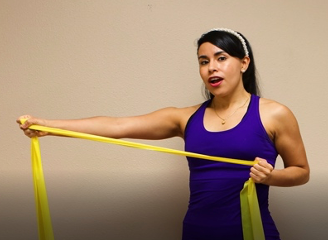
Figure 11. Shoulder abduction with theraband.
Figure 12 shows a stretch on all fours. I like to dim the room and let the client relax in this position, which is called child's pose.

Figure 12. Child's pose on a mat.
They stretch out all of their muscles in this pose, so their range of motion improves drastically. This is key for occupational therapists. We discussed the SPADI and talked about placing things on a high shelf. It also talks about lifting objects over 10 pounds. Many people ask me, "Why are you doing total-body exercises if they are here for their arm?" My response is, "They need to get back to what they were doing before." These exercises mimic their movements for functional activity. Many people say, "I've never squatted." We do use a toilet every day, and that is a squat. These exercises strengthen the lower and upper body and mimic many of the motions they do every day. There are also prone stretches.
As I mentioned, I typically go through all these exercise phases with post-op clients. A common question is, "When do you know when to transition to a phase? Is it every two weeks?" Do not focus on the time, but instead, focus on the patient meeting their goals. If they have not completed their full range of motion, I will start incorporating higher-level exercises because they will start compensating. Thus, I do not have a set time to see a client. An average is twice a week for eight weeks. Many patients go through the program rapidly, and I have patients that might need extra time. It depends on what their goals are and their prior activity level. There is no cookie-cutter answer. However, this is a protocol; use your clinical judgment to progress the patient.
Aerobic Capacity
Aerobic capacity is another critical area for this population. An overview of this can be seen in Figure 13.
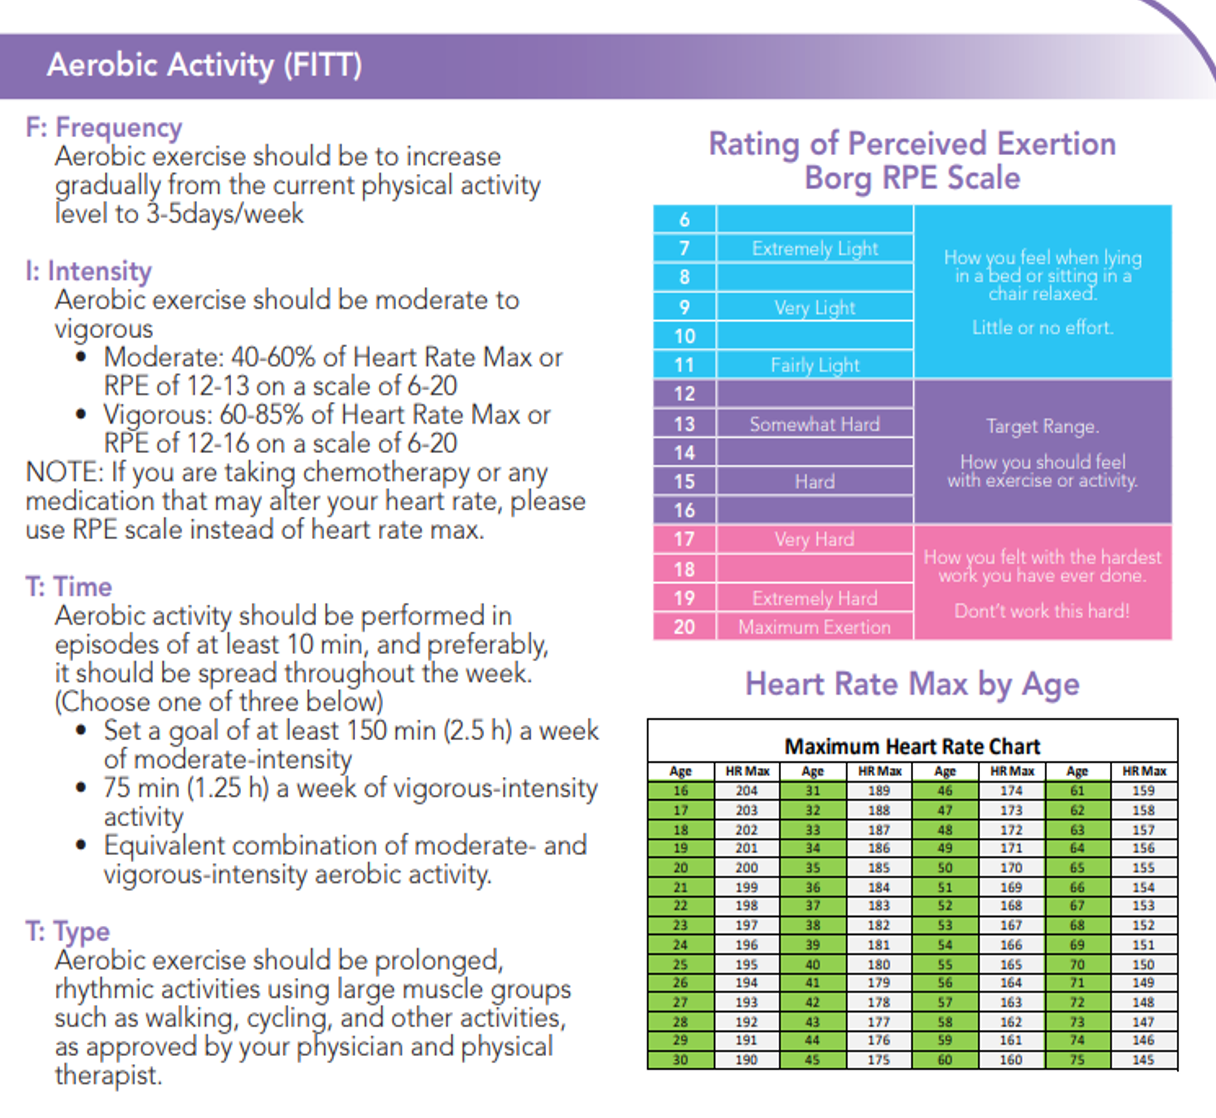
Figure 13. Overview of aerobic capacity scale. Click here to enlarge the image.
Many clients get chemotherapy, and some chemo does cause cardiotoxicity. By the time clients leave my program or go to rehab, they have a HEP that they are following. Usually, they are aerobically exercising three to five days a week. For intensity, aerobic exercise should be moderate or vigorous to get to 40 to 60% of their heart rate. If they are on chemo, I teach them the Rating of Perceived Exertion (RPE). For example, if they are doing a moderate activity, their RPE should be a 12 to 13 on the rating of perceived exertion. And, if they are doing vigorous activity, which is 60 to 85% of their max heart rate, they should be somewhere between that 12 to 16, which is somewhat hard.
Risks
- Cardiotoxicity from chemotherapy
- Utilize RPE to identify moderate or vigorous activity
- Increase exercises gradually
- Perform in clinic to set an appropriate HEP
- Identify cancer-related fatigue
- Perform pacing
- Bouts of ten minutes at a time to start
- Rest breaks throughout activity
- Identifying proper Rate of Perceived Exertion
If any of their chemo causes cardiotoxicity, ask them about their RPE. "How much time?" is often a question my patients ask me. It should be performed in at least episodes of 10 minutes and preferably spread out throughout the week. I tell them to set a goal of at least 150 minutes a week of moderate intensity. They can also do an equivalent combination of moderate and vigorous-intensity aerobic activity.
What is the type of aerobic exercise they should be doing? They can do prolonged and rhythmic exercise using large muscle groups, such as walking, cycling, and other activities that their physician approves. Exercises must be increased gradually. Have them perform the exercises in the clinic before setting the appropriate HEP, especially for getting to that fourth phase that includes resistive exercise. You do not want them to get extremely tired, and you want them to incorporate rest breaks.
I like to time them in the clinic to see how long it takes them to recover between exercises to incorporate this at home. We need to know if they have any cancer-related fatigue. They need to pace their activities. For example, they may want to do 20 minutes in the morning and 20 minutes in the afternoon instead of one long workout. You can even start with 10 minutes and then increase the time.
Lymphatic System
- The main purpose of the lymphatic system is to drain substances that are not able to be drained and reabsorbed by the blood system called lymphatic loads.
- Lymphatic loads are comprised of water, proteins, cells, and fat (long-chain fatty acids).
- Lymphedema is an abnormal accumulation of protein and water in the interstitial space.
- Lymphedema is a progressive disease.
We will go into the lymphatic system, as seen in Figure 14.

Figure 14. Overview of the lymphatic system.
The main purpose of the lymphatic system is to drain all the substances that are not able to be drained and reabsorbed by the blood system, and that is what the lymphatic loads are called. Lymphatic loads are comprised of water, proteins, cells, and fat, which are long-chain fatty acids. Lymphedema is an abnormal accumulation of protein and water in the interstitial space. The client might say their arm, "Feels heavy." Lymphedema is a progressive disease.
Breast Cancer Lymphedema
- When an axillary node dissection is performed, the surgeon must cut through some collectors to remove the lymph nodes.
- Additionally, radiation can damage or harm lymph nodes and vessels that lymph moves through.
- Lymph collectors drain areas of the body and go directly to their regional lymph nodes.
- Regional lymph nodes include axillary, inguinal, and cervical lymph nodes.
- In some instances, the collectors and/or lymph nodes may remain intact, however, they can begin to become overloaded/worked.
- Over time, the flow of lymph can overwhelm the remaining pathways, resulting in a backup of fluid into the body’s tissues.
- In these instances, lymphedema occurs.
- NOTE: In the early postoperative period, edema may arise in the axilla, chest wall, breast, or arm.
When the surgeon performs an axillary lymph node dissection, they must cut through some lymph collectors to remove the lymph nodes. Additionally, radiation can damage lymph nodes and vessels that the lymph moves through. Lymph collectors drain areas of the body and go directly to their regional lymph nodes.
Regional lymph nodes include the axillary, the inguinal, and the cervical lymph nodes. In some instances, the collectors or the lymph nodes may remain intact, however, they can begin to become overloaded and taxed. And over time, the flow of lymph can overwhelm the remaining pathways resulting in a backup of fluid into the body's tissue. In these instances, lymphedema occurs. It is also essential to note that there will be edema and post-op swelling in the early post-op period.
Edema in the axilla, chest wall, breast, or arm is normal, but it is vital to do a girth measurement to show any significant difference or change. Many patients say, "Was it the removal of the lymph nodes? Or was it the radiation or chemotherapy that caused my lymphedema?" There is no known onset. I have had people get upwards of 22 lymph nodes removed, and they have never had lymphedema.
On the other hand, I heard of a patient with four lymph nodes removed that got lymphedema. And there was one case where a person, who did not have lymphedema after breast cancer, developed lymphedema after falling on an outstretched hand (where she had previously had axillary lymph node dissection) when riding her motorcycle. The trauma caused lymphedema in her arm. This is why it is crucial throughout the patient's care that you constantly check and educate the patient on the signs and symptoms of lymphedema.
Patient Information
Figure 15 shows information from our protocol.
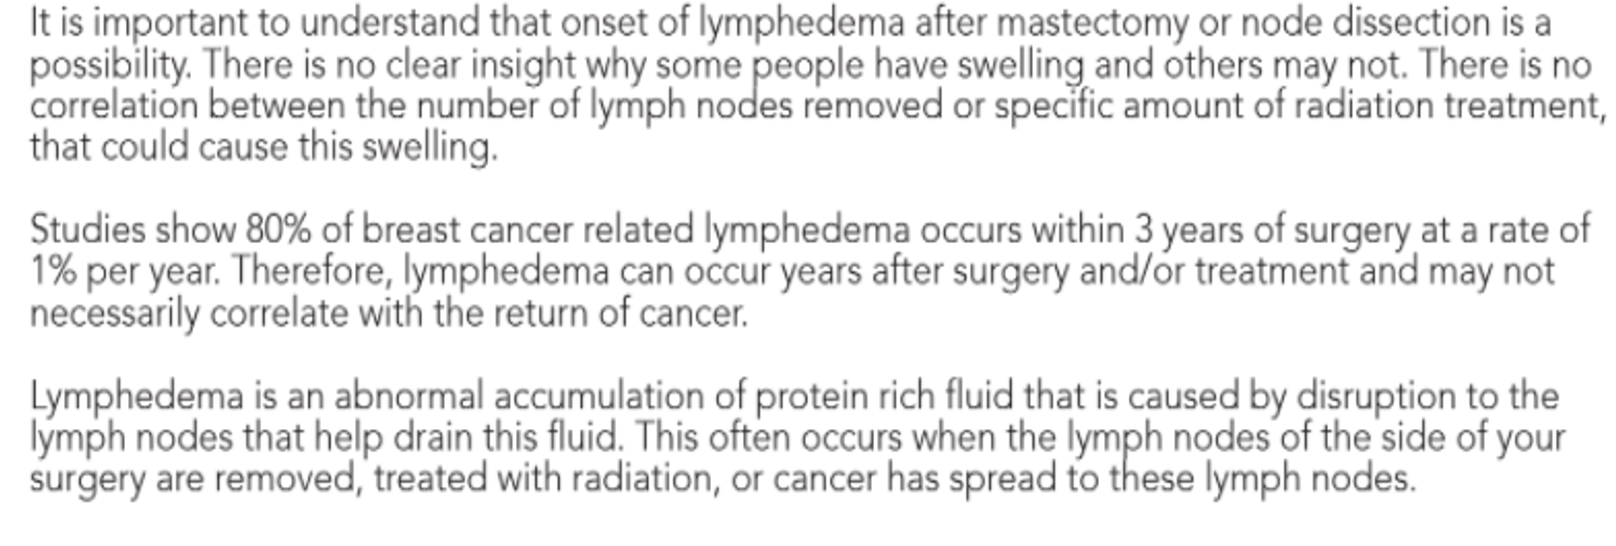
Figure 15. Protocol information. Click here to enlarge the image.
Lymphedema Clinical Signs
- Pitting edema
- Edema that doesn’t recede with elevation
- Recurring infections
- Hardening and thickening of the skin (fibrosis)
- Asymmetrical
- Restricted range of motion
- Limb girth of affected arm is >2cm than unaffected
- BIS detected lymphedema
Here are lymphedema clinical signs. Are they getting cellulitis frequently? Do they tell you, "My arm feels a little swollen, but you know what? I go to bed, and it's fine." Were they reaching 150 degrees of flexion, and now it's 120? These are some things that you are looking out for as a clinician. And, of course, a significant change would be a limb girth of the affected arm greater than two centimeters.
Lymphedema Self-Assessment
- Limb may feel:
- Full
- Heavy
- Tight- Note: Be sure to identify fluid vs. muscle tightness.
- Present with a positive:
- Pitting Edema Test
- Pinch Test
When I teach patients self-assessment, I often say, "Your limb may feel full, heavy, or tight." "Tight" is hard because they have just had surgery, and their pecs may be tight. It is essential to educate them on muscle tightness versus tightness from a fluid. It is moveable but feels like it is expanding.
We also want to see if they present with a positive Pitting Edema Test or Pinch Test. You will see a picture of this in the later slides. If they feel that their arm feels full, heavy, or tight, or they present positive on any of these two tests, I tell them to contact their doctor and ask for a referral to therapy.
Pitting Edema Test
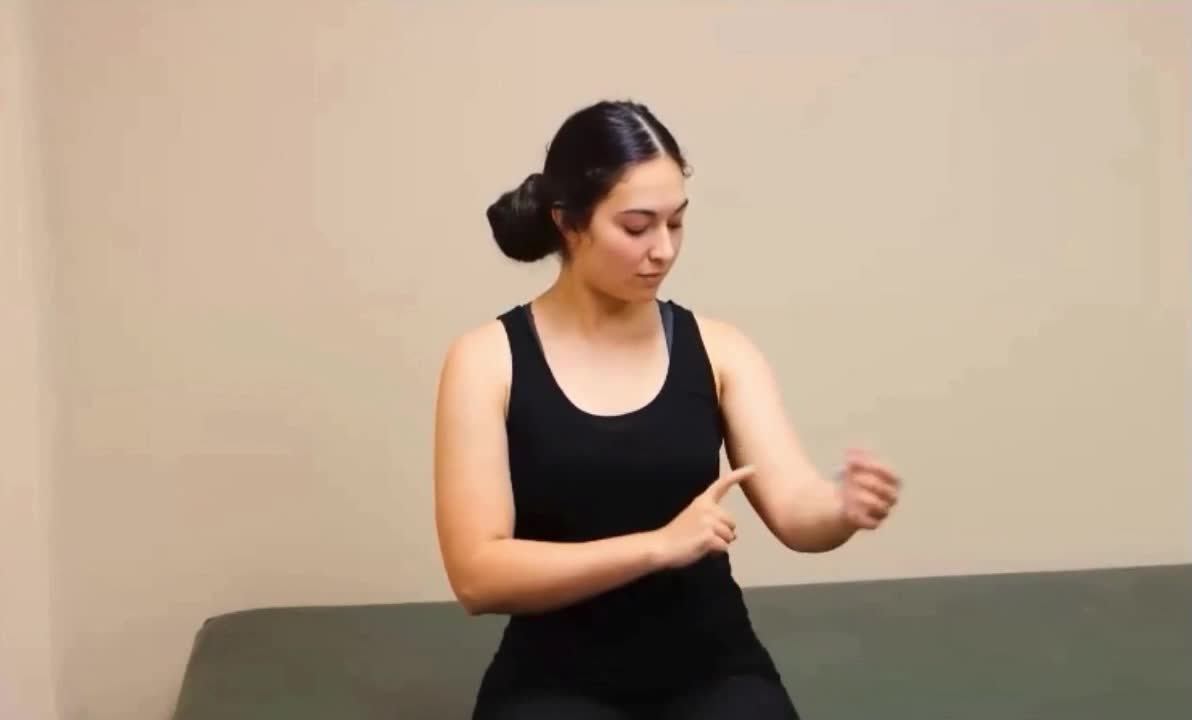
Now we are performing the edema test. I instruct the patient by saying, push on your skin and check to see if any indention occurs, indicating the tissue of the proximal forearm medially and laterally and the distal upper arm. I do have them hold for about two to three seconds to allow the tissue to indent if there's any indention. If the indention occurs, I have the patient count how many seconds it takes to rebound back to its original position. If this is positive, you have a positive edema test.
Pinch Test Demonstration
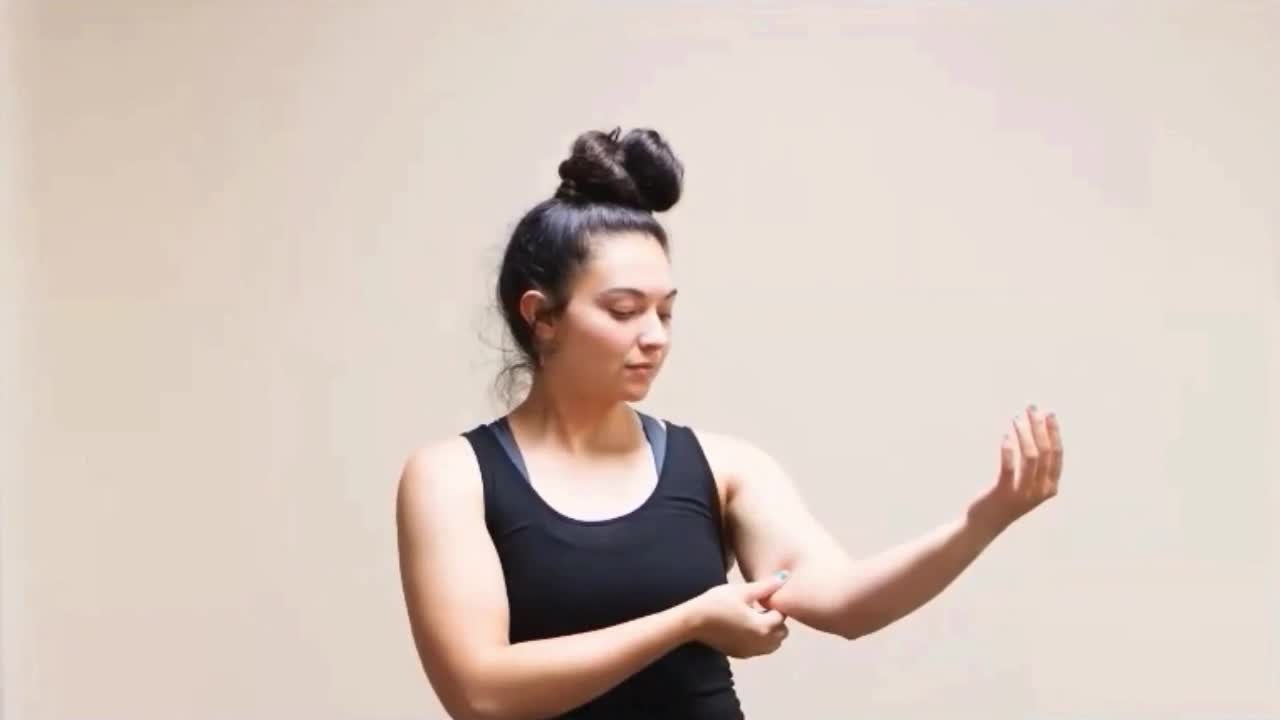
Now we are going to perform the Pinch Test. I instruct the patient by saying, "When you pinch your skin in this area (indicating the tissue of the proximal forearm medially and laterally and distal upper arm), does it feel like the same spot on the other side? Or, does one side feel thicker, fuller, tighter, or firmer?" If any of these are positive, you have a positive Pinch Test.
These two videos are specifically used for patient self-assessment. If you see some of these things and you are not a CLT, I recommend that you contact a CLT for a referral for lymphedema treatment.
Patient Education
Here is some patient education that I do with my clients.
Lymphedema Cautionary Zones
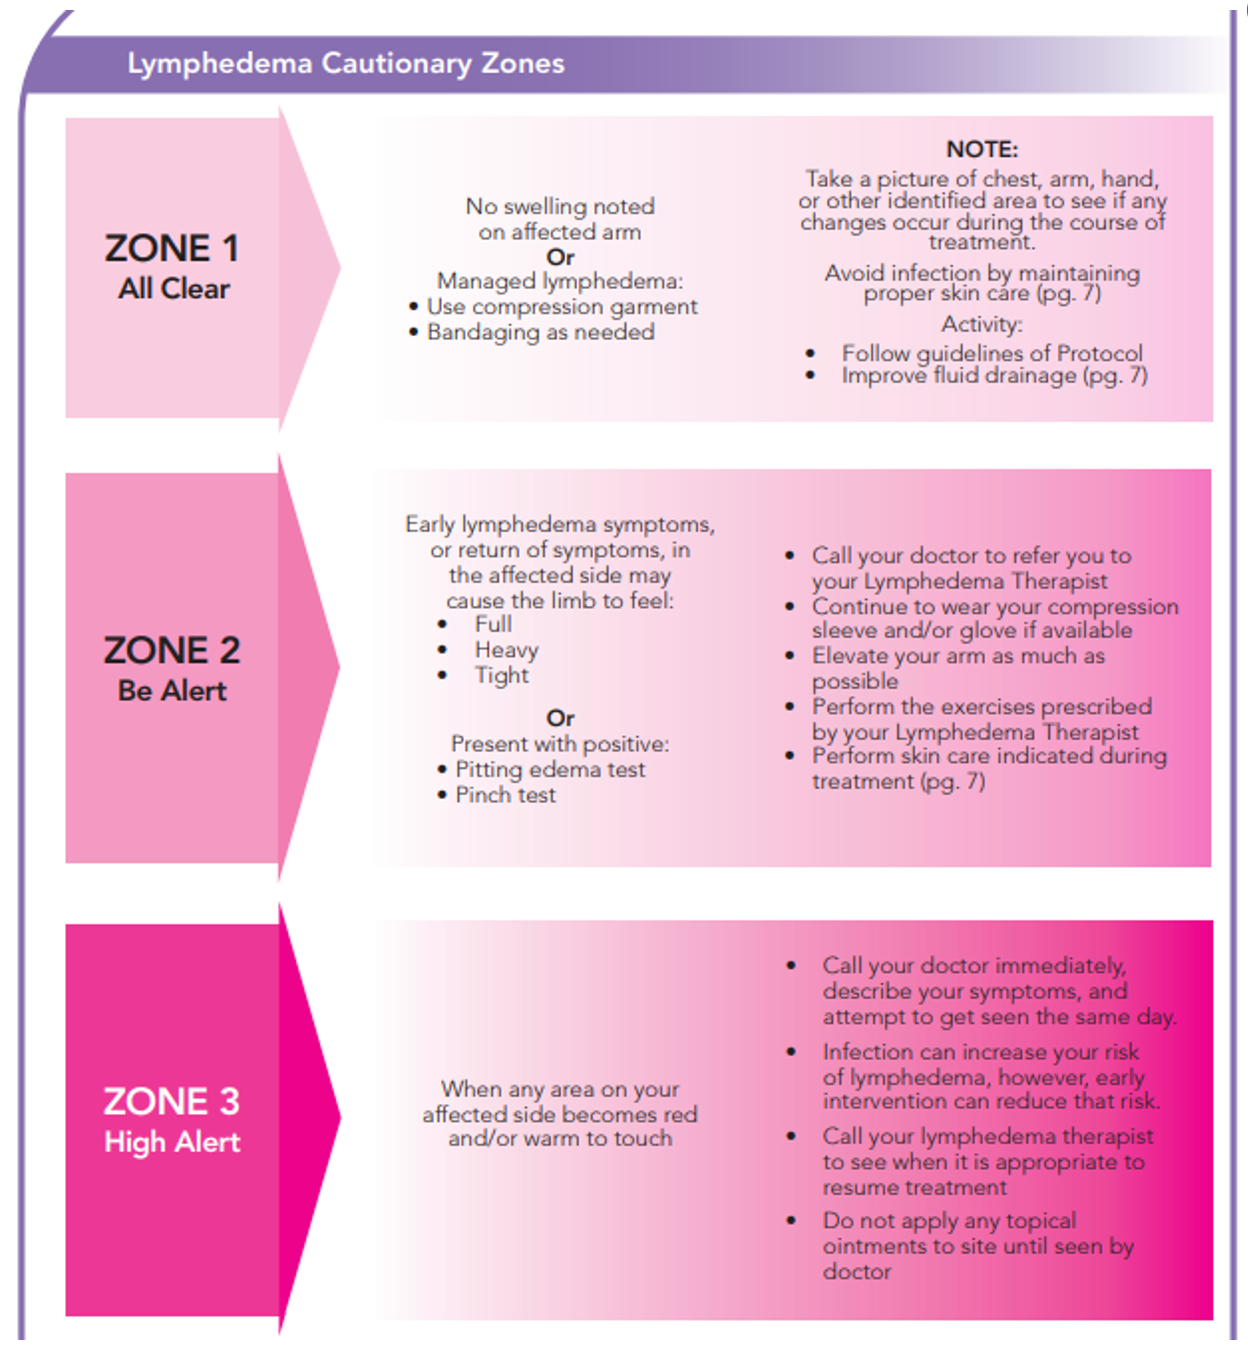
Figure 16. Handout on lymphedema cautionary zones. Click here to enlarge the image.
When we created this document, we wanted to make it easy for the client to read, especially with the colors. We used pink as we did not want to overwhelm them with red. Zone one is post-op day one or as soon as they come into the clinic. If they do not come in post-op day one, I have them take a picture of their chest, arm, and hand with their phone. Pictures are good to have to notice any differences. In the "all clear" area, we are looking for any swelling noted in the arm and if they are using their garment and bandages. Our protocol has different things, such as improving fluid drainage, avoiding infection, and doing proper skincare.
"Be alert" is what we just discussed. If they have early lymphedema symptoms or a return of symptoms, their arm may feel full, heavy, or tight. Remember, tightness is not a muscular tightness but rather like the tissues are expanding. They may present with edema and a positive pinch test. It is vital to go over the pinch test with them. If they are in this zone, I have them call their doctor and have a referral sent back to me. I also want them to continue to wear their compression sleeping glove if they have one until they see me again and elevate their arm as much as possible until they can fully perform the exercises and skincare that the lymphedema therapist or/ either therapist have prescribed.
If any area on the affected side becomes red or warm to the touch, it might be an infection. I call the doctor and try to get them seen the same day because an infection can increase the risk of lymphedema. We want to intervene as quickly as possible. They may also pick a scab and see purulent drainage. This is another time I call the doctor. It is also vital for them to call their lymphedema therapist to see when it is appropriate to resume treatment once the doctor gives them antibiotics or recommends other therapy. Many of my Hispanic clientele loves Vicks. For example, I had a patient with a huge wound, and they applied Vicks, which infected it even more. I remind clients not to use a topical ointment on their affected arms.
Skin Care
- Apply a low pH lotion to the arm (ex. Eucerin, Aquaphor)
- Reduce sun exposure to the affected arm
- Avoid any cuts and scrapes to the skin
- Avoid dry skin as this can lead to cracking and increased risk of infection
- Wear repellent to avoid mosquito bites
- Shower and inspect skin daily
I educate them on how to apply a low pH lotion to their arm. The two common ones I prescribe are Eucerin and Aquaphor. If you find others, that is fine. You also want them to reduce sun exposure to the affected arm or wear sunscreen. We also want them to avoid any trauma like cuts and scrapes to their skin. It is also essential for them to wear repellent. I had a patient with mosquito bites for months as they would not go away. We want them to avoid dry and cracking skin, which could increase their risk of infection. Lastly, they need to shower and inspect their skin daily, including scars.
Diaphragmatic Breathing
- Diaphragmatic breathing is encouraged to improve the cardiopulmonary system.
- Place hands on the stomach. When you inhale, enlarge your belly and try not to raise your chest. When you exhale, relax your belly. Repeat.
Now diaphragmatic breathing is also incorporated to improve fluid drainage (Figure 17).
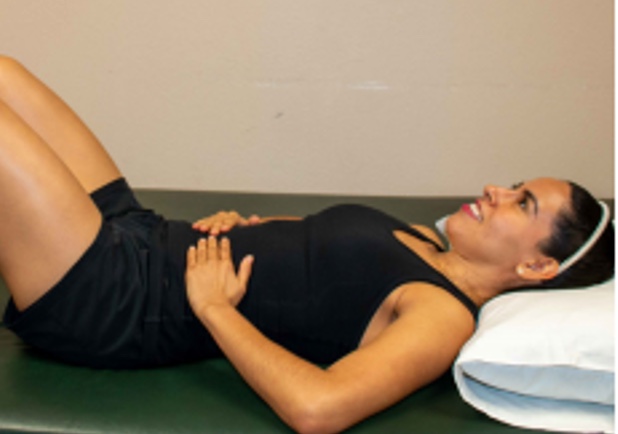
Figure 17. Example of diaphragmatic breathing.
This is straight from the protocol. You teach the patient where their hands need to be when they inhale and exhale. I like to have clients do diaphragmatic breathing with dimmed lights, so they are nice and relaxed before starting the manual lymph drainage.
Fluid Drainage
Now, this is straight up from the protocol (Figure 18).
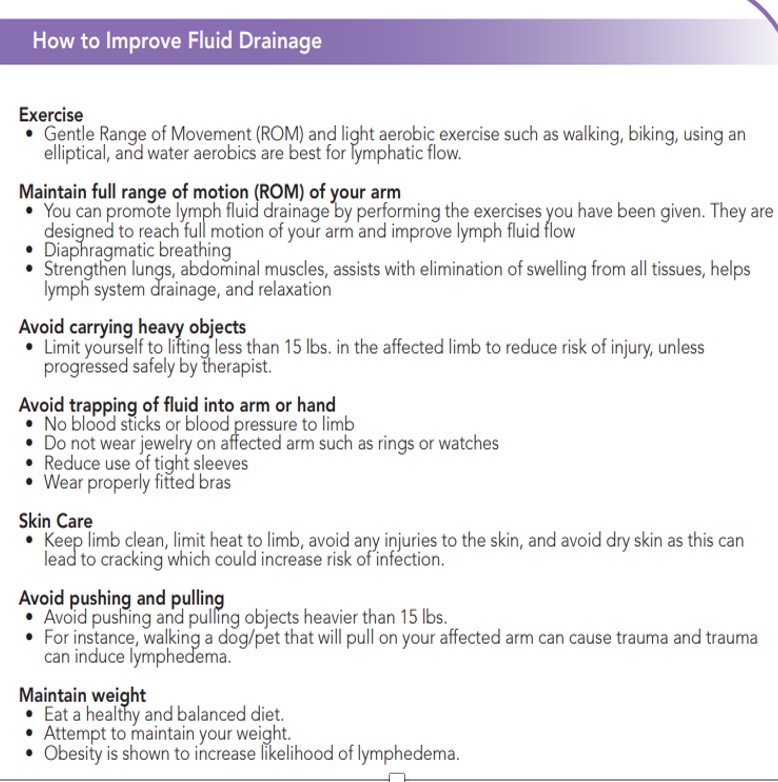
Figure 18. Fluid drainage tips. Click here to enlarge the image.
These are tips for them to increase fluid drainage. We talked about aerobic exercise and maintaining a full range of motion. If they were getting 175 degrees and now they are at 140, we want to make sure that they are doing exercise to maintain that full range of motion. They should avoid carrying heavy objects. I always set the limit to 15 pounds unless I feel like they can carry more. You can teach them how to progress efficiently and safely, but you do not want them to all of the sudden try and lift something really heavy.
Another thing is to avoid trapping a fluid into or arm or hand, including no blood sticks or blood pressure or wearing jewelry on that arm. They should also not wear tight sleeves or restrictive bras. They should also keep the limb clean, limit heat, and avoid injuries to the skin. Make sure that skin is clean and avoid heavy ointments.
We also want them to avoid pushing and pulling. If you have progressed a patient appropriately, this is not a problem, but remember, trauma could lead to lymphedema.
A lot of research also shows that an increase in weight and obesity can increase the risk of lymphedema. We want the patient to eat a healthy and balanced diet and maintain weight.
Cases
Case Scenario 1
- A 34-year-old patient presents to the clinic post left mastectomy s/p 5 weeks. The patient reports a scab on her L scar that is sore. Upon assessment, you note that the scab has purulent drainage, has lifted, and is collecting moisture. What will be your next steps?
The answer choices are to continue with treatment, educate the patient on signs of infection, inform a referring physician, help set up a follow-up appointment as soon as possible, or perform scar mobilization to improve drainage.
The vast majority said to refer to a physician and help set up a follow-up appointment. You guys are right, especially as purulent drainage is a sign of infection. This is part of the high alert protocol. When they removed the scab, it was very deep. We want to decrease the risk of infection for proper healing, but we do not want them to have an increase in lymphedema either, so getting them to the referring physician as soon as possible would be the correct answer.
Case Scenario 2
- A 42-year-old patient following an axillary node dissection on her right arm states she has been having a lot of pain lifting her arm. After questioning, she states she can feel a thick rope under her armpit. How can you treat it?
This sounds like axillary web syndrome to me, but I will let you guys go ahead and put in your answers. The choices are active range of motion, gentle manual techniques, stretching, and manual lymph drainage.
Some answered gentle manual techniques, some put stretching, and a few others put active range of motion. This was kind of a trick question. All of these things would help axillary web syndrome. If you are doing one or all of these, that is fantastic. Those are all things that can help with axillary web syndrome. Active range of motion and stretching will help. You can do manual lymph drainage if you are a certified lymphedema therapist.
Case Scenario 3
- A 76-year-old patient comes into your clinic status post-mastectomy and right upper extremity axillary node dissection 2 weeks ago. Upon examination, you note >1cm difference in right vs. left arm following circumferential (girth) measurements. There is no certified lymphedema therapist in your area. How can you assist this patient with fluid drainage?
Your options are exercise and proper skincare like moisturizer, reducing the use of tight sleeves, and/or diaphragmatic breathing. This might be a little bit harder. All of these things are appropriate.
Case Scenario 4
- A 64-year-old patient comes into your clinic post bilateral mastectomy (5 days ago) with drains in place. The doctor’s orders state, “Eval and Treat. No restrictions with drains in place.” What will you do?
The options are to follow the medical doctor's order, call the doctor to get further information or give treatment according to your clinical judgment. All of these are correct as well. If the doctor allows you, and you feel comfortable with using your clinical judgment, that is fine. If you want to get further information on the doctor's thought process, it is also acceptable to call. Our protocol was created in agreement with the medical team about what the restrictions should be and with what they are okay. Some surgeons say no limits. We created this protocol as a guide to help you, hopefully, but it is not absolute. You could follow the doctor's orders if you want to do, or call them to get more information. This could prompt a, "I would like to meet you." These are good opportunities to speak and get to know the physicians in your area. Many physicians do not even know the benefits that you as an occupational therapist could offer and how you can help reduce the risk of lymphedema.
Questions and Answers
Do you use any moist heat before massage of the cording?
I do not use any heat because heat can increase the risk of lymphedema.
Do you have physicians that automatically refer the patients to your post-mastectomy rehab program?
Yes, and this has been the greatest blessing of being in a rural area. Physicians like the medical oncologist, radiation oncologist, and surgeon refer directly to me. Our PCPs are detecting the lymphedema and chemo-induced neuropathy and referring them over.
What is the typical timeframe for progression throughout the phases of rehab?
Most of my patients stay with me for about eight weeks. I typically see them twice a week for eight weeks. as far as the progression of the phases, I do not progress if they do not meet anything within that phase. They may progress through Phases I and II in like a week or two, but they may struggle in Phase III and take longer. I also have people that finish off the program quickly. I tell my clients that they have to do their homework.
Can you explain the process of how you became certified as a CLT?
I did the Academy of Lymphatic Studies. There are many ways that you can become certified as an occupational therapist and a physical therapist.
Do you ever use Kinesio taping for improving lymph drainage?
That's a great tool to use as well. I have advanced lymph draining training which included this modality.
Do you ever use ultrasound on cords?
I do not. Again, we do not want to use heat. Again, if they have metastatic breast cancer, we do not want to apply ultrasound or anything that could progress the cancer. It could also increase the swelling.
How long are drains in place?
Usually, a drain is in for three to four days.
How do you bill for prehab?
For prehab, you are evaluating and doing outcome measures and assessing what their quality of life is at that moment. You are also evaluating strength and endurance and getting a circumferential measurement before surgery. So, I would bill it as an evaluation.
Summary
I hope that you learned a lot today and are able to incorporate all the things that we discussed in your treatment. Thank you for your time.
References
Koehler, L. A., Haddad, T. C., Hunter, D. W., & Tuttle, T. M. (2018). Axillary web syndrome following breast cancer surgery: symptoms, complications, and management strategies. Breast cancer (Dove Medical Press), 11, 13–19. https://doi.org/10.2147/BCTT.S146635
Koehler L. A., & Hunter, D. W. (2016). Lymphspiration: The axillary web and its lymphatic origin. Lymphology, 49(4):185-191
Stout, N. L., Pfalzer, L. A., Springer, B., Levy, E., McGarvey, C. L., Danoff, J. V., Gerber, L. H., & Soballe, P. W. (2012). Breast cancer-related lymphedema: Comparing direct costs of a prospective surveillance model and a traditional model of care. Physical therapy, 92(1), 152–163.
McLaughlin, S. A., Wright, M. J., Morris, K. T., Giron, G. L., Sampson, M. R., Brockway, J. P., Hurley, K. E., Riedel, E. R., & Van Zee, K. J. (2008). Prevalence of lymphedema in women with breast cancer 5 years after sentinel lymph node biopsy or axillary dissection: objective measurements. Journal of clinical oncology: Official journal of the American Society of Clinical Oncology, 26(32), 5213–5219. https://doi.org/10.1200/JCO.2008.16.3725
Samphao, S., Eremin, J. M., El-Sheemy, M., & Eremin, O. (2008). Management of the axilla in women with breast cancer: current clinical practice and a new selective targeted approach. Annals of surgical oncology, 15(5), 1282–1296. https://doi.org/10.1245/s10434-008-9863-8
Koelmeyer, L. A., Borotkanics, R. J., Alcorso, J., Prah, P., Winch, C. J., Nakhel, K., Dean, C. M., & Boyages, J. (2019). Early surveillance is associated with less incidence and severity of breast cancer-related lymphedema compared with a traditional referral model of care. Cancer, 125(6), 854–862. https://doi.org/10.1002/cncr.31873
Campbell, K. L., Winters-Stone, K. M., Wiskemann, J., May, A. M., Schwartz, A. L., Courneya, K. S., Zucker, D. S., Matthews, C. E., Ligibel, J. A., Gerber, L. H., Morris, G. S., Patel, A. V., Hue, T. F., Perna, F. M., & Schmitz, K. H. (2019). Exercise Guidelines for Cancer Survivors: Consensus Statement from International Multidisciplinary Roundtable. Medicine and science in sports and exercise, 51(11), 2375–2390. https://doi.org/10.1249/MSS.0000000000002116
Chachaj, A., Małyszczak, K., Pyszel, K., Lukas, J., Tarkowski, R., Pudełko, M., Andrzejak, R., & Szuba, A. (2010). Physical and psychological impairments of women with upper limb lymphedema following breast cancer treatment. Psycho-oncology, 19(3), 299–305. https://doi.org/10.1002/pon.1573
Hayes, S. C., Janda, M., Cornish, B., Battistutta, D., & Newman, B. (2008). Lymphedema after breast cancer: Incidence, risk factors, and effect on upper body function. J Clin Oncol., 26:3536‐3542.
Stout Gergich, N. L., Pfalzer, L. A., McGarvey, C., Springer, B., Gerber, L. H., & Soballe, P. (2008). Pre-operative assessment enables the early diagnosis and successful treatment of lymphedema. Cancer, 112:2809‐2819.
Shah, C., Arthur, D. W., Wazer, D., Khan, A., Ridner, S., & Vicini, F. (2016). The impact of early detection and intervention of breast cancer‐related lymphedema: a systematic review. Cancer Med., 5:1154‐1162.
Soran, A., Ozmen, T., McGuire, K. P., Diego, E. J., McAuliffe, P. F., Bonaventura, M., Ahrendt, G. M., DeGore, L., & Johnson, R. (2014). The importance of detection of subclinical lymphedema for the prevention of breast cancer-related clinical lymphedema after axillary lymph node dissection; a prospective observational study. Lymphatic research and biology, 12(4), 289–294. https://doi.org/10.1089/lrb.2014.0035
Koehler, L. A., Blaes, A. H., Haddad, T. C., Hunter, D. W., Hirsch, A. T., & Ludewig, P. M. (2015). Research report movement, function, pain, and postoperative edema in axillary web syndrome. Phys Ther., 95(10):1345–1353.
Moskovitz, A. H., Anderson, B. O., Yeung, R. S., Byrd, D. R., Lawton, T. J., & Moe, R. E. (2001). Axillary web syndrome after axillary dissection. Am J Surg., 181(5):434–439.
Koehler, L. A., Hunter, D. W., Blaes, A. H., & Haddad, T. C. (2018). Function, Shoulder Motion, Pain, and Lymphedema in Breast Cancer With and Without Axillary Web Syndrome: An 18-Month Follow-Up. Physical therapy, 98(6), 518–527. https://doi.org/10.1093/ptj/pzy010
Baggi, F., Nevola Teixeira, L. F., Gandini, S., Simoncini, M. C., Bonacossa, E., Sandrin, F., Sciotto Marotta, M., Lanni, G., Dadda, P., Colpani, D., & Luini, A. (2018). Axillary web syndrome assessment using a self-assessment questionnaire: a prospective cohort study. Supportive care in cancer: Official journal of the Multinational Association of Supportive Care in Cancer, 26(8), 2801–2807. https://doi.org/10.1007/s00520-018-4123-3
Stubblefield, M.D. (2019). Cancer rehabilitation: Principles and practice. New York, New York: Springer Publishing Company.
Moore, K., Agur, A. and Dalley, A., n.d. Clinically oriented anatomy. 4th ed. Philidelphia: Lippincott Williams and Wilkins, p.688. 1999
Cueni, L. N., & Detmar, M. (2006). New insights into the molecular control of the lymphatic vascular system and its role in disease. J Invest Dermatol., 126:2167-77
Citation
Guerra, A. R. (2022). Post-mastectomy and/or axillary node dissection rehabilitation protocol. OccupationalTherapy.com, Article 5494. Available at https://OccupationalTherapy.com