Editor's note: This text-based course is a transcript of the webinar, Stroke, Electrical Stimulation, And Therapy, presented by Amy Friedl, MS, OTR/L.
Learning Outcomes
- After this course, participants will be able to identify how to incorporate electrical stimulation into their treatment to support functional performance.
- After this course, participants will be able to compare and contrast parameter selection based on the client and their needs.
- After this course, participants will be able to identify the correct use and placement of electrodes in preparation for functional tasks.
Introduction
Thank you so much for joining me today. I'm hoping to give you some good information, and hopefully, it's some new stuff that you haven't heard yet, and you're able to use electrical stimulation in a different way when you're in the clinic.
A Quick Review of the Motor Pathway
First, I'd like to go over the motor pathways. Here is a simple illustration.
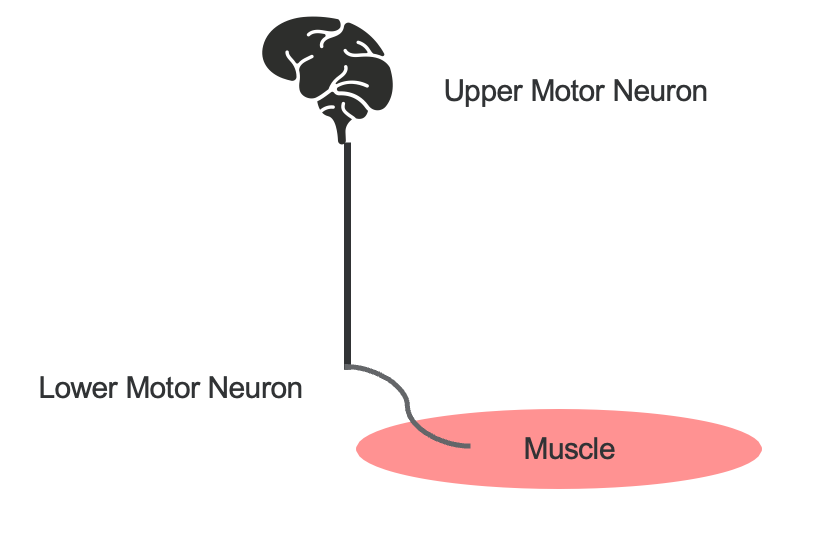
Figure 1. Illustration of the motor pathway from the brain to the muscle.
Let's quickly review the distinctions between upper motor neuron and lower motor neuron functions. Upper motor neuron issues typically arise from conditions like stroke or brain injury. Lower motor neuron disorders, on the other hand, often involve spinal cord injuries at the site of the trauma or brachial plexus injuries.
In the upper motor neuron pathway, nerves originate in the brain's motor cortex, travel down the spinal cord to the relevant level, and then continue to the rest of the spinal cord before reaching the muscles. These nerves then activate the lower motor neurons, which directly stimulate muscle contraction. This process essentially involves relaying information from the brain to the spinal cord, where lower motor neurons are activated to contract muscles.
While these concepts may not be unfamiliar to you, it's beneficial to refresh our understanding periodically, given their infrequent use in clinical settings. Now, let's delve into a more detailed breakdown.
A Muscle Contraction
Next, let's look at a muscle contraction with electrical stimulation (Figure 2).
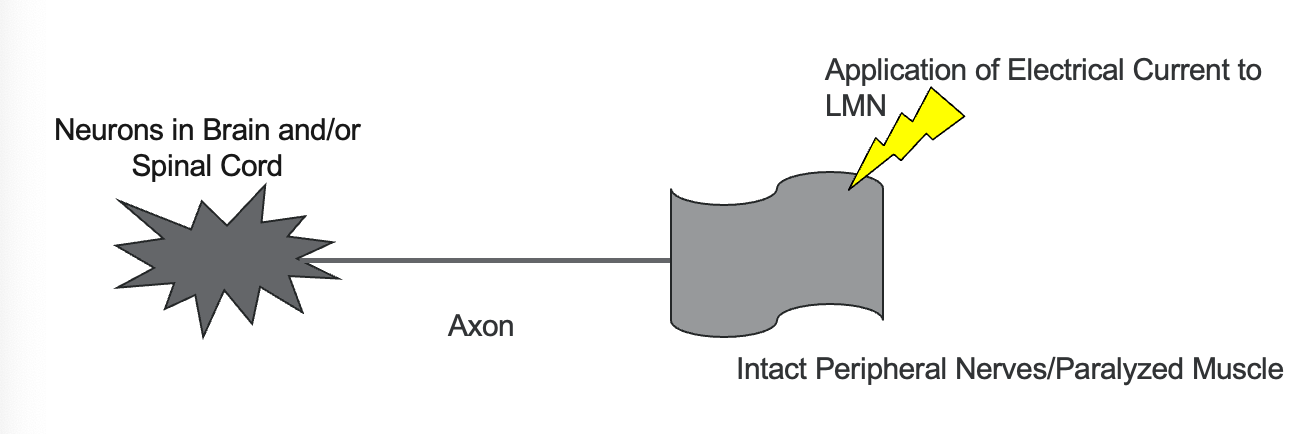
Figure 2. Overview of a muscle contraction using electrical stimulation.
Let's now discuss the process of applying electrical current to the lower motor neurons, which are the intact peripheral nerves responsible for our paralyzed muscles. Applying this current triggers an action potential in the lower motor neurons, resulting in muscle contraction. To refresh, an action potential is an electrical signal that travels along the neuron to stimulate muscle activity.
Imagine your patient sitting at the table in your clinic, muscles at rest, in what's called the resting potential state. The action potential occurs when the electrical activity travels down the neuron to the muscle, essentially conveying messages along the way. By applying the current to the intact peripheral nerves, we aim to depolarize the axons, making them less negative and ultimately triggering the action potential that leads to muscle contraction. Once the axons reach a certain threshold of depolarization, the action potential occurs, initiating muscle contraction.
In essence, applying the electrical current to the peripheral motor nerve innervating the targeted muscle sets off a chain reaction, "a domino effect," where the action potential propagates through the nerve fibers, communicating with the muscle tissue along the way.
- The resultant muscle contraction can range from a small muscle twitch to a powerful enough contraction to cause a physiological movement at the joint(s).
The resulting muscle contraction can vary, ranging from a minor muscle twitch to a noticeable movement at the joint. In clinical practice, we can utilize both of these outcomes depending on the specific parameters we employ.
Upon achieving contraction, the manipulation of various parameters—discussed further today—determines the type of response obtained. This could be a small muscle twitch or a more significant contraction leading to physiological movement at the joint.
Now that we grasp the mechanism behind stimulation application, let's delve into several types of stimulation.
A Few Types of Stimulation
- Functional Electrical Stimulation (FES)
- cyclic Neuromuscular Electric Stimulation (cNMES)
- Transcutaneous electrical nerve stimulation (TENS)
- Deep Brain Stimulation (DBS)
- Transcranial Magnetic Stimulation (TMS)
- Transcranial Direct Current Stimulation (tDCS)
Let's start by discussing two types of electrical stimulation: functional electrical stimulation and cyclic neuromuscular electrical stimulation. While both utilize the same stimulator, cyclic stimulation involves passive movements where muscles are alternately stimulated and relaxed over a specified period. On the other hand, functional electrical stimulation incorporates stimulation into specific tasks, assisting patients in completing those tasks.
Next, it's essential to recognize the various purposes behind these stimulation techniques, including brain control, pain management, paralysis compensation, spasm reduction, rehabilitation, and even sports performance enhancement.
Regarding transcutaneous electrical nerve stimulation (TENS) units, it's common for patients to inquire about their use, especially if they've used one before for pain management. While both TENS units and electrical stimulation units share similarities, they differ in parameters and capabilities. Yes, you can use the same device, but understanding the nuances in parameter adjustment is crucial, as each device operates differently.
Electrical Stimulation Vs. TENS
Here are the two different things delivered by these devices (Figure 3).
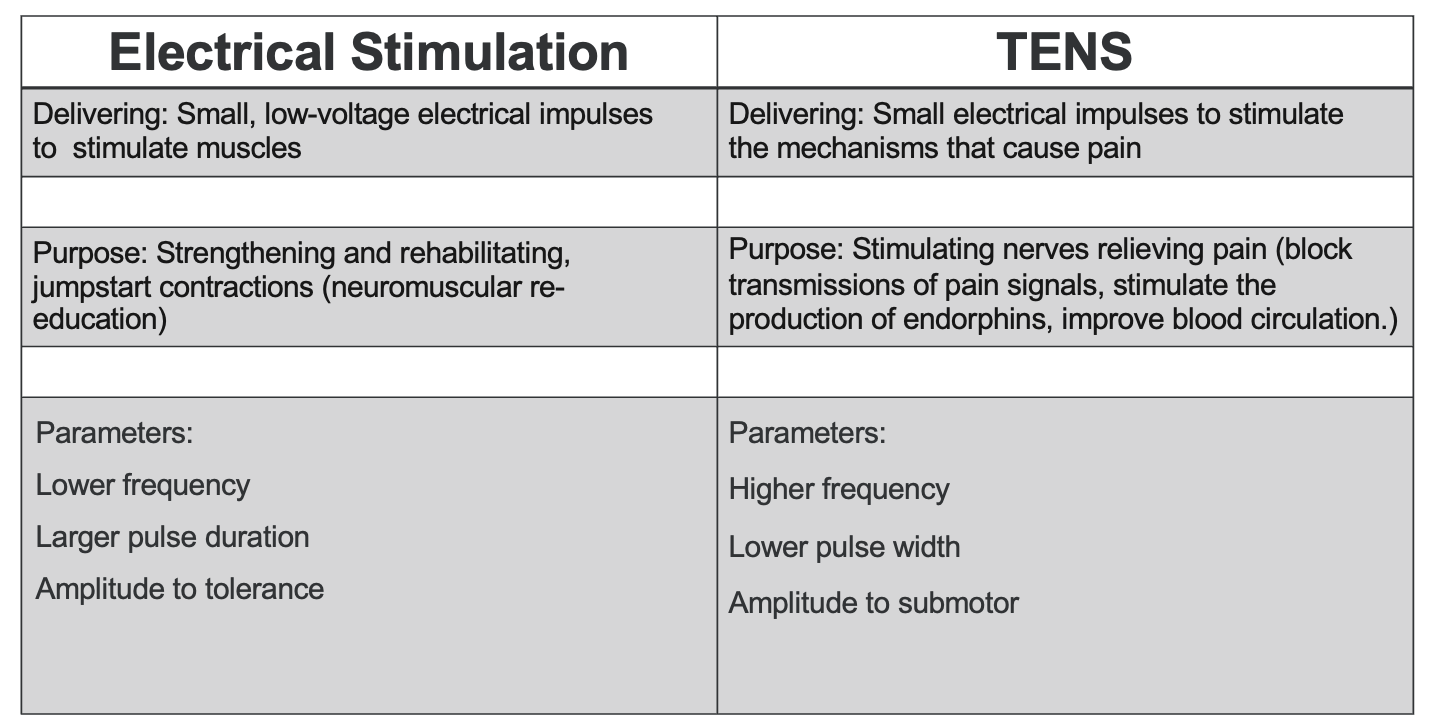
Figure 3. Chart comparing the parameters for electrical stimulation versus TENS (Click here to enlarge this image.)
Electrical stimulation and TENS units deliver small electrical pulses to the electrodes placed on the body. However, their purposes differ significantly. Electrical stimulation targets muscle stimulation by activating neurons, leading to muscle contraction. Conversely, TENS units aim to alleviate pain by modulating pain signaling mechanisms.
Electrical stimulation is commonly used in stroke rehabilitation to strengthen muscles, provide rehabilitation, and neuromuscular reeducation. Conversely, TENS units primarily focus on pain relief by blocking pain signals, stimulating endorphin production, and improving blood circulation. Interestingly, both modalities contribute to enhancing blood circulation.
The parameters defining these modalities highlight their differences. Electrical stimulation typically employs lower frequencies and larger pulse durations to recruit muscles effectively. In contrast, TENS units utilize higher frequencies and smaller pulse durations to modulate pain signals without inducing muscle contractions.
Lastly, when adjusting amplitude, electrical stimulation aims for muscle contraction within the patient's tolerance level. In contrast, TENS units operate at sub-motor levels to avoid muscle contraction, focusing solely on pain relief.
In the upcoming slides, we'll delve into these parameters further, elucidating them in more accessible terms to ensure a comprehensive understanding. With a grasp of the mechanisms and distinctions between stimulation types, we're equipped to explore these parameters in greater depth.
Contraindications
- Pacemakers
- Defibrillators
- Broken Bones
- Pregnancy
- Tumors
- Metal Implants
- Sensory/Cognitive Deficits
Let's discuss contraindications associated with electrical stimulation. These contraindications are standard across most electrical stimulation devices. First and foremost, it's crucial to avoid using electrical stimulation in individuals with pacemakers, defibrillators, or any other implanted electrical devices, as this could interfere with their function.
Additionally, electrical stimulation should not be applied over broken bones, during pregnancy, or in the presence of tumors. Stimulating over tumors can potentially increase blood circulation to the area, which may pose risks such as promoting metastases.
When dealing with individuals with metal implants, it's essential to consider the type of material used. While internal hardware nowadays is typically titanium and less prone to interference, it's still prudent to discuss the situation with the healthcare team to ensure safety.
It's crucial to proceed with caution regarding sensory and cognitive deficits. Individuals who cannot communicate discomfort or pain due to cognitive impairments should not undergo stimulation initially. However, this can be revisited as their condition improves. Sensory deficits also warrant careful monitoring, as individuals may not perceive discomfort from faulty stimulation parameters.
Assessing the skin's response to electrical stimulation is essential to ensure the safe and effective use of electrical stimulation. Redness or irritation at the electrode site is normal and typically resolves within a few hours. Persistent redness may indicate inappropriate stimulation settings or electrode placement, requiring adjustment.
In summary, understanding and adhering to these contraindications are essential to safely and effectively apply electrical stimulation in clinical practice. Collaboration with the healthcare team and vigilant monitoring of patient responses are key to optimizing outcomes and minimizing risks.
Electrodes and Devices
- Skin surface
- Electrode selection
- Electrode placement
- Electrode care
- Channels
Let's discuss the importance of electrode selection, care, and placement in electrical stimulation therapy.
Firstly, ensure the skin surface is clean and dry before applying electrodes. Alcohol prep pads are commonly used to wipe the area, but it's also essential to advise patients not to apply lotion beforehand, as it can impede electrical conductivity and adhesion.
Now, onto electrode selection. While clinics often have specific electrodes on hand, it's essential to understand the options available. Electrodes come in various sizes, ranging from small round to larger rectangular ones. The size selected should match the target muscle to ensure optimal stimulation. Smaller electrodes are precise but may require more time for placement, whereas larger ones cover more surface area and can produce stronger contractions.
Careful attention to electrode placement is crucial for effective stimulation. Smaller electrodes are preferred for smaller muscles to avoid stimulating neighboring muscles. Conversely, larger electrodes are suitable for larger muscle groups to ensure a smooth and comfortable contraction. Avoid using small electrodes on larger muscles, which can concentrate stimulation and cause discomfort.
Gel-backed electrodes are commonly used in clinics for electrode care. After each session, a drop or two of water can be applied to the electrode surface and rubbed in lightly to reactivate the gel. This prolongs the electrode's lifespan, allowing for multiple uses over several days.
Now, let's briefly touch on the concept of channels. Some devices feature multiple channels, allowing stimulation over different muscle groups simultaneously. This can be advantageous for targeting multiple areas or muscle groups in a single session, enhancing treatment efficiency.
Lastly, a note on device recommendations: While discussing electrode options and devices with patients is common, it's essential to refrain from recommending specific products. Instead, offer guidance on safe and effective use and encourage patients to bring their devices for inspection if they wish.
Ultimately, thorough understanding and meticulous attention to electrode selection, care, and placement are essential for maximizing the benefits of electrical stimulation therapy while ensuring patient safety and comfort.
Common Terms
- Most EMS units share similar parameters for adjustments.
- Frequency
- Pulse Width
- Amplitude
Some common terms associated with electrical stimulation units and their parameters. While there are many parameters to consider, I'll focus on a few main ones to ensure clarity and understanding.
Firstly, it's essential to recognize that not all units allow for adjustments to every parameter. Some devices may offer flexibility in changing frequency, pulse width, and amplitude, while others may have limitations.
Frequency refers to the rate at which electrical pulses are delivered per second, typically measured in Hertz (Hz). Pulse width, also known as pulse duration, denotes the duration of each electrical pulse, typically measured in microseconds (µs). Amplitude, often referred to as intensity, represents the strength of the electrical stimulus, usually measured in milliamps (mA).
It's worth noting that some units feature ramping up and ramping down options, allowing for gradual increases and decreases in stimulation intensity. This feature can be particularly useful for achieving functional tasks efficiently or managing spasticity and tone.
While I won't delve deeply into ramping up and ramping down techniques, it's essential to understand their significance in adjusting stimulation intensity over time.
By familiarizing yourself with these common terms and their implications, you'll be better equipped to optimize electrostimulation therapy for your patients' needs.
Frequency (Hz)
- The number of stimulation pulses delivered per second or unit of time.
- Frequency is measured in Hertz (Hz).
- For example, if a device delivers electrical pulses at a frequency of 50 Hz, it means 50 pulses occur in one second.
Frequency plays a crucial role in determining the intensity and effectiveness of electrical stimulation therapy. Measured in Hertz (Hz), frequency refers to the number of stimulation pulses delivered per second.
When setting the frequency on a device, lower frequencies, typically ranging from 1 to 10 Hz, result in weak muscle twitches or flutters. While these lower frequencies may be uncomfortable for some individuals, they do not produce the robust muscle contractions desired for effective therapy.
Conversely, higher frequencies, ranging from 60 to 70 Hz, initially elicit strong muscle contractions. However, as the session progresses, the power of these contractions diminishes, leading to increasing fatigue and discomfort. This fatigue can hinder the ability to perform multiple repetitions effectively, impacting the therapeutic outcome.
Therefore, striking a balance with frequency selection is essential, aiming for a level that produces adequate muscle contractions without inducing excessive fatigue or discomfort. By optimizing frequency settings, therapists can maximize the benefits of electrical stimulation therapy while ensuring patient comfort and adherence to treatment protocols.
Pulse Width (µs)
- The length of time pulses of stimulation is set to.
- Pulse width is measured in microseconds (us) or milliseconds.
- This is the duration of the time with which the pulse occurs.
- For example, if you set the device at 100 microseconds, that’s how long your pulse will last.
Pulse width, measured in microseconds (µs), refers to the duration of each electrical pulse. Essentially, it indicates how long the stimulation pulse lasts.
When setting pulse width on a device, shorter pulse widths are generally more comfortable for individuals undergoing electrical stimulation therapy. However, longer pulse widths are advantageous as they recruit more motor neurons, leading to improved muscle contractions.
Thus, while shorter pulse widths may be preferred for comfort, increasing the pulse width can enhance the effectiveness of muscle contractions by engaging a greater number of motor neurons. Balancing patient comfort with the need for optimal muscle recruitment is essential when adjusting pulse width settings in electrical stimulation therapy.
Pulse Amplitude (mA)
- Refers to the strength or intensity of the stimulation delivered.
- Amplitude is measured in milliamps (mA) or volts.
- For example, if you set a device to an amplitude of 20, that’s the strength of your signal.
Pulse amplitude, measured in milliamps (mA) or volts, determines the strength or intensity of the electrical stimulation provided by the device. Setting the pulse amplitude to a specific value, such as 20, determines the level of stimulation intensity delivered to the muscles.
Finding a balance with pulse amplitude is crucial, ensuring that it is high enough to elicit the desired muscle response while remaining comfortable for the individual undergoing therapy. Patient comfort is paramount to promote engagement and adherence to treatment protocols.
As muscle strength improves over time, adjustments to pulse amplitude may be necessary. Gradually reducing the pulse amplitude as muscles become stronger allows for continued therapy while maintaining comfort levels.
Additionally, optimal electrode placement plays a significant role in achieving effective muscle contractions. In cases where electrode positioning is suboptimal due to factors like wounds or anatomical considerations, higher pulse amplitudes may be required to compensate and achieve the desired muscle response.
Visualizing pulse amplitude, pulse width, and frequency can be likened to a graph, where pulse amplitude represents the height or intensity of the stimulation, pulse width signifies the duration of each pulse, and frequency indicates the rate of stimulation pulses per second. Understanding these parameters visually can aid in optimizing electrostimulation therapy for patients' needs.
Comparison
- Higher Amplitude = more uncomfortable
- Lower PW - smaller muscle groups
- Higher PW - larger muscle groups
- Lower frequency - uncomfortable, heavily atrophied muscles
- Medium frequency - good contraction and sufficient movement
- Higher frequency - impact is sensory and causes fatigue
Here is a visual comparing these parameters (Figure 4).
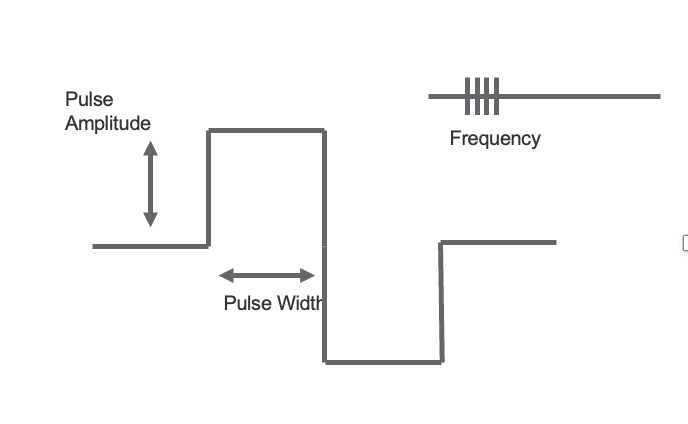
Figure 4. Comparison between the 3 parameters.
Pulse amplitude, which is essentially the strength or intensity of the stimulation, varies depending on factors like body size and tissue density. Typically, I divide it into ranges like 20, 40, and 60 milliamps or volts to tailor it to different patients' needs. Smaller individuals or those with less muscle mass might respond well to lower amplitudes, while larger or denser individuals might require higher ones.
Pulse width, on the other hand, determines the duration of each pulse. Lower pulse widths are better suited for targeting smaller muscle groups, while higher widths are more effective for larger ones. This allows for precise targeting and optimal muscle recruitment based on the area being stimulated.
Now, let's talk about frequency. This is the number of stimulation pulses delivered per second and plays a crucial role in achieving effective muscle contractions without causing excessive discomfort or fatigue. Higher frequencies can lead to sensory discomfort and fatigue, which may hinder the effectiveness of therapy sessions. So, I usually aim for a medium frequency, which strikes a balance between achieving strong contractions and minimizing fatigue. However, in cases where muscles are heavily atrophied, lower frequencies might be necessary to elicit a response.
Understanding how these parameters interact and how to adjust them based on individual needs is key to optimizing treatment outcomes for my patients.
Balancing the Parameters
- Balancing the amplitude and the pulse width can help to optimize both the muscle contraction produced and the comfort for the patient.
Finding the right balance between pulse amplitude and width is crucial for achieving optimal muscle contraction while ensuring patient comfort. These two parameters are inversely related, meaning that if I increase one, I typically decrease the other, and vice versa.
For example, if I'm adjusting the amplitude to increase the strength of the stimulation, I'll usually decrease the pulse width to maintain a comfortable experience for the patient. Conversely, if I'm decreasing the amplitude to make the stimulation more tolerable, I'll increase the pulse width to compensate and still achieve effective muscle recruitment.
This balancing act allows me to customize the stimulation parameters to each patient's needs, ensuring they receive the most beneficial and comfortable treatment possible. Additionally, considering the frequency, as we discussed earlier, is essential for avoiding fatigue and discomfort during therapy sessions. So, finding that middle ground where the parameters work together harmoniously is key.
Functional Electrical Stimulation (FES)
- Functional movements can be produced by coordinating the contractions of multiple paralyzed muscles.
We're now going to talk about functional electrical stimulation, as shown in Figure 5.
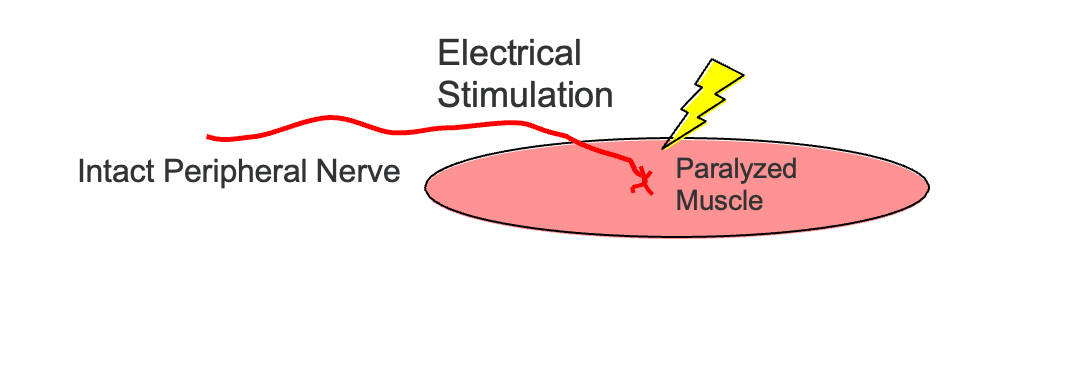
Figure 5. Illustration of electrical stimulation with a paralyzed muscle.
It's essential to establish a solid foundation of understanding of electrical stimulation before delving into specific applications. Focusing on wrist, finger, and thumb extension is an excellent choice because it lays the groundwork for a wide range of functional tasks, regardless of proximal stability. By targeting these movements, we can enhance independence and quality of life for individuals with various conditions.
It's important to note that functional electrical stimulation isn't a one-size-fits-all approach. There are different modalities and applications within the realm of FES. While some devices serve as assistive devices, providing permanent neuromuscular function replacement, our focus today is on using FES therapeutically to enhance movement and function. This therapeutic approach offers tremendous potential for rehabilitation and improving motor control.
Why Use FES for Stroke Rehab?
- Activity dependent (therapy helps recovery)
- Motor Re-learning/Re-education
- High repetition
- Novel movement
- Cognitively engaging
- Goal-oriented movement
Our therapeutic approach with functional electrical stimulation aims to restore voluntary hand function and motor control. We're leveraging the principles of motor relearning and neuromuscular reeducation, which are fundamental to stroke recovery. Research supports the idea of high-dose task-specific training, with over 100 repetitions of a particular task ideal for promoting neuroplasticity and functional improvement.
However, we often face time constraints in clinical practice, so we aim to maximize repetitions within a manageable timeframe, typically around 15 minutes per session. The key is to provide opportunities for patients to practice functional tasks repeatedly, focusing on quantity and movement quality. Each session becomes an opportunity for improvement, whether achieving more repetitions or refining movement patterns.
Importantly, we ensure the tasks are meaningful and goal-oriented, aligning with the individual's functional needs and objectives. We optimize the therapeutic benefits of functional electrical stimulation by engaging patients in tasks that require skill, motor intention, and functional relevance. As occupational therapists, this is central to our practice philosophy and approach.
Study: Participants who were < 2 yrs post-stroke with moderate hand impairment at baseline
Understanding the research landscape is essential to effectively inform our therapeutic strategies. This particular study focused on individuals who were less than two years post-stroke and had moderate hand impairment at the study's onset. The graphs in Figure 6 provide insights into the effectiveness of interventions for this population.
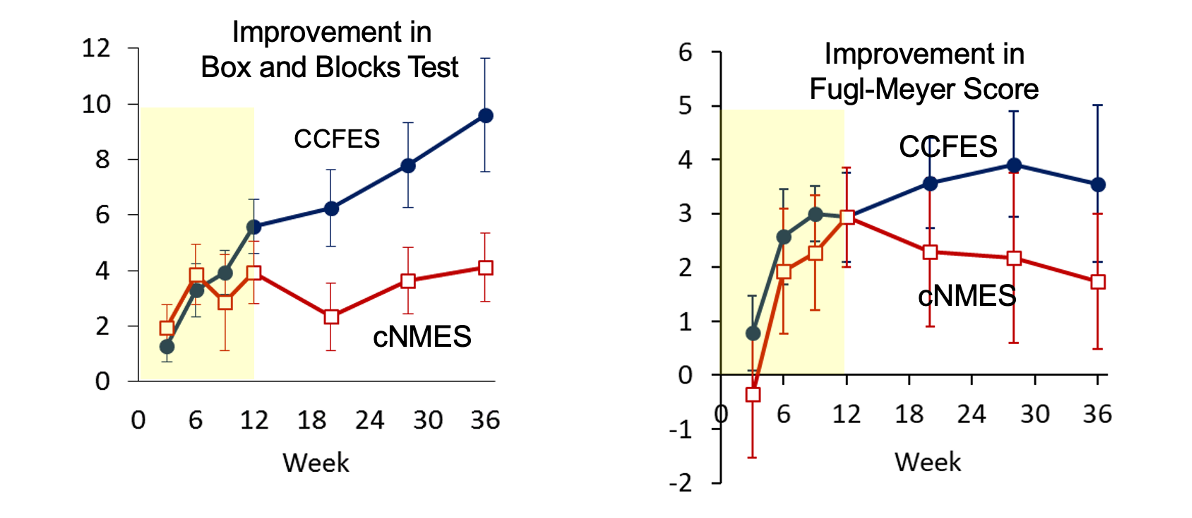
Figure 6. Results from stroke study <2 years post-stroke (Image from the author). Click here to enlarge the image.
Looking at these graphs, it's interesting to see the progression of improvement over time for participants with moderate hand impairment post-stroke. The yellow area represents the twelve-week period during which participants received either functional electrical stimulation or cyclic stimulation, coupled with occupational therapy sessions twice a week. It's encouraging to note that both groups showed improvement by the end of this intervention period.
However, what stands out is the sustained progress seen in the functional electrical stimulation group during the six-month follow-up period. Despite the cessation of therapy and stimulation, they continued to make significant gains. This suggests that the functional approach, which emphasizes task-oriented movements, may have a longer-lasting impact on functional recovery than cyclic stimulation alone.
These findings highlight the importance of incorporating functional tasks into rehabilitation interventions for individuals post-stroke, as they promote meaningful improvements in motor function that can endure beyond the duration of therapy sessions. Let's proceed to the next slide for further insights.
Study: Chronic (> 6 mo) post-stroke, moderate and severe hand impairment
This similar study focuses on participants who are less than two years and greater than six months post-stroke. This group includes individuals with both moderate and severe hand impairment, defined as those scoring at least a one on the Fugl-Meyer and an eleven or less on the hand Fugl-Meyer portion. The graphs in Figure 7 are set up exactly like the previous slide, allowing for a comparison of the effectiveness of interventions across different levels of hand impairment in stroke survivors.
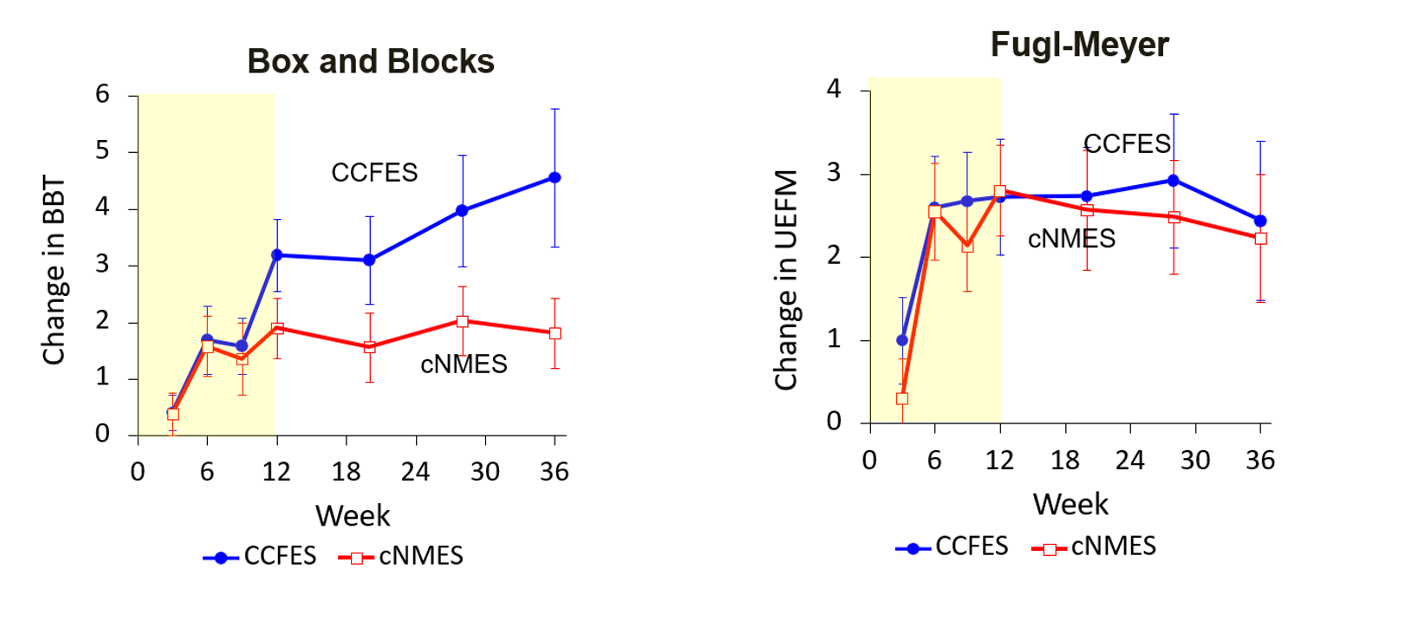
Figure 7. Results from stroke study >6 months post-stroke (Image from the author). Click here to enlarge the image.
Examining these graphs along the yellow areas where participants received occupational therapy twice weekly in conjunction with functional or cyclic electrical stimulation provides valuable insights. We can clearly observe the changes during the twelve-week intervention period, indicating that both groups experienced improved motor function.
However, what's particularly striking is the divergence observed during the subsequent six-month follow-up period. While participants who received functional electrical stimulation continued to make significant improvements, those in the cyclic stimulation group showed minimal change. This contrast underscores the effectiveness of functional electrical stimulation in promoting sustained gains in motor function over time.
These findings serve as compelling evidence to support the use of functional electrical stimulation as a therapeutic intervention for individuals recovering from stroke-related hand impairments. By incorporating task-oriented therapy and tailored stimulation protocols, we can optimize outcomes and facilitate meaningful recovery for our patients.
Let's Stimulate
- Determine the motion you want to achieve.
- Determine the activity that incorporates this motion.
- Place the electrodes over the muscle belly.
- Test the stimulation.
- Set the ramp up/down for a short period.
- Start the stimulation with the functional activity.
Moving into the practical aspect of electrical stimulation, the first step is pinpointing the specific motion we're targeting with our client or patient. In this context, we're focusing on wrist extension, finger extension at the metacarpophalangeal joints, and, ideally, some thumb extension to enhance grasp.
Once we've identified our objective motion, we select an activity that integrates this movement. For today's demonstration, I'll showcase a video of a patient picking up a deodorant can and applying it to their stronger arm's underarm using electrical stimulation. I'll also demonstrate a typical placement over the muscle belly. However, I'll also discuss alternative placements if necessary for improved response or comfort.
After positioning the electrodes, it's crucial to test the stimulation to ensure it's producing the desired effect. Finding the right balance is key here. While maximizing stimulation for greater movement might be tempting, we must remember that functional tasks require precise control. Therefore, we aim for sufficient stimulation to accomplish the task without going overboard.
Once we've confirmed the setup meets our requirements, we can proceed with the stimulation alongside the functional activity. If everything aligns as expected, we're moving in the right direction.
Figure 8 shows a picture of the arm. I highlighted a couple of things in red.
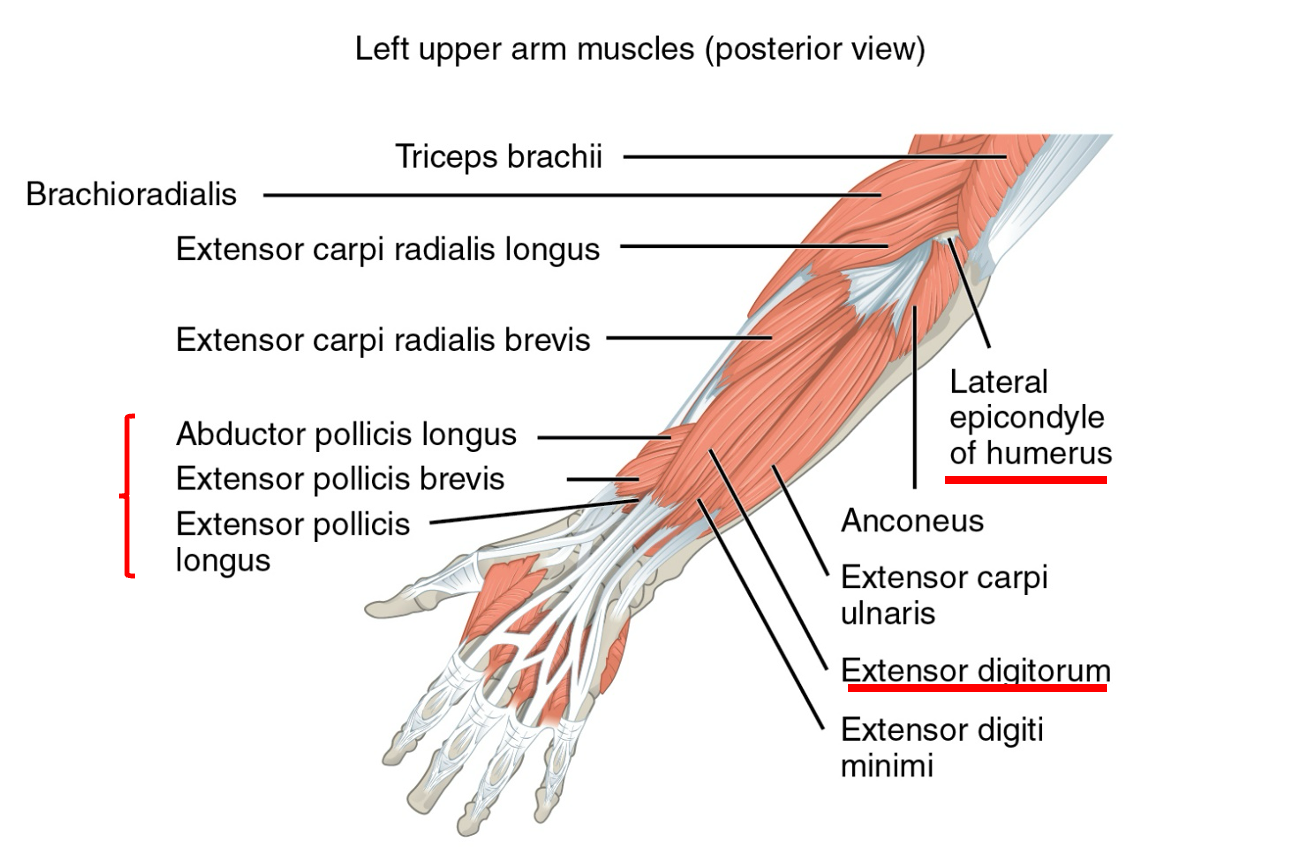
Figure 8. An illustration of a labeled upper extremity.
As you can see in the image, the extensor digitorum muscle is prominently located in the center of the forearm. This muscle plays a key role in finger extension. The thumb muscles are also situated deeper, requiring more precise electrode placement to stimulate them effectively. It's essential to maneuver the electrode until you find the optimal position to target these muscles accurately.
I often use the lateral epicondyle of the humerus as a reference point for electrode placement. This landmark helps guide me to the target muscles. In this case, I'll place electrodes over the extensor digitorum and thumb muscles to stimulate their respective neurons.
It's worth noting that the extensor carpi radialis and extensor carpi ulnaris muscles are in close proximity to our target area. When placing electrodes, there may be some "bleeding" of stimulation to these adjacent muscles, resulting in radial or ulnar deviation. Adjusting the electrode placement, either further down the muscle or through other means, can help mitigate this effect. Ultimately, the decision to address this bleed depends on individual judgment and what will work best for the patient's needs and comfort.
Movement | Muscles | Bleed | Purpose | Added benefit |
Wrist extension | EDC | Slight finger ext | Wrist stability; manage wrist drop | Decrease spasticity, proprioceptive input, cognitive, sensory input |
Wrist & Finger Extension | EDC | Radial/ulnar deviation | Assist with release of object | |
Wrist & Finger Extension, Thumb Abd/Ext | EDC, EPL | Supination, radial/ulnar deviation |
|
I've created a simple chart illustrating the targeted muscles and their associated benefits during functional electrical stimulation.
In the first row, we focus on wrist extension using the extensor digitorum communis (EDC) muscle. While primarily targeting wrist extension, there's also some finger extension involved. This setup is particularly useful for addressing wrist stability and managing wrist drop, providing support for functional tasks involving the hand.
Moving to the second row, we combine wrist and finger extension by stimulating the EDC muscle again. Despite the potential for radial and ulnar deviation due to "bleeding," adjusting the electrode placement can mitigate this effect. This configuration aids in releasing and grasping objects, enhancing hand function during activities.
Incorporating thumb extension in the last row further enhances hand function. By including the extensor pollicis longus (EPL) muscle and the EDC, we promote coordinated wrist, finger, and thumb movements. Although fine-tuning the electrode placement may be necessary to minimize unwanted muscle activation, the overall synergy of these muscles contributes to improved hand function.
Beyond the primary motor benefits, functional electrical stimulation offers additional advantages. It can help decrease spasticity, almost like cyclic stimulation to alleviate tightness during tasks. Moreover, the cognitive and sensory inputs associated with performing tasks under stimulation can enhance attention span and concentration, contributing to overall rehabilitation progress.
Example Set-Up
This is an example setup in Figure 9.
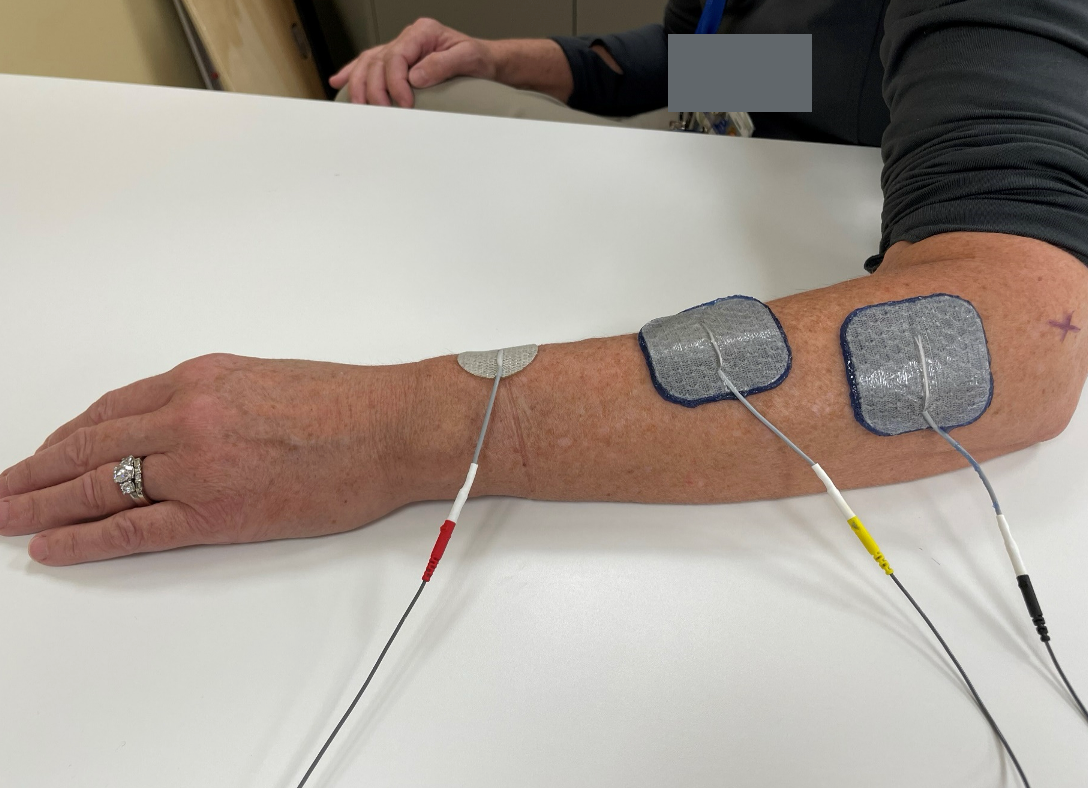
Figure 9. An example of an electrical stimulation set-up.
You can see I've marked the lateral epicondyle with a small "x" to provide an anatomical reference point. Now, let's discuss the device I'm using.
We have three cables: black, yellow, and red. For now, let's focus on the black and yellow cables. The black is the anode, and the yellow is the cathode. If you only place the cathode without attaching the black one to the skin surface, you won't get any stimulation. This unit operates on a circuit system, meaning we must complete the loop. So, the black and yellow cables must be used together. You can see here that I've placed the anode just distal to the lateral epicondyle and about two-thirds down the forearm. I'm targeting the EDC muscles to activate those neurons.
The red cable represents an additional channel. In this case, I'm using a smaller 1.25-size electrode to stimulate the thumb muscle. I won't use it in the next picture, as I used it on my coworker, who didn't require the extra stimulation that day. Unfortunately, upon reviewing the video, I noticed some mistakes, which I'll address to highlight what not to do.
Electrical Stimulation Video
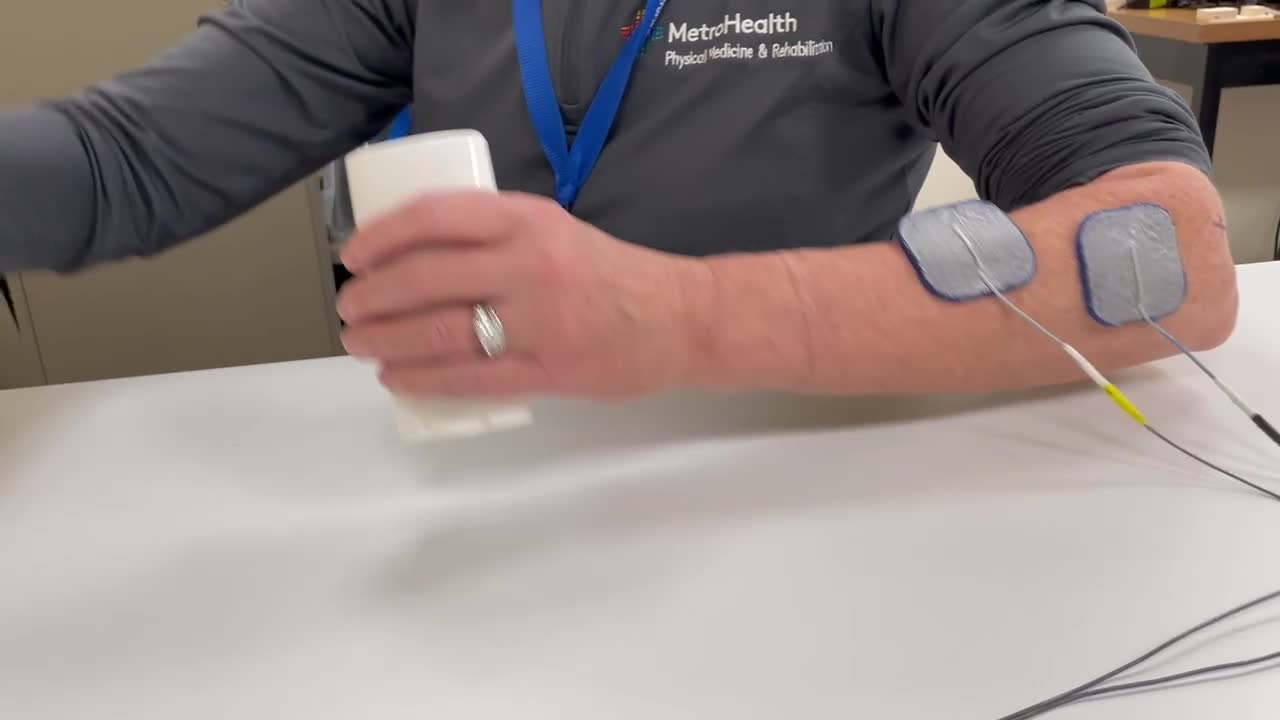
I want to point out a mistake I made here. As you can see, my cathode, connected to the yellow wire, is not fully touching the skin. This is a significant error on several levels. When using electrodes, you must ensure that the entire surface area of the electrode is in contact with the skin. If the edges are not making contact, you're sending the same current over a smaller pinpoint area, which can lead to pain or skin breakdown.
So, avoid doing what I did here. Make sure to firmly attach the electrode to the skin to cover the entire surface area. Let me walk you through the correct process. Since it's a short clip, I'll show it multiple times.
Here, you can see I turn the stimulation on and then off, and she grasps the object. I turn the stimulation back on. It's crucial to assist the individual in completing the task, ensuring they feel accomplished and oriented towards their goals. You may notice that her wrist is slightly more extended than usual. However, this setup requires her to concentrate on bringing her hand to the right spot, which is beneficial.
If you don't have the option to control the stimulation as I'm doing here, you'll need to carefully ramp it up and down. This may require some trial and error, but you can adjust the stimulation as the individual moves towards the object and decrease it as they move away. Let's watch it one more time.
I apologize for not having a live demonstration, but I hope this provides valuable insight into the process.
Summary
I believe I've covered all the essential points regarding functional electrical stimulation. It was important to highlight how we can integrate it into functional tasks to effectively support clients' daily activities. We ensure personalized and optimized treatment plans by comparing and contrasting parameter selection based on individual client needs.
Additionally, emphasizing the correct use and placement of electrodes is crucial for achieving desired outcomes. Documenting the parameters used and the client's response during the session is essential for tracking progress and informing future interventions.
I hope this session has provided clarity on how to incorporate electrical stimulation into occupational therapy practice and address any questions or concerns you may have had. If there are any further inquiries or topics you'd like to discuss, feel free to let me know. Thank you for your engagement and participation!
Questions and Answers
How often do you perform the functional number of tries before upgrading the task without the stim?
Great question. I love it. You can do this in so many different ways. Let's say the goal is ten minutes with the stimulation, trying to get 15 reps. We can do it together without the stim at the end of this. You can always try it without the stim. I think the bonus of doing this is showing them at the end what it's like to do it without that assistance. However, depending on their level, everyone's a little different, but you might have to assist. For instance, you might have to hold the deodorant jar for them while they reach for it. There are many different variations.
Can you use it with a subluxed shoulder?
I question exactly how you would do something functionally with them unless you're putting the shoulder in the correct position and then trying to do something functionally with it. That's not really what I was covering today. I just kind of wanted to cover some functional tasks that you could use with your hands, but you can always use stim on a sublux shoulder. I think it'd be difficult to connect it with a functional or functional task practice.
References
Citation
Friedl, A. (2024). Stroke, electrical stimulation, and therapy. OccupationalTherapy.com, Article 5700. Available at www.occupationaltherapy.com