Motion and Strength of Joints
We are going to go back to some basics and talk about assessing motion and strength.
- Motion and strength of a joint related to the functional ability of the body part and the individual
- Affects the ability to reach toward and away from the body
- Affects the ability to turn an object toward the body
These are pertinent in multiple settings and the components that we should always be looking at. Why do we even address motion and strength? As OTs, we know that we are always looking at function, but we have to break it down into the components of being able to complete a task. It is those components that we address that enable a person to be able to perform the function.
- Affects the ability to grasp and hold an object
- Affects the ability to exert force or resist a force
- Weight bear for mobility
- Push/pull: doors, drawers, etc.
- Affects the ability to maintain a position
- Hold objects: read, stir, etc.
We are going to focus on the upper extremity today. The motion of an upper extremity joint relates to the functional ability of that body part to perform activities. It affects one's ability to reach both toward and away from the body. It affects one's ability to turn an object toward the body to be able to use it as a toothbrush or eating utensil.
- Affects the ability to grasp and hold an object
- Affects the ability to exert force or resist a force
- Weight bear for mobility
- Push/pull: doors, drawers, etc.
- Affects the ability to maintain a position
- Hold objects: read, stir, etc.
Motion and strength of the joints also affect the ability to grasp and hold an object. It affects the ability to exert force or resist force, such as weight-bearing for mobility and pushing or pulling on doors and drawers, and opening containers. It also affects one's ability to maintain a position to hold objects, such as holding a book to read or holding a bowl while stirring.
We always need to address and look at the motion and strength of the upper extremity joints. And often, we need a way to objectify this. This does not mean that we have to actually measure each joint. but if we do need to measure, and we want to do that correctly and consistently.
Motion: Methods of Assessing
- Observation
- Measurement
- Description of function
For motion, some different methods can all be objectified and used for documentation to establish goals.
Observation
Sometimes, you can just use your observation skills. Many of you that have measured motion for a long period of time are very good at looking at the shoulder flexion in Figure 1 and saying, "The shoulder movement on her left is about 150 degrees of flexion, and the one on her right is at about 120 degrees of flexion." Sometimes our observation skills are all that we need to determine how much motion has been measured.
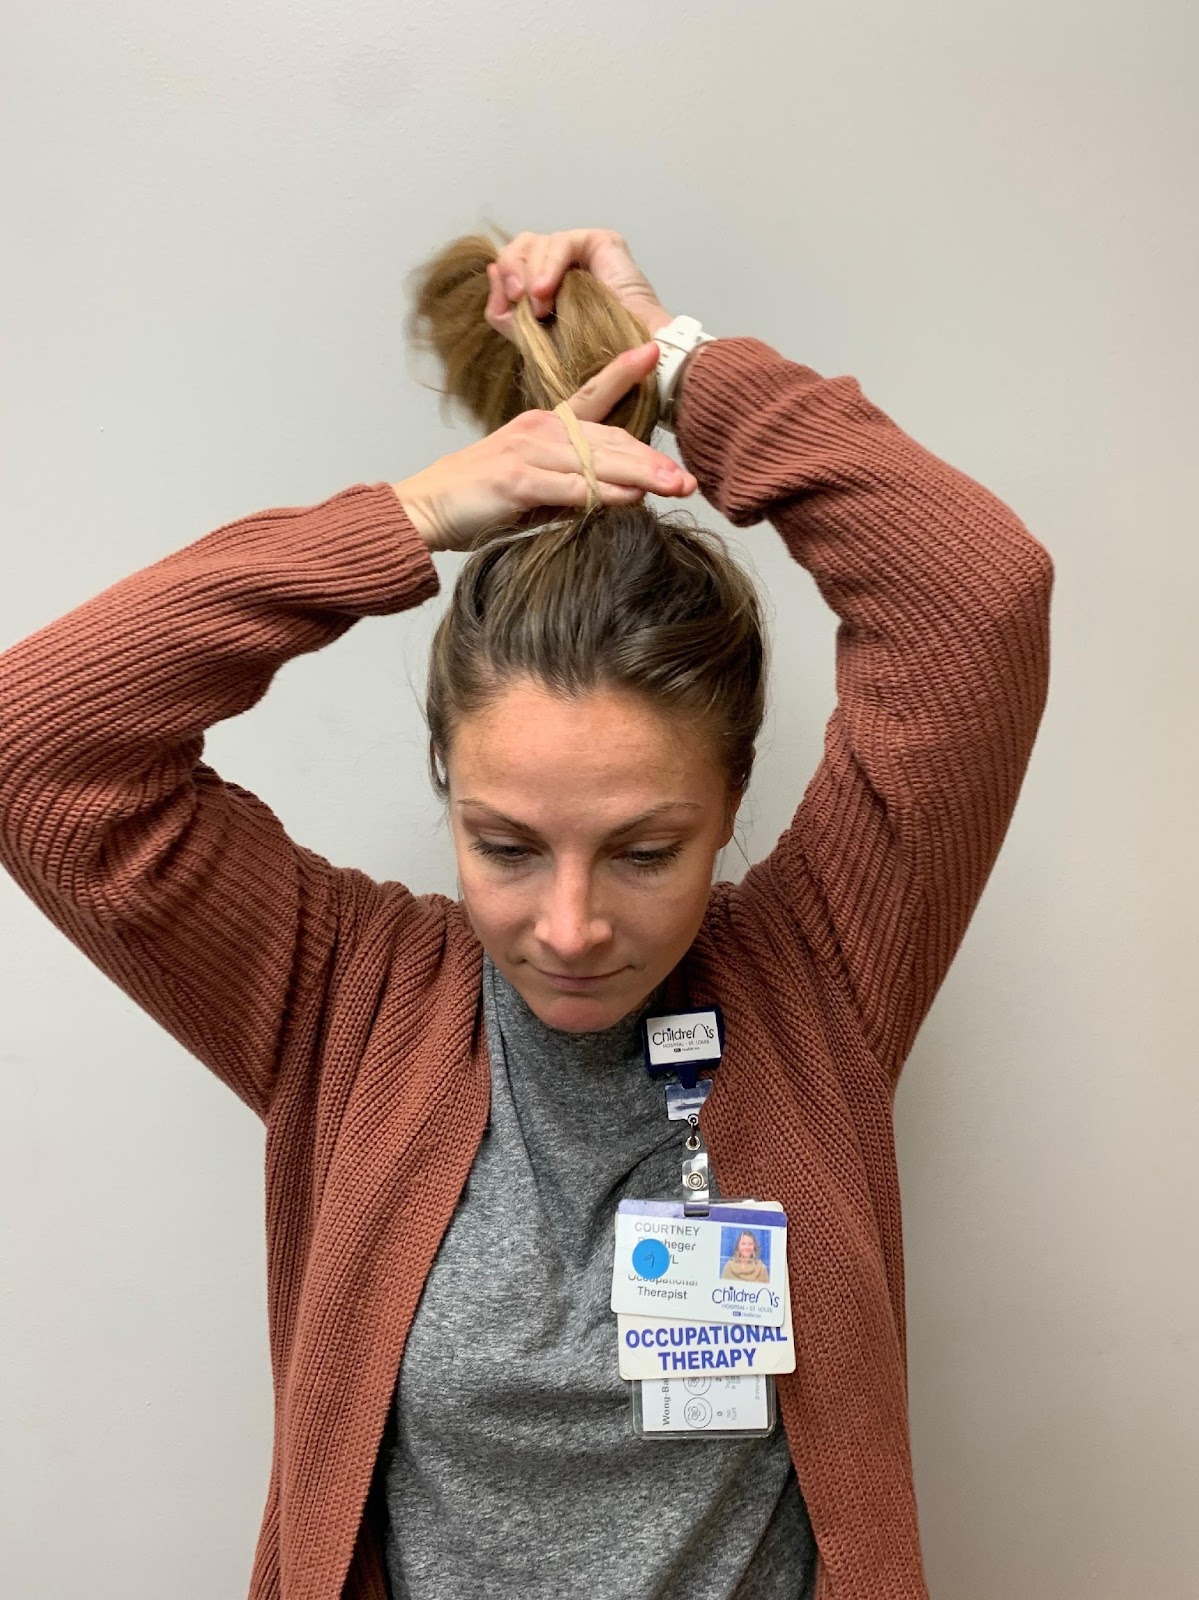
Figure 1. OT with different shoulder movement while putting in a ponytail.
We can also take direct measurement of joint motion, either during an activity or by looking at that motion as part of our evaluation.
You can also describe the function. Are they able to touch the top of their head? Are they able to reach their feet? This is what I mean by a description of the function. This could be defining the motion of that joint adequately enough for your treatment and your goal establishment.
Occupational Therapy
- As occupational therapists, we can not just look at a component but must correlate the motion and strength with function.
- This is for treatment planning, implementation, and goal setting.
- Objectify treatments and goals
- Establish outcomes from an intervention
As occupational therapists, we do not just look at the components of a movement.
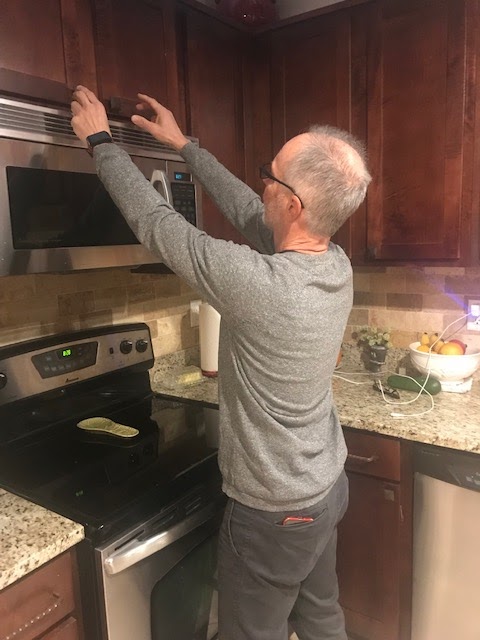
Figure 2. Gentleman reaching into a cupboard.
For example, we take how much elbow flexion a person has and correlate it to a specific activity. We do that to establish a treatment plan, measure outcomes, objectify treatments, and create goals to see if we are making a difference. I first need to determine though for my treatment planning what are they not able to do.
Motions That Are Measured
- Active: How much they can volitionally move the joint. Define limitation reasons.
- Passive: Movement of the joint by an outside force
- Define end feel: soft, firm, hard, empty
- Torque ROM: Known quantity of force
- Functional: define activities they can perform and limitations.
- Is active or passive limited; the age of the patient; which one will be changing
Active Motion
The first motion that we can measure is active. This is how much the individual can volitionally move the joint. We want to define what the limitations are and to define the reasons they have those limitations if we can. Do they have limited active motion due to weakness or joint restrictions? We are going to get into that more in a little bit.
Passive Motion
You can also look at passive motion. This is the movement of the joint by an outside force such as a therapist. Once you determine the end of passive motion, you typically want to define the end feel. You can define the end feel as soft, firm, hard, or as an empty end feel where there is not a restriction as there should be. An example of an empty end feel would be with say a ligamentous injury. There is also something known as torque range of motion. This is where you quantify the force that you are applying during passive motion. You may read about this in a lot of studies as a torque range of motion. It is typically only used in research projects. I think it is important that you understand that you can actually quantify the amount of force when you are assessing joint range of motion.
Functional Range of Motion
Then, you want to look at functional range of motion. You want to define the activities that the client can and cannot perform. You want to look at why active or passive is limited. If they have full passive motion but limited active motion, this may be an indication of weakness, pain, or fear of moving that joint. For example, if you are working with somebody who frequently dislocates their elbow, they may not want to fully flex it for fear of it dislocating again.
Once we have determined active and passive motion and a person's limitations, this is when we can then determine which ones we want to change with our treatment. Rarely do we have passive motion as a goal. This is because passive motion may not be what is limiting their activities, and our goal should always be related to activities. Typically, our goals should address active motion limitations. And if we cannot change active motion, this would lead us into the next type of treatment which would be the use of adaptations.
Tools to Measure UE Motion
- Goniometers:
- Large
- Small
- Cut small
- Metal
- Ruler
- Computerized and electrical goniometers
There are multitudes of goniometers, some of which are seen in Figure 3.
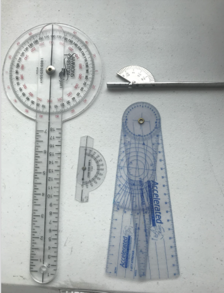
Figure 3. Types of goniometers.
I always have three with me during an assessment. I have a large goniometer that I use for the shoulders and the elbow. I have a small goniometer that I will use for the wrist and forearm. Then, I like to use either a cut-down small one (in the middle) or the silver metal one when measuring smaller joints like the fingers and thumbs.
You can also use a ruler as some of the time when we are assessing active motion, we are looking at how far the tips of the fingers are to the palm or the distal palmar crease. With that measurement, you are going to use a ruler and document that distance in either centimeters or millimeters as long as you are consistent.
There are computerized and electrical goniometers that some clinics have the luxury of having. One issue with that is that it cannot be taken bedside or to different types of settings. They are also very costly.
There is also something called a motion analysis device. These motion analysis computerized devices are extremely costly and are used for research projects.
Active Range of Motion (AROM)
- Start from a neutral position
- Adjacent joints should be neutral/anatomical
- Negative if unable to achieve a neutral position
- Arc of motion: the difference between the start and final position
- Use of a consistent tool
- Consistent person measuring
- Make contact to the body
When I am talking about measuring active range of motion, I am referring to a clinical setting where the patient comes to you. The other time that we want to measure active range of motion is following a treatment intervention or at the end of our treatment duration. This is a way to see if we made a difference. If we have determined that we are going to see them for four weeks, as an example, we would want to reassess their active range of motion at the end of this time period to see if we have made a difference and relate that to function. For today's talk, I have left out shoulder assessment as the motion, and strength of the shoulders could take up more than an hour. Instead, we are going to talk only about ROM and strength distal to the shoulder.
With active range of motion, you are going to look at a specific joint. You want to always start from a neutral position. The adjacent joints should also be neutral. When you are trying to figure out what neutral is, you can just use the anatomical position. If they are unable to achieve that neutral position, then you use a negative. For example, if somebody cannot extend their elbow fully, the measurement may start at negative 30 degrees. Next, you are going to look at the arc of motion. This is going to be the difference between the start of your motion and the final motion. If they have negative 30 degrees for elbow extension and have 140 degrees of elbow flexion, their arc of motion would be 110. We can use the arc of motion as our objective number.
When you are measuring the range of motion, you need to use a consistent tool each time you measure that joint. If you are switching tools that can affect the consistency of the measurement. It is also ideal to have a consistent person measuring. There have been multitudes of studies over the years for both inter-rater and intra-rater reliability of measuring range of motion with goniometers.
As you are measuring, you also want to make body contact. I have had some students want to hold the goniometers away from the body part and then try to make sure it's lined up. You need to make contact and touch the axis of the tool to the axis of the joint for the most consistent measurement.
The other really important thing is to be at eye level. If I am measuring a person sitting in a chair but I am standing up above them, it is going to be very challenging to see the numbers. It is important to squat down and be at eye-level with that goniometer.
Range of Motion Recommendations
- ASHT Recommendations for ROM:
- “0” is neutral
- “+” is hyperextension
- “-” is an extension deficit
- Measurements should be written extension/flexion
- Finger and wrist should be volar/dorsal placement
- Hamilton and Lachenbruch: ‘equal reliability between lateral and dorsal goniometer placement’
With motion, ASHT has some recommendations for range of motion. Zero degrees of motion is neutral for the upper extremity. If you have hyperextension of a joint, the accepted designation is a plus for hyperextension. If you have an extension deficit, it is a minus. The measurements should be written extension over flexion. They also recommend that the finger and wrist should be volar and dorsal placements for those measurements. The study by Hamilton and Lachenbruch, however, showed that there is equal reliability between lateral or dorsal goniometer placement. If you are not going to do a volar-dorsal placement, you should state that those were lateral measurements. There are sometimes reasons why you should use lateral as opposed to volar-dorsal.
Range of Motion Norms
- Norms are established per textbook
- Contralateral side if not affected
- The functional amount necessary: how to define
Gates, Cowley, Wilken, & Resnik, L. (2016). Brief report-range of motion requirements for upper-limb activities of daily living. AJOT, 70.
Some norms are established per textbooks for range of motion, but as we know, I do not think very many of us fit into the norms. What is ideal when measuring an upper extremity is that you can use the contralateral side if it is not affected. Figure 4 shows a thumb hyperextension.
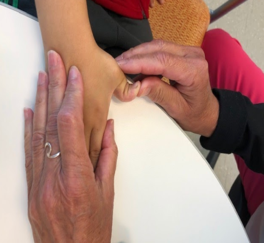
Figure 4. Hyperextension of the thumb.
As an example, if you have a patient with extreme hyperextension, you may think, "This is really going to be a problem." But if the other side also has extreme hyperextension, that may normal for them and not be an issue. We always want to look at the contralateral side because that is going to be more accurate than looking at norms.
You can also look at the functional amount of motion necessary for activities of daily living. There have been multiple studies done on defining the amount of active range of motion that is necessary to complete certain ADLs. For example, some say that you only need between five or 15 degrees of wrist flexion to complete 85% of your ADL activities. You may have an individual with very limited wrist flexion, but we need to determine if it is a problem that we need to address. If it is a recent injury or surgery that limits their movement, that may alter that patient's perception of their bodies and how they have recovered. They may be able to do their activities, but it may be important to them to get back to their baseline. In contrast, a person may have a longstanding joint restriction and state that they broke their wrist 20 years ago. If they can do all of their activities, this is probably not a component that we need to address or try to change.
It all comes back to when you are doing your initial evaluation. That interview process is really critical to determine what is important for that patient. We need to client-centered and cannot determine for them what amount of motion they need.
Methods of Measurement
- Volar/dorsal
- Lateral
- Ruler for a tip to crease
- What affects the measurements?
When I was talking about some contraindications for measuring volar, dorsal, or laterally, one of the documented contraindications would be an open wound as shown in Figure 5.
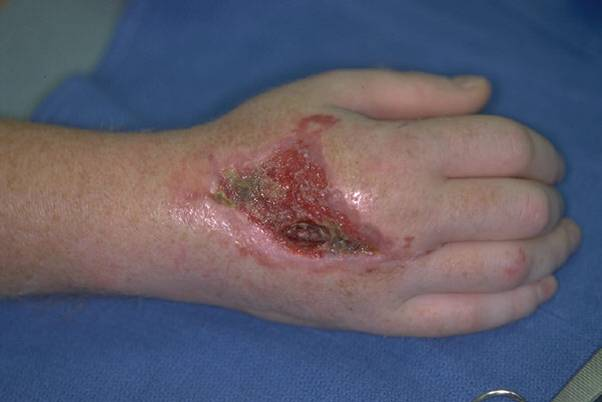
Figure 5. Open wound on dorsum of the hand.
In the case of this time of would, I would want to measure laterally for the finger and MP motion when possible. Additionally, if there is extreme swelling or edema on the dorsum of the hand or the fingers, this also affects your measurements (Figure 6).

Figure 6. Swelling in the dorsum of the hand.
Again, you may want to switch to a lateral measurement in this case. Lastly, if there are some longstanding flexion contractures, such as the camptodactyly finger, they will have a very knobby, hard, and bulky dorsum of their finger that will affect your measurement (Figure 7).

Figure 7. Example of a camptodactyly finger contracture.
This is another one where you want to do a lateral measurement. Be aware that for the central digits, it is very challenging to get the lateral motion of the PIP and MP joints. For those, whenever possible you need to use a volar-dorsal technique.
Goniometer Placement
- Axis of motion
- Stationary Arm
- Moving arm
For goniometer placement, you need to know your anatomy and be able to palpate where the landmarks and the axis of motion are. The stationary arm is always the more proximal bone of the joint, and the moving arm should always be placed on the distal component to get accurate measurements. Figure 8 shows an example of this.
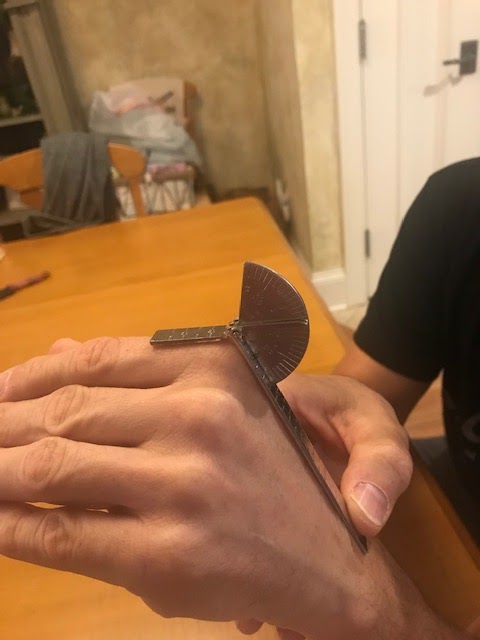
Figure 8. Example of goniometer placement.
When you are doing a volar or dorsal measurement, you want the goniometer to be flush with the surface of the digits. If the goniometer rises off the finger, you are going to have a different number than if you have joint contact.
Joint Range of Motion
Now, I am going to go over each joint for measuring range of motion. It is important to practice. This is especially true when measuring kids to get quick measurements. I am also going to highlight some of the substitutions to watch out for. As you get more adept at this, you will be able to identify these substitutions. For example, many kids with brachial plexus injuries are really good at looking like they have more motion than they do by substituting other body parts. Sometimes, that is okay because that allows them to do functional activities. However, if you want to get an accurate measurement, you need to stop that substitution pattern.
Elbow
- Elbow Assessment
- Elbow: Reach toward and away from the body
- Measure laterally
- Compensations to watch for
- Trunk motion
- Wrist
- Cervical motion
- Shoulder
The elbow and shoulder allow the hand to be placed where it is needed. We need full elbow flexion to touch our chest and face, and it allows us to reach away from our body to access objects and reach parts of our body like our feet.
You want to measure this joint laterally. Compensations to watch for are trunk motion. People who cannot extend or flex their elbow all of the way will bring their trunk back or forward. They may bring their shoulder forward or backward to make it look like their hand is straightening further. They can also flex their wrist or fingers if they cannot bend their elbow all the way. You need to watch for all of those substitutions when you are taking your measurements to try to eliminate those.
The best way for the elbow to eliminate any trunk or shoulder substitution is to have the individual lying down as in Figure 9.
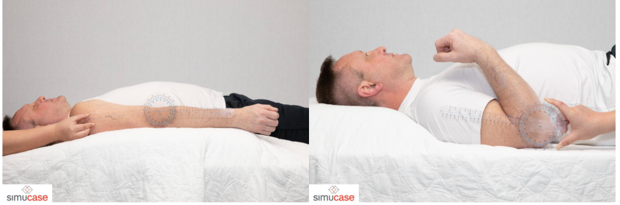
Figure 9. Measuring the elbow with a goniometer.
The mat table is going to eliminate any extraneous trunk motion. While it does not eliminate shoulder motion, I can manually put my hand on top of their shoulder to help eliminate this movement. Using a large goniometer, you want to place the stationary arm on the humerus and the other one on the forearm to get your measurement.
Forearm
- Forearm assessment
- Forearm: Palm up and down
- Measure true forearm motion: the position of distal forearm
- Functional Motion can be different: the position of the hand
- Substitutions to watch for:
- Trunk
- Wrist
- Shoulder
For forearm assessment, this is palm up and palm down. This is an important motion because if you cannot supinate, you cannot get your palm to your mouth, perform toilet hygiene, work on a laptop, or play a musical instrument. To measure true forearm motion, you look at the distal forearm versus the hand to eliminate wrist motion. For true forearm motion, you want to measure proximal to the wrist joint (Figure 10).
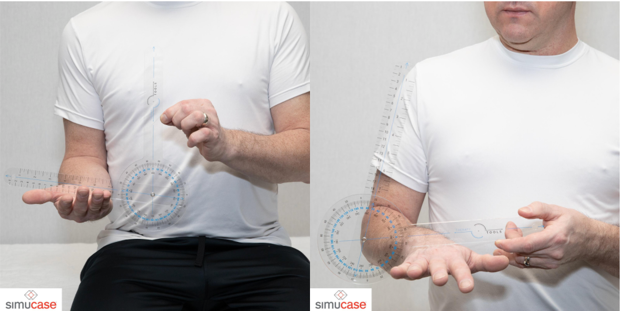
Figure 10. Supination and pronation with a goniometer.
When looking at functional motion, I may have them hold something like a tray or a box. For functional movement, I can include the wrist and hand position. Substitutions to watch for with forearm rotation are at the shoulder, trunk, and wrist. As an example of pronation, a person might bring their shoulder into abduction. And, if a person cannot supinate, they may try to bring their elbow in beyond their body to substitute for a lack of supination.
When you are measuring supination and pronation, you want their elbow bent at 90 degrees with their upper arm next to the body. If the upper arm comes away from the body, like in the picture above, you just need to make sure that you keep your stationary arm in line with the humerus and not with the trunk. Some people try to measure pronation and supination by using the trunk as the stationary arm placement, but you are going to get an inaccurate measurement with that. As you can see, you place the moving arm on the flat surface of the forearm.
Wrist
- Flexion/extension:
- Two methods to stabilize forearm
- Goniometer Placement
- Finger position
- Potential substitutions: fingers, forearm/elbow motion
- Radial/Ulnar Deviation:
- Goniometer placement
- Potential substitutions
- Forearm motion
There are two different motions of the wrist. There are flexion and extension and radial and ulnar deviation. One thing that I want to mention is that for some of our functional motions, these are all not one-joint motions. As such, sometimes joint motion restrictions do not affect the ability to use a hand. This is a way to objectify where the limitations are.
With flexion and extension, there are two ways you can stabilize the forearm. My preference is to stabilize the forearm on a table with the hand hanging off like in Figure 11. This takes away any substitution by the elbow, shoulder, or body.
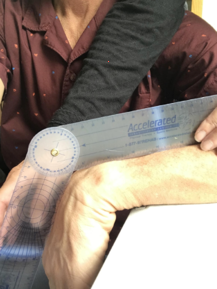
Figure 11. Hand flexion with the forearm on the table and wrist dangling.
The other way is you can have them rest their elbow on the table. This technique can be used with someone who has some shoulder issues and cannot comfortably rest on a tabletop. By resting their elbow on the tabletop, you can eliminate some substitution motions. Your goniometer placement is typically volar and dorsal. When you are assessing wrist extension, you want to come between the ring and the long finger, and you want the fingers to be relaxed as finger position can affect wrist motion. By allowing the fingers to be relaxed, when they go into extension, the fingers will flex. When they go into flexion, the fingers will relax and straighten. This eliminates the effect of the extrinsic muscles on wrist motion and any potential substitutions. Again, finger, forearm, or elbow motion can substitute for wrist motion. You place the goniometer on top of the wrist (even with the lateral assessment) to get a more accurate measurement. This can be seen in Figure 12.
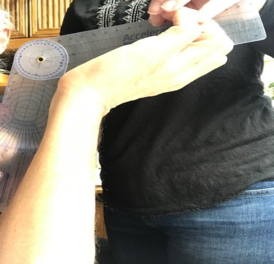
Figure 12. Hand extension with the elbow on the table and wrist relaxed.
For radial and ulnar deviation, the goniometer placement should be, the stationary arm should rest exactly in the middle between the radius and ulna as noted in Figure 13.
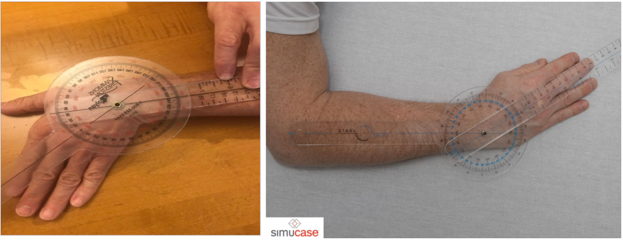
Figure 13. Wrist ulnar and radial deviation.
You want the hand flat on the table, and do not allow any wrist, forearm rotation, or finger motion that can substitute for this. The moving arm (distal end) should be in line with the third metacarpal. You do not line it up with the finger because the fingers can abduct.
Fingers
- Finger Motion: Each Joint: MPJ, PIP, DIP
- Composite motion: Tip to palm or distal palmar crease
- Functional: Ability to grasp certain objects.
With finger motion, you can look at each joint like the metacarpal, the proximal interphalangeal joint, or the distal interphalangeal joint.
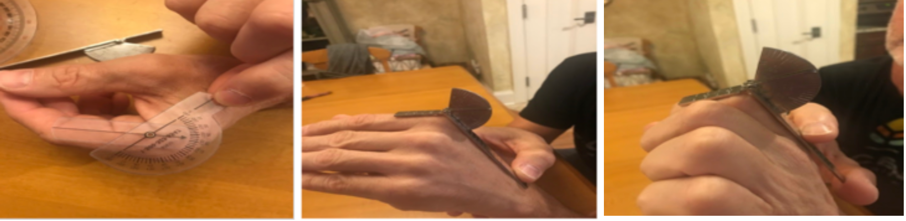
Figure 14. Individual joint measurements.
You can also look at them compositely. It depends on the diagnosis and goals.
If you are not going to address individual joints, you can do more of a composite motion. The standard measurement for composite finger flexion is measuring the tips of the fingers to the palm or the distal palmar crease. Thus, if you have full finger flexion, you should be able to touch the tips of your fingers to the distal palmar crease. If they cannot reach this landmark due to an injury or limitation, you can measure from the bottom of the pad to the distal palmar crease. I like to use the ruler on the goniometer and state how many centimeters from the distal palmar crease that digit is. This lack of total movement affects is their ability to firmly grasp objects.
If you want to measure composite finger motion laterally, either of the border fingers, index and small, can be used or you can do a dorsal measurement. The thing to know about the silver goniometers is that the majority of them do not go into hyperextension. Thus, you may need to use one of these little plastic ones to measure any hyperextension at a joint. Again, make sure that you have the goniometer flush against the joint.
- Total Active Motion (TAM)
- TAM = AROM of the MP, PIP, and DIP minus any extension deficits.
- Example:
- MP 0/90
- PIP -10/85
- DIP -5/55
- TAM = (90 + 85 + 55) – (10 + 5) = 215
- *not accurate if the patient has hyper extensible joints.
- Total passive motion (TPM) – same formula
Another measurement that you can use is total active motion or total passive motion. Total active motion is active range of motion of the MP, PIP, and DIP joints.
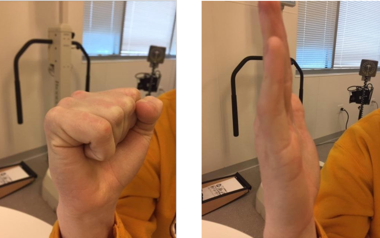
Figure 15. Example of TAM.
Total active motion (TAM) is active flexion minus any extension deficits. For example, if the MP joint is zero over 90, the PIP is lacking 10 degrees of extension with 85 degrees of flexion, and the DIP is lacking five degrees of extension and has 55 degrees of flexion, you would add all of the flexion and subtract the lack of extension to come up with a total number for total active motion. You will see this number referred to in a lot of research papers, and some individuals use this. If there is any hyperextension, this is not an accurate measurement. Total passive motion is done using the same formula. For composite finger motion, instead of doing total active and total passive, I will just measure tip to the distal palmar crease. To me, this is a much quicker and easier method of measuring that. If I am looking for a full composite extension, I can quickly look to see that all fingers are at zero. I can then note that they have demonstrated a full composite extension of the digit.
Thumb
- MP joint
- IP joint
- Radial abduction
- Palmar abduction
- CMC joint
- Composite motion
The thumb is an interesting digit. It has the MP joint, the IP joint, and the CMC joint. It has a lot more motion than the fingers do because of the CMC joint. These movements at this joint help with manipulation and opposition. We can look at MP joint motion, IP joint motion, and both radial and palmar abduction.
- Thumb Functional Motion
- Opposition
- Hand span
Web space
Composite motion involves more than one joint moving like opposition, hand span, which can be very important if they have some overall arthritis or overall tightness, and the webspace.
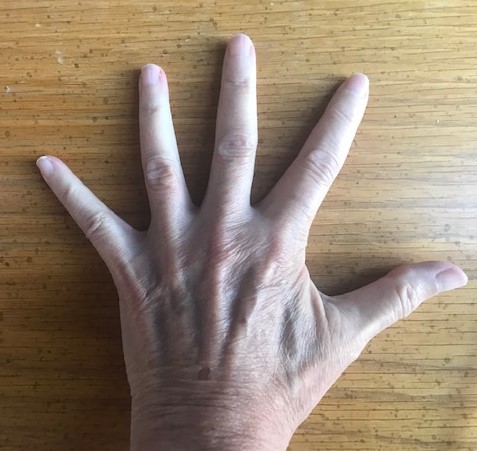
Figure 16. Hand span.
- The thumb has a highly mobile CMC joint with the saddle-shaped trapezium as its base.
Thumb range of motion has a highly mobile CMC joint. This is what allows it to do all of these different motions.
- Flexion to Base of Small Finger
- Occurs in the frontal plane, parallel to the plane of the palm
The first is flexion to the base of the small finger as noted in Figure 17.

Figure 17. Thumb to the base of the 5th digit.
Many resources, including the American Association of Orthopedic Surgeons, defines this as opposition as well. They state that you should be able to touch the base of the small finger, but really opposition is different from composite flexion to the base. Composite flexion to the base includes flexion of the CMC, MP, and IP joints. The hand is flat, and the small finger is not rotated in at all. In a few minutes, I am going to talk about opposition and show you the difference with that. However, this is an important motion to notice as it addresses all of the joints together.
- Radial abduction
- Frontal plane, parallel to the plane of the palm
Radial abduction is in the frontal plane, and it's parallel to the plane of the palm or hand.
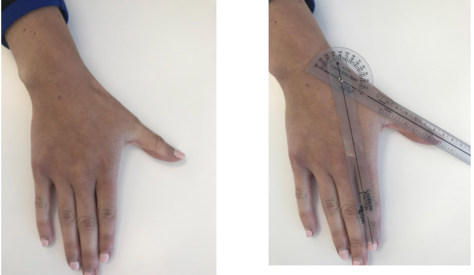
Figure 18. Radial abduction.
The easiest way to stabilize to remove substitution patterns is to have the hand flat on a surface. You also should never guess where the CMC joint or the axis of motion are. I always palpate this one because it can be very deceiving.
- Palmar abduction
- Sagital plane, perpendicular to the palm
- Adduction returns the thumb to the hand
Palmar abduction is in the sagittal plane, and it is perpendicular to the palm (Figure 19).

Figure 19. Palmar abduction.
I always describe it as a puppet hand. When you are measuring this, you can see that the wrist and the fingers want to move. However, if you palpate the CMC joint and use the first metacarpal as the moving arm and the second metacarpal as the stationary arm, you will get an accurate measurement for this one.
- Opposition: composite abduction, rotation, and flexion
- Nailbeds in line and parallel to each other
Opposition is different from composite flexion to the base of the small finger (Figure 20).
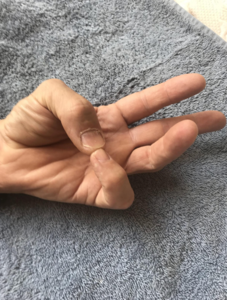
Figure 20. Thumb opposition.
Opposition involves a rotation that allows the nail beds to meet in line parallel to each other. It includes rotation of both the thumb CMC and the small finger. That is the difference between opposition and flexion to the base of the 5th digit that is sometimes referred to as "opposition." Once they can oppose these two fingers and get the nail beds parallel, you can go ahead and measure that if you want. With this, there is a space rather than the thumb being flush to the hand. You really need to look at those nail beds because people can substitute and only go to the side of the finger as they cannot rotate around and get into a parallel position.
Motion Can Be Limited By:
- Adhesions
- Denervation
- Weakness
- Inflammation
- Subluxation, dislocation, or bowstringing of tendons
- Lack of tendon continuity or tendon attenuation
- Joint restrictions (articular or capsule)
There are so many things that can limit motion. You need to start by defining what is creating the limitations. It can be adhesions of the soft tissue, specifically adhesions of the tendons or arthritis. In rheumatoid arthritis, many joints get swollen as they incur friction as they go over the joints. You can get adhesions from that as well. There can also be lacerations with repairs and scarring. You can have limited motion from denervation to certain muscles either originating from the central nervous system, from systemic denervation, or bowstringing subluxation of the tendons. You can have lack of tendon continuity or a tendon attenuation that creates limited motion. There can be articular or capsular restrictions within the joints. The one thing that is not on this list is limited motion from pain. If an individual has sustained some type of an injury or an insult to their body, they may be fearful to move too far. I work with children, and they can be fearful. The last thing they remember before their cast came off for example was that it hurt. This can bring in a psychosocial aspect to your treatment.
Motion
- Determine if it is a functional limitation.
- Do we need to address it?
- Define what specific activity it is limiting
- Establish a goal for that motion and function
- Define substitutions: Are they allowing function?
- Determine methods of treatment to address that motion.
With motion, we need to determine if it is a functional limitation or not. Do we need to address it? If it is not a functional limitation and the patient is not bothered by it, we should note it. However, we might not need to address it in our treatment. We need to define what specific activity it is limiting so then we can establish that as our goal. We do not just want to say, "Increase wrist extension to 60 degrees." We need to say instead, "Increase wrist extension to 60 degrees to allow the client to push up from the chair." We also need to define what substitutions they are using and are they allowing function. Tthose substitutions are okay if it is a permanent restriction. We then need to determine the methods of treatment to address that motion.
Strength
- Assessing Strength of the UEs
- Strength relates to functional use of the upper extremities.
- Do we know how much strength is required to perform tasks?
Assessing strength of the upper extremities is kind of interesting. Strength relates definitely to functional use of the upper extremities. It is a little more challenging to define. How do we define how much strength is required to perform a task? How can I objectify how much strength is required for a grandfather to pick up his grandbaby, and play with her? This is a more challenging area to address.
Methods to Assess Strength
- MMT
- Dynamometry/gauges
- Functional testing
- Isokinetic
These are the methods that you can use with your patients to assess strength. You can use manual muscle testing which we will go over in a minute. You can use dynamometry or gauges to measure static strength. As OTs, we also use functional testing. We ask the client to perform an activity like open a drawer, open a door, or get up out of a chair. We can look at functional testing, but if they are not able to complete that activity, we need to be able to break it down and figure out why. There can be weakness or other things that are restricting movements. There is also isokinetic testing, which typically involves large, expensive pieces of equipment.
Strength Method: Manual Muscle Testing
Assessing MMT
- Applying manual resistance to assess the strength of either a functional movement with a group of muscles or specific muscle
- Compare to uninvolved side
- Does not assess endurance
Manual muscle testing has been around forever. You are applying manual resistance to assess the strength of either a functional movement with a group of muscles or one specific muscle. Typically, when completing manual muscle testing, you are looking at functional strength and the muscle groups that perform that motion. It can be challenging to isolate it out. The easiest way is if you have some type of an insult or injury, like a CVA or orthopedic injury. You can compare it to the uninvolved side, and that is the most accurate test if the affected side is limited or not. If both sides are involved, then you are going to use your judgment based on that patient's age, their normal activity level, their diagnosis, and on what you feel is normal or not. The one thing manual muscle testing does not test is endurance. The only way we can test endurance is repeatedly performing the same resistive activity over time. This then turns into more of a functional type of testing, as opposed to using manual muscle testing.
Contraindications
- CP (spasticity)
- Cognitive impairment
- Fracture/dislocation/subluxation
- Pain
- OI/Osteoporosis/osteopenia
Some contraindications are listed for manual muscle testing includes CP spasticity. You are not going to create harm, but you are not going to get an accurate picture of strength due to the spasticity of the group of muscles. If someone has a cognitive impairment, they may not understand the instructions. Along with cognitive impairment, there is a certain age that you can test. For younger ages, it is hard for them to understand what you want them to do and to do it accurately. For example, if I say, "Do not let me pull your arm down" to test elbow flexion strength, they may pull with their whole body or use their other hand. If there is a fracture, dislocation, or subluxation, it is contraindicated. And, any pain would contraindicate the use of manual muscle testing. For any individual with OI, osteoporosis, or osteopenia, it is also contraindicated.
- Cardiovascular
- Medications
- Hemophilia
- Abdominal impairment/injury
Any cardiovascular condition, because of the Valsalva maneuver where they hold their breath when they are resisting despite your instructions, is contraindicated. There are also certain medications that can affect their ability to follow directions or can affect their perception of pain. Lastly, those with hemophilia or any abdominal impairment/injury should not engage in manual muscle testing.
Effects on Strength
- Age
- Sex
- Fatigue
- Medication
- Time of day
What affects our strength? We know age affects strength. We know that as people age, their muscle mass and strength decreases, even if they are working out. Sex affects strength. A male typically has larger, stronger muscles than a female, but again, we know there are exceptions to everything. Fatigue also plays a role. If you test somebody at the end of the day and then for a second time the first thing in the morning, you are going to get different results. If they are seen after physical therapy, they may also not have an accurate test. Medications that they take can affect their strength. What people do with their normal activities also affects strength. I would expect a steel worker to have different strength than somebody who sits at a desk. You need to know both their vocations and avocational activities. If I have an individual who bowls three nights a week, I might expect their grip strength to be a little bit better than somebody who does not bowl. During the interview process, you need to get a good idea of who that individual is and their occupations.
Method of MMT
- Assess motion against gravity: charts available
- Demonstrate motion
- Explain procedure
- Stabilize proximal joint/body (muscle origin)
- Line of the pull of the muscle
You want to first assess the motion against gravity. There are charts available for how to position an individual both against and with gravity eliminated. You may have already done some of this during your range of motion assessment. If they are unable to move a full way against gravity, then you need to assess them into a gravity eliminated position.
Once, I have determined that they can move against gravity, I will explain the procedure to them. "Do not let me bend your arm." You may have to demonstrate it a couple of times until they understand. You need to stabilize the proximal joint or the proximal part of the body. You always want to pull in the line of the muscle.
- Stabilize: surface or your hand
- Watch for substitution
- Gradual/slow application of resistance
- Apply force to distal body part
- Around mid range of position
- Try to distribute force
- Stop if pain is reported
To stabilize the proximal part of the body, you can use a surface. If I am looking at the elbow, I am going to have them lay down on their back on the mat table to help stabilize the proximal humeral head of the shoulder, or you can use your hand if they are sitting up in a chair. I may have them sit back in the chair, and then I can stabilize it with my hand. I want to watch for substitution. What I get a lot of times during the testing of the elbow is that the client will pull their shoulder into extension or lean back into their chair. At this point, you need to stop them and tell them that you only want to look at their elbow bending.You should always have a gradual slow application of your resistance. This is not a quick break test but a gradual slow application of resistance in order to prevent any injuries. You apply the force to the distal body part of the moving arm of that joint. You want to test the joint around the mid range of position. If you have it fully extended, you are not going to get the good muscle strength or distribute the force. Lastly, you want to use the flat of your hand to distribute the force that you are exerting, and if they report pain, you need to stop.
Scoring for MMT
- Can use “words” or numerals
- Different references: just be consistent
- Multiple resources: Medical Research Council
- Daniels and Worthingham; Kendall and McCreary
- Some have more plus/minus
There are a couple of different ways of scoring manual muscle tests. If you look at the references, there are some that are very detailed, such as the one by Daniels and Worthingham. Their scale has a plus and minus for every number. I like to use a little bit less complicated one. There are also words associated with scales. Some people use good, poor, or normal. Whatever you use is fine. There is no right or wrong, but you need to be consistent. When using words or numbers, use them consistently. If somebody reads your report, you want them to understand what you are talking about.
- 0: zero; no activity
- 1: Trace; palpate or visualize contraction
- 2: Poor; full range of motion in gravity eliminated
- 3: Fair; full ROM against gravity and can maintain position
- 3+: Fair plus; full ROM against gravity and takes minimal resistance
- 4: Good; full ROM against gravity and takes moderate to strong resistance
- 5: Normal; full ROM against gravity and takes maximal resistance.
You must know your anatomy for accurate palpation of muscle contractions. The scoring that I typically use is zero, which is no activity. This is where you cannot palpate any muscle contraction or see any movement. They are also not able to move the joint in a gravity eliminated position. Trace is number one. This is where you can palpate or visualize a contraction. This comes back to your manual skills. You need to be able to palpate the muscle-tendon junction and the muscle belly to determine if there is any contraction. We do a lot of palpation with infants because you cannot tell them what to do. For instance, I can hold a toy in a certain place, and I can palpate if their muscles are contracting or not. The same goes with all of your population, especially with geriatric clients. They may say, "Honey, I can't move." However, if you ask them to touch their face, you may be able to palpate the bicep is contracting a little bit. Number two is poor. Poor is a full range of motion in a gravity eliminated position. If they cannot move against gravity, I go right to a gravity eliminated positions. For fair, they can perform full motion against gravity, and maintain that position with no resistance. Three plus is called fair plus. They can do a full range of motion against gravity, and they can take minimal resistance. You can give them a little bit of resistance before they are unable to maintain that position. Number four is good. This is a full range of motion against gravity, and they can take moderate to strong resistance. This is where the grading between four and five gets a little bit subjective because you need to know what maximal resistance is for that individual. Maximal resistance for my 84-year-old mother would be very different than maximal resistance for me or for my 30-year-old daughter. This is where your subjectivity comes in a little bit. Most important, you need to be consistent with yourself. Number five is normal with full range of motion against gravity with maximal resistance. If it is a one-sided injury, it makes it easy. I always test their non-involved side, and then I look at their involved side. This gives a good overall picture.
MMT: Elbow
- Stabilize humerus at side of body
- Resist distal forearm
- Forearm at neutral: Biceps is a supinator
- Stabilize trunk against chair back to eliminate trunk substitution; also watch for shoulder adduction and extension
When you are looking at the elbow, you need to stabilize the humerus either at the side of the body or you can have them lay down with their humerus stabilized on the bed/mat table. You are going to resist at the distal forearm, leaving the wrist out, and the forearm should be in neutral. Remember, if you go into supination, the biceps is a supinator. If you go into pronation, it eliminates the bicep. If you want to only look at bicep strength, the forearm needs to be in neutral. Again, you need to eliminate trunk substitution and watch for shoulder abduction and extension. Figure 21 is an example assessing elbow strength.
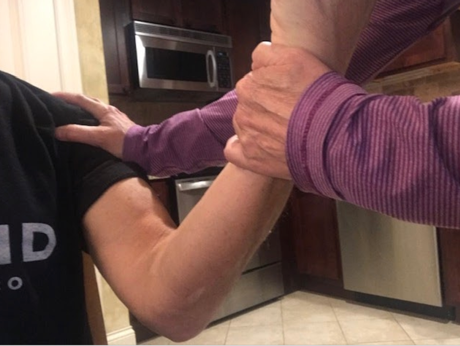
Figure 21. Example of MMT of the elbow.
Forearm Rotation
- Stabilize elbow
- Mid range of rotation
- Hand flat against distal forearm
- Substitute with shoulder motion and wrist motion.
Forearm rotation is the trickiest one. You need to stabilize the elbow. The ebow should be bent at 90 degrees and maintained at the side. You want the forearm in neutral. They can substitute shoulder, wrist, or trunk motion for this.
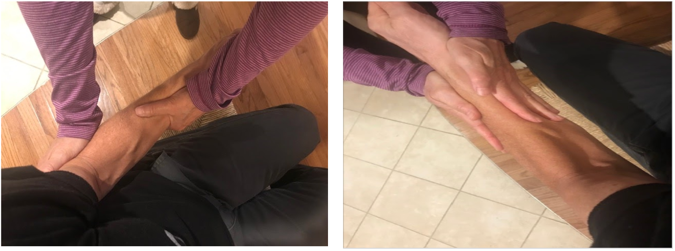
Figure 22. Example of MMT of the forearm.
The image on the left shows stabilizing and using one arm to move them into supination or pronation. If that is uncomfortable for them, you can use two hands if they can stabilize their elbow at their side. You can rotate with the palms of your hands.
Wrist
- Forearm stabilized on table with hand hanging off
- Mid range of extension or flexion
- Central motion for groups of muscles
- Angle of pull for specific muscle groups
- Distribute pressure
- Substitute: elbow motion, finger motion
For the wrist, you want to stabilize the forearm on the table with the hand hanging off mid-range for extension or flexion. You can place them in pronation or supination depending on if you are doing flexion or extension (Figure 23).
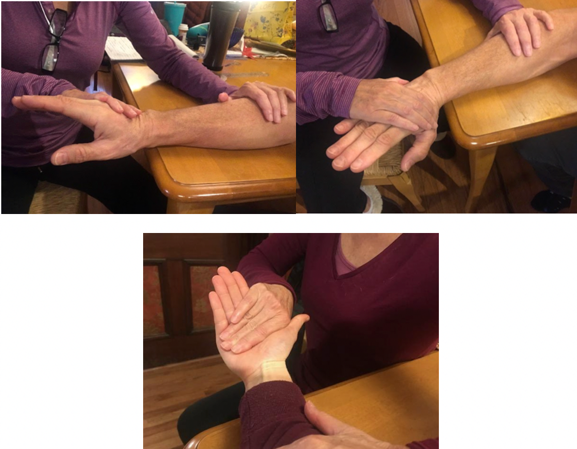
Figure 23. Examples of MMT at the wrist in supination and pronation.
Figure 24 shows wrist MMT for radial and ulnar flexion.
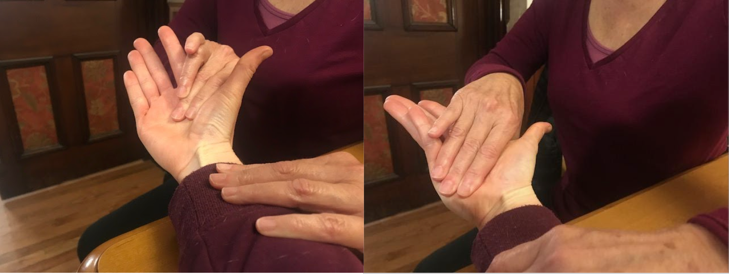
Figure 24. Examples of MMT for radial and ulnar flexion.
This is looking at flexor carpi ulnaris (FCU) versus the flexor carpi radialis (FCR). I will actually say, "Pull toward your small finger side and bend up," or "Pull towards your thumb side and bend up" if I am targeting those specific muscles. You want to distribute pressure across the metacarpals. You do not want to grab the hand or the fingers. Substitution is elbow motion or finger motion.
Thumb
- Stabilize hand
- Test each motion
- Watch for pulling of the whole hand to substitute
- Wrist motion
- Finger motion
For the thumb, you want to stabilize the hand as noted in Figure 25.
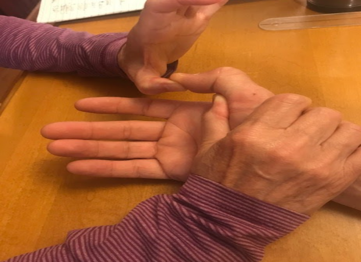
Figure 25. MMT of the thumb.
Typically, I try to always have the hand resting on the table or sometimes I will use a pillow. You can test the IP, the MP, and the combined motion. You want to watch for pulling of the whole hand. They may start to pull back with their shoulder which will make them appear like they have more resistance than they do. They can also substitute with wrist motion by pulling the wrist up a little bit. You want to stabilize well and test.
Fingers
- Together or individually
- Stabilize hand on table top
- Each motion
- Substitution: wrist motion; elbow pull
You want to stabilize the hand (Figure 26).
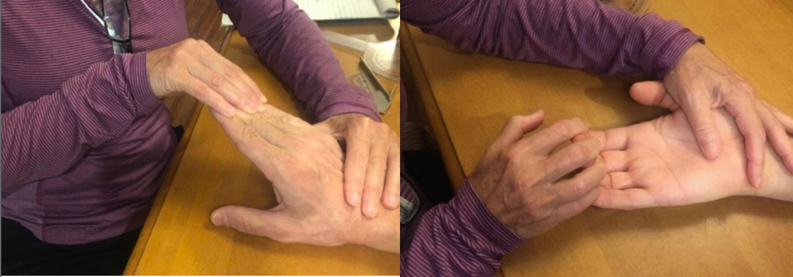
Figure 26. MMT of the fingers.
Again I use the table tabletop or a pillow if they cannot take the pressure of a hard surface. Look for substitution by the wrist or elbow. You can look at all the finger extensions together, or I can look at one finger individually. Remember that with the EDC or the finger flexors, the FDP or FD the flexor digitorum. They are all one muscle, and individual tendons, so we typically use them as a group. So test