Definition
- Brain-based specific learning disorder that impacts the child’s writing and fine motor skills
- High prevalence in children with:
- ADHD
- ADD
- ASD
- High prevalence in children with:
The definition of dysgraphia is a brain-based specific learning disorder that impacts a child's writing and fine motor skills. Brain-based means it is a neurological disorder. It can affect adults and children, but today we will be focusing on children. As with many diagnoses, dysgraphia can present differently in each child, but usually it includes difficulty forming letters, spacing words, or even organizing text into complete sentences.
Activity: I would like you to do a quick activity with me. Go ahead and grab your writing utensil and place is in your non-dominant hand. Now, write your name, the date, or draw a picture of something simple. While you are doing this, pay attention to how much more effort it takes you to use that non-dominant hand. This is similar to the experience of someone with dysgraphia trying to form letters, words, or pictures on a page. This exercise gives you a little bit of an understanding of what they are experiencing as they are trying to write.
There is also a high prevalence of dysgraphia in students with ADHD, ADD, or autism spectrum disorder (ASD), although they can be mutually exclusive. This is something to keep in mind as you are working with your students. In fact, an estimated 20-60% of children with ADHD have one or more learning disabilities, and one of those may be dysgraphia. There is a bibliography available for you to download, and it has these research studies for your review if you would like to dive farther into that information.
Myths About Dysgraphia
We are going to start off with a short quiz to help you to learn some facts about dysgraphia.
Is messy handwriting a sure sign of dysgraphia? True or False?
This is false. A common sign of dysgraphia is messy handwriting, however, some students do write neatly, but it will likely take them a lot of time and effort. Other signs besides sloppy handwriting include slow or effortful writing and poorly sized or spaced letters. It is important that we as clinicians look at how they are writing.
Quiz #2: Kids with dysgraphia have below-average intelligence. True or False?
Our next statement is that kids with dysgraphia have below-average intelligence. This is false. It is a myth that people with learning or thinking differences have cognitive deficits. Children with dysgraphia often fall under that same misconception. Kids with dysgraphia usually have average or even above-average intelligence. They just struggle with getting their thoughts and ideas down on the paper. Thus, their written work may not reflect their understanding or their ideas on the subject. We are going to talk more about this throughout today's session because I feel this is a very important aspect of dysgraphia and something that we really need to keep in mind as we are working with the students.
Quiz #3: Students with dysgraphia are just being lazy. True or False?
Statement number three is that students with dysgraphia are just being lazy. This is also false. Dysgraphia can make the act of writing a slow and tedious task. When the task of forming the letters and the words requires so much effort and focus that a child forgets what they wanted to say in the first place, it is not surprising that they often hate to write or will resist any sort of writing activities. This may look like laziness, but we know that there may be underlying factors that we may not see if we only look at the behavior that is in front of us. If you think about how these students are watching their friends or their peers write easily, you can imagine that this does not help their self-esteem either.
Quiz #4: Dysgraphia is the same thing as dyslexia. True or False?
Dysgraphia is the same thing as dyslexia. This is also false. Both dysgraphia and dyslexia can affect a student's ability to spell. However, they are two different conditions, and dyslexia makes it more difficult for a child to learn to read, while dysgraphia affects the actual handwriting.
Quiz #5: Most kids outgrow dysgraphia so it is not necessary to spend time helping them. True or False?
The final statement is that most kids outgrow dysgraphia so it is not necessary to spend time helping them. Dysgraphia is considered a lifelong condition. Our focus as therapists is to help support the challenge of writing. We will talk more specifically about how to do that as we move forward.
Five Types of Dysgraphia
- Dyslexic Dysgraphia
- Motor Dysgraphia
- Spatial Dysgraphia
- Phonological Dysgraphia
- Lexical Dysgraphia
A child can present with more than one type of dysgraphia, and they are not mutually exclusive. When we are thinking about any type of diagnosis, we can recognize it and notice the red flags. We then need to refer them to a pediatric neurologist or a neuropsychologist with experience in the disorder in order to get the formal diagnosis. As we go through these different types, let's just keep our therapist lens on. Remember that we will treat the student individually and not just based on the diagnosis category that they fit into.
It is important to understand that there are differences in presentation and challenges within the umbrella diagnosis of dysgraphia. The five different types are as listed here; dyslexic dysgraphia, motor dysgraphia, spatial dysgraphia, phonological dysgraphia, and lexical dysgraphia. We will go through each one so that you have a better understanding of what they are. As we are looking at these different types, we want to analyze these three different areas: spontaneous writing, copied writing, and fine motor skills. These are usually the markers that help us identify which category they may be presenting.
1. Dyslexic Dysgraphia
- Poor spontaneous written work
- Copied work okay
- Minimal fine motor deficits
The first one is dyslexic dysgraphia (see Figure 1).
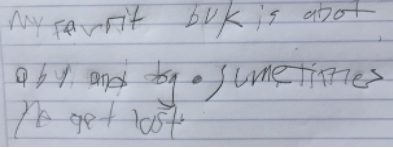
Figure 1. An example of illegibly written work.
Dyslexic dysgraphia is the type we see when spontaneously written work is illegible. In contrast, copied work can be okay or pretty good. Spelling typically is affected. For this student coming up with letter formations and shapes on their own, this is where their challenge is. Usually, speed and dexterity for fine motor skills tend to be normal. As we mentioned during the quiz, dyslexia and dysgraphia are two separate diagnoses and unrelated. However, they can occur together.
2. Motor Dysgraphia
- Poor fine motor skills
- Written work is illegible; spontaneous or copied
- Short samples may be okay, with extra effort/time
- Poor grasp
- Spelling not affected
The next type is motor dysgraphia. I feel this is a one that is the most common that we, as OTs, will likely catch and recognize. Again, sometimes it is not only the writing product that we need to be analyzing but also the process of writing. How much effort or exertion does it take this child to produce the writing? With motor dysgraphia, usually, it is due to deficient fine motor skills. They may have poor dexterity, poor muscle tone, or just unspecified motor clumsiness. For these students, any written work is poor to illegible so spontaneous and copied work are affected, even if it is copied by sight from another document. Letter formation for these students may be acceptable in very short samples of writing, but you will be able to see that it takes them extreme effort or extra time, and they cannot sustain this letter formation or "neat writing" for any length of time. Often, these students also have a poor grasp. The writing could be crooked due to holding the pen or pencil incorrectly. They may be using too hard of pressure or there may be darker writing or inconsistent pressure due to decreased fine motor skills. Usually, spelling is not affected. In Figure 2, you can see that my little guy had a pretty poor grasp.
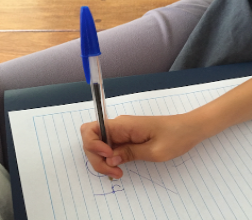
Figure 2. Student with poor grasp.
And in the writing (see Figure 3), you can see that the pressure that he used to form those letters was very inconsistent.
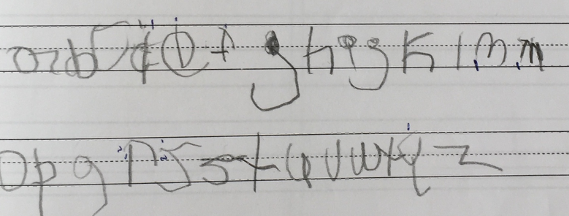
Figure 3. Inconsistent pressure demonstrated in this writing sample.
His fine motor skills were definitely delayed.
3. Spatial Dysgraphia
- Visual-spatial deficit
- Both spontaneous and copied work is poor
- Spelling and fine motor skills are usually okay
- Poor baseline placement and spacing
Our next type of dysgraphia is spatial dysgraphia. Spatial dysgraphia is usually due to a visual-spatial deficit. These students present with illegible spontaneous written work and illegible copied work. Both types of writing are affected. Typically, these students have normal spelling and normal fine motor skills, but they have trouble keeping their writing on the lines and difficulty with spacing between the words. It can also be noted in their drawing skills as well. Figure 4 demonstrates the prompt in the first two lines and the student's writing is on the third and fourth lines.
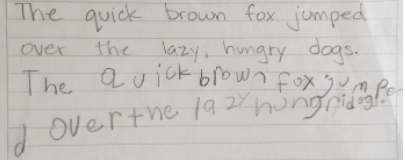
Figure 4. Student's writing is on lines 3 and 4.
You can tell that this young student had a tough time identifying where the line was and keeping her letters on that line, especially as the writing progressed. She started out okay, but as the session progressed the baseline placement of letters was really affected.
The last two types of dysgraphia are harder to recognize from an OT perspective as they are more spelling related. These may be more likely identified by a learning specialist. We will review them so that you are aware of what they are.
4. Phonological Dysgraphia
- Notable in the spelling of unfamiliar words, non-words, and phonetically irregular words
- Difficulty with phonemes and blending appropriately
The fourth one phonological dysgraphia. It presents as writing and spelling difficulties in which the spelling of unfamiliar words, non-word, and phonetically irregular words is impaired. These students have difficulty holding phonemes in memory and blending them in their appropriate sequence to produce the target word.
5. Lexical Dysgraphia
- Relies on sound-to-letter patterns
- Misspellings in irregular words
Finally, the last type is lexical dysgraphia. The child can spell but relies on standard sound to letter patterns with misspellings of irregular words. This is more common in languages such as English or French that are less phonetic than a language such as Spanish. This type of dysgraphia is also known to be pretty rare in children.
Signs and Symptoms
Since we do not diagnose legally or formally, I do find it less important to focus on exactly which type they may have. It is more important to focus on the general signs and symptoms so that we know what to focus on in our treatment sessions.
- Poor letter formation, baseline, spacing, size
- Difficulty with longer writing assignments
- Poor grasp on writing utensils
- Awkward stabilizing hand
- Generally illegible writing
When assessing the handwriting of a child with dysgraphia, we usually see poor letter formation, poor baseline placement or spacing, and poor letter size. These students also have difficulties staying in the margin or writing straight across the page. They often have difficulty with longer writing assignments, and they may have an awkward or inefficient grasp on the writing utensil. They also may display an awkward stabilizing hand, incorporating that bimanual skill of stabilizing the paper with the non-dominant hand. They have generally illegible writing.
- Written work does not reflect the students’ cognitive level
- Pain with writing
- Anxiety or refusal to write
However, their written work does not reflect nor match the students' verbal expression or comprehension on a subject, or even their cognitive level. The gap between what they know and what is coming out on the paper typically indicates a challenge with the writing process. It is also important to consider that there may be physical symptoms with dysgraphia. The student may be experiencing pain with writing as they are not efficient with their fine motor control. They also may exhibit anxiety or a refusal to write. All of these signs and symptoms can result in a child falling behind an assignment and schoolwork and overall work avoidance. As we noted in the quiz, they may get labeled the lazy or defiant kid, but we know that there is more going on underneath that writing.
Frame of Reference
As we move towards thinking about how to treat the student, we should consider which frame of reference to use.
Person-Environment-Occupation-Performance (PEOP)
My personal favorite is the Person-Environment-Occupation-Performance Model (PEOP). This is a pretty common frame of reference in OT (see Figure 5).
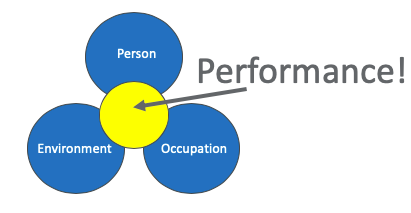
Figure 5. PEOP Model (Law et al., 1996).
A person's performance is affected by the person, the environment, and the task itself, or the occupation. The "person" refers to the physical components of the person themselves. For example, we may be looking at their grasp and posture for strength and endurance. It could also involve praxis or coordination. The "environment" refers to components in the student's workspace. For example, we may want to look at their desk height and their work surface. Is it adequate for what they need and does it support their body the best? We also need to look at their chair to see if it is the best way to support their posture. The third component is "occupation" or the task itself. Are there elements of the task that we can modify? Can we change the format of the assignment, or are there tools or accommodations that would support the task of writing? Keeping this in mind, we are going to look at different strategies for working with students, but we will also look at accommodations that can support the student while they are completing writing.
Strategies
These are strategies that you can start using with students. As OTs, our greatest skill is to perform task analysis and address the components of a task to support performance. We will now talk about the strategies that can strengthen the foundational components of writing in order to make the process of writing less overwhelming and demanding. This is not an exhaustive list of ideas, but it is a good place to start.
Kinesthetic Learning, Proprioceptive Work
The first strategy we will consider is kinesthetic learning and proprioceptive work. What is that? This is tapping into the brain-body connection using as much of our body at once while learning, and we can do this with writing.
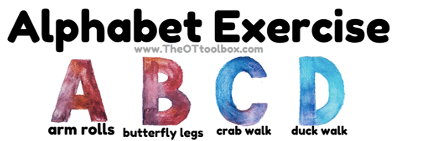
Figure 6. Examples of alphabet exercises. https://www.theottoolbox.com/alphabet-exercises-for-kids/
For example, we can have students form the shape of the letters with their bodies. This came from the OT toolbox. I do not have any affiliation with them, but it is a resource that I often use. They have a lot of really wonderful ideas if you are interested. The idea with this ABC movement is the student figuring out how to use the whole body in order to learn about the letter shapes. Another idea could be tracing letters on the student's back and then they trace that on your back and having to guess what the letter is that you are forming. Again, this is connecting the brain-body components together.
Proprioceptive work, or otherwise known as heavy work, is always an excellent way to get the whole body involved in the learning. My go-to's are animal walks. For example, just the other day, I had a student working on the letter "S" so we formed an S on the floor with a hammock type material that I have. She also did a bear walk all along the S to get her whole body involved with learning this one letter shape. You can also use big foam blocks or gym equipment in order to make the shapes of the letters. The student has to use all of their muscles and their body movement as they are moving this equipment around as they are learning about the letter shape. Pool noodles are another great tool to use for the same purpose.
There are many resources out there such as Pinterest or Teachers Pay Teachers that have great ideas and resources.
Multisensory Activities
Our next strategy involves multi-sensory activities. Using a variety of experiences and tools increases brain involvement and activation. Any time that you can incorporate multiple materials, especially if they involve different tactile experiences, you are going to activate different parts of the child's brain and increase the chances of experiential learning. One idea is writing in sand in a small sandbox or table.

Figure 7. Example of a multisensory activity.
They can use their fingers, and this allows some finger isolation while tracing letters, shapes, or pre-writing strokes. They can also use some sort of utensil, maybe a stick or a paintbrush as they are making these shapes in the sand. Foam or shaving cream is also a favorite amongst many of my students. Again, they can work on different finger isolation as well as drawing and writing in the foam. You can also put the foam on a window or a mirror for some vertical surface work at the same time.
Playdough is another favorite. They can make different shapes, roll out the dough, and make different shapes, like a snake and turn it into a letter shape. Or, you can make little playdough balls, and they can put those balls into the letter shape. Another thing I like to do is put paper over a piece of sandpaper. The student writes on the paper, and they get an extra level of friction with that sandpaper underneath. Depending on the grain of the sandpaper, whether it is fine grain or thicker grain, you will get more or less friction.
There is always water or paint that we can use in many different ways. I also like chalk in different sizes. There is the skinnier kind for chalkboard use or thicker pieces of sidewalk chalk. Sidewalk chalk is great as they use it in a weight-bearing position. They are getting proprioceptive work while they are working on the multisensory activity of using chalk. You can also use a vertical chalkboard. Some children have a hard time working with chalk because they do not like the feeling on their fingers. You can find ways to work around that by wrapping a piece of paper towel around the chalk for them. Chalk does provide more feedback than normal utensils similar to the sandpaper. This gives more input while they are working on handwriting skills.
Visual Processing Interventions
Dysgraphia can include visual processing challenges, most commonly in those kiddos with the spatial dysgraphia type. These are the kiddos who have difficulty with the baseline placement and spacing while they are writing. So, it could be beneficial to work on things such as visual discrimination, left and right orientation, and visual scanning. With this particular exercise in Figure 8, it is just a simple sheet that I made on a Word document where I have capital letters in different fonts.
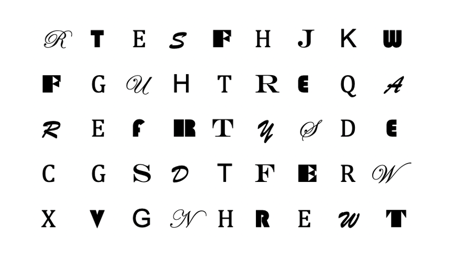
Figure 8. Word document with different fonts.
I print that out and have it either on the table or on the board. With this one, we usually are working on scanning from left to right while also working on discrimination as they have to find the same letter printed in different fonts. Sometimes I will also add visual markers on the side if they need some visual cue for the scanning or I may have them circle the vowels and underline the consonants so that they are also working on visual processing and visual-motor skills. There are many things you can do with one simple letter sheet.
Letter Formation and Repetition
The next strategy is letter formation practice and repetition as shown in Figure 9.
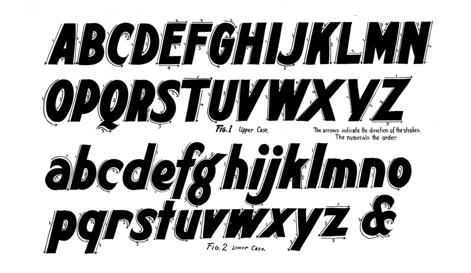
Figure 9. Letter formation and repetition practice.
Traditional practice and repetition of handwriting are also crucial in order to form good habits of letter formation. Now, if it is the only thing you do, then you are missing many vital components. On the other hand, if we never get to practicing actual handwriting, that is missing out on essential skills as well.
You can use a formal writing curriculum, and there are many out there. Find whatever works best for your student or use what the teacher implements in the classroom for continuity. Otherwise, you will need to communicate with the teacher and the parent as to what you were doing in order to ensure that there is consistency between the classroom and the home and therapy sessions. The student will have much more success when there is consistency across different environments for these students.
Hand and Finger Strengthening
Finally, the last strategy that we will discuss is addressing the basic biomechanical requirements of handwriting. Writing requires a lot of risk control and finger dexterity. Thus, we want to be sure to include hand and finger strengthening. In Figure 10, I am using TheraBand to work on grasp and pull.
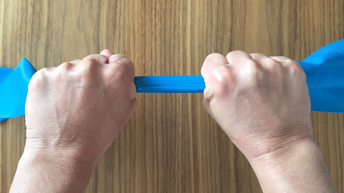
Figure 10. Theraband exercises.
This can also work on wrist isolation and strengthening as well as finger strengthening. In Figure 11, this is showing pinching along a "snake" of playdough or Theraputty for finger pinch.
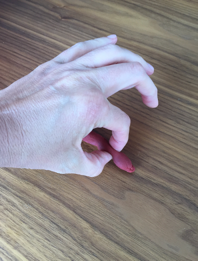
Figure 11. Finger exercises with playdough.
Be sure to have the student pinch with each finger isolated and work on the thumb strengthening as well. There are many different exercises you can use with playdough. These can include pulling, twisting, pinching, and squeezing. It can also include weight-bearing components.
Thinking back to our frame of reference that we noted earlier, we are mostly addressing the person within that framework. Now, in order to consider the environment and the task itself, we also want to think about accommodations that we can provide that will also support the student. The idea is to help the student convey their ideas and create a product that shows that knowledge. There are many ways to do this, especially if we know that writing is so taxing and difficult. This affects the student's ability to perform and produce work in the classroom.
Accommodations
- Speech-to-text, dictation
- Recording
- Typing
- Graphic Organizers
- Visuals closer to student
- Extra time
- Decrease workload
- Pencil grips
- Desk space
- Adaptive paper
- Graph paper
Assistive Technology (Speech-to-Text, Dictation)
I want to start with some ideas that are more in the realm of assistive technology. If need be, you would want to get an IT specialist involved if you feel that these strategies would be most appropriate for your student. Some examples of assistive technology options or resources would be a speech-to-text type program where the student is speaking and the computer or the app is typing out the text for them. It is a dictation type program. This is a great way that they can show what they know. For example, for a comprehension type test, writing is not needed to really be able to assess the student's abilities. Another option would be recording. The student records themselves speaking, and then they can listen back and write it out. This way they only have to think of one thing at a time. As they are recording, they are thinking of their ideas and getting them out. And then as they are writing, they are just thinking about the writing and not having to also think of what it is they are trying to say because that is already on the recording.
Typing
Typing is another good tool or resource for these students because there are fewer variables involved in typing than there is in handwriting. With typing, you do not have to worry about the letter size or the letters sitting on the line. Spacing happens automatically. Letter formation is also taken care of as well as spelling if there is an auto-correct feature. There is much less that the child has to be focused on while typing. This also helps with their self-esteem with being able to produce work that looks a lot neater. They can be proud of that product that they have created.
Visual Supports (Graphic Organizers, Visuals Closer)
The next thing to consider is visual support. What visual supports can we provide these students? Graphic organizers are a great way to shorten work into smaller sections at a time. It also can provide a visual model for how the work should look once it is completed. Additionally, it is much easier for them if the visuals are closer to them. Asking them to copy from the board is an added challenge so if we can put a copy of what is going to be on the board on their desk, this can be a great support for them.
Work Modifications (Extra Time, Decreased Workload)
The next type of accommodations to consider is work modifications. If we can provide these students extra time to complete their writing tasks, this could be a way to reduce pressure and stress around writing assignments. Maybe there is an appropriate way we can decrease the workload itself. Again, this is focusing on the product and trying to not overwhelm them with the process. Say they are working on our worksheet, could they just fill in the keywords instead of writing complete sentences? If it is a matter of needing to show their knowledge on a topic, could they also work with a buddy and share notes? Or, could they work on one shared document? The student with dysgraphia could dictate their input while the partner can be the one to write down those ideas. And in the end, there still is a complete assignment that is turned in. The student is still able to show their knowledge in an appropriate way. These ideas have to be implemented in the classroom, but we, as occupational therapists, can be the ones to make the suggestions to the teachers about what may work best for the student. It could be things that we are trying out in our session, and then we can help implement that in the classroom.
Physical Tools (Pencil Grips, Desk Space, Different Paper)
The last area is physical tools that we can provide to the students. For example, if we know that the student has a poor grasp, we could try out different pencil grips in order to support that grasp and reduce strain on the fingers. Another area is to look at desk space. The environment is a child's workspace. It needs to be supportive or optimal for them to perform. Perhaps, they would do better with a vertical or slanted surface. They may do better with their page taped up on the wall. Standing may be more comfortable and supportive for the child as this requires less postural activation versus a seated posture.
We can also look at flexible seating. We can test out with the student and then implement it in the classroom.
Finally, we can try different adaptive paper or graph paper. Figure 12 shows the different styles of paper. Additionally, handwriting programs have their own type of paper that might be helpful.
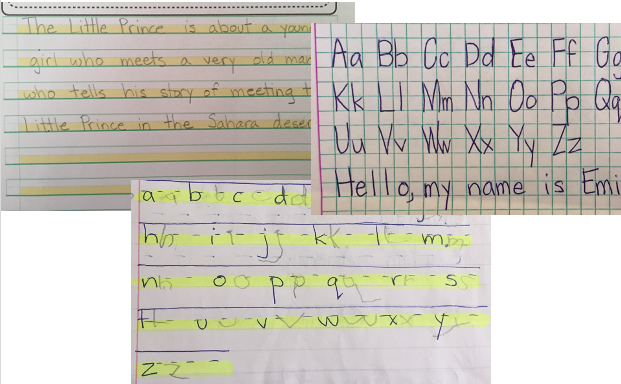
Figure 12. Examples of different types of papers.
Try out different things with your student to see what works best for them. For example, I love using graph paper. In the example above, capital letters fill two boxes, and the lowercase letter fits into either one or two boxes, depending on the type of letter. I have found this strategy to work very well for some students. However, others had more difficulty due to visually how busy it is. Again, it is trial and error, and there is no one size fits all for these tools.
Another example is highlighting either the bottom or top half of the line space. It could also be two different colors with the top half one color and the bottom half another. As you can see in the picture on the top left, this paper is also darkened at the baseline. This gives a visual for the student of where the baseline is, where on the contrary, the middle picture, this student needed more queuing for where the top of the line of the space was. This student tended to make letters too tall or too big so for this student, I darkened the top line. There are also some papers that have raised lines that give tactile feedback of where the bottom or the top lines are. An easy DIY is to use Wiki sticks, or thin sticks of wax, to highlight the top and bottom lines. Another way to do this is to use a thin line of hot glue. Again, this provides tactile feedback, The only issue with these accommodations are that letters that go below the line have to go up and over. Wiki sticks tend to be thicker but the hot glue can be made a little thinner. Sometimes, this can give some feedback to the child as they are drawing these letters.
The last thing I wanted to mention about writing papers is that the use of color also needs to be considered. I had one student tell me that the yellow highlighting was really distracting for them, but that he did much better with blue. We started using a blue highlighter, and I created some for him to use in the classroom. The teacher came back to me and let me know that his writing had significantly improved using that blue highlighted space. There are so many different resources out there that have their own versions of adaptive paper or highlighted paper. Do not feel like you have to come up with it on your own. Do a little digging and see what is available out there. There are also some available for free.
Summary
- Writing is IMPORTANT!
- Writing is COMPLEX!
- Focus on the product vs. the process
In summary, I just want to reiterate that writing is important. It is what we use to help us remember, organize, and process information. If the act of writing is so overwhelming for a student, imagine how little is retained or gained from that writing experience. In school, writing is most often used to show how much a student knows. If they are constantly struggling to perform, it will take a toll on their self-esteem and perhaps their attitude towards learning.
We also have to remember that writing is complex. We have to approach it with different strategies and accommodations, and there is no quick fix or one size fits all. We have to try things out and see what works. In the classroom, we need to assess how the student expresses their ideas and knowledge, and then focus on how they can do that best in the classroom. In the treatment sessions or during handwriting practice time, this when we can focus on the physical process of writing. This is why we have to consider both the strategies and the accommodations that will best support them. I hope that this course has given you some ideas on how you can do that with your students.
Frequently Asked Questions
There are many questions that I get during my practice about dysgraphia, and I just wanted to share a few of those frequently asked questions with you.
How can we distinguish between dyspraxia and dysgraphia because they may present similarly? For example, a child with dyspraxia may also have difficulty with handwriting.
What I think is important to distinguish is that dyspraxia is usually going to present itself across many different environments or different activities. We could see it on the playground or in the classroom with not just handwriting activities; whereas, dysgraphia is just difficulty with handwriting tasks. If you are seeing it more across the board, it is dyspraxia. If it is only seen in handwriting, that is dysgraphia.
Are there items or tools that I always keep in my toolbox?
I do have a couple of favorites. I do not have any affiliation to any of these things. First, I love the pencil grasps that have "wings" where the student's fingers slide in and do not come off. It helps those fingers to be better positioned. I also love to use putty, and this is something that the students love to use as well. Putty can be used for hand strengthening and as a multisensory approach for making letters. I usually have a small TheraBand and a tennis ball in my box. I like to cut a slit cut down the side of the tennis ball. The child has to pinch it open in order to slide small items in like pennies or small balls. I have even drawn a face on the tennis ball and called it "tennis ball man." That is not an idea that I came up with on my own. It is a great tool to work on pinch and hand strengthening. It also works on fine motor control. I almost always carry an air cushion because I want to provide postural support for students while they are writing. I also like vertical surfaces. This is not necessarily a tool per se, but it is a great accommodation. The easiest way to do this is to tape it up on the wall. You do not have to have a fancy slant board or an adjustable desk. Now, they are in a really nice upright position with the shoulder and the arm working better in this position. Granted, I do want to note that this can be fatiguing for students as well so keep an eye on this and move them back to a horizontal surface to support them. I always carry a couple of different colored highlighters and colored pens to highlight the baseline or top lines.
What are some take-home activities?
I think the best thing to do rather than sending homework is to promote multisensory activities and experiences. It is finding those organic moments to incorporate writing practice, visual motor skills, and strengthening into the child's day. One of my favorite things is to promote cooking and have the student be involved in meal planning and/or preparation. They can write down the list of ingredients for the shopping list. Now, you are getting some writing practice. They can also read the recipe and create a meal. You are getting bi-manual skills, some postural skills, and some strengthening. This is all being organically incorporated into the experience.
How can we best educate teachers about dysgraphia?
I often have teachers say, "Their handwriting is just bad," or "He's lazy." I believe it is our greatest tool to be able to say, "No, there is something else going on for the student." Help them understand what is dysgraphia. Providing that moment of education can be really powerful for teachers. How can you apply the strategies and accommodations that we have gone over into your practice, whether it is the next week or in the next school year?
Thank you for being here today. Please feel free to reach out to me anytime. I am happy to chat with you should you have any questions.
Citation
Finn, E. (2020). Dysgraphia 101- Introduction and strategies for understanding dysgraphia in children. OccupationalTherapy.com, Article 5327. Retrieved from http://OccupationalTherapy.com