Editor's note: This text-based course is a transcript of the webinar, Expanding Ergonomic Concepts Across Areas Of Occupation, presented by Sara Loesche,
MS, OTR/L, CHT.
Learning Outcomes
- After this course, participants will be able to:
- Evaluate various areas within the domain of occupational therapy that occupational therapy practitioners can address ergonomics outside of the occupation of work.
- Identify ergonomic risk factors in common daily activities that increase risk for pain and discomfort.
- Examine how an occupational therapy practitioner can provide ergonomic education to modify the person, environment, or occupation resulting in improved occupational performance.
Introduction
Thanks for the introduction and for having me back to present on ergonomics. My primary area of practice is in traditional outpatient hand therapies. I get to see a lot of new biomechanical treatments, but I am also a firm believer that if you do not change underlying habits and how you are using your body, other treatments will not be much help in the long run. I want to look at ergonomic concepts, risk factors, and things we can implement in daily tasks outside work and industry.
Definition of Ergonomics
If we look at the Merriam-Webster definition of ergonomics, it says it is an applied science concerned with designing and arranging things so that people interact efficiently and safely.
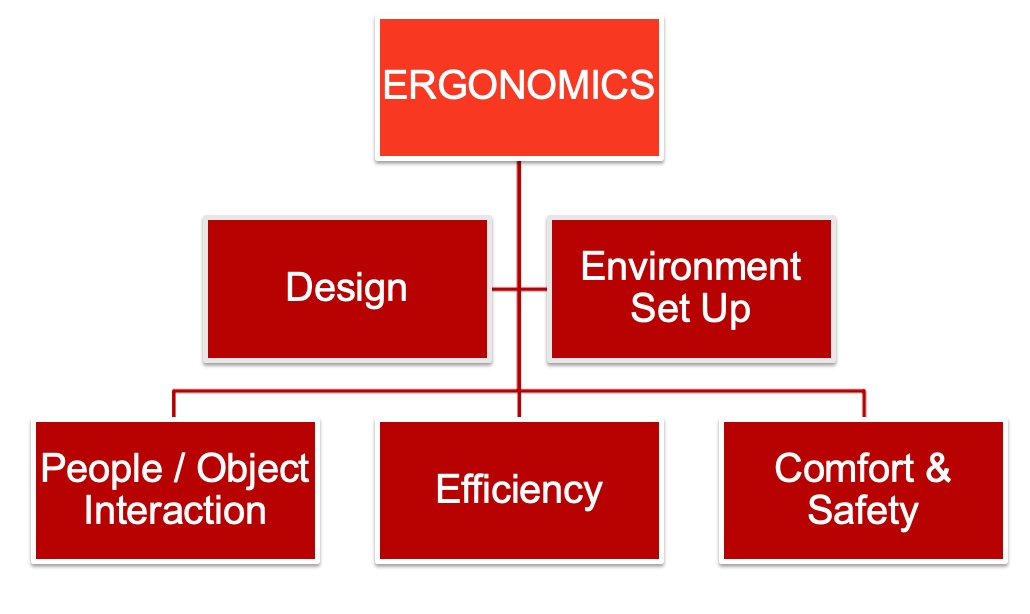
Figure 1. Infographic about ergonomics and factors.
First, you have to look at the human factors. Often, we think we can take a human and place them into a job, thinking that it will be a fit, and instead, we have to take the job and fit it to the human factors. When what we should be doing is the opposite. And that's one thing that ergonomics can do.
So with those human factors in mind, we can look at the design of tools or machines, look at the systems that are in place, look at the tasks and the job demands that are going to fit in with that occupation piece of the PEO model.
Then we can look at the setup of the environment, whether it's the physical setup of the environment. Still, we can also look at other things like the environment's social, cultural, or temporal aspects.
OT and Ergonomic Concepts
Another concept is the interaction between people and objects (Figure 2).
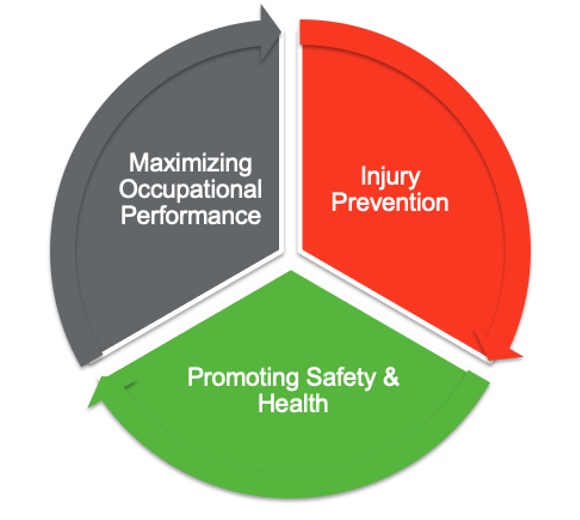
Figure 2. Pie chart of the people/object interaction.
We want people who can perform their tasks safely, comfortably, and efficiently. In terms of occupational therapy, we want to maximize the occupational performance of our clients. In addition, we can also look at injury prevention, health promotion, and wellness. These areas fit well within occupational therapy and ergonomic frames of reference.
Ergonomic Risk Factors
- Cause wear and tear on the body
- Repetition
- Awkward postures
- Forceful motion
- Static position
- Contact stress
(NIOSH, 2018)
Ergonomic risk factors cause wear and tear on the human body. We may be using our bodies outside of their anatomical limits. We are overusing or overworking the body, which causes it to wear down over time. These risk factors often result in an acute injury.
One risk factor is repetition, where you do things repeatedly, causing body areas to break down. Another one is using an awkward posture with poor anatomical alignment. Forceful motion is when we can overtax or strain a specific body part, muscle group, or joint from one forceful motion. Static positions are bad because it is essential to move. OT practitioners are good at explaining why we need to move. When we describe the "why" to our clients, they are more apt to buy into that. Our tissues and joints do not get recharged, rejuvenated, replenished, or nourished unless we move our bodies. Our bodies also get oxygen and blood flow and eliminate waste via movement. Lastly, contact stress or direct pressure over areas can impact soft tissue and compress nerves and vessels.
- Other factors
- Lifting
- Push / Pull
- Carrying
- Gripping
- Overhead work
- Vibration
- Extreme noise or temperature
- Work stress
(NIOSH, 2018)
These are other factors that fit into those general categories. I want to highlight lifting, pushing, pulling, and carrying as these are mainly forceful motions, although there could also be static or awkward postures. Other risk factors are forceful gripping and anything that is overhead work. When doing overhead work, we are already putting ourselves out of anatomical alignment and making some joints and structures work a little harder. Vibration and extreme noise or temperature often come into play with work tasks and other areas of occupation that we will discuss. The last one is work stress. It is not only the work you are doing, but sometimes it is outside factors like being unable to take breaks, doing monotonous tasks, poor work organization, poor supervision, or poor help throughout the task. These factors result in musculoskeletal disorders.
Musculoskeletal Disorders
- Symptoms include:
- Pain & discomfort
- Weakness
- Stiffness
- Edema
- Tingling/numbness
- Fatigue
Musculoskeletal disorders are referred to as repetitive strain injuries, repetitive stress injuries, or cumulative trauma disorders. These injuries occur over time in soft tissue, muscles, tendons, ligaments, nerves, joints, and blood vessels. The result is that the client will feel pain or discomfort and be unable to perform their physical activities. They may have a decreased functional capacity, feel weak, and lose independence. They cannot do what they want and need to do, ultimately leading to low health-related quality of life.
Common Settings
- Work & Industry
- Assessments and interventions for workers in health promotion and injury prevention
- Looking at workplace environments, tools, equipment
- Consulting with employers, insurance companies, and workers' compensation programs
Work-related musculoskeletal disorders impact an estimated 150 million people worldwide, and it is common to address these issues in work and industry. So it makes sense that occupational therapy practitioners are trying to help. Additionally, we can use ergonomic assessments and interventions not only to identify musculoskeletal disorders but also for prevention and health promotion. Occupational therapy practitioners look at the workplace environment, the workers' tools, and tasks. We also consult with employers, insurance companies, and workman's compensation plans to help reduce injury and illness-related costs and absenteeism.
OT Domain: Occupations
Looking at OT's domain, here are all of the areas of occupational therapy according to AOTA's fourth edition of the OT Practice Framework (Figure 3).
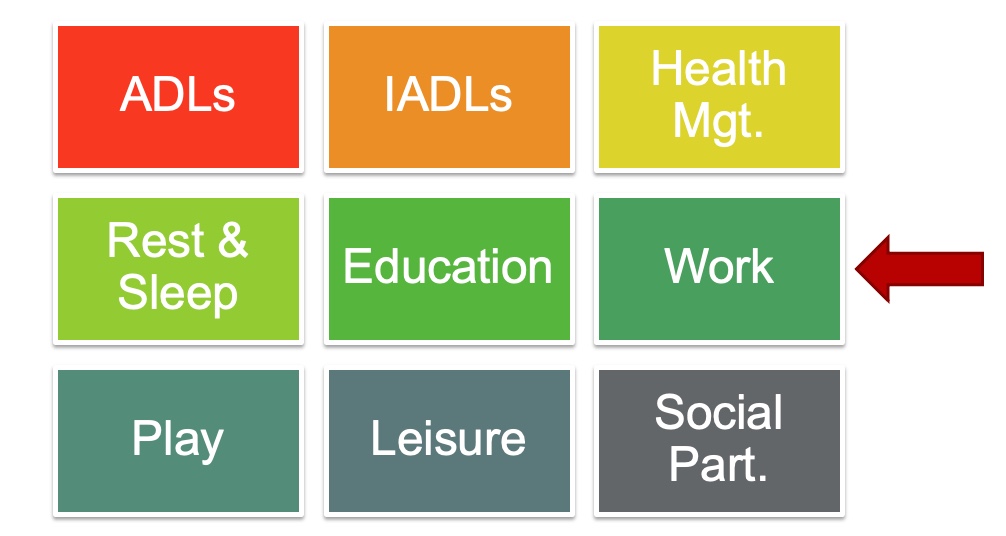
Figure 3. Infographic of the OT domains occurring to the OT Practice Framework.
Work is only one of these nine areas, but can we use ergonomic concepts for the other eight?
Ergo Outside of Work
- Study by Norouzi et al. (2021)
- Homemaking tasks have biomechanical and psychosocial risk factors.
- "Studies have shown that housekeeping activities require twice as much energy as many other jobs." (p. 2)
- Homemaking tasks have biomechanical and psychosocial risk factors.
- Homemakers 20-65 with musculoskeletal pain complaints participated in the study
- Back, neck, and shoulder pain as the most prevalent complaints
- Multifactorial – significant time commitment and physical, emotional, & mental efforts
Today, we are going to look at some of these other areas. A study by Norouzi and colleagues is currently in progress, but the beginnings of this study were published in 2021. It is taking place in Iran and should be wrapping up about now. The study addresses concerns about musculoskeletal disorders due to biomechanical and psychosocial risks of homemaking tasks. Both of these things together can impact the quality of life.
Most studies on ergonomics are focused on work, but this one looks at other areas of occupation. "Studies have shown that housekeeping activities require twice as much energy as many other jobs." (p. 2). A few studies looked simultaneously at biomechanical and psychosocial interventions to help with that. This study looks at female homemakers between 20 and 65, and one inclusion criterion is that they are already experiencing some musculoskeletal pain or discomfort. The most prevalent areas reported are the back, neck, and shoulders due to cooking, cleaning, washing, shopping, caring for family members, and caring for children. The study recognizes that homemaking tasks require a significant amount of time and physical and emotional demands.
Housewives Ergonomic Intervention (HEI)
- Training interventional program as a practical way to:
- Reduce musculoskeletal disorders (MSDs)
- Reduce stress
- Enhance ability to work
- Improve QoL
- Address both biomechanical and psychosocial risk factors of housework
- Participatory ergonomic approach
(Norouzi et al., 2021)
They came up with the Housewives Ergonomic Intervention (HEI) trial. When this study was published, they were still in the recruitment phase. It should be wrapping up, and the final results should be published soon.
They divided participants into four different groups. The first group receives biomechanical interventions, the second psychosocial interventions, the third gets a combo of biomechanical and psychosocial interventions, and the fourth is the control group. They wanted to look at providing interventions and then doing a three-month and six-month follow-up. The HEI study aims to see if a training program is a practical way to reduce musculoskeletal disorders, reduce stress, enhance the ability to work, and improve the quality of life for homemakers. They also are using a participatory ergonomic approach in training. This is a fancy way to say that they are doing what we already do as OT practitioners: to involve their study participants in the planning and goal setting.
Areas of Occupation
- Instrumental Activities of Daily Living (IADLs)
- Driving
- Home management
- Communication management
- Rest & Sleep
- Education
- Leisure
My goal today is to look at some of these other areas of occupation outside of work. We will look at ergonomic risk factors, problem-solve some solutions, and look at ways we can help as occupational therapy practitioners. I am sure some things will speak to us personally, but it will also highlight things we can do to help our clients.
Under IADLs or instrumental activities of daily living, we will focus on driving as an occupation and home management with things like washing dishes, doing laundry, vacuuming, and communication management. We will discuss rest and sleep. We will look at education regarding postures children use in educational settings and leisure tasks like gardening.
Driving
We spend a lot of time in our cars, whether it is getting from point A to point B or whether sitting in traffic. I am in the Philadelphia area, and I am sure other sites are worse than here. Some people also drive for employment. Driving allows us the independence to get to places we need to go, like shopping, medical appointments, or kids' activities. Much of our social life depends upon driving.
We also develop many driving habits over time, whether how far we like to sit away from the steering wheel or what type of posture we use. We establish these postures and routines in the car. In Figure 4, this woman has a relaxed posterior lean (Figure 4).

Figure 4. Woman demonstrating a typical driving posture.
I can picture her posterior pelvic tilt, and she has one hand on the wheel and one out the door, which is already making me think of contact stress.
Driving is a multifaceted occupation. It is not only the physical part of getting in and out of the car and maneuvering the seatbelt and controls. There are also cognitive, visual, and emotional components. Today, we will focus on the physical features of driving.
Driving Risk Factors
- Awkward and/or prolonged posture
- Repetitive motion
- Contact stress
- Force
- Vibration
- Areas of discomfort
- Back
- Feet
- Neck
- Shoulders
- Wrists
- Driving is not the same as sitting at a desk
(McGaha, 2020)
Posture in your car can be awkward at times. You are also seated in one position for some time. It is unrealistic that you will get up and walk around your car every once in a while to change position. You are somewhat stuck in that position in the car, especially if driving.
In terms of repetitive motion, switching from the gas to the brake is a repetitive motion. And if you are going on the same route repeatedly, sometimes you develop repetitive habits in the car. These habits include neck rotation for scanning.
For contact stress, you may lean into that center console or the driver's side door handle.
There is a bit of force with accelerating and decelerating, especially in stop-and-go traffic. Another forceful movement is the isometric grip on the steering wheel. We often hold the steering wheel tighter than needed, which can increase with stress or traffic. It also may be a behavior, pattern, or habit. Force occurs when fastening the seatbelt or getting things in and out of the car, like groceries or children.
Driving is also a task with vibration as a risk factor. Depending on your road or how smoothly your car works, you might feel the vibration through the steering wheel, as the vibration has to go somewhere. As the vibration comes into our body, we counteract it by trying to stabilize our postural muscles or upper extremity muscles isometrically. Vibration provides extra effort on our part as the driver.
Another thing to point out is that driving, even though it is a seated activity, is not the same as sitting at a desk. Thus, we cannot apply those same ergonomic principles that we would during like a workstation evaluation. The upper extremity position is different. You work in front of you with your hands on a table or desk. When driving, your hands are in front of you to maneuver the steering wheel. This is the same with the lower extremities. They are not flat on the floor and immobile; instead, they are extended out in front to operate the gas and brake and are in motion.
Driving Study: Vehicle Design
- 47 drivers (50-80 yo)
- Looked at seat setup; analyzed posture; evaluated the usability of controls and adjustment features (own vehicle and unfamiliar vehicle)
- FINDINGS
- The majority of participants made design modifications.
- Difficulty adjusting headrest
- Difficulty finding/using seat adjustments
- Recommend considering reach, bilateral vs. unilateral control, avoid reaching side/back, consider grip/pinch strength
(Karali et al., 2017)
This study looked at vehicle design and what older drivers' needs were in terms of vehicle design. It included 47 drivers between 50 and 80 in the UK. They evaluated the study participants in their vehicles and in unfamiliar vehicles. They looked at their setup, including how close they were to the steering wheel, how much they reclined the back and their posture. They took measurements and checked the usability of the different controls for adjustment, like the seat or headrest. They took anthropometric data of body measurements and combined all of these into their findings.
They found that people were already making modifications. Many used seat pads to sit higher in the seat to look over the steering wheel. They were also putting a shopping bag on the driver's side seat so they would have less friction to swivel to get in and out of the car. Some people were even using a footrest for the left foot. The footrest did not sound safe to me. Additional findings were that the individuals had difficulty adjusting features, particularly the headrest and seat.
Based on these issues, the vehicle design recommendations included making controls in easy-to-reach areas (not too far to the side or back) and the ability to access them with one hand versus needing two. The researchers also looked at how much grip and pinch strength are required to make those adjustments.
Driving Recommendations
- Seat Adjustment
- Height: 3" over the steering wheel; See mirrors & out all windows comfortably; LE position; Head space
- Back Rest Adjustment
- Hip angle; Elbow in slight flexion; Lumbar support; Headrest
- Steering Wheel
- 10" minimum from the wheel; 9&3 position; Shoulders & neck relaxed; Slight elbow flexion; Wheel pointed at the chest (not angled)
- Seatbelt
- Over hips, not stomach; If seatbelt rubs neck, seated too low; Consider seatbelt pull to decrease shoulder ROM
McGaha, 2020
With all the recommendations, I will frame things using the PEO model as it makes the most sense. We will look at the person's posture and how they use their body. The environment is the car, whereas in other cases, it might be in the home. And we will look at the occupation. In this case, the occupation is driving.
As in any ergonomic workstation evaluation, you always start with the seat. The first thing is the seat height. An individual should see about three inches over the steering wheel and the entire road by looking out all the windows and mirrors without excessive neck range of motion to look and scan. When moving the seat forward and backward, the whole foot should fit on the pedal, and you should be able to access that pedal by using plantar flexion instead of knee extension. And if a person has to pull the seat forward to access those pedals, the back should still be flush against the back of the seat. One should not have space between your back and seat. In most cars, the seat pan you sit on is not adjustable. We had a vehicle that could extend a little for a taller individual. The best case scenario is the ability to fit about two fingers between the back of the knee and seat. Seats are pretty forgiving in cars with waterfall edges and padding.
Regarding the backrest adjustment and looking at hip angles, the hips and knees should be similar. If somebody is experiencing low back pain, it is okay to recline the seat a little more in the back, but they should still be able to access the steering wheel with slight elbow flexion. You should not fully extend your arms to hold the steering wheel, as this puts more strain on the shoulders and hands. The individual's back should be flush against the seat for lumbar support. If the car does have lumbar support, that can be adjusted and flush against the lumbar curve without any gaps. The headrest has some maneuverability up and down, but many are tilted forward, which does not make much sense. The headrest should be at your level or a little over ear level so you can have some support.
We already discussed that the steering wheel should be close enough so that the elbows are not fully locked out and not so close that the arms are on top of it. The client should be at least ten inches away from the steering wheel for safety should the airbag go off. It is commonplace that the hands on the wheel be at ten and two positions on a clock which activates the upper trap muscles. The latest research says nine and three is a better placement as it takes the hands down a bit so the individual can relax through the neck and the shoulders when driving. You can go a bit lower to eight and four if there are neck issues. Again you are ensuring that everything is relaxed through the upper extremities. Steering wheels also have a tilt feature and should face the person directly and not be tilted up. This is because if the airbag goes off, you want it coming straight at you and not angling up.
The seatbelt should rest at your pelvis and across your hips, not your abdomen or stomach. It should rest at your pelvis across your hips. If it rubs at the neck, it may mean that the seat is too low, and if you raise it a little bit, the seatbelt will come down to a more comfortable height. There are many things you can do to modify a seatbelt. There are seatbelt pulls to reduce shoulder range of motion and force, seatbelt extenders if you have an individual who needs it a little bit longer give to their seatbelt and modifiers for the seatbelt button.
Driving Position Goals
- After adjusting the car, you should be able to:
- Reach and operate the controls, pedals, steering wheel
- See out all windows and see mirrors without strain
- Maintain alignment of the spine and relax UE muscles
- Avoid contact stress of lateral lean
The goal is for the driver to reach and operate all of the controls in the car comfortably. For example, the person should be able to put their entire foot on the pedals, and there are pedal extenders if needed. They can access the steering wheel with a slight bend in their elbow and their hands at nine and three. Figure 5 is my car.

Figure 5. Author sitting in car demonstrating proper ergonomics.
My hands are at ten and two because my steering wheel has a lot of controls going on at nine and three, and I cannot get a good grip on it. I have to either go above or below that. I like to alternate when I am in my car.
The other thing you want to be able to do is to see out your mirrors and the road without a lot of neck range of motion. As I said, you always want to maintain the natural curves of your back, at the lumbar, thoracic, and cervical areas, as you do not want your body to work harder. It is also best to avoid leaning to one side or the other. Lastly, if you have a longer trip, make a goal to stop every few hours for 15 minutes to move your body and alter your posture.
Vacuuming
All right, our next area is vacuuming.
Vacuuming Risk Factors
- Repetitive push/pull
- Sustained grip
- Weight of vacuum (varies)
- Lift and carry (over ledges, up/down the stairs)
- Frequency and duration of vacuuming
- Fitness level of homemaker
- Physical demands of vacuuming have "potential implications for health and wellness" (p.39)
(Bak et al., 2019)
Vacuuming is repetitive and one of my least favorite tasks. You must sustain a grip on the vacuum handle throughout that process. It is an isotonic movement of the upper extremity with an isometric grip. The force to push and pull the vacuum will vary based on the surface, like carpeting or hardwood floors. There is a difference in friction, the weight of the vacuum, and how maneuverable your vacuum is. You may also need to lift it over a ledge or up and down stairs. And then everyone has different habits and routines with vacuuming. Do you do the whole house at once or only do certain rooms?
Study of Muscle Use Vacuuming
- 18 young adult participants (9m/9f), RHD
- Upright vacuum – LIGHT, MEDIUM, HEAVY weight class
In a survey completed in the United States, over 60% of people indicated that they vacuum once a week and reported 37 minutes on average to vacuum their home. Thirty-three percent of the respondents also said they took breaks by splitting this task up because they indicated that vacuuming is a time-consuming and physically demanding homemaking task. About a third of the people opted to break it up into different sessions. There are also fitness level differences that are going to impact a person's ability to vacuum as well. This 2019 study also said that the physical demands of vacuuming have implications for the health and wellness of individuals.
This study examined the upper extremity muscular load during carpet vacuuming with an upright, traditional vacuum cleaner. The study examined 18 young adults (nine males and nine females) to see what muscles were firing in the upper extremities. They were all right-hand dominant and used three upright corded vacuums weighing 20, 15, and 10 pounds (low, medium, and heavyweight).
They also looked at four different vacuuming tasks. The first vacuuming task was lifting the cleaner. As stated, sometimes you have to lift up and over a ledge or up and down stairs repetitively lifting up and down in a vertical pattern. The second task was straight back and forth, like vacuuming back and forth in front of you. The following two activities were lumped together and were moving the vacuum to the left or right while vacuuming. The last one was floor vacuuming for two minutes while walking forward.
After looking at those four tasks, they determined that the upper extremity muscles that have a role in vacuuming were the anterior and posterior deltoids, upper traps, biceps, triceps, and flexor carpi. This muscle activation makes sense as the vacuuming motion uses shoulder flexion and extension to advance that vacuum forward (deltoids). It also uses the upper traps to lift the vacuum. Vacuuming also uses the biceps and triceps for elbow flexion and extension to push and pull the vacuum forward and backward. And then the last muscles used were the flexor carpi due to the deviation of the wrist.
Vacuuming is a potential source of musculoskeletal disorders due to the upper extremity muscular load of the task. The findings also showed that the females had higher muscle activation levels than their male counterparts. And they found that vacuuming had similar levels of muscular load comparable to occupational tasks that are known culprits for musculoskeletal disorders, like painting, patient handling, hairdressing, and cutting hair. They also reported that musculoskeletal disorders would be less likely from vacuuming than the other activities above because it is done less frequently and for shorter periods of exposure time.
Vacuuming Recommendations
- Keep arm at side vs. front
- Use LE to reduce UE load (step back and forth)
- Avoid twisting
- Avoid looking down (move eyes not neck)
- Alternate sides
- Avoid bent posture with a 'big lunge'
Here are some recommendations for vacuuming. When you keep your arm at your side versus the front, your arms are in a different alignment. In Figure 6, you can see that vacuuming in front cause awkward upper extremity angles.
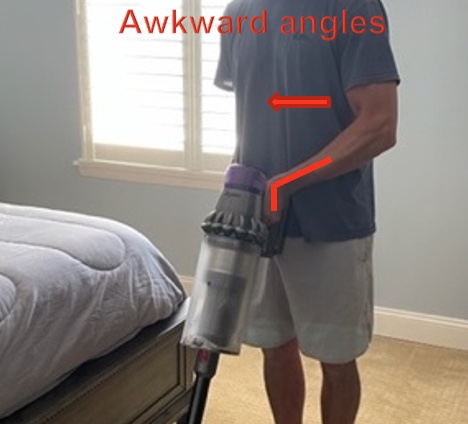
Figure 6. Awkward upper extremity angles when vacuuming in front.
The shoulders will adduct and come across the body leading to extreme wrist postures to maneuver the vacuum. Whereas, in Figure 7, holding the vacuum out to the side maintains neutral alignment of the upper extremity and trunk simultaneously.
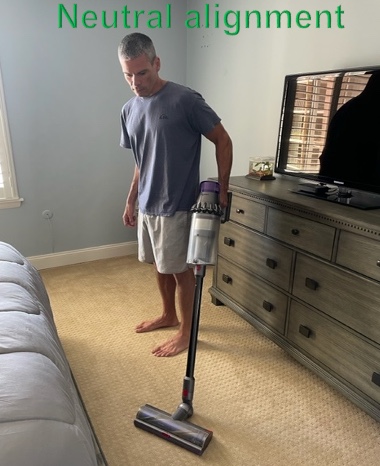
Figure 7. Neutral alignment is maintained with the vacuum off to the side.
We also went to look at using the lower extremity to reduce the muscular load of the upper extremities. Instead of using all upper extremity motion, we can walk with the vacuum to take some of that strain off the upper extremities and use the larger muscles of the lower extremities. We also want to avoid twisting motions and looking down with extreme neck flexion when vacuuming. Alternating sides can spread the muscular load. The last one is we like to do big lunges with the vacuum, trying to cover more area, but this puts us in a bent posture which breaks the biomechanical rules of spinal alignment. Other recommendations involve how we lift, carry, and use the vacuum handle.
- Lifting vacuum
- Top vs. middle
- Wrist neutral with grip
Figure 8 demonstrates the proper way to lift the vacuum.
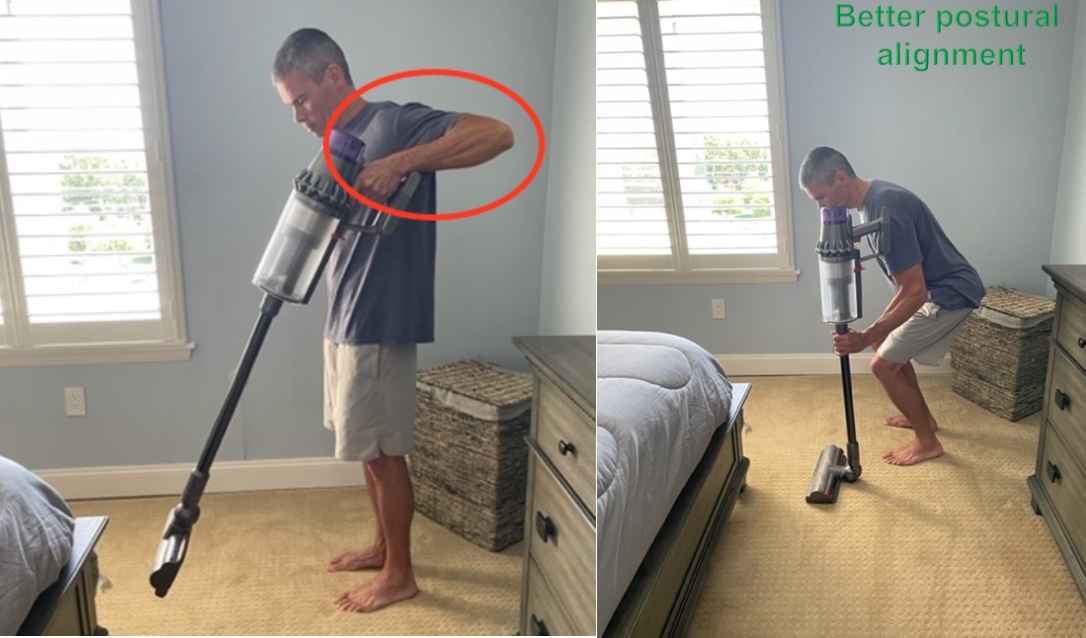
Figure 8. The proper way to lift the vacuum.
These pictures show a cordless, stick vacuum. You can see by grabbing the top handle you hike up at the shoulder and activate the muscles in the upper traps and shoulders. If we use a better postural alignment and grip from the middle, we can stay more in alignment and use more of the whole body rather than just focus on that one area of the shoulder. All vacuums will have different grips and place your wrist in extreme ulnar deviation, wrist flexion, or extension. When grasping the handle, you want to get into the most neutral posture with your wrist.
Vacuum Design
- Upright Design
- Higher suction
- Durability
- ↑ Weight
- Handle position?
- Higher suction
- Stick Vacuum
- Lightweight
- One carrying handle at top
- Effort to maneuver
- Handheld Vacuum
- UE holds all weight
- All power to maneuver comes from UE
- Efficiency?
- Considerations: Handle location, weight, maneuverability
(Bak et al., 2019)
This study also looked at a human-centered design to improve vacuum design. It looked at upright vacuums, stick vacuums, and handheld vacuums like a dustbuster. A traditional upright vacuum will have a higher suction, meaning it has more drag and requires more force to push and pull. It could also be more efficient and get the job done quicker. An upright vacuum can be more durable, but sometimes it will weigh more. The handle position on an upright vacuum is mainly at the top, but sometimes these vacuums have a handle part way down at the canister.
Stick vacuums are lightweight and typically only have a carrying handle at the top. As they are super maneuverable, you must stabilize them a little more. They are a little easier to push than an upright vacuum.
A handheld vacuum only uses the upper extremities to hold the device's weight and maneuver it. The biomechanical impact is a strain on the upper extremity.
When choosing the correct one, you must consider the vacuum design, including the handle, wrist position, weight, and maneuverability. Additionally, it would be best to look at your pace, the time you vacuum, and the environment.
Laundry
The next IADL is completing laundry which can put a lot of muscular load on your body.
Laundry Risk Factors
- Repetition to get laundry in/out of washer and dryer
- Awkward postures to reach in and around washer and dryer
- Spinal position - Needing to reach overhead or below the waist
- Forceful exertions to lift and carry a laundry basket
There is a lot of variation in laundry, the laundry routine, and the type of appliance. It involves carrying a laundry basket and loading and unloading the washer and the dryer. As you can see in Figure 9, this task requires repetition.
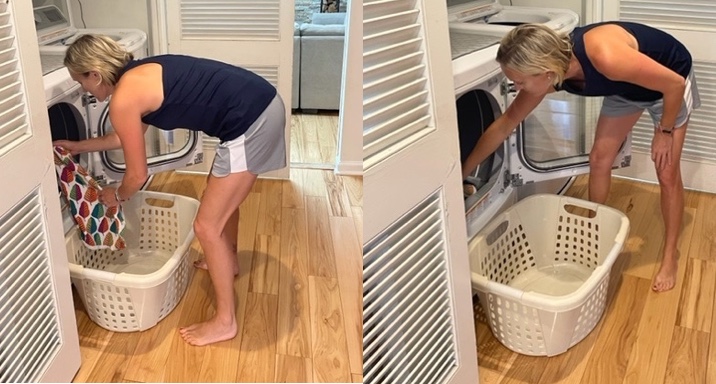
Figure 9. Author loading and unloading the washer.
Unfortunately, the load of laundry does not come out in one nice load, and then you add in the folding. There is also variation in the appliance position and type, which may involve an awkward or static posture. You may have to bend over or reach overhead if you have a stackable washer and dryer.
Laundry Recommendations
- Do smaller loads
- Laundry basket
- Use proper body mechanics to lift/carry
- Load/unload appliance
- Get close to the appliance
- Maintain spinal curves
- Avoid bend and twist
- Use one hand to support
- Lift one leg backward if reaching into the washer
Under that PEO model, we can look at the occupation of laundry. Figure 10 shows better ergonomic positions.
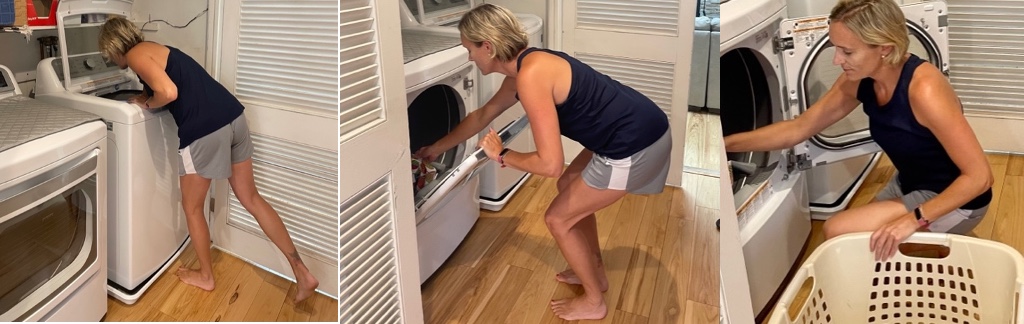
Figure 10. Author demonstrating better positioning for laundry.
Doing smaller, manageable loads of laundry can be better for the body as it reduces the weight and the repetition of the task. The downside is you are doing laundry more often. Another thing to consider is body mechanics when lifting and carrying a laundry basket. Make sure that that laundry basket has comfortable handles and that you use bilateral upper extremities. When lifting or putting it down, it is essential to maintain the spinal curves. You also want to keep the basket close to your body.
You must get close to the washer and dryer to load and unload laundry. The closer you get, the less you will skew anatomical alignment and keep your spinal curves, mainly the lumbar curve. We need to keep the lumbar curve and not exaggerate the thoracic curve. If we go back to the previous pictures, there were no curves. In these pictures, we are maintaining more of a lumbar curve. One thing that can be helpful with laundry is using one upper extremity to support yourself on the washer or the dryer while the other hand manipulates the laundry.
Additionally, extending one leg behind will help with balance and reduce pressure through the low back. As you can see in the images, my dryer door has two options. One is to open it from the top, where I have to reach in, and I can maintain the lumbar curve by bending at my hips and knees rather than in my trunk. The other option is that the door opens up as a hinge. In that case, I need to crouch down and get close to unload the laundry.
Washing Dishes
The next IADL is washing dishes.
Dish Washing Risk Factors
- Washing at sink
- Prolonged static posture of standing
- Position of sink impacting reach
- Dishwasher
- Awkward posture while loading and unloading
- Repetitive task to load and unload items
- Space constraints depending on the environment
Here are some risk factors for using a dishwasher or washing dishes in the sink. Washing dishes requires standing in a static position for a prolonged time until those dishes get clean. Sink height and your height will vary, as will the number of dishes and how dirty they are. It is a more static occupation.
If you use a dishwasher, loading and unloading will likely be below your waist, requiring you to reach below the waist. This can lead to awkward postures, as shown in Figure 11. Depending upon how much you are loading and unloading, it can be a very repetitive and time-consuming task.
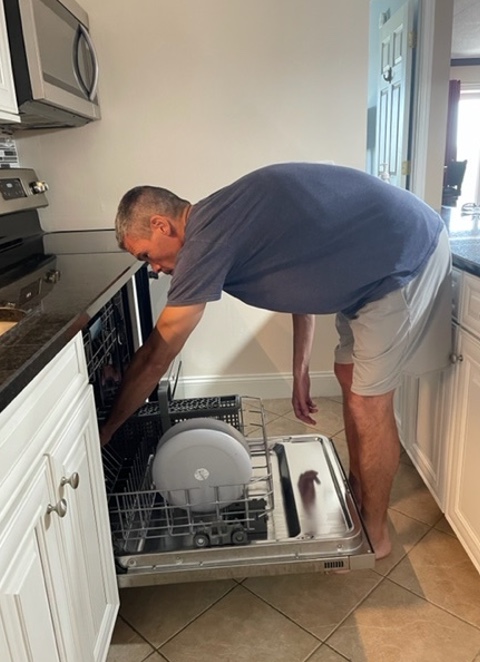
Figure 11. Excessive bending and reaching for loading the dishwasher.
This task may put you in this awkward position for some time. Everybody's kitchen workspace is also different. This is more of a galley-style space, and the individual does not have much room to do the task.
Dish Washing Recommendations
- Washing at Sink
- Trunk against counter
- Step inside cabinet or stool
Looking at the PEO model, we probably cannot do too much for the environment as the sink and dishwasher locations do not change much. The dishwasher is typically going to be below the waist. We need to look at the person and the occupation to make recommendations.
When washing dishes at the sink, your abdomen should be right up against the countertop, as close to the sink as possible, to reduce the bending and reaching needed to wash the dishes, especially if you have low back strain.
Another tip is to open the doors under the sink or use a stool to put one foot up (Figure 12). I made this recommendation to a colleague, and she said, "I have never thought of that." Putting one lower extremity up breaks up that posterior chain in the back and reduces pressure through the low back.
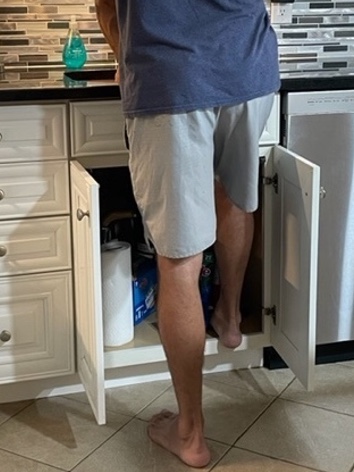
Figure 12. Putting one foot up to reduce back strain.
This position will also activate core stability because you will have to start contracting your hip and pelvic muscles to be able to stand there. It will also force you to be close to the sink and is an easy fix. You can alternate legs if needed. It also forces you to look underneath your sink and see what you are hiding under there so you can make some space.
- Dishwasher
- Maintain spinal curves
- Prop with one UE
- Avoid twisting by clearing space for clean dishes
With the dishwasher, instead of bending over at the trunk, which will flatten out your back curves, it is better to squat using hip and knee flexion to maintain those spinal curves.
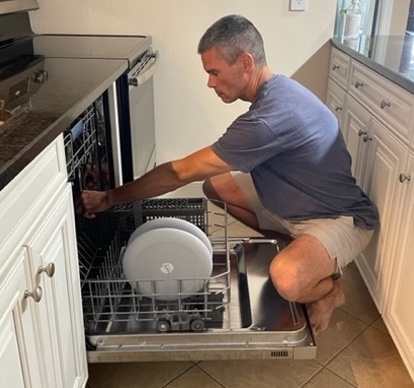
Figure 13. Squatting for proper unloading of the dishwasher.
The other thing you can do is use the one-hand prop like shown for laundry. You can use one extremity to prop yourself while the other moves the dishes. With loading and unloading the dishwasher, you should try to pre-plan this task. Perhaps you can do shifts of moving dishes from the countertop to the dishwasher and the same in reverse. You should also clear space, so you are not doing much reaching or twisting to unload and unload the dishwasher. It might be an extra step, but your body should do it that way.
Smartphone Use
Next, let's look at communication management, specifically smartphone use. Kids use smartphones earlier, which correlated with growing concerns about musculoskeletal problems and bad postures and habits.
Smartphone Risk Factors
- Awkward posture
- Neck flexion, scapular protraction, elbow flexion, wrist flexion, supination
- [PROXIMAL STABILITY]
- Repetitive motion
- Keying & scrolling
- [DISTAL MOVEMENT]
- Static posture
- Sustained grip
- Areas of discomfort
- Neck
- Upper trunk
- UE
(Namwongsa et al., 2018)
It is reported that people are using phones and other devices anywhere from two to eight hours a day, according to this study from 2018. In the problem areas that were reported, over half of the people said neck complaints were number one. Force is not an issue for this occupation as they weigh half a pound or less. Another concern is awkward posture specifically neck flexion. When the neck flexes, the scapula starts to protract and come forward. So we see increased neck flexion, scapular protraction, elbow flexion, and sometimes wrist flexion and supination. There are also issues with proximal stability.
Then, we look at the distal movement of our thumbs and fingers. These movements are very repetitive with smartphone use. We are in a static posture if we use our smartphones five plus or minus three hours a day. We also use a sustained grip unless you use the device hands-free. Another consideration when thinking about posture is that as the neck and the shoulders go forward, this decreases the thoracic space needed for breathing. So they are finding some respiratory implications as well.
The study by Namwongsa took place in Thailand. It was aimed at assessing the ergonomic risk factors for smartphone users, and they used Rapid Upper Limb Assessment (RULA). This is a common ergonomic assessment used in work settings that looks specifically at the neck and the upper limb loading during tasks. It is an observation tool; the more someone moves away from the neutral postures, the higher their RULA score becomes. So there is a risk between one and seven, with one being low and seven being high.
Study of Smartphone Risk Factors
- 30 participants (ages 18-25 yo) who regularly used a smartphone (2 hr/day for at least 6 mo)
- Intake assessment information & video recording using a smartphone, RULA tool
- No acceptable RULA scores
- R scores > L scores (RHD)
(Namwongsa et al., 2018)
Participants were 30 young adults between 18 and 25 years old. There were four males and 26 females, and they were familiar with using a smartphone. The inclusion criteria were that they used it for at least two hours a day and had done that for six months before participating in this study. They did an intake assessment to learn more about their smartphone use and a video recording watching them use and access their smartphone. While that recording took place, the researchers were doing the RULA assessment. They found that nobody in the study had an acceptable RULA score. Anything from a score of one to four is no risk to low risk, where you probably do not have to make any modifications or very minimal modifications to posture.
They were all in the five to seven range, meaning they needed changes to their posture. They also used the Standard Nordic Questionnaire (SNQ) to determine areas where musculoskeletal disorders can arise. Figure 14 shows the chart of the results.
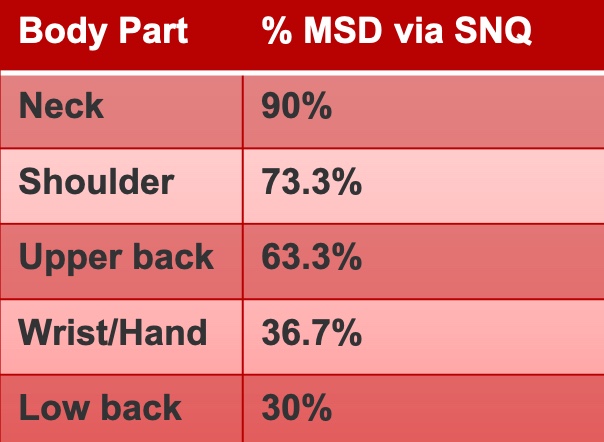
Figure 14. Results of the Standard Nordic Questionnaire.
Using the SNQ, participants had a chance of getting a musculoskeletal disorder in their neck (90%), shoulders (73.3)%, and upper back (63.3%). From there, the percentages dropped lower. Using smartphones resulted in high ergonomic risk due to posture and muscle use, particularly in the neck and the upper back. As I mentioned, there may be respiratory implications as well.
MSD Risk Findings
- Neck Posture
- More than 20° flexion
- Extension with neck rotation or lateral flexion
- Trunk Posture
- More than 20° flexion
- Trunk rotation or lateral flexion
- Lower Extremity Posture
- Unsupported or unbalanced LEs
- "Smartphone users should avoid any combination of these postures..." (p. 13)
- Unsupported or unbalanced LEs
(Namwongsa et al., 2018)
As a result, the researchers said smartphone users should avoid any combination of these postures—more than 20 degrees of neck flexion results in risk and extension with neck rotation or lateral flexion. Trunk flexion of more than 20 degrees along with trunk rotation or lateral flexion would also be a risk factor. Often, we get ourselves in a funky position while using the smartphone. And if the lower extremities are not supported or balanced, the rest of the trunk works harder.
Smartphone Recommendations
- When shopping for a new phone, look for a good fit with screen size and hand size
- Alternate R/L hands to hold, grip and type
- Pop socket
- Case options
- Put the phone down to type
Here are some recommendations using the PEO model. We can start with hand size. We want to ensure that the cell phone fits your hand well. I have smaller hands. In Figure 15, you can see my cell phone on the left, and my son's on the right. Mine fits much better in my hand than the other and is more comfortable.

Figure 15. The author holds two different sizes of cellphones.
Another thing is looking at the occupation area and how you use the phone. Can you alternate your right and left hands to use or key the phone? There are many options for different grip types on the phone, like a pop socket or other cases. You could also put the phone in front of you to remove the grip altogether.
- Reduce keystrokes
- Voice-to-text features
- Digital assistants (Siri, Alexa, etc.)
- Alternate using thumbs and digits for typing
In terms of hand posture and repetition, you use small muscles and joints to access. You can reduce keystrokes by using the voice-to-text features on a smartphone or whatever digital assistant is available, like Siri, Alexa, or Cortana. Figure 16 shows two different ways to do keying or typing.

Figure 16. Different ways to do keying or typing.
One is that thumb use, which you can see in the left picture, but another would be to hold the smartphone and key with one digit so you can switch up the postures and how you're using the hands to key on the smartphone.
- Avoid neck flexion & bad posture
- Lift phone between shoulder and face height
- Use a phone stand
- Avoid lateral neck flexion and avoid full elbow flexion to hold phone to ear
- Use earbuds, Bluetooth
- Put on speaker mode
- TAKE BREAKS & STRETCH
Again, posture is crucial when looking down at the smartphone. Instead, you can bring that smartphone up a little to reduce neck flexion. This increases upper extremity movement, but this is better than the alternative. Another option is that instead of laying the phone down on a flat surface, you can use a phone stand. My phone is always at an angle, so I am not looking down at my desk.
If you are talking on the phone, make sure that you are trying to avoid full elbow flexion, which is a risk factor for a cubital tunnel issue. Additionally, holding a phone to your ear with lateral neck flexion or rotation is not a comfortable posture. You can use earbuds or a speaker to communicate hands-free.
It is also essential to take breaks and stretch out.
Rest and Sleep
Rest and sleep are critical IADLs because we spend a third of our time sleeping. Our bodies need sleep.
Sleep Risk Factors
- Static position for a prolonged time
- Neck and low back pain
- Nerve compression
- Awkward posture
- Poor spinal alignment leading to neck/back pain
- Nerve compression
- Contact stress
- Pressure on soft tissue
(Cai & Chen, 2016; Ren et al., 2016)
Sleep has risk factors because we are in a static position for a prolonged time. This static positioning can be connected with neck pain, usually related to your posture on the pillow or poor pillow design. You can also wake up with low back pain, which can be connected to your sleeping posture.
Sleep is also a time where we may see nerve compression, whether carpal tunnel or cubital tunnel syndrome.
It is also possible to fall asleep in an awkward posture, like in a car or airplane.
Contact stress does not always happen during sleeping, but I use this picture of one of my children. I do not understand why he likes to sleep on the hard part of his car bed (Figure 17).

Figure 17. The author's son is sleeping on the hard part of his bed.
This image makes me think of contact stress.
Pillow Design
- Studies on pillow design
- Ergonomic pillow design (Cai & Chen, 2016)
- Pillow height and pressure/alignment (Ren et al., 2016)
- Sleep posture: Supine, side-lying, prone
- Spinal alignment: Cervical spine
- Height of pillow
- Soft vs. firm pillow
- "People may often choose a pillow based on their immediate perception and comfort, which could be misleading …" (Ren et al., 2016, p.2).
Here are two studies looking at pillow design. The first study was by Cai and Chen in 2016. They were trying to design an ergonomic pillow. The second study is by Ren and colleagues (2016). These researchers looked at cranial cervical pressure and spine alignment with pillow height.
They studied sleep posture in supine, sidelying, or prone. They looked at what the cervical spine was doing and how much pressure was applied through that area. They also wanted to know the pillow height and firmness. Ren and colleagues found that people often choose a pillow based on an immediate perception of comfort, which could be misleading and not provide the best long-term postures.
Sleep Recommendations
- Maintain spinal alignment
- Supine: Cervical support from the pillow, pillow under knees
- Side-lying: Cervical support from the pillow, a pillow between knees
- Prone: Nope.
- Pillow and mattress firmness
- Needs to support spinal curves
It is not an issue about a hard versus soft for the mattress or pillow, but rather, it is about how it supports your body in anatomical and spinal alignment. It is okay if you are a back or side sleeper, but please, do not be a prone sleeper. When you are prone, either your face is in the pillow, or you are in real extremes of cervical rotation, which is unsuitable for prolonged periods. When supine, ensure the pillow supports the cervical spine, and you can add a pillow under your knees to release the low back. In sidelying, you may need more cervical support from the pillow to prevent excessive lateral flexion. A pillow can be placed between the knees to have better hip alignment.
Figure 18 shows some pictures of sleep recommendations.
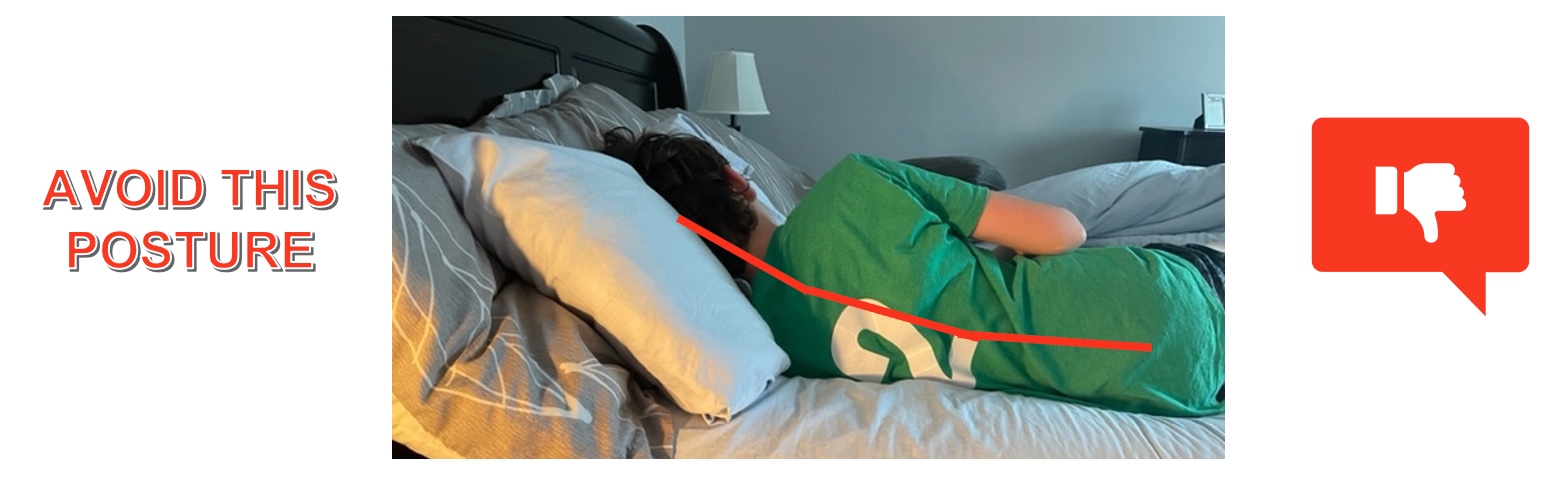
Figure 18. An example of bad sidelying posture.
Avoid the posture above with the stacked pillows as it causes increased angulation and poor anatomical alignment. Figure 19 shows better positioning in sidelying and supine.
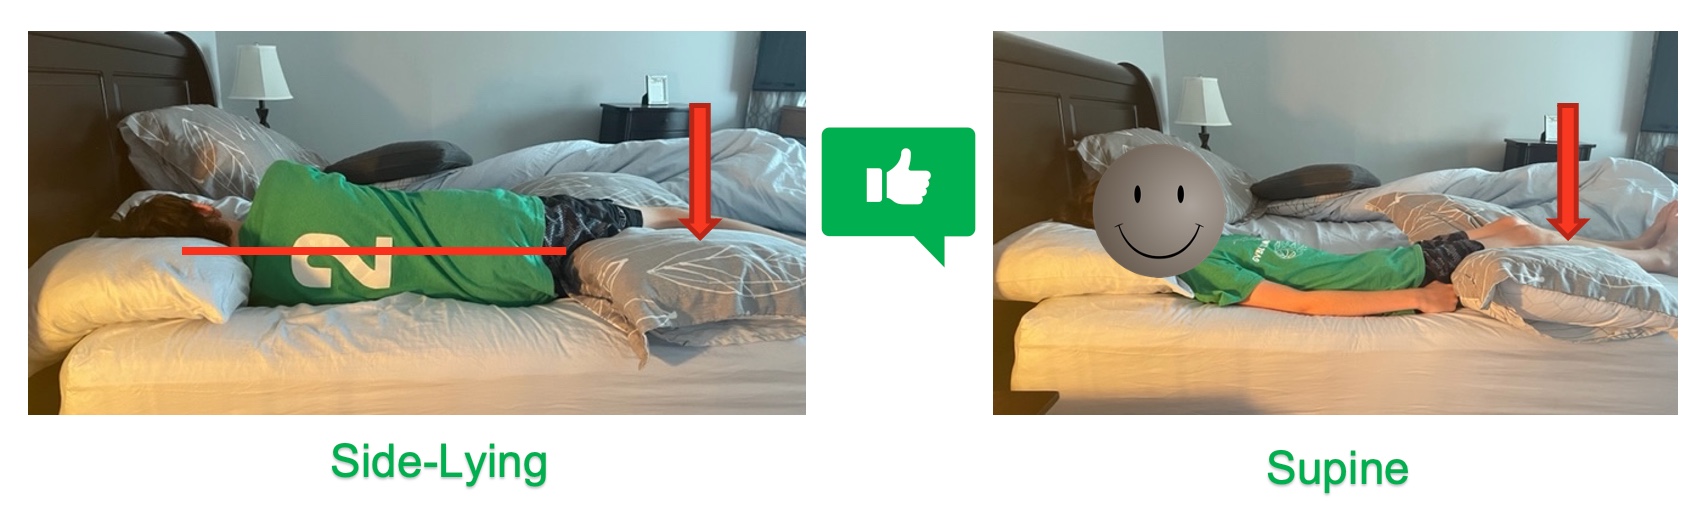
Figure 19. Better sidelying and supine postures.
In sidelying, we can draw a straight line through the cervical, thoracic, and lumbar spine. You can also see a pillow between his legs, giving him a more neutral alignment. In supine, we do not want to stack the pillows too high. We want just enough support to maintain spinal alignment. And again, putting a pillow under the knees can release the low back.
Education
Ergonomic risk factors can happen in school-based settings, mostly centered around posture and back health. Back pain can be caused by posture while using technology and carrying heavy backpacks. They also do not know proper lifting techniques. They also are seated for prolonged periods and have incorrect postures.
School-Based Risk Factors
- Static postures
- Sitting for a long period of time – increase in the use of technology has added to seated hours
- Awkward postures
- Backpack
- Forceful motion
- Lift and carry a backpack
(Bettany-Saltikov, et al., 2019)
Bettany-Saltikov looked at some basic risk factors of static postures, awkward postures, and forceful motions.
Educational Program Goals
- Positional
- Sitting posture
- Injury prevention
- Make healthy decisions about using their body
- Mechanical
- Improve body mechanics
- Wear backpack correctly
- Numerical
- Decrease students experiencing back pain
(Bettany-Saltikov et al., 2019)
They also provided educational programming for students to decrease low back pain, improve body mechanics and posture, improve backpack safety, and teach sitting postures and safe lifting. Their goal was to get children involved in their health and wellness. That last part is critical. They also felt that elementary school ages are the best time to teach students as they are flexible and adaptable. They are not as set in their routines and can adopt healthy lifestyle habits early on.
Education Recommendations
- Assess Workstation: Desk, chair, technology
- Backpack Awareness
- PICK
- PACK
- POSITION
- Education on posture and back care
- Recommend 'active learning' to create healthy habits
Occupational therapists can look at the setup of the desk and chair and the technology they are using and make recommendations for the best setup.
We can also look at backpack awareness, as this is a long-discussed topic by OT practitioners and well supported by the AOTA. I have a backpack biomechanics course on OccupationalTherapy.com. Feel free to check that out.
I like to frame backpack education with the terms: pick, pack, and position. One must pick the right backpack with padded straps and perhaps a chest or a waist strap to help with alignment. It also needs to be the right size for a child's body. You need to pack it correctly. You pack it with the heaviest items closest to the body and the lightest items farthest away. Lastly, you position it correctly on that child so that it sits on their back appropriately. Some examples of this are in Figure 20.

Figure 20. Examples of proper backpack positioning.
It should not hang over one shoulder or low off their back. You can also educate on posture and back care so that the students are active in the learning process, as this will better translate into creating healthy habits. Figure 21 shows proper lifting.
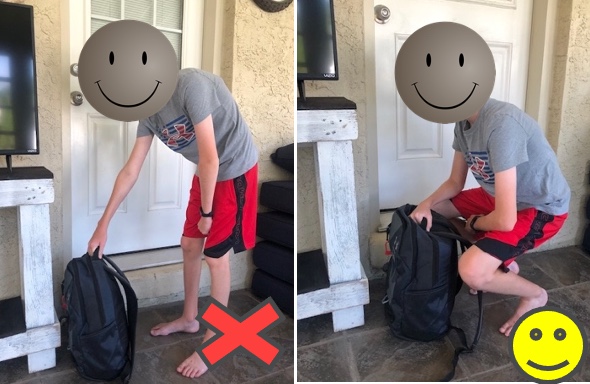
Figure 21. Proper lifting of the backpack.
Leisure-Gardening
Lastly, we are going to discuss leisure. Gardening is a huge pastime. I was talking to people at our local feed and seed, and they were saying many more people are doing gardens since the pandemic.
Gardening Risk Factors
- Force with gripping
- Awkward or prolonged postures
- Non-neutral wrist position
- Poor spine alignment
- Vibration
- Temperature
Gardening does come with its own set of risk factors. One is forceful gripping when using gardening tools or pulling weeds. Another is awkward and prolonged postures. Gardening typically occurs on the ground or close to the ground, like Figure 22.

Figure 22. A man is crouching to garden.
Figure 23 shows a man using bad posture to water his plants.

Figure 23. Man watering his indoor garden with poor posture.
Many things we do in the garden require poor spinal alignment and awkward positioning of the wrists and forearms. Gardening is one of those tasks where we can also run into the risk factor of vibration, especially with electric tools. Temperature can also be an issue in warm weather.
Gardening Recommendations
- Tools
- Cushion grip
- Longer handle
- Neutral wrist
- Spring-loaded or power vs. manual
- Keep up with maintenance
- Anti-vibration
- Postures
- Spinal alignment
- Warm up muscles first
- Don't reach, move
- Change position often
- Environment
- Raised garden bed
- Tabletop planting
- Lighten the load
- Consider the time of day & temp
(BeneFIT PT, 2016)
Using the PEO and the occupational component, we want to ensure to use the proper tools with a good grip, no sharp edges, and handles that are not too big or wide for your hand size. Many tools also will place your joints in a neutral grip.
The longer the handle on a tool, the more leverage, as you use larger muscle groups. Figure 24 shows a long-handled trimmer.

Figure 24. Man using a long-handled trimmer.
You can also use spring-loaded tools, as they can decrease both the effort and the repetition that the upper extremity has to use. If vibration is an issue, anti-vibration or handles can be added to tools. It is also important to keep tools sharp to be more efficient.
In terms of posture, maintaining spinal curves and warming up your body before you do gardening work, like stretching or a bit of aerobic or cardio, may be helpful. Make sure the things you need are close to you so you can avoid lunging and reaching. Moving your position often while doing garden tasks is essential because they can be repetitive and lengthy.
The outdoor environment is what it is. However, you can think about the time of day you are gardening or the temperature best suited to work in your garden. You can use raised beds, tabletop gardens, or container gardening. You can also lighten the load by using things like a wheelbarrow, dolly, or wheeled cart to lighten the load.
To Sum It Up
- Health and wellness interventions can (should?) use ergonomic principles
- Be comfortable taking ergonomics outside of work
- Activity analysis – Client-centered interventions
- It's all about finding neutral postures
- Fitting the person (P) to the tools, task (O), environment (E)
- Creating healthy habits – awkward at first? Becomes routine over time
We are at the end of our time here. We can look at all of the areas of occupation that are outside of work where we can make a difference. We want to look at risk factors and make recommendations. I provided many examples in different occupations today. We need to use activity analysis, an occupational therapy's distinct tool. Occupational therapists and assistants need to be comfortable taking the ergonomics outside the work and industry realm.
We are client-centered. Everybody does everything differently, and we need to tailor our interventions and recommendations for that person. This is never more apparent than when we are doing our everyday tasks. Everyone has different tools and routines. We must focus on neutral postures in the upper extremity, trunk, spine, and lower extremities.
I always think it is easiest to frame this within the PEO model for the best fit for optimal occupational performance.

Figure 25. The Person-Environment-Occupation Model.
In what area do we see a problem, and where can we make a recommendation? Changing everyday tasks can be awkward at first. You can get pushback. "It's not as easy as I normally do it. The way I do it is quicker." Over time, I think you and your clients will be surprised at how quickly they can change to healthier habits.
References
American Occupational Therapy Association (2021). School backpack safety. https://www.aota.org/Conference-Events/Backpack-Safety-Awareness-Day.aspx
American Occupational Therapy Association (2020). Occupational therapy practice framework: Domain & process (4th ed). American Journal of Occupational Therapy, 74 (Suppl. 2), 7412410010.
Asher, A. (2021, September 5). Housekeeping with good body mechanics. Verywell health. https://www.verywellhealth.com/cleaning-house-without-hurting-back-4117441
Bak, H., D'Souza, C. & Shin, G. (2019). Upper extremity muscular load during carpet vacuuming with household upright cleaners. Applied Ergonomics, 79, p. 38-44. https://doi.org/10.1016/j.apergo.2019.04.008
BeneFIT PT. (2016, June 6). Gardening ergonomics. https://benefitpt.com/gardening-ergonomics/
Bettany-Saltikov, J., McSherry, R., van Schaik, P., Kandasamy, G., Hogg, J., Whittaker, V., Racero, G.A., & Arnell, T. (2019). PROTOCOL: School-based education programmes for improving knowledge of back health, ergonomics & postural behavior of school children aged 4-18: A systematic review. Campbell Systematic Reviews, 15:e1014. https://doi.org/10.1002/cl2.1014
Cai, D. & Chen, H. (2016). Ergonomic approach for pillow concept design. Applied Ergonomics, 52, 142-150. https://dx.doi.org/10.1016.j.aprego.2015.07.004
Karali, S., Mansfield, N.J. & Gyi, D.E. (2017). An approach to vehicle design: In-depth audit to understand the needs of older drivers. Applied Ergonomics, 58, 461-470. https://dx.doi.org/10.1016/j.apergo.2016.07.017
McGaha, J. (2020). Driving ergonomics. [webinar]. The Back School. https://thebackschool.net/online-courses/webinars/ask-the-experts-driving-ergonomics
Namwongsa, S., Puntumetakul, R., Neubert, M.S., Chaiklieng, S.,& Boucaut, R. (2018). Ergonomic risk assessment of smartphone users using the Rapid Upper Limb Assessment (RULA) tool. PLoS One, 13(8), 1-16. https://doi.org/10.1371/journal.pone.0203394
National Institute for Occupational Safety & Health (2018, February 28). Ergonomics & musculoskeletal disorders. https://www.cdc.gov/niosh/topics/ergonomics/default.html
Norouzi, S., Tavafian, S.S., Cousins, R. & Mokarami, H. (2021). Study protocol for a RCT to improve the quality of life of housewives with MSDs: A health promotion intervention based on the participatory ergonomic approach—the Housewives Ergonomic Intervention (HEI) trial. Trials, 22(1), 1-10. https://doi.org/10.1186/s13063-021-05436-w
Red, S., Wong, D.W., Yang, H., Zhou, Y., Lin, J., & Zhang, M. (2016). Effect of pillow height on the biomechanics of the head-neck complex: Investigation of the cranio-cervical pressure and cervical spine alignment. Peer J, 4:e2397. 10.7717/peerj.2397
Schaffa, M.E. & Flick, J.E. (2022). Health promotion and wellness for the client and practitioner. In Mahle, A.J. & Ward, A.L. (Eds.). Adult physical conditions: Intervention strategies for occupational therapy assistants (2nd ed, pp.92-115). F.A. Davis.
Citation
Loesche, S.(2022). Expanding ergonomic concepts across areas of occupations. OccupationalTherapy.com, Article 5527. Available at www.occupationaltherapy.com