SueAnn: Thank you so much for having me. I am so excited to be here and thanks to occupationaltherapy.com. Today, we are going to be talking about how to utilize a 3D printer as an occupational therapy practitioner. There is a little picture of me and my family in Figure 1.

Figure 1. My family.
That is my son Noah, who is four, and my daughter Natalie, who is one. One person that is not pictured is my brother, who was instrumental in introducing me to the concepts of 3D printing. He has a degree in manufacturing and machining. He understands a little bit different level of the utilization of 3D printing and was able to help me understand it as an occupational therapist. I hope to bring some of that information to you as well. And, I also hope that through our presentation, you are able to communicate with someone in that field if you choose to collaborate in any future endeavors.
What is 3D Printing?
What is 3D printing? You are going to find a lot of different terms related to the concept of 3D printing.
- Rapid prototyping
- Stereolithography (SLA)
- Digital Light Processing (DLP)
- Fused Deposition Modeling (FDM)
- Selective Laser Sintering (SLS)
- Selective Laser Melting (SLM)
- Electronic Beam Melting (EBM)
- Laminated Object Manufacturing (LOM)
- Binder Jetting (BJ)
- Photopolymerization
- Fused Filament Fabrication (FFM)
Most commonly, you will see that first one, rapid prototyping. Another really common one is fused deposition modeling. Those are the two most common. All of those are utilizing various different mediums to produce an object. Some of them utilize heat to make the object and other laser beams.
Today, we are going to be talking about rapid prototyping. I want to talk about the word rapid. When you think about manufacturing in general, the word rapid is utilized when you are making a one-off prototype of an item that is going to be manufactured, and to be able to do that rapidly is on their own timeframe. Later in the presentation, we are going to talk about what rapid means in relationship to being able to manufacture a piece of adaptive equipment, for example.
Figure 2 is an example of one 3D printer.
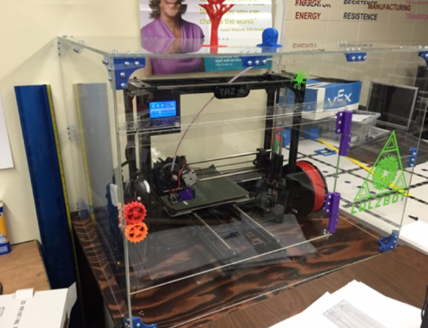
Figure 2. 3D printer.
This one happens to be enclosed by a piece of clear glass. We will talk about why it needs to be enclosed or not enclosed later.
Costs
How much do these cost?
- 3D printer costs vary from $600 for a “mini”
- $1700 “average”
- $6500 “deluxe”
- Spools of filament are approximately $20-40 each
- Options:
- Heated bed
- Enclosed
Just like you make various choices when you purchase a vehicle based on what features your vehicle has, 3D printers are the same way. It can range anywhere from $600 to $6,500 for an average desktop 3D printer. Spools of the filament, or the plastic that makes the item, costs between $20 to $40. There are also some options that you can upgrade. You can get a heated bed and an enclosed printer. If you do not want to purchase your own 3D printer, you can also utilize the services of someone else who already has one.
How Does It Work?
How does this 3D printing process work? We are going to talk about it in an overview first, and then we will go through the process more specifically.
- Computer design (CAD)
- Slicing
- Load filament onto the printer
- Send an object to the printer
- Filament moves through a heated nozzle
- Nozzle or bed moves along the route to build the object layer by layer
- Finish the object if needed for precision
First, you use computer design software like you would for a normal printer. You also format it just like you would format your word processor. The second part is called slicing. This takes cross-sectional pieces of the object to send to the printer. After you have designed and sliced it cross-sectionally with your computer so the printer knows how to print it, you then load your filament into the printer. You select your filament based on features that you need, just like you select printer paper for what size or what color. You send your object to the printer at step four, and then the filament moves through a heated nozzle in step five. The nozzle moves along the bed to build the object layer by layer. Finally, the seventh step is finishing the object. If it is a very precise object, it might need to be tweaked in certain ways, but we will talk about that at the end as well.
Looking back to our picture of our 3D printer, I want to compare it to a hot glue gun (Figure 3).
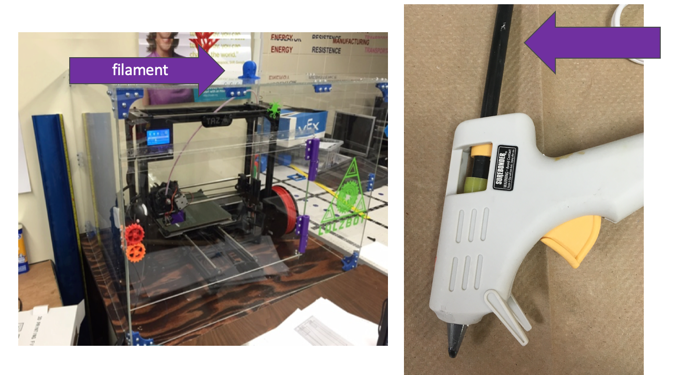
Figure 3. 3D printer compared to a hot glue gun- Filament.
The printer utilizes filament similar to a hot glue gun needing glue. The advantage to the 3D printer is that the filament is on a spool, and so you do not have to replace the glue sticks as often as you do in a hot glue gun. The red spool is a long piece of plastic that comes up and around to the top and then is fed down into the nozzle. The filament is equivalent to the hot glue stick.
The next way we can compare it to our hot glue gun is with the heated nozzle in Figure 4.
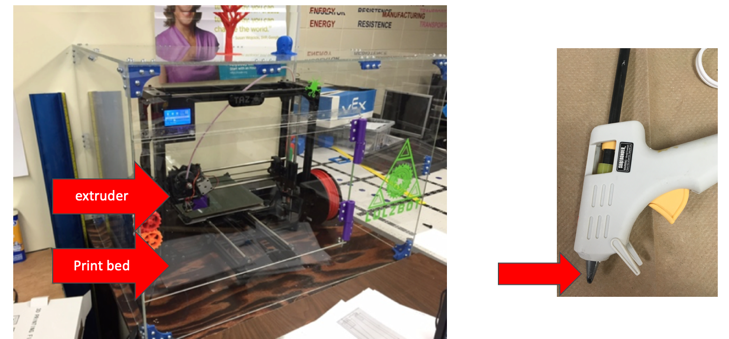
Figure 4. 3D printer compared to a hot glue gun- Nozzle.
The heated nozzle of the hot glue gun is equivalent to the heated extruder in the 3D printer. The glue stick comes down through the hot glue gun and comes out at the end in liquid form because it is heated. Similarly, the 3D printer filament comes down and passes through the heated extruder and comes out in a liquid softened form. The print bed is the flat part in the 3D printer. Either the extruder or the print bed is the item that moves to build the object.
There are metal guides along the bottom and along the side, that allows the 3D printer to build the object left right, and vertical as well. The item is built layer by layer, just as you imagine someone building with bricks as shown in Figure 5.

Figure 5. Layering in 3D printing.
If the bricks are built on a heated print bed, they are going to stay warm as the item is being built. If the room is warm and the plastic is warm, and there is not a big temperature difference, this is ideal. Conversely, the room is very cold and the item is cooling rapidly as it is being extruded in the heated form, the item can warp as it prints.
Most Common Types of Filaments and Their Properties
The two most common types of filaments utilized in the 3D printing world are PLA and ABS (Stephens et al., 2013). PLA
- Polylactic acid (PLA)
- Biodegradable thermoplastic
- Made from renewable resources like corn starch or sugarcane
- Also seen in medical implants, food packaging, and disposable tableware.
- The main benefit of PLA is that it’s easy to print.
PLA is a biodegradable thermoplastic. It is polylactic acid and made from renewable sources like corn starch. It is commonly used in medical devices, food packaging, and disposable utensils. It is really easy to print. The downside is that the plastic does become brittle in a few years after being printed.
ABS
- Acrylonitrile butadiene styrene (ABS)
- Oil-based thermoplastic
- Also used in pipe systems, automotive trim, protective headgear, and toys (like Legos!).
- Slightly higher strength, flexibility, and durability
- Requires heated and adhesive print bed (hairspray, tape, etc.)
ABS, on the other hand, is an oil-based thermoplastic so it is not biodegradable. It is used commonly in many other things that you might be familiar with such as PVC plastic, LEGOs, and automotive trims. It is stronger. When you compare PVC pipe to a disposable fork, that shows a durability feature of ABS. ABS requires a heated print bed to print it accurately. People use either hairspray, double-sided tape, or masking tape to create an adhesive or to have better adherence during the printing process.
Infill
Another thing to think about when making an object is how solid or how dense it will print out, and that is called infill. If you were to think about a cube or a box, 100% infill would be a solid box and a 0% infill would be a hollow box. The two really common percentages of infill are 20 and 50%. They offer different features. A 20% infill is durable and does not use as much material consumption. If you were trying to be cautious on how much filament you use, you would lean towards 20%. If you do not mind using more filament and want more durability, you would lean towards 50% or even higher. If you were to create a cross-sectional view of the box, it might look honeycomb or grid-like based on the particular slicing and design patterns that you are using.
Benchmarking
You have to calibrate a 3D printer. They do it with a really fun little tugboat called 3DBenchy shown in Figure 6.
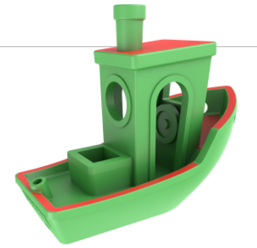
Figure 6. 3DBenchy.
It tests the printer's accuracy and sees how much it warps an object. This tugboat is only six centimeters long, three centimeters wide, and four centimeters high. The plans are shared for free and anybody can download and print it. It is even available for commercial use. I have listed the website. They have a great number of resources. The team that makes this prototype gives all of the measurements in extreme specificity so that a person utilizing a 3D printer can make sure what they are printing is accurate (Figure 7).
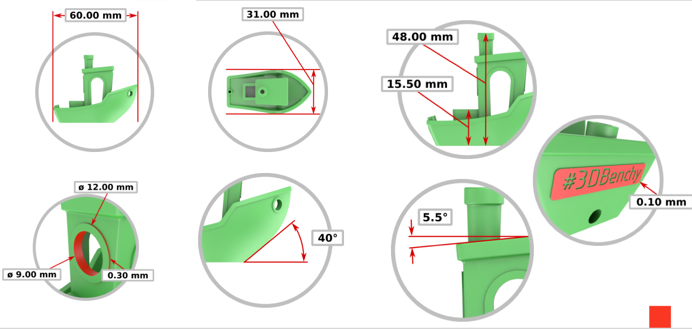
Figure 7. Dimensions of 3DBenchy.
There are a lot of angles and it is very complex. It is called a torture test on their own website. If we are laying these bricks walls down and building an object layer by layer, this tugboat can be extremely challenging for a 3D printer. Imagine trying to put hot glue and suspend it in midair with nothing underneath of that. Here is an example in Figure 8.
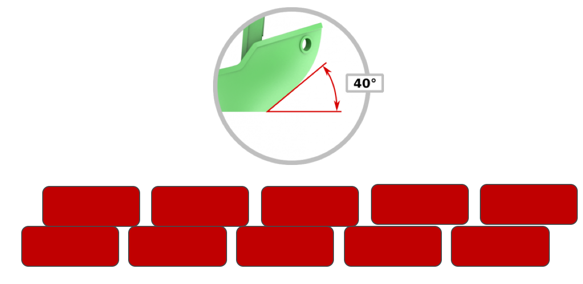
Figure 8. 3DBenchy- demo of angles.
Rapid Prototyping
Rapid prototyping is one of the really common names of 3D printing. If you look in the middle of Figure 8, we have 3DBenchy listed twice as it has been tested on two different brands of 3D printers.
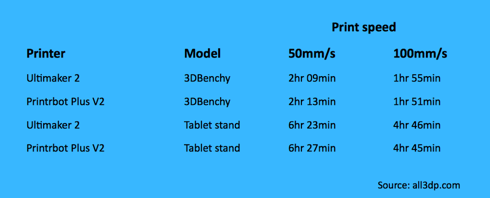
Figure9. Print speeds of different printers.
The Ultimaker 2 was able to print 3DBenchy at the speed of 50 millimeters a second in a whopping two hours and nine minutes. Remember, 3DBenchy is only six centimeters long, but because it is very complex, even when it was printed at a faster speed, the time was not much shorter. Thus, the word rapid may be a little misleading. The table stand was downloaded and utilized to dock a computerized touchscreen tablet, like an iPad. This tablet stand was 14 centimeters long, and four centimeters high, and nine centimeters wide. It was printed in six hours and 23 minutes on one particular speed, and then it was shortened down to four hours and 46 minutes. You can see even between the two brands of printers for the two different items, the times were fairly consistent.
I mentioned my brother being the person that introduced me to 3D printing. Oftentimes, he creates 3D prints while he is at work because the prints take a very long time. This is something that can be done while you are gone. You can also set up a video camera that can live stream so you can check in on your print because prints do warp with temperature changes due to the heated plastic. Instead of printing an eight-hour item when it has begun to warp, you can stop it and save your filament.
Thingiverse
How could an occupational therapist come up with some adaptive equipment or some ideas? The first place I would direct you to in your pursuit of 3D printing and occupational therapy is the website called Thingiverse. Thingiverse is what I consider Pinterest for 3D printing. It has 3DBenchy's file on there. Anybody can sign up for an account. In their search engine, you can find anybody who has previously designed a "thing." That is what they call their items. Most of the things on Thingiverse are open-sourced which means they are licensed under a Creative Commons license. The user can determine what license they want to share but most people share freely and openly. It does not cost anything to download their thing and print it yourself. Occasionally, some people do not permit selling their item so you could not download it, print it, and then sell it for a financial gain.
Businesses and sometimes libraries have 3D printers. Some public schools also have 3D printers. If you utilize a 3D printer in a library, typically the item is paid for by weight. It is printed, and then it is weighed on a scale to determine how much of their filament that you utilized.
Indications
What could an occupational therapist do with a 3D printer? Here are some ideas of some possible uses of a 3D printer.
- adaptive equipment
- prosthetics
- orthotics
These are all ideas that have been taken specifically from Thingiverse that you could access today. I have included the designer's name, their town if they listed it on their Thingiverse account, and the thing name. You can specifically go and access these things if you find a great idea for it.
Adapted Equipment
Occupational Therapy Stylus for Quadriplegic.
- Designed by: Cor Winckler
- User name: xcorwin
- Location: Cape Town, South Africa
- Thing name: Occupational Therapy Stylus for Quadriplegic
This one is an adapted stylist in Figure 10.
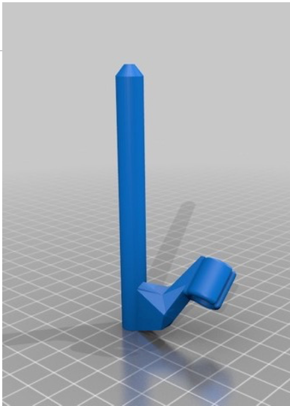
Figure 10. Adapted stylist.
It was designed for a person with a spinal cord injury or limited hand function. It was designed in South Africa, and the item name includes the word occupational therapy, which I thought was great. If you look, the one thing that you will not see very well in the picture is the universal cuff holding the stylus in place. It is a way to modify and use a universal cuff. The vertical part is slid down into the universal cuff, and then this circular part holds the stylus. The designer does give left and right-hand dominant options in their designs. One thing to keep in mind is that many things we utilize have metal inside which can be bent. We cannot always do that with items from 3D printing because the item is printed and manufactured, and many of the plastics cannot be modified. It cannot be tweaked if it needs to. It might need to be entirely reprinted.
Personalized Cup Holder.
- Designed by: Alabama Department of Rehab Services
- User name: Alabama Department Of Rehab Services
- Location: Alabama
- Thing name: Personalized Cup Holder
Another item on Pinterest that you might be interested in is a cup holder for a wheelchair tray. This was designed by the Alabama Department of Rehab Services. The cup holder is shown here in black (Figure 11.
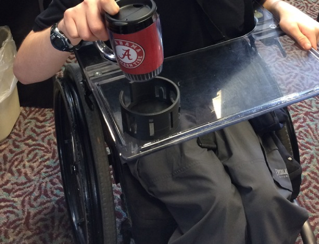
Figure 11. Cup holder.