Editor's note: This text-based course is a transcript of the webinar Supporting Pediatric Engagement In Community Mobility, presented by Wendy Stav, PhD, OTR/L, FAOTA.
Learning Outcomes
- After this course, participants will be able to differentiate the developmental stages of child passenger safety and the principles of installing and using child safety seats.
- After this course, participants will be able to apply community mobility assessment and intervention approaches to support safe bicycle and pedestrian safety.
- After this course, participants will be able to recognize concerns related to transition to driving for pre-driving teens with development and learning needs.
Introduction
I am excited to talk about this topic today. Many people get focused on a child's development and how they are performing on pediatric assessments and moving them along that continuum but tend to forget about how much our kids travel out and about in the community. There are many different modes of that mobility. Today, we are going to be talking about how we can best support pediatric engagement in community mobility, and we will be covering a range of modes of community mobility.
Driving and Community Mobility
- Classified as an IADL
- Driving and Community Mobility
- “Planning and moving around in the community and using public or private transportation, such as driving, walking, bicycling, or accessing and riding in buses, taxi cabs, or other transportation systems.” (AOTA, 2014, p. S19)
- Occupation Enabler
- Facilitates participation in other occupations (AOTA, 2016; Stav & Lieberman, 2008)
According to the AOTA OT Practice Framework, driving and community mobility are classified under IADLs or instrumental activities of daily living. Specifically, driving and community mobility are defined as planning and moving around in the community and using public or private transportation such as driving, walking, bicycling, or accessing and riding in buses, taxi cabs, and other transportation systems.
In addition to getting people from point A to point B, we also look at driving and community mobility as an occupation enablers. Think about all that kids do out in the community. Examples are going to school to engage in education, visiting a friend's house to engage in play or social participation, or going to the doctor's office or therapy office to engage in health management.
Travel from point A to point B allows for engagement in a whole host of other occupations. So, we recognize driving and community mobility not only as a means of transportation but also as an occupation enabler.
Value of Community Mobility
- Transportation from point A to point B
- Access to other types of engagement
- Represents milestones:
- Ride home from the hospital as a baby
- Trip out with grandparents
- First steps… down the sidewalk
- Independent bike riding
- Riding the school bus
- Independent street crossing
- Walking to a friend’s house
- Riding a skateboard
- Independent outing
- Riding a public bus
- Out with friends who drive
- Passing the driver's license test
Again, we need to value community mobility as it gets us from point A to point B and allows access to other types of engagement, but there are several milestones that a child goes through, specific to driving in community mobility, beginning with that first ride home from the hospital as a baby.
For those of you who are working in hospital systems, you might have a role in checking out new parents and making sure that their seats are installed properly. Most hospitals have a system in place to make sure that babies get home from the hospital safely.
That first trip out with the grandparents can also be a milestone. It can be nerve-wracking for the parents because the grandparents are not as familiar with current technologies and seating systems in child passenger safety.
In terms of pedestrian travel, those first steps that we take in the community down the sidewalk or as we are walking somewhere are big milestones. As kids age, they may become independent bike riders. Riding the school bus can be another step toward independence.
How do we transition as parents from always transporting our children from here to there to putting them in vehicles with other people? Independent street crossing is another new activity. All children go through the process of needing to hold somebody's hand, but that first time that they can cross a street and cognitively navigate that safely, including the awareness of precautions, timing, and environmental awareness, is another big milestone. The first time your child walks to a friend's house or ventures into the community by themselves opens up an entire world of occupational engagement for these little folks. Once they get on wheels, we see kids taking more risks by riding bikes and also skateboards, and scooters. They can now travel through the community a whole lot faster, so it can speed up some of that engagement.
Any type of independent outing is a big deal to them. "Bye, Mom, I'll see you in five to six hours." That travel through the community can be a big milestone. For those of you who live in areas with a lot of public transportation, riding the public bus can be a big step for a child to be able to plan and navigate the route, including some transfers. When do I have to be there? How do I have to plan my outing so that I can make it back in time?
Going out with friends who drive is a scary thing for parents. We are sending our children out with peers who have a driver's license and whose frontal lobe is not fully cooked. Teenagers are impulsive, do not have great judgment, and believe that they are invincible.
Finally, passing the driver's license test is a rite of passage and a huge developmental milestone for teenagers. They are legitimized and recognized by the government with formal identification.
As therapists, we see kids traveling through many of these milestones, and hopefully, we can facilitate some of that happening.
Implications of Disrupted Community Mobility
- Interruption in meaningful occupational engagement:
- IADL
- Leisure and play
- Social participation
- Education
- Negative effects on health and development
- Access school
- Play
- Social participation
- Fatalities
- Injuries
When community mobility is disrupted, meaningful engagement and occupation are impacted. It becomes more difficult for them to engage in IADLs, leisure, play, social pursuits, and maybe education. There are also some negative health and developmental effects. We also see many fatalities and injuries with community mobility. We want to try to prevent as much of that as we can.
Why Should We Pay Attention?
- All clients need to be mobile in the community for travel to:
- School
- Friends
- Healthcare
- Throughout neighborhood
As OTs, why should we care or pay attention to community mobility for kids? Our clients need to be able to travel out and about in the community so that they can get to school, engage with friends, access healthcare, and learn about their environment. We can even think about how our clients get to us for treatment.
Modes of Community Mobility Across the Lifespan
- Child passengers
- Pedestrians
- Bicyclists
- Drivers
- Bus users
- Airplane passengers
We cannot forget that there is a whole range of community mobility. First, we look at child passenger safety and how they are riding in cars. We also then look at pedestrian travel and how they can successfully and safely travel throughout the environment by foot. We move to bicycling and other wheeled transport and how to keep them safe. Finally, they move to navigate on roadways in motor vehicles. We also look at school and public transportation. A massive number of kids ride buses as part of the school day. Kids also travel on planes.
Child Passengers
Why is OT Concerned with CPS?
- Our clients include:
- Children
- Are clients coming/going safely?
- Clients who have children
- Can our disabled parents secure their kids?
- Clients who transport children
- Grandparents who parent
- People who drive professionally
- Companies that serve children
- Schools, daycare centers, transit companies, state agencies
- Children
We are concerned with CPS, which is child passenger safety, because our clients are children, and we want to know that they are coming and going safely. With the complexities of child passenger safety, a parent with a disability may have trouble securing their children. We also have clients who transport children that are not familiar with new technology, including grandparents or people who drive professionally.
CPS Impacts on Occupation
- How does sitting in a child safety seat impact the child?
- Positioning
- Behavior
- Social interaction
- Injury fatality prevention- crashes leading cause of death in children 4 and under (Durbin et al., 2018)
- How does the child safety seat impact the adult?
- Logistics
- Driving
Child passenger safety does have some influence on occupation because it affects positioning, supports behavior, and increases social engagement, as it raises the child up in the vehicle. It also does a tremendous amount for injury and fatality prevention.
Automobile crashes are the leading cause of death in children ages four and under, and we want to protect them in the event of a crash. Child passenger safety affects an adult because there are a lot of logistics, including choosing the right seat, getting the seat installed in the vehicle, and getting the child seated and strapped in properly. If the child is strapped in properly, now the adult can focus on driving.
What Should We Know
- Different types of seats
- Infant Seats
- Forward-facing car seats
- Booster seats
- Seat belts
- Child passenger safety laws
- Securing disabled children
- Disabled parents securing children
- School bus safety
As OTs, we should know the different types of seats that are out there, and we are going to go through all of these in terms of the four stages of seating. We should know the child passenger safety laws in the state where we work and provide services. We should also know the complexities of installing a seat and securing a disabled child. Finally, we also need to be aware of school bus safety.
Different Types of Seats
- Seating needs change based on development
- Guidelines are by age and weight
- Crash dynamics are taken into consideration
- Best fit between car/seat/child is necessary
There are different types of seats. The great part is that much of this information is available for free through the U.S. Department of Transportation, specifically the National Highway Traffic Safety Administration, NHTSA.
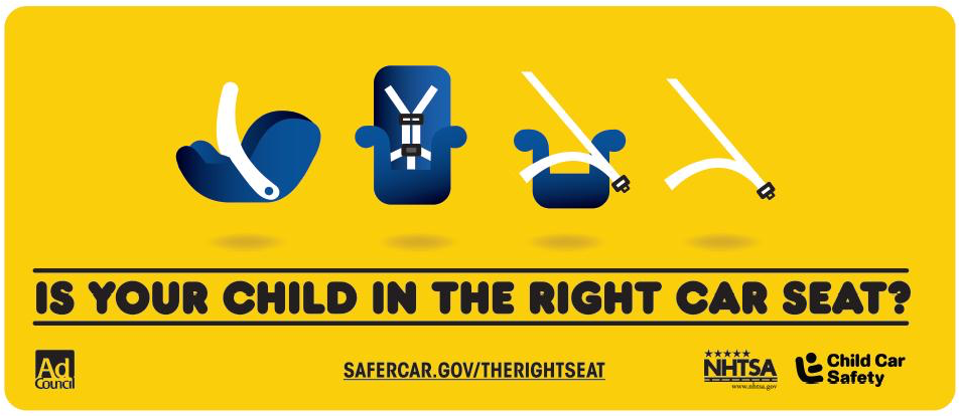
Figure 1. Infographic for picking the right car seat by NHTSA (https://www.nhtsa.gov/campaign/right-seat)
These resources are free for the public to use.
Cars Seat Recommendations
The stages are based on where that child is developmentally, Figure 2.
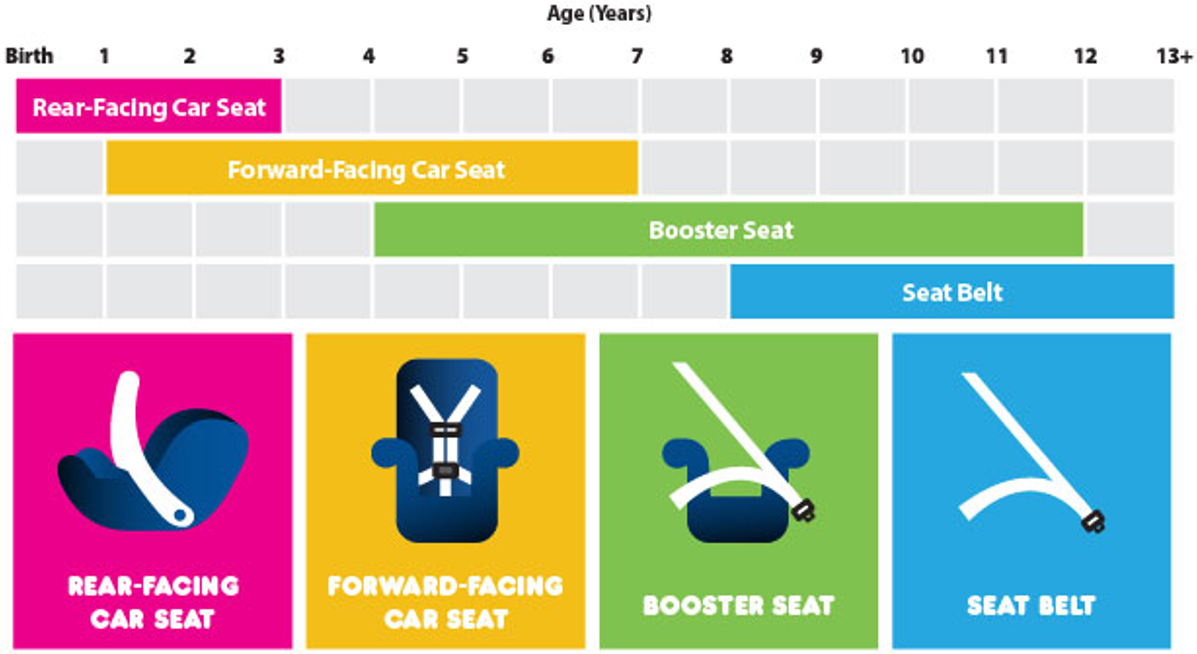
Figure 2. Stages of car seats (Resources for safety week).
There are guidelines by age and weight for most seats, taking crash dynamics into consideration. Looking at physics, force equals mass times acceleration. The amount of force that hits us when there is a crash is calculated by mass (the weight of the body times acceleration). Acceleration is typically calculated by a change in acceleration. For example, if I am going 60 and I hit a brick wall, that change in velocity is calculated as G-force. The amount of G-force going from 60 to zero times the child's weight is the amount of force that is put on the body. For child passenger safety, we want to find ways to spread out those energy forces so it does not affect the body in terms of fractures, spinal cord injuries, and what have you. We are paying a lot of attention to those forces as well as where in the vehicle the child is seated and the best fit.
In OT, we talk a lot about the person-environment fit, and with child passenger safety, we need to find the best fit between the car, the seat, and the child. We need to fit these pieces together as best we can.
There are certifications in child passenger safety that anybody can get, and the information is included in the resources at the end. It is a four-day training, and there is additional training for child passenger safety for children with special needs.
Figure 2 shows the latest recommendations, and they do change from time to time. The first type of seating is a rear-facing seat. This is used from birth up until as late as three years old. The recommendation now is to keep that child rear-facing for as long as possible, as long as they can fit in a rear-facing seat and will tolerate it. You will notice that there is some overlap. After rear-facing, you move on to a forward-facing seat, and this is for many years up to as late as seven. Next is a booster seat and then a regular seatbelt.
4 Steps of Child Passenger Safety
- Step 1 - Rear-facing infant seat
- Until age 3, in the rear seat
- Fastened to the butt of the seat
- Never near an airbag
- Harness guidelines
- Clip guidelines
Step one is a rear-facing infant seat, shown in Figure 3.
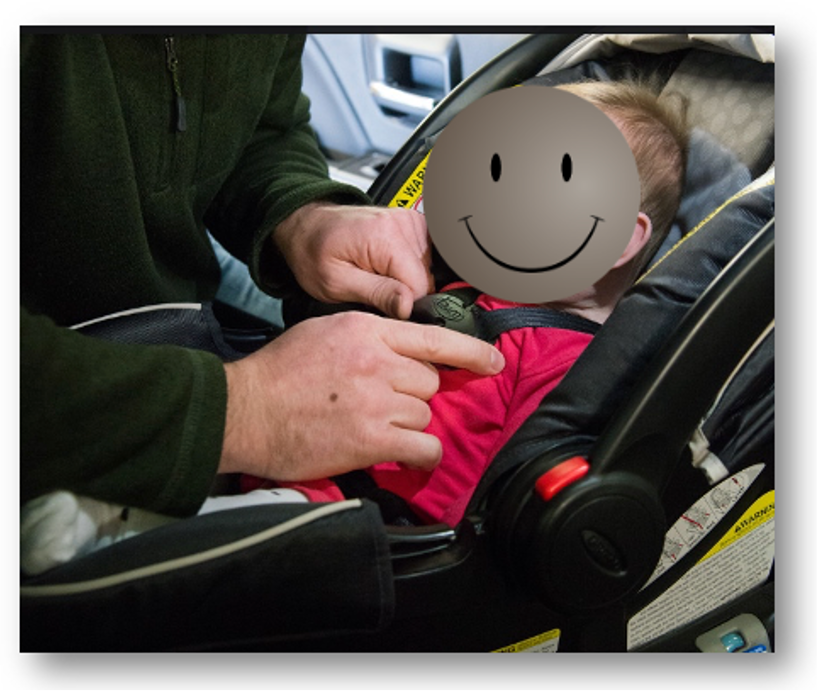
Figure 3. Rear-facing infant seat.
We want this child to be rear-facing as long as possible because that is the best way to protect their body, which is not anywhere near as developed as an adult's for their skeletal system, muscle control, and the ability for their small body to sustain the energy forces of a crash.
We also never want them near an airbag. They are fastened at the butt of the seat, and there are specific guidelines for the harness and the clips. I am going to demo some of this in the video.
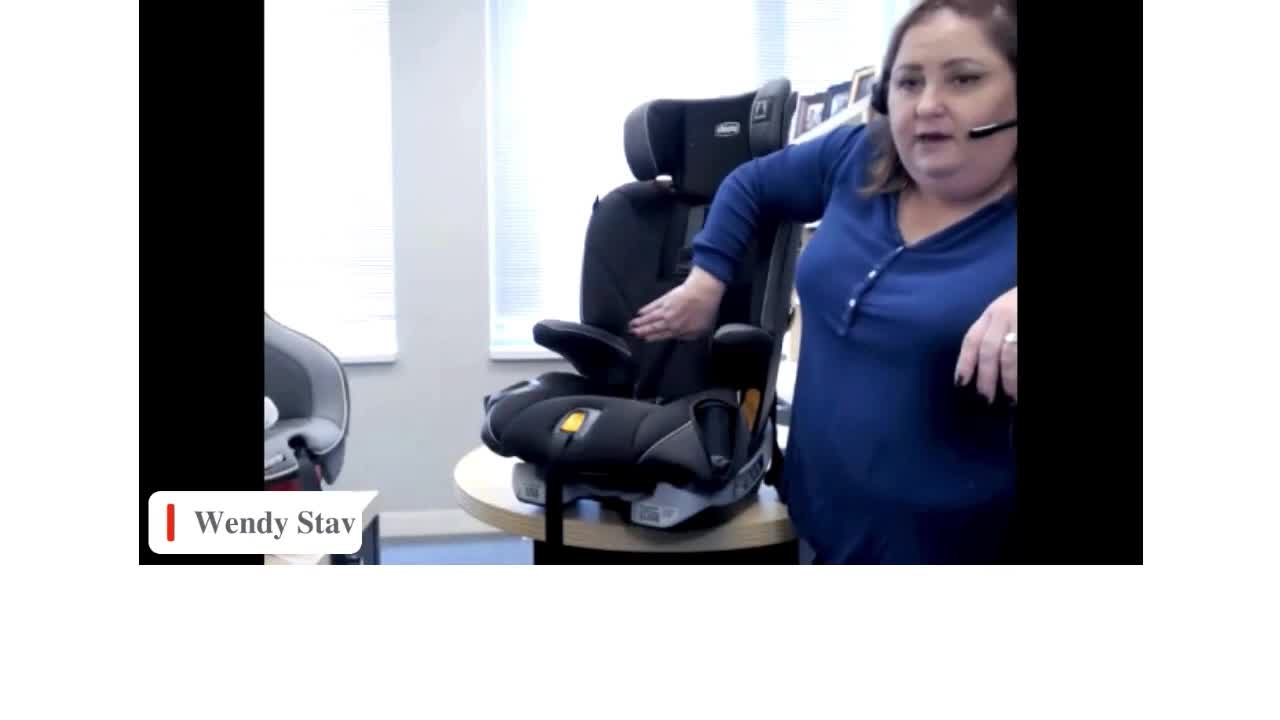
Video 1
So I'm going to stop sharing my screen for a moment because I want to show you what this looks like.
Okay, so here we have... Here we have a rear-facing seat. This is the back of the seat, so the child is facing the back of the seat, and it's hooked in a way to the butt of the seat. So if this child should crash, it can actually fly forward. Technically, flying backwards. So here's the back of the seat, so the child would then be sort of cocooned in the shell of this seat. There are guidelines about rear-facing seats. They're intentionally very, very reclined at 40 degrees. Every seat will have some sort of a level on it. So in this level, there's a little ball that you want it to sit right in the middle, right in that ideal range.
That's intentionally seating at 45 degrees 'cause this little guy does not have head control yet. So we want his head to be resting backwards because if he were seated upright like this without good head control, this head could tip right forward, closing off his airway. So we want these harnesses to be nice and tight, super, super, super tight. We're not supposed to be able to fit more than two fingers under this harness. It's supposed to be very tight so that this child is one with the seat, and the seat is installed so tightly into the car that the seat is one with the vehicle. So this child can't move at all. And then this clip, this clip right here is supposed to be at the level of the axillas.
So all these positioning guidelines are done so that this child, there's no way this child can come and fall out. If these straps are too loose... Let's see if I can loosen these up a bit. So if I have straps that are very, very loose, now this child has all sorts of movement with this underdeveloped shoulder girdle. This kid's shoulder girdle could fall, in an impact, can come right out through the seat, and he can get super, super injured. So we want these to be nice and tight. So that also has some implications for winter weather. If you live in an area of the country that has seasons, you don't want a big, big puffy snowsuit underneath between the child and the harness because you want this harness to be right up next to them.
So in the winter months, you don't want, if they were to crash, you don't want that snowsuit to be able to compress. You want the harness right up against them. So it's best to dress them in their clothes, put them in the seat, and then you can put a million blankets or jackets on top of them, but you don't want them wearing it between their body and the harness. So a lot of this comes from, I'm going to bring you back to physics again, the idea in physics that an object in motion stays in motion until it's acted upon by another force. So if a car is driving and the car crashes, the car is moving until it hits, we'll call it a brick wall, until it hits the brick wall.
So the child keeps moving until it's acted on by another force. In this case, it's going to be the harness. Well, this child is rear-facing. So the car crashes, this child is rear-facing. And so they're getting a lot of impact on the back of this seat. And the energy forces then are then distributed across the back part of the shell and throughout the child's whole body. And they're not getting any massive direct impact to their body from the harness. So that's a good thing protecting this child. And we want this child to be protected as long as we can until their skeletal structure is much bigger and much firmer, so it can sustain some of those energy forces.
- Step 2 – Forward facing car seat
- Over age 2, once height and weight of seat are exceeded
- Fastened with seat belt or LATCH system
- Never near an airbag
- Harness guidelines
- Clip guidelines
Once our kids get a little bit bigger, they can be turned around and be forward-facing (Figure 4).
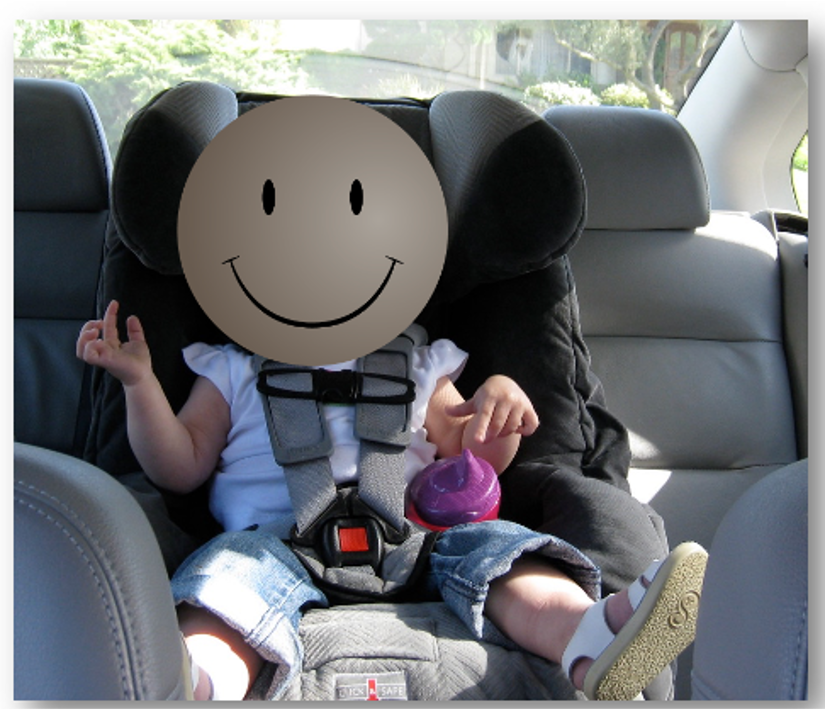
Figure 4. Forward-facing car seat.
The previous slide with the timelines said you can put somebody forward-facing at one, but I would not try this before two. And if you can get them to stay past two, even better. You must pay attention to the height and weight limits of that particular seat. All seats will be fastened either with the seatbelt or with the LATCH system.
The LATCH system stands for Lower Anchor and Tether for Children, which is the locking system used to install the seats instead of a seatbelt. All vehicles now come with connections for the LATCH.
If you stick your hand into the butt of the seat you will feel a metal loop. The metal loop is soldered to the frame of the vehicle. Thus, by attaching the seat to the LATCH system, you are attaching the seat to the frame of the vehicle, which is the safest option. The tether is a strap that is on the backside of the seat. In a minute, I will show you what the clips and the tether strap look like. In an SUV, it will go down the back of the seat, where you will see a little loop where you can attach it. In a sedan, like this car in Figure 4, there will be little loops on what I would call the rear dashboard.
Again, we should never place this near an airbag. This also has the same clip guidelines where we never want to be able to put more than two inches between the harness and the child. The clip is supposed to be positioned right at the axilla.
Video 2

So I am going to stop sharing again. Make the chair out of the way. So all of that clunking, that's part of the LATCH system.
This is the tether system. This strap, you'll see this clip right here. So this comes from the back of the seat. And so if this were in an SUV, it would go over the back of the seat, and there would be some loop to clip this to. And then you tighten it as much as you can. Or in a sedan, it would just get hooked to that rear dashboard loop. So what that does is that prevents the seat. Remember this child is now forward-facing. If this child gets in a crash, this tether is hooked up so tightly that it prevents the seat from going too far forward. And remember that object in motion stays in motion until it's acted upon by another force.
So we want to prevent this, not only the seat from going forward. So just because the seat stops does not mean the child stops. We don't want too much what we call forward head excursion with this head bending too far forward. So unfortunately, this doll is about the same age as the other doll, so this child would be taller to be sitting in the seat. But we have a nice tight harness system, we have the clips right here at the axillas. This seat gives us a nice adjustable height for the head restraint so that a child does not get any rear neck injury from being rear-ended 'cause we always want the head protected as well. The other LATCH systems, the lower anchors, you'll see this is like a, it looks almost like a stapler, but there's one of these on each side.
And this, you're going to put into that butt of the seat to get that loop that's attached to the frame of the vehicle. And then you tighten the heck out of these. When you install a seat, you put the seat in. This is for any size seat. You put the seat in and your body weight should go into the seat. You literally should crawl into the seat, put your knee in it, you're trying to compress as much of that stuffing down in the vehicle seat as you can. And while everything is compressed, that's when you tighten all the straps because at the end of the day, this seat shouldn't be able to move more than one inch.
Really, if it's tight it won't move at all. But if you cannot get it to fit right because there's too much dump, here's the bottom. There's too much dump in the seat, so you can put pool noodles and other firm sort of fillers in there to get that, tight.
So this is a forward-facing seat. Again, you're going to want to pay attention to the height and the weight. You can see we, again... This is the exact same seat as the one that I just showed you. There's again, there's this level, but the ball is now way down here rather than at that optimal point. So if you want to be rear-facing, you want this to be 95 degrees reclined, so the ball's right in the middle.
But this child has enough head control and weighs enough and is tall enough to be able to sit forward-facing. So they're going to be in this position forward-facing for a long time, for several years. Maybe even as late as seven years old.
- Step 3 – Boosters
- Transition when height and weight of forward-facing seat are exceeded
- Use with vehicle lap and shoulder belts
- Use until the child is
- 80 – 100 lbs.
- Is 4’ 9”
- Pass the Safety Belt Fit Test
- Typically 8 – 12 years
- Allows safety belt designed for an adult to fit a child
Let's go on to step three, which is booster seats, as seen in Figure 5.
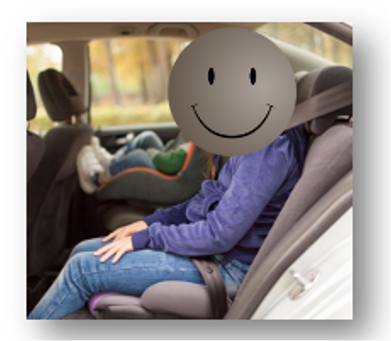
Figure 5. Booster seat.
Boosters are important because once a child grows out of one of the seats that I just showed you, their body is still not big enough for a regular seat and seatbelt. They are not tall enough, and their pelvis is not large enough to properly use a seatbelt. Boosters are the transition between a car seat and a regular vehicle seat, and it is used with the vehicle lap and shoulder belts. Booster seats are used until the child is between 80 and 100 pounds and at least 4'9".
We will talk more about this when we get to the seatbelt in a minute because they have to pass the seatbelt fit test. Typically, they are in that booster seat until they are eight to 12 years old. It allows the seatbelt to be used properly to fit as it would fit on an adult.
Figure 5 shows a bottom-only booster. There is not an appreciable difference in safety between this and a high back booster.
Video 3
Okay, this seat is also a convertible. It can be used as a forward-facing seat. You can see there's a five-point harness. By the way, all the seats I've shown you so far have a five-point harness because there's one strap here on the top of one shoulder, another anchor here at the top of the other shoulder, one down here at one hip, one down here at the other hip, and then the strap that goes between the legs.
So that's a five-point harness. So this seat can be used as a forward-facing seat, but when the child is big enough, all of this harness system can be removed, and then it can operate just as a booster and nothing else. The cool part about boosters is what we have here. Let me turn this sideways. These look like they're armrests. I mean, they're there for comfort 'cause they're nice and padded. But in addition to being an armrest, when the seat and you can even see this orange, this says booster mold lap belt here. So it shows you that the lap belt goes right through here, and it's supposed to go under these armrests. These armrests become the pelvis for the child whose pelvis is not large enough.
So these armrests will hold that lap belt in place and will hold the lap belt low enough in place because we want that lap belt to go low across their pelvis, not up here across their abdomen. If it goes across their abdomen, then when there's a crash, we get a lot of what's called seatbelt syndrome, where we get all that pressure from the seatbelt going to the abdomen, we get liver lacerations, and we get a lot of intestinal injuries. So we want a much larger pelvis to hang on to that lap belt. And these, what the armrest does, these are essentially the ASIS of your pelvis. So that's great. The other thing that a booster does is look how much height there is here.
So this is where the vehicle seat is. The child is raised up so much that it's going to put their shoulder or their trunk in the right position for the shoulder belt. This is called... Let's see if I can get the right angle. You see this little hole right here where I'm going to stick my fingers through where you can see the light? This is called a belt positioning booster. You don't have to have it, but you can see it says shoulder belt here. So you weave the shoulder belt right through here and that makes sure that the shoulder belt is going to cross the child mid-clavicle, not at their neck and not cause injuries. And it will also prevent them from putting the belt underneath their arm, which they will frequently do because it's cutting across their neck.
If a seatbelt is cutting across a child's neck, it's because they're not tall enough to properly fit in the seatbelt, and they need a booster. So boosters are stage three and children remain in that until they are, typically, eight to 12 years old.
- Step 4 - Transition to a vehicle seat with a seat belt
- Must be:
- 4’9” and 80-100 pounds
- Pass the fit test
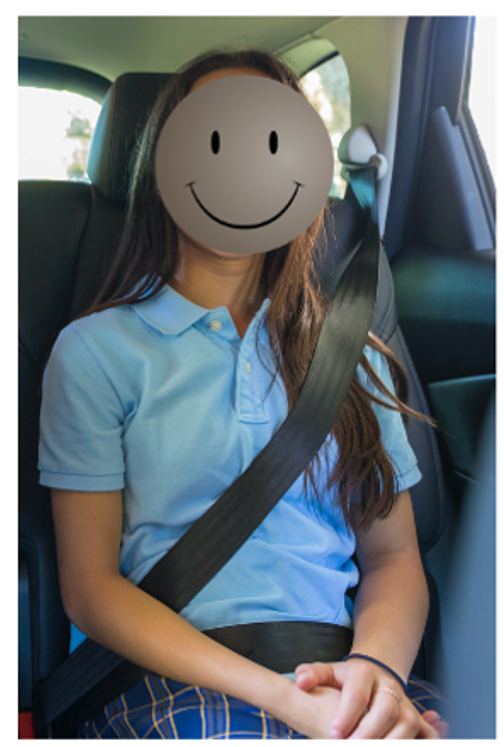
Figure 6. Regular seat belt.
Our fourth stage is using seat belts. To move on to this stage, you need to be 4'9", 80 to 100 pounds, and pass the fit test. The fit test means you are sitting in the seat with the lap belt going low across your lap, being caught by the ASIS of the pelvis and the shoulder belt crossing mid-clavicle, not the neck. The other test is that the child's knees should be able to flex over the front of the seat. If a child is so short that when they sit back, their legs go straight out, they are not quite ready for a seatbelt. Stage four of child passenger safety takes them all the way up to the end of their life. Requirements for older children sitting in the front seat include being 13 or older and wearing a seatbelt like any other passenger.
How many seats can be installed in the back seat in a row for it to be considered safe? If the seats, including the plastic bases, are narrow enough, you can fit three seats, but it is going to be extremely difficult to get them in. It may feel like a game of "Tetris," but technically, you could put three seats in there.
The safest seat is going to be what we consider the inboard seat or the middle due to lateral crashes. This does not mean it is unsafe, but it is safer than the outboard position.
Child Passenger Safety Laws
- Know the laws in your state
- https://www.iihs.org/iihs/topics/laws/safetybeltuse
- For all age levels
- Level of enforcement
- Penalties for violation
- Effective date
In terms of child passenger safety, you should know the laws in your state for age level and level of enforcement. The Insurance Institute for Highway Safety (IIHS) does a lot of crash testing. There is a tremendous amount of information on their site, and insurance companies are the ones that fund it. This is because they want to make sure that vehicles are safe to decrease the amount they have to pay for crashes. This means is it primary enforcement, like getting pulled over for not having a child buckled or properly seated, or secondary enforcement, where if you pull me over for something else, my kid is not properly secured. You want to know what the penalties are for violations, and I use that information with many parents. For example, Johnny may hard to keep buckled due to his excessive movement, but it is a $500 fine the first time and $1,000 for the second. I use this information about violations as motivation to get parents to follow those rules.
Particularly around election years, laws often will get passed but then do not go into effect until after the first of the year. You want to pay attention to effective dates.
Child Passenger Safety Resources
- www.safekids.org
- https://www.nhtsa.gov/equipment/car-seats-and-booster-seats
- https://www.nhtsa.gov/car-seats-and-booster-seats/car-seat-ease-use-ratings
- https://www.preventinjury.org/Special-Needs-Transportation
These are some great resources. Safekids.org is where you can find a plethora of information about training in child passenger safety, and it has a tremendous amount of information about the prevention of pool drownings, gun safety, and so on. At one point, the site was run by NHTSA, but it has been passed over to Safe Kids.
On the NHTSA website, you can find information about car seats and booster seats, including ease of use ratings, as not all are easy to use or install. The federal government has a rating chart for this.
Preventinjury.org has a section on special needs transportation that covers the different considerations.
There are some neat programs like loaner programs. If a child has a hip fracture that is casted for eight weeks with no hip flexion, they cannot fit in any of the seats that I just showed you. They are going to need to be in a special seat that allows them to sit up even higher while maintaining a cutout for one of their legs so it can remain in extension. These types of seats are six to $800 and would only be needed for a few months. To combat this, there are some pediatric hospitals that have a lending library so that you can borrow that seat and then it can be returned.
Pedestrians
Why Are OTs Concerned with Pedestrian Travel?
- Clients live within communities
- Walking is healthy
- Shown to sustain bone density
- Can battle childhood obesity
- Improves overall health
- Even drivers have to walk to/from their car
Our kids also walk a lot. Walking is healthy and helps a child to develop and sustain bone density, combats childhood obesity, and improves overall health. Even when traveling in cars, people need to walk to and from the car and travel safely in a parking lot. Think about all the kids that are impulsive or not aware of their surroundings. They may not have a good ability to read the body language of drivers to navigate safely in the community.
Tackling Pedestrian Issues
- Education
- Program development
- Infrastructure
- Community-based
- Policy implications
Tackling pedestrian issues involves educational programs and a tremendous amount of infrastructure. Infrastructure means roadways, bridges, and those things. However, infrastructure is also important for pedestrian travel. Figure 7 shows a marked crosswalk with curb cutouts and extra texture for people who are visually impaired.
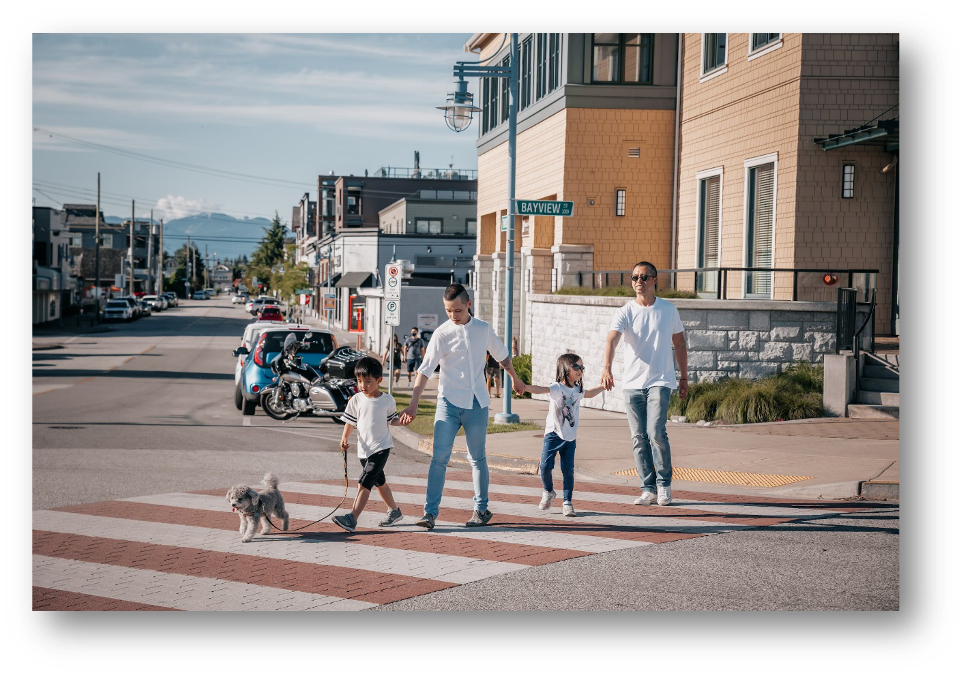
Figure 7. A marked curb cutout.
You can see there is very distinctive texturing, coloring, and patterning on this pedestrian crosswalk so that drivers can be more aware. These characteristics are all part of the infrastructure, and we can have a role in shaping what that infrastructure looks like so that our communities can be more walkable.
Pedestrian issues require a community-based approach, and there are many policy implications. If you have put on an advocacy hat, this is a great place to do it. For example, every time a new neighborhood is built, there are pedestrian safety measures put in place.
Pedestrian Issues Impact on Occupation
- Helpful to consider occupational performance models
- Person who is engaged
- Complexities and demands of walking
- Contexts and environment where walking occurs
Pedestrian issues can impact somebody's occupation. Think about our occupational performance models, whether it is the Person-Environment-Occupation (PEO) model, Ecology of Human Performance framework (EHP), or Model of Human Occupations (MOHO). All of our models consider the person who is engaged. We have the pedestrians, the occupation, and the complexities and the demands of walking. In addition to the motor piece, there are visual and cognitive pieces and context and environment where walking occurs.
If we think about pedestrian issues through the lens of one of our occupational therapy models, it becomes obvious that we have a role in optimizing walking safety. Not only do we have to work on the person and address the skills and the demands of walking, but we also have to create a context and an environment that is much more supportive of walking and safety.
Walkability Checklist
The walkability checklist is a collaborative effort between the following agencies, as seen in Figure 8. To create a supportive environment, we can use tools such as this. This partnership is a collaborative effort by the US Department of Transportation, which is where NHTSA is housed, the Pedestrian & Bicycle Information Center, the Partnership for a Walkable America, and the Environmental Protection Agency.

Figure 8. Walkability Checklist logo. https://www.nhtsa.gov/sites/nhtsa.gov/files/walkingchecklist.pdf
When you click on this link, there is a series of questions.
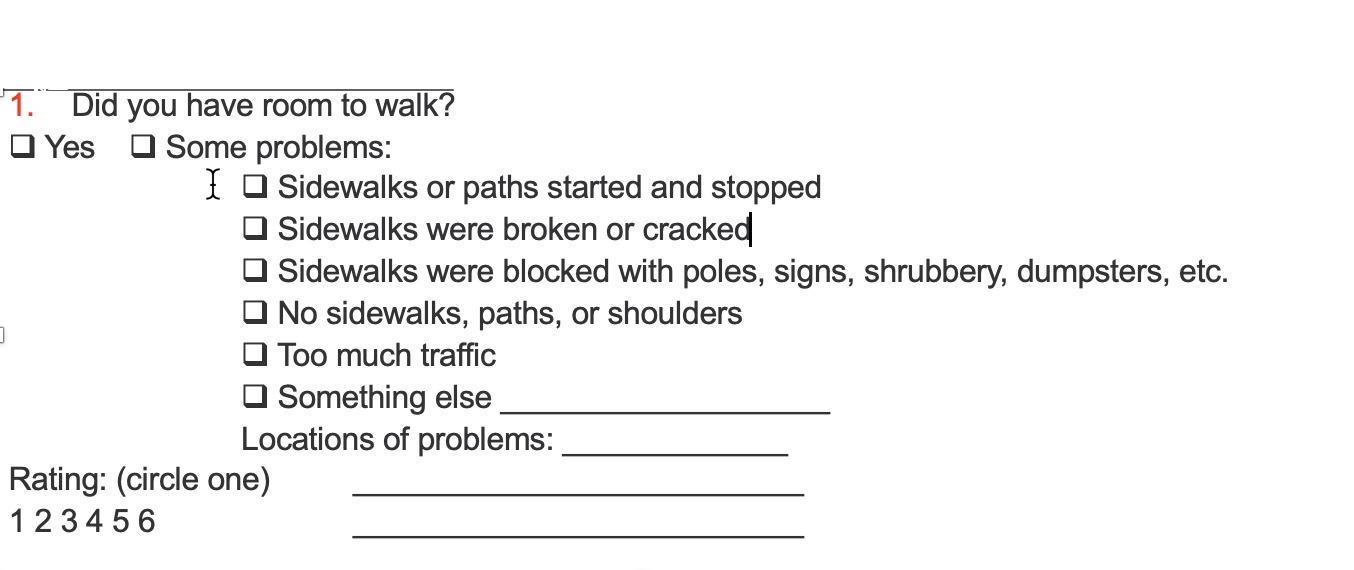
Figure 9. Question 1 of the Walkability Checklist.
Do you have room to walk? You either yes, have room to walk, or identify what the problems are. For example, are the sidewalks broken or cracked, are there no sidewalks, paths, or shoulders, or is there too much traffic? You then need to rate how much room there is to walk.
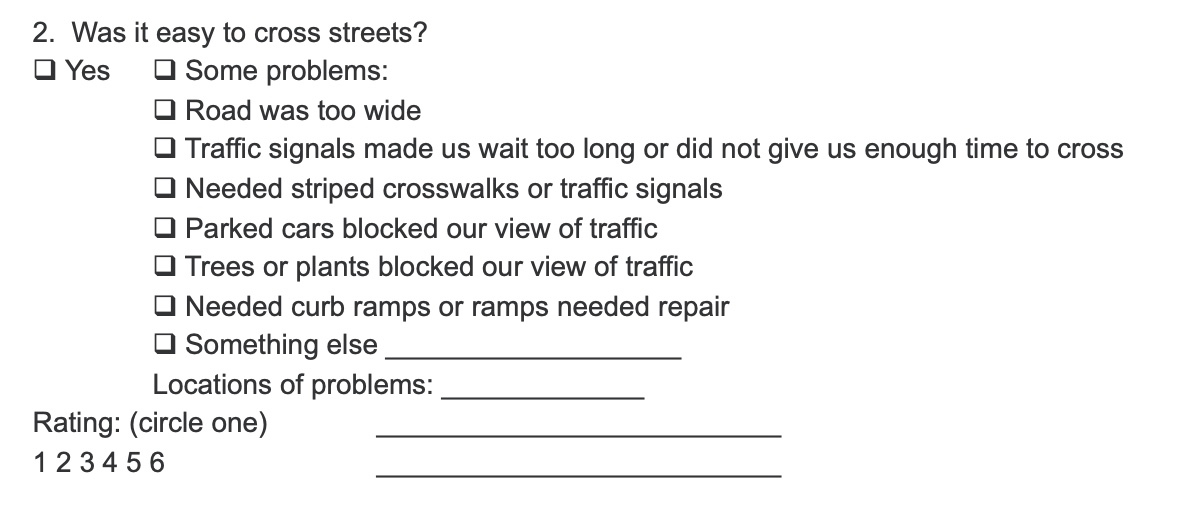
Figure 10. Question 2 of the Walkability Checklist.
Was it easy to cross the streets? If not, what were the issues? Were there parked cars or trees and plants that blocked the view of traffic? Are curb cuts or ramps needed? Again, you are going to rate how easy it was to cross the street. These questions are measuring the environment and the context, not the person.
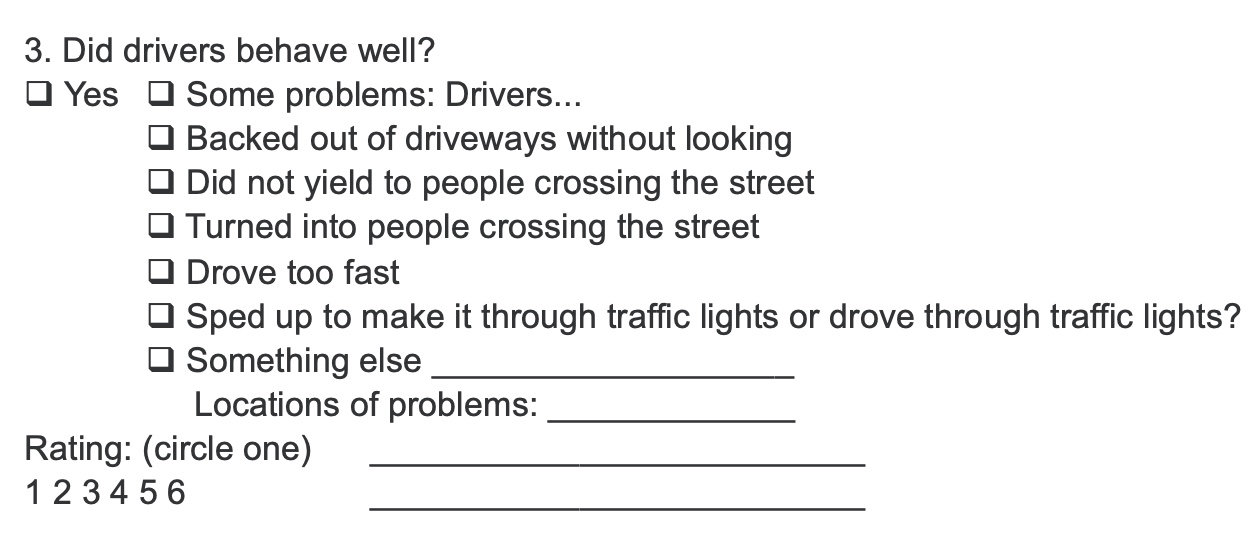
Figure 11. Question 3 of the Walkability Checklist.
How do the drivers behave? This question is looking at the culture of an environment. In a rural connected community, drivers might yield and be courteous to passengers, whereas in an urban area with lots of traffic, people are trying to get down the street. You need to pay attention to how the drivers are behaving.
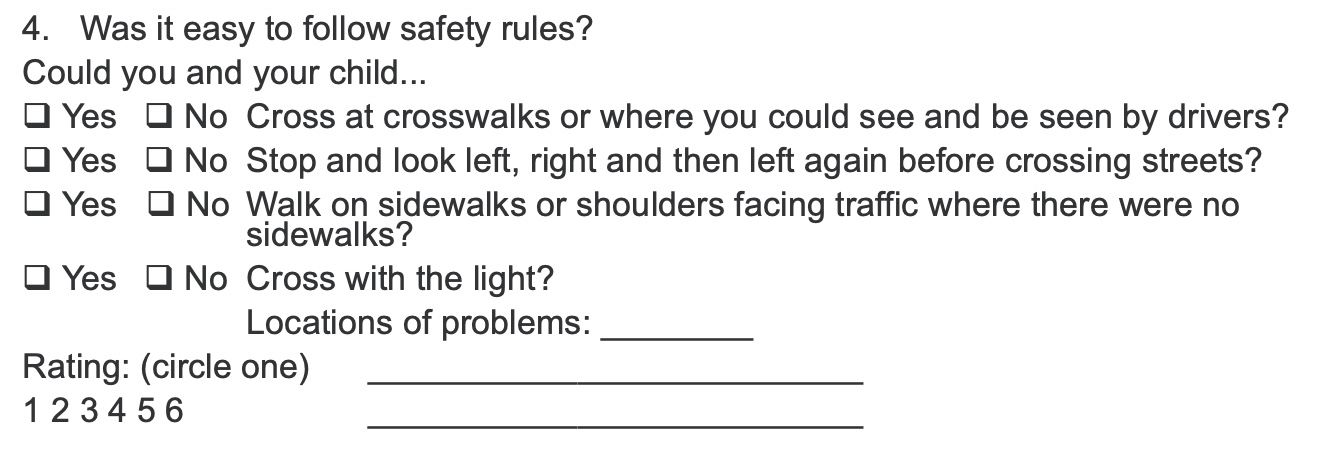
Figure 12. Question 4 of the Walkability Checklist.
Question 4 asks if it is easy to follow the safety rules. You are looking at crosswalks and if people are walking on the sidewalks. Are pedestrians crossing at a light or are they jaywalking?

Figure 13. Question 5 of the Walkability Checklist.
Was the walk pleasant? What are the factors in the neighborhood?
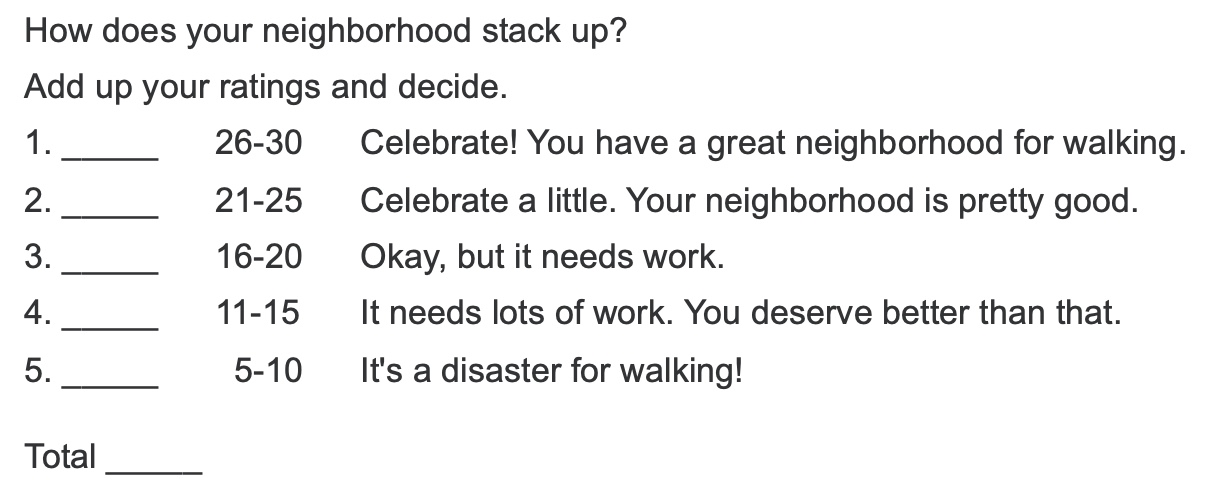
Figure 14. Question 6 of the Walkability Checklist.
How does the neighborhood stack up?
Next, you are going to add up these numbers to assess the neighborhood for walking safety. It is a simple, publicly available checklist.
Walking Programs
- Community-based programs
- To/from school
- Stay-at-home mothers
- Teens
- Venues
- Malls
- Neighborhoods
- School tracks
- Benefits
- Exercise
- Social participation
- Community connectedness
You might also want to investigate walking programs, either participating in one or setting one up. These tend to be community-based programs with travel to and from school. There are also great programs for stay-at-home moms and teens.
There are multiple venues where you can have walking programs, particularly in areas where there is a lot of traffic or inclement weather. For example, malls may have walking programs. There are also programs held on the school tracks.
What benefit are you looking for with a walking program? Are you trying to create a venue where people can go get exercise, or are you trying to promote social participation or community connectedness? Those are all important things to think about at the outset to see if you have accomplished your goal.
One of my favorite walking programs is Safe Routes to School.
- Safe Routes to School
- Coordinated efforts between
- Educators
- Parents
- Public officials
- Law enforcement
- Children
- Engineering
- Manages drop-off/pick-up
- Walking School Buses and Bike Trains
- Built-in program evaluation
- Coordinated efforts between
This is also a federal initiative put out by NHTSA with resources, signs, talking points, coloring worksheets, tips for advocacy, and so on. Safe Routes to School is a coordinated effort throughout the community, and you build a team. They also have funding, and you can apply for $10,000 to improve the safety around your school. You put together your team of educators, parents, like the PTA, the school officials, public officials, like town commissioners, the superintendent, and the municipal planning organization that plans out roadways and sidewalks, law enforcement, crossing guards, engineering, et cetera. You also want to involve the children.
There are multiple aspects to Safe Routes to School. You can look at drop off and pick up at school to ensure there is coordination between the bus route, the drop off line, and where kids walk, especially if everybody's converging on the same space. There may be pedestrians traveling where the school buses go or moms with their lattes on their cell phones and not paying attention. There is too much happening in one place, causing an unsafe environment. You can design routes around the school and make policies for designated entrances, depending on how you are getting to school.
There are walking school buses and bike trains. These are for folks who are a little bit further in the neighborhood. For kids who walk to school, you start with the child who lives the furthest away, and you have a "bus driver," which is an adult, who starts off with that kid. As they walk to school and pass other houses and neighborhoods, they pick up more and more kids until everybody is walking together to get to school. This can address social participation, obesity prevention, and safety. Bike trains work the same way, except everyone is riding a bike. With both of these options, there is strength in numbers, and kids are going to be safer. There is also going to be less bullying because of adult supervision. It is a win-win-win.
There are built-in program evaluations for Safe Routes to School programming. If you work in the school system, and there are issues around getting to and home from school for kids who are not on the bus, I would take a look at some of the resources. Some things are free, while other things you may need grant money like painting crosswalks, hiring crossing guards, or purchasing signage.
Supporting Pedestrian Activity
- Audiences
- Walkers (children and adults)
- Drivers
- Bicyclists
- Roadway engineers
- Walkable Communities www.walkable.org
- Walkability Checklist https://www.nhtsa.gov/sites/nhtsa.gov/files/walkingchecklist.pdf
- Educational program https://www.pedbikeinfo.org/pedsaferjourney/
- SafeKids' Walk This Way https://www.safekids.org/blog/walk-way
- NHTSA Pedestrian info https://www.nhtsa.gov/Pedestrians
You must think about your audiences, as there are different messages for each. There are walkers, drivers, bicyclists, and roadway engineers. You also want to be able to connect with the municipal planning organization in your town because they are the ones who plan out these routes.
The above list of links will take you to a range of pedestrian resources looking at walkable communities. Again, there is the link to the Walkability Checklist. There are also educational programs that include coloring books, language for news announcements, organizing tips, and how to get buy-in.
There are programs such as Walk This Way, National Walk & Roll to School Day, and Walk Our Children to School Day. You can have the principal and teachers walk to school and take pictures to post on social media. This can get people excited about walking to school and doing so safely. The NHTSA also has some pedestrian resources.
Bicycling
If a child is fortunate enough to have a bike and be able to ride a bike safely, we must pay attention to this type of community mobility.
Areas of Bicycling Concern
- Bicycle helmets
- Rules of the road
- Bicycle programs
Kids should wear bike helmets, do so properly, and understand the rules of the road. Kids are impulsive and have difficulty following rules. These kids need to be on track before they ride alone
Importance of Bike Helmets
- Properly fitted
- Reduces risk of head injury by as much as 85%
- Reduces risk of brain injury by as much as 88%
- More children aged 5-14 go to ER for bike injuries than for any other sport
- Should be worn for EVERY bike ride
Helmets not only need to be worn, but they need to fit and be worn properly. Bike helmets will reduce the risk of head injury by as much as 85% and brain injury by as much as 88%. They distinguish head injury from brain injury because they are also looking at facial/head lacerations, as opposed to an injury to the brain. Between the ages of five and 14, more children go to the ER for bike injuries than any other sport. We pay a lot of attention to athletic injuries, and now bicycling is one of those.
A helmet should be worn for every single bike ride. I am also going to add to this list that helmets are crucial for scooters, rollerblades, and roller skates. Anytime you are on wheels and your feet are not on the ground, a helmet should be worn.
Choosing a Bike Helmet
- Fits now rather than one that will fit when you grow
- Is comfortable – more likely to wear it
- Desirable design/color – more likely to use
- Increased cost does not mean increased safety
In terms of choosing a bike helmet, it is not something you want to "grow into." You want a bike helmet that fits right now. If it fits well and is comfortable, the child is more likely to wear it.
Helmets come in a million designs and colors with their favorite movie characters on them, even with unicorn horns coming off the top. It does not matter what the design looks like, but if they like it, they are more likely to use it. You should allow the child to be creative.
An increased helmet cost does not necessarily mean increased safety. Like with seat belts and car seats, we are finding ways to absorb the energy forces of an impact when a child's head hits the road. We need materials that will absorb the energy forces of that impact rather than the skin, skull, or brain. Helmets are primarily made out of a styrofoam material that can absorb the impact, and there is typically a shell on top of that.
If a bike helmet gets cracked or broken, it should be thrown in the garbage. You now need a new one because the integrity of the helmet and the ability to absorb those energy forces are not as good. The rule for properly fitting a bike helmet is 2-4-1.
- 2-4-1
- Two fingers above your eyebrows to the bottom of your helmet
- Four fingers to make a V-shape around the bottom of your ears
- One finger under the strap beneath your chin
When you are wearing a bike helmet, you should be able to put two fingers above your eyebrows and between your eyebrows and the helmet. You should not be able to fit any more than two fingers. If you can fit four fingers between your eyebrows and the helmet, you are not properly protecting your brain. If it is less than two fingers, you could potentially be interfering with vision. If you make two Vs with your fingers and you put those Vs on the side of your head under your ear, that is the shape that the strap should make. Those four straps should be making a V, just like your fingers under your ears. Finally, the one is that you should not be able to fit more than one finger under the strap under the chin. The chin strap should not be too loose because then the helmet can fall forward or back in case you were to crash. There is a video at this link to show you how to properly fit a bike helmet.
Bike Helmet Laws
Something else to be aware of is bike helmet laws in your state. And if you live or work near a state border, you want to know what the laws are in your other state. This table in Figure 15 came from this website.
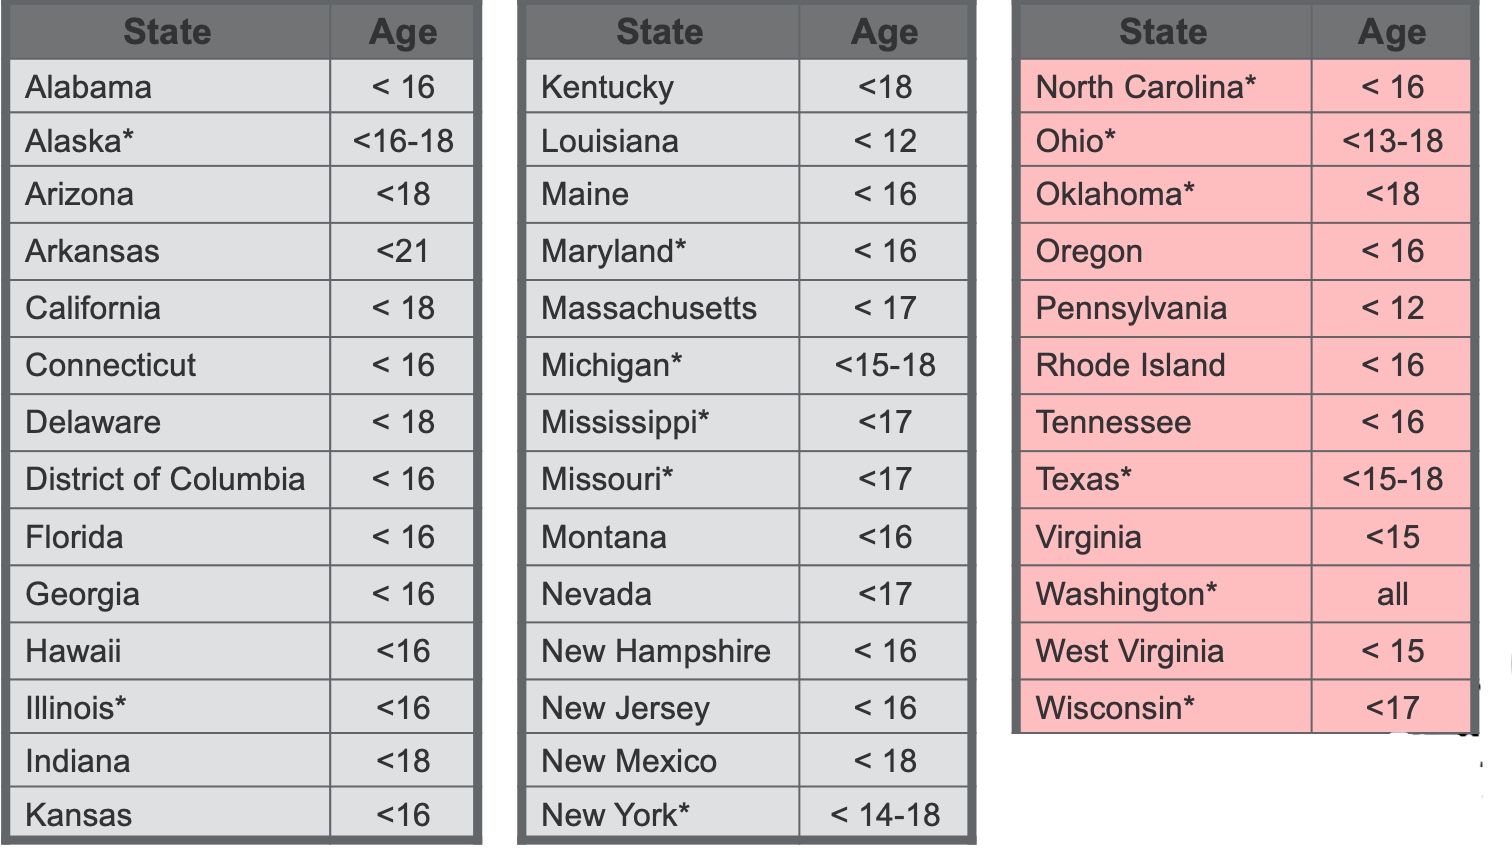
Figure 15. Table of the bike helmet laws per state.
I made this table based on what is on the website, and it gets updated periodically due to new laws getting passed. A bike helmet law will get passed raising or lowering the age, but typically it will not go into effect until a specific date. You want to know not only what the law is but what the penalty is.
Safe Biking
- Always wear a helmet
- Also, for other wheeled equipment (skates, scooters, etc.)
- Proper rider-bike fit
- Space between rider and top bar
- 1 – 2” on a road bike
- 3 – 4” on a mountain bike
- Level seat front to back
- Seat height allows slight knee flexion when leg is fully extended
- Handlebar height same as seat height
- Follow the rules of the road
- Inflate tires
- See and be seen (bright fluorescents rather than white)
- Control the bike
- Avoid night riding
Here are some things to think about in terms of biking safety. First, you want then always to wear a helmet. Getting back to that person-environment fit, you want to make sure that a child fits on that bike properly and that it is not too big or small. For instance, there should be space between the rider and the crotch and the top bar. This is different for a road bike versus a mountain bike. A mountain bike has a lot more up-and-down jarring, and you want there to be a three to four-inch gap between the rider and that top bar. However, on a road bike, there is only one to two inches. The seat should be level from front to back, and the height of that seat should allow slight knee flexion when the pedals are at the lowest position. When the knee is extended, there should still be a little bit of flexion left in that. You should not have to reach down, like when you rode your older sibling's bike. The handlebar should be the same as the seat height.
For safe biking, everybody should follow the rules of the road, tires should be inflated, and clothing should be bright. The person should have full control of the bike and avoid night riding if possible.
Rules of the Road
- Go with the flow of traffic
- Obey all traffic laws
- A bicycle is a vehicle and the rider is the driver.
- Yield to traffic when appropriate according to traffic rules
- Bikes are lighter and easier to stop than a 2000 lb. vehicle
- Also, yield to pedestrians who have already entered a crosswalk
- Ride predictably in a straight line, signaling moves to others
- Stay alert at all times
- Visual and auditory stimulus, no headphones
- Look before turning
- Watch for parked cars
There are lots of rules of the road that we should follow when riding a bike, including going with the flow of traffic and obeying all traffic laws.
When you are riding a bike, the rider is the driver, and you have to follow the same rules of the road. You should always yield to traffic. Bikes can stop at a much shorter distance and are lighter. Vehicles should be yielding to bikes, but bicyclists should be yielding to pedestrians.
You should also ride in a predictably straight line. If you are zig-zagging all over the place, cars do not know where you are going. You should always stay alert at all times and not use headphones. Look when you are turning and always watch for parked cars because those doors can always open. There is a lot to juggle.
Think about some of the kids that we treat. There is a lot of cognitive juggling. Not to mention, they have to remember to activate their core to keep them upright, move their arms to operate the handlebars, keep their legs moving at the right momentum to regulate their speed, pay attention to the rules of the road, and visually always be aware.
Riding a bike is extremely complex, which is why it is such a big milestone for a lot of the kids we treat and a long-term goal versus a short-term goal.
Where to Ride
- Safest place for bicycle riding is on the street
- Children <10 years old are not mature enough to make the decisions necessary to safely ride in the street.
- Children <10 years old are better off riding on the sidewalk
- For anyone riding on a sidewalk:
- Check the state law to determine if sidewalk riding is permitted
- Watch for vehicles coming out of or turning into driveways
- Enter a street at a corner and not between parked cars
- Alert nearby pedestrians by saying, “Excuse me,” or, “Passing on your left,” or use a bell or horn
Where people can ride is often up to the state laws, but the safest place to ride is on the street. However, for children under 10, this is typically not the best place for them to be riding as they need to make quick decisions. Somebody under 10 is not mature enough to make the decisions that they need to make when moving in the same space as a motor vehicle. Thus, those under ten should ride on the sidewalk.
Before you make any recommendations, check to make sure that you know the rule in your state or municipality. In some cases, it is not. They are not automatically safe on a sidewalk due to driveways, cars coming in and out, and pedestrians.
Bicycle Programs
- Unit 1: Getting Ready to Ride
- Unit 2: Bicycle Handling Basics
- Unit 3: Emergency Bicycle Handling Skills
- Unit 4: Advanced Bicycle Handling Skills
- Unit 5: Rules of the Road for Riding
- Unit 6: Bicycle Maintenance
- Unit 7: Riding for Fitness
There are some cool bike programs out there, like Bikeology, a federal program. You are going to keep seeing this acronym NHTSA, the National Highway Traffic Safety Administration. This is our government dollars creating programs to keep people safe. If you go to this website, you can get the actual curriculum. There are multiple units that start with Getting Ready to Ride, Bicycle Handling Basics, Emergency Handling Skills, Advanced Handling Skills, Rules of the Road, Bicycle Maintenance, and Riding for Fitness.
If you work for a community program, like a boys or girls club or an afterschool program, this is designed for middle and high school safety to be implemented by PE teachers and rec therapists. If you are already out in the community working with a community group, a camp, or whatever it is, here is a ready-to-go program.
They also have some cool riding courses, like the one in Figure 16, that you can set up that are going to challenge kids.
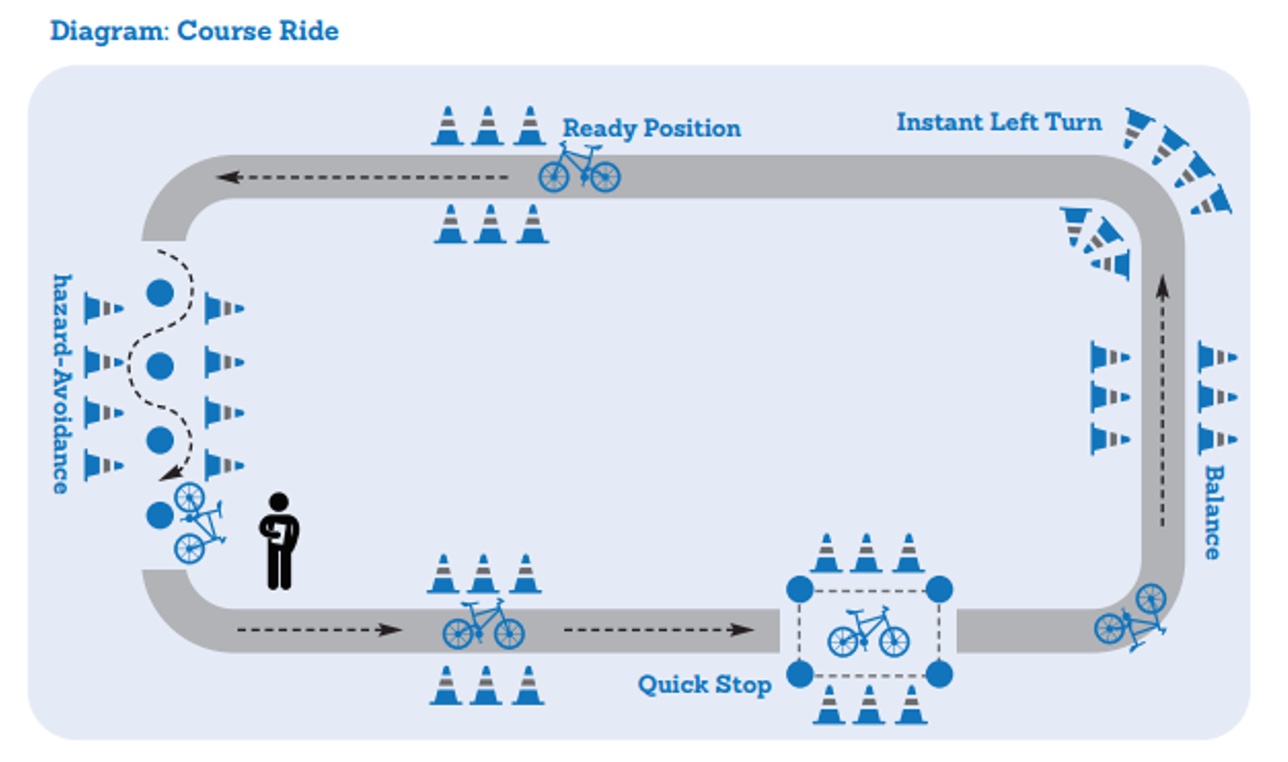
Figure 16. Example of a riding course.
The cool thing is these things are ready to go, as the engineers were already involved in this.
Bicycling Resources
- Bikeability checklist
- National Highway Safety Administration curricula, activities, Spanish language materials
Here are some other bicycling resources. We talked about the Walkability Checklist when we were talking about pedestrians. There is a similar bikeability checklist that you can get on the first link. And several areas of NHTSA have Spanish language materials.
Teen Drivers
Coming of Age
- Teens are still adolescents with immature frontal lobes
- Typically developing teens have pre-driving mobility experiences
This is a very meaningful milestone for our teens, but they are still adolescents, and even for the typically developing teen, their frontal lobe is not fully mature. They are impulsive and think nothing could happen to them. They engage in high-risk behaviors. They typically have some pre-driving mobility experiences, but this has been decreasing due to societal changes. Current teenagers have not lived their entire childhoods looking out the window for landmarks, playing the alphabet game on the road, or learning the roadways around them. They also have not observed driver behavior because they have looked at their iPads or cell phones instead of the roadway their entire childhood.
Then they turn 16 and get behind the wheel. They do not know where to go, cannot navigate, and do not know how to interact with other road users because they have not been observing this behavior for the last 10 to 15 years. This creates a whole new area for development, and we need to start with pre-driving experiences. When my daughter turned 13, she was no longer allowed to look at her phone in the car so she could learn the roadways and see how people drive and behaved.
In addition to typically developing teens, we have a tremendous population of kids with special learning needs, whether a learning disability, ADHD, or autism spectrum disorders. They also want to meet this next big developmental milestone but might not be able to learn in a typical way.
Role of Generalist Vs. Specialist
- Generalist:
- Inquire about driving needs
- Educate about driving implications from diagnosis
- Assess skills used in driving and comm. mobility
- Identify driving needs
- Develop skills related to driving
- Determine if a referral is needed, then refer
- Address deficits identified by specialist
- Specialist:
- Educate generalist about what to look for in clients; red flags, or predictive performance
- Train generalists in screening tools
- Inform generalists about community resources, including driving evaluation
- Evaluate driving
- Determine fitness to drive
- Provide intervention to learn to drive
I want to distinguish the role of the generalist versus the specialist because not everybody specializes in driving rehab.
- Billy
- 15 years old
- Diagnosed with ASD and SPD
Let's look at Billy. He is 15 years old and has a diagnosis of autism spectrum disorder and a sensory processing disorder. Billy wants to drive because he is 15, and he knows that his siblings all got their licenses at age 16. Billy's needs will be addressed differently by the generalist and by the specialist.
The generalist should be inquiring about his driving needs and how much he needs and wants to drive. We should also provide some education about their diagnosis specific to driving. For example, you may say, "You have difficulty with non-verbal communication, and that's a lot of how road users connect with each other to prevent crashes." Generalists should also assess the skills used in driving, whether it is processing speed, visual skills, or problem-solving. They can then help them develop the skills related to driving. Areas we can assess are his paying attention to more than one thing at a time and cognitively juggling things in high-stress situations. These are areas the generalist should be doing to build Billy's skills so he can get ready to drive.
When it comes time for Billy to go and drive, the generalist should be making a referral to the specialist so that he can get the services that he needs. It is possible that when Billy gets evaluated by the specialist they may identify other areas that Billy needs to develop before he is ready to drive and refer Billy back to the generalist. The specialist, on the other hand, addresses Billy and his needs a little bit differently. The specialist should be educating the generalist about the red flags and when to make a referral. The specialist can also train the generalist in screening tools and assessment tools. Each of these parties should be aware of what the other one is doing because you do not want to start replicating assessments. Otherwise, Billy is going to learn the tool but not have the skills.
The specialists can also tell the generalists about all the community resources, travel training, driving rehab, and evaluation programs that are available.
The specialists will comprehensively evaluate driving, including a behind-the-wheel test, and then ultimately determine fitness to drive. If Billy's not quite ready to drive and he still needs more intervention, the specialist might also provide those interventions if they are driving-specific. For example, Billy may need to know how to scan the driving environment better. The specialist might go out on the road with Billy to a neighborhood and say, "As we drive through this neighborhood, I want you to point out every time you see a flag in front of somebody's house," or "Tell me every time you see a red front door." In this way, Billy is now learning how to drive and maneuver on the roadway while also attending to the driving environment. It depends on what the intervention needs are whether the child is seen by the generalist or the specialist.
Evaluation of Driving
- Clinical assessment
- Tests of client skills/deficits
- Battery of assessment tools
- What constructs are being measured
- Vision
- Cognition
- Motor performance
- What does the literature say about a relationship to driving?
- Predictability of crashes
- Indicative of driving performance
During an evaluation of driving, the specialist will also do a battery of clinical assessments in the clinic. They will measure things like vision, cognition, and motor performance and make decisions about what tools to use based on what the condition is.
Another example is that if the child has some form of dwarfism, then the assessment will focus on motor skills and make sure to look at adaptive equipment. If a child has ADHD, then they will pay more attention to cognitive assessments.
They will also need to pay attention to what the literature says about those assessments. Does the literature tell me that this tool will predict crashes or predict driving performance? Those are two different types of studies with two different outcomes.
It is a little bit harder to get good information about the predictability of crashes because it means I have to administer some assessments, send this person out on the road to drive, and wait for a crash to happen. Crashes are very rare occurrences, so it is much easier and faster to predict driving performance. I can administer a bunch of tools, put the person in a behind-the-wheel test, and tell you if they passed or not if that assessment is predictive of performance.
- Vision/Perception Assessment Tools
- Vision important to assess to ensure adherence with state guidelines.
- Acuity most commonly has state minimum (typically 20/40-20/70).
- Visual field minimums often identified.
- Use traditional screens and refer to eye care specialist for concerns.
- Visual scanning is critical to capture driving environment.
When we do a visual assessment, we want to look at the state visual guidelines. Most states have a minimum visual acuity. In some states, this is 20/40, while some states are as low as 20/70. Some states also have visual field minimums.
You have to make sure that the child has those visual skills. We can use traditional vision screens like a Snellen test or use a visual field analyzer. If they do not meet those minimum criteria, then we are done, and they need to be sent to an eye care specialist.
- Cognitive Assessment
- Diagnoses of concern:
- ASD
- ADHD
- Learning disabilities
- Low IQ
- Dyspraxia
- Anxiety
- Sensory processing disorder
- Skills assessed:
- Ability to read
- Interpreting non-verbal language
- Understanding abstract ideas
- Visual-perceptual-motor
- Planning
- Organization
- Attention
- Processing speed
- Problem-solving
- Executive functioning
- Diagnoses of concern:
I do many cognitive assessments when I am testing driving. Diagnoses that I may see are autism spectrum disorders, ADHD, learning disabilities, intellectual disabilities, dyspraxia, anxiety, and sensory processing disorders. Any of these folks can have cognitive deficits that will limit their ability to manage things while they are driving. I look at the person's ability to read and interpret nonverbal language. I want to know if they understand abstract ideas, plan and organize, and pay attention to everything that is happening in the driving environment. I also want to know their processing speed because when an issue happens on the road, you need to instantaneously respond to that. I look at their executive functioning as well.
- Motor Performance Assessment
- Consider ability to:
- Transfer in and out of vehicle
- Operate vehicle controls
- Steering wheel
- Foot pedals
- Key in ignition
- Sustain movement or position
- Feel where limbs are in space
- Consider ability to:
In terms of motor performance, it is fairly straightforward. I want to see if they can transfer in and out of the car, operate the vehicle controls, and sustain their position and movement. We also want to know if they know where their limbs are in space and if they can feel them. For example, they need to know what their feet are doing while they are driving without looking down at them.
- What does it all mean?
- Performance on assessment tools paints a picture
- Outlines what you MIGHT see during the road test
- Clinic-based tests do not definitively predict crashes or performance
Once I do a whole battery of assessments, this paints a picture for me about how a person might perform on the road test. It is definitively not predictive, but it is going to shape my road test because if I saw a person who consistently struggled at a certain point, I am going to include those challenges in the road test.
Road Test
- Assesses driving in the naturalistic environment
- Provides real-life perceptual challenges
- Sensory feedback while driving with consequences
- Progressively complex environments
- Real-life problem solving
- INVALUABLE in making clinical determinations about safety
I want to test their driving in a naturalistic environment where they are getting those real-life perceptual challenges. This is invaluable in helping me to make decisions about somebody's ability to be safe.
Driving Intervention
- The Goals
- Must balance independent performance with safety
- Should meet client’s need for desired community mobility
- Should consider all possibilities of intervention approaches
- Should foster engagement and participation in community mobility
If someone needs interventions specific to driving, I will write goals that balance independence and safety. I also evaluate their need for community mobility and the full range of intervention options from the practice framework.
- Establish Occupational Performance
- Directed toward developing safe function
- Strategies are focused on the person
- Engagement in the occupation of driving is the end result
- Emphasis is placed on building performance skills
I might be establishing occupational performance or their skills so that they can be safe.
- Establish Interventions
- Exercise Programs
- Strength/ROM/Coordination
- Cognitive Training
- Memory
- Attention
- Reasoning
- Scanning
- Problem-solving
- Route planning
- Exercise Programs
I may design my interventions so they can build their skills, like an exercise program or cognitive retraining.
- Modify Interventions
- Vehicle modifications
- Therapists should never modify a vehicle.
- Only trained specialists should recommend adaptive equipment.
- Clients should be trained on equipment prior to installation.
- Equipment needs are unique to the client.
- Vehicle modifications
Sometimes, I am doing modify-type interventions, like vehicle modifications. As therapists, we should never modify a vehicle, and only a trained professional should be doing that. All their needs are unique, but you need to figure out what they need, train them to use it, and then finally install it. If you install equipment before you have trained them on it, they will go ahead and use it, especially an impulsive teenager. You want to make sure that somebody is safe, competent, and consistent in their use of the equipment before you have a professional install it.
Commonly Used Equipment
- Spinner Knob
- Considerations
- Most frequently used steering device
- Requires functional grasp
- Mounted within available reach
- Often recommended secondary to another necessary adaptation
- Considerations
A spinner knob is frequently used when a person only has one to hand available for steering. It works on a ball-bearing system, and it looks like a doorknob. It attaches to the steering wheel, and it can steer completely in both directions with one hand.
- Hand Controls
- Considerations
- Replaces use of vehicle-installed accelerator and brake
- Multiple planes of movement for operation
- Client ROM, strength, vehicle, and size of occupant cabin dictate which controls
- Original pedals still work for other drivers
- Takes considerable practice to acclimate to new motor habits
- Considerations
Many times, they get a spinner knob because they have another piece of adaptive equipment, specifically hand controls. A child who does not have functional use of their lower extremities, like with CP, a spinal cord injury, or dwarfism, cannot use the factory-installed foot pedals for the brake and the accelerator, so they need hand controls. A hand control will operate the gas and the brake, but now they only have one hand left for steering, which is why people will get a spinner knob secondary to the hand controls.
- Pedal Extenders
- Considerations
- Allows reach to foot pedals while maintaining a safe distance from the airbag
- Can be clamped on- allowing 1-4 inches of extension
- Can be adjustable fold down to allow 6-12 inches of extension
- Considerations
Some folks need pedal extenders if they are short-stature. These bring the pedals closer to their feet, and then they can drive independently using the regular gas and brake.
- Specialty Mirrors
- Considerations
- Typically convex to expand viewable area
- Assists driver in seeing vehicles in their blind spot without distorting image
- Important for individuals with limited neck and trunk mobility
- Considerations
If somebody has some visual field issues, vertigo, or neck range of motion issues, they might need specialty mirrors that are convex so they can see more of the driving environment. Only a specialist will recommend this equipment.
- Wheelchair Tie-Downs
- Considerations
- Who is operating?
- Wheelchair seating system
- Considerations
For a child who uses a wheelchair, they will need wheelchair tie-downs. You want to think about who is operating the vehicle. Are they in a power wheelchair that they plan to drive in, or is it something with straps that somebody else is going to have to do?
School Buses
School buses are an area that we do not pay a lot of attention to, even though this is how kids travel to and home from school every day.
School Bus Safety
- Physics behind occupant protection
- Buses weigh over 10,000 lbs and therefore distribute crash forces differently than cars
- Resulting crash forces of buses are less than crash forces by car occupants
- Crash protection mechanism is called “compartmentalization.”
- Children are protected without the need to buckle up in a protective envelope consisting of strong, closely spaced seats that have energy-absorbing seat backs
(Elias et al., n.d.)
We talked a lot about physics in the crash dynamics with cars. For a school bus, it is very different as school buses weigh over 10,000 pounds and are much higher, whereas a car only weighs about 2,000 pounds. There are many different forces on the occupants.
A school bus uses something called compartmentalization. Children are seated between the seat that they are in and the seat in front of them. These are strong padded seats that are energy-absorbing. Thus, they do not typically use seatbelts. Some school buses are now being built with seatbelts in them, but if you remember, the seatbelts need to be one with the vehicle. If you retrofit a school bus with seat belts, you are going to have a hard time. If a school bus crashes and stops short, the weight of all those kids will continue to go forward. There have been some incidents with buses that were retrofitted and the floor of the school bus peeled up like a sardine can because the weight of all those kids continued moving forward. Obviously, that caused a whole lot more injuries. So, if there are seat belts on school buses, they need to be put in at the time the vehicle is manufactured and those seat belts need to be attached to the frame of the vehicle.
School Bus Crash Protection
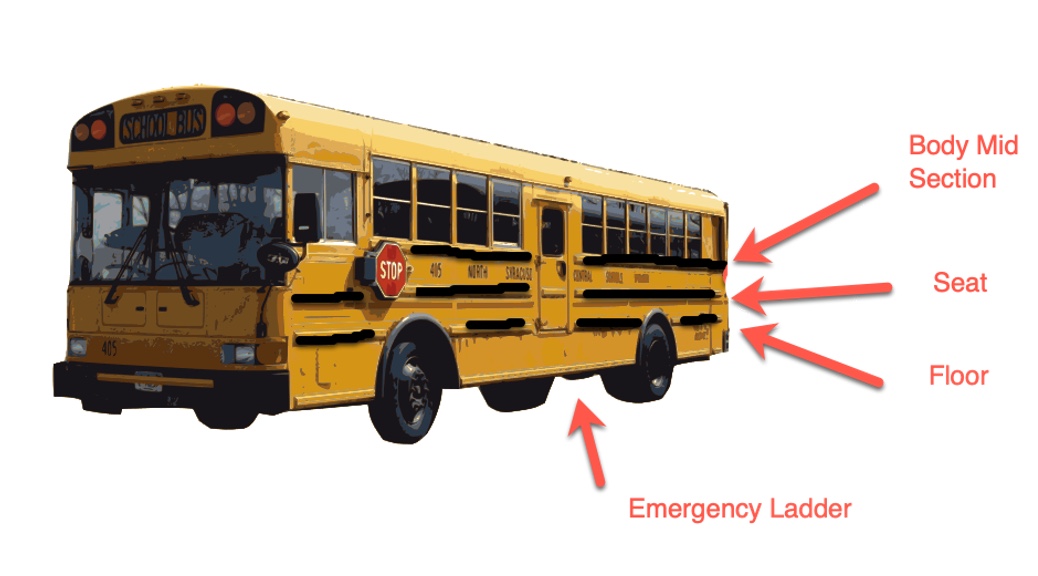
School buses look a whole lot different than our vehicles (Figure 17).
 .
.
Figure 17. School bus components.
All buses have three black lines on them that mean something. The lowest black line is the floor of the bus. If a car crashes into that, it will be below the actual floor of the seat to protect the kids. The middle black line is where the seats are, so a car does not even reach up to this level. The top black line is the mid-body section. The bulk of the kids' bodies are all up here, but a car is going to crash right down here. Again, this is why school buses do not need seat belts as much.
Seating Capacity
- Federal regulations do not specify seating capacity
- Capacity determined by bus manufacturers
- Based on three small elementary school-age persons in a 39-inch school bus seat
- Generally, seats accommodate 3 smaller elementary school-age kids or 2 adult high school kids
- NHTSA recommends that all passengers be seated entirely within the confines of the school bus seats
- Due to compartmentalization, persons not sitting or sitting partially outside of the school bus seats will not be afforded the occupant protection provided by the school bus seats
Unfortunately, federal regulations do not specify seating capacity, and they defer to the bus manufacturers. Typically, a 39" bus bench seat is based on three small elementary school children or two larger high school kids, as seen in Figure 18.

Figure 18. Illustration of seating on a school bus.
School systems do not tend to pay attention to this rule about three small elementary school-aged kids. Often, they will pack a high school bus with three to a seat or even have kids standing or sitting on the floor. This is a big area for OTs to do some advocacy work. The problem with this is there can be kids spilling over into the aisle because the children are larger and they cannot fit in the seat. In these situations, the whole safety mechanism of compartmentalization no longer works.
What Will You Do to Address Community Mobility in Practice?
The kids we work with travel throughout the community in a variety of modes of mobility. Throughout a child's lifetime, they are likely going to go through different modes of mobility to get from point A to point B and engage in different areas of occupation. Hopefully, this has sparked some ideas about what you could do a little bit differently in your practice to address driving and community mobility.
Questions and Answers
Can you go to fire stations to get your seat properly checked?
Firefighters go through the same child passenger safety training that I was talking to you about. You can get certified as a child passenger safety technician, as can law enforcement personnel, firefighters, and people from AAA. You may see events like child passenger safety seat checkup events. Everybody who is working at those events has the same credentials.
Do states give weight limitations for the type of seat?
Every state and seat is different. You will see stickers on the seats that have information about the height and weight limits for that specific seat. You will also see a born-on date.
Can OT assistants get that certification?
Yes, an OT assistant can get that certification. It used to be around four days, but I still do not know if it is that long. The born-on date for most seats is six years, so a seat cannot last more than six years. You never want to use a hand-me-down seat or pick up a seat that someone has put out at the curb because you do not know the history. Additionally, any time a seat has gone through a crash, the shell could be cracked or the integrity of the seatbelt webbing can be compromised.
Are there reporting requirements for therapists for a parent who is not securing their child safely?
Typically, no. It is not like an abuse situation, but it depends on the laws in your state. If there is secondary reporting, even a police officer cannot cite somebody for that. However, it may be different in various states.
Many parents buy covers to put under the car seats to protect the seat of the car. What are your thoughts on these?
The issue with the seat covers is that the safety of the car seats was not tested using the covers, and they could make the car seat less effective and safe. We need to pay attention to aftermarket products like seat covers, toys, visor systems, mobiles, etc. None of these aftermarket products have gone through any safety testing. You want to think about how these items may alter seat safety. Could it make the seat less safe or become a projectile in the event of a crash?
Do you recommend a specific brand?
I do not recommend a specific brand. The most expensive brand that is out there is Britax (one shown in the video). Many parents feel as though if they pay more money, it is safer. However, it is not true. Every seat goes through the exact same safety testing, called a sled test. A car seat is attached to a bench seat that is traveling at 35 mph with an anthropometric dummy in different sizes strapped to the seats. After the sled crashes, they can look at all of the computerized data installed in the dummy to see the energy forces of the impact and what the injuries may be. Every seat passes that same exact 35-mile-per-hour sled test, so a more expensive seat is not necessarily better.
Where do we stand legally when modifying the fit by stuffing pool noodles?
There are many attorneys that have been involved with child passenger safety training. The protocol is that you can demonstrate how to install the seat, but ultimately, the parent is responsible.
We use a teach-back method. We teach them how to properly install the seat, including showing them that it should not move, how to put the child in, and how to tighten the straps. We then undo it and say, "Now you show me how to do it." The attorneys involved in overseeing the safety standards as part of the NHTSA signed off, saying it is the parent who is the last one with their hands on that seat. So if anything should go wrong, it is not legally the fault of the person who taught the person how to do it.
What are your thoughts on using those side supports that attach to the headrest when the kids are using a booster?
I have concerns about any aftermarket product because, again, it has not been tested. Most newer vehicles also have curtain airbags. In the event of a lateral crash, a curtain comes down across the whole side of the vehicle, so you should not need that. However, you do want to ensure that there is a headrest behind the seat.
Do some of the seats need to be addressed because of different standards in the countries where they are produced?
In order for a vehicle to be sold in the United States, it has to pass those certain safety standards so it should not be an issue if a car is produced in another country.
Do you have any suggestions for maintaining car seat integrity while traveling via airplane?
Airlines typically will allow a lap baby for two years and younger. Beyond that, the child needs its own seat. Some people bring car seats. To my knowledge, there has never been crash testing. I think it makes parents feel better, but I do not know if it increases safety.
How safe are high-back boosters that do not have a tether strap?
Good question. All boosters are designed to be used with the seatbelt, and you should not need a tether. It is meant to sit on the seat, and the regular vehicle seatbelt holds it in place.
What would you recommend for a single parent whose child unbuckles themselves while the parent is driving?
Some kids are Houdinis and often have behavior disorders. In Indianapolis, there is a pediatric hospital that has an entire child passenger safety division with three OTs working for them. Parents often come back and say, "Well, he learned how to get out of this one." I would suggest something to cover up the buckle mechanism that will not affect safety.
There are also some behavioral modifications to overcome the behaviors. I have seen people take a toilet paper roll, cut it, and put it over the buckle so the kid cannot access it. I would say look into some of the child passenger safety protocols for special needs issues.
What about a base booster with no back?
The seatbelt holds you in place, and the base booster raises the child up enough so that the shoulder belt crosses mid-clavicle, and the two armrests hold the lap belt in place.
My two-year-old will not buckle up, he just cries.
Buckle him and let him cry. It is better to be crying than not alive. Children can get ejected from vehicles very easily.
I had a client's mom who kept a child rear-facing well into four years old because of his autism issues. Is it safe?
Being backward is safe as long as the kid is still within the height and weight measurements of that seat.
At what age do kids stop using a car seat?
When they are big enough to sit in a regular vehicle seat. Typically, they should be 4'9" or taller, which is typically around twelve years old, when their legs can bend over the seat.
Parents often fly with car seats in the luggage compartment when they fly on planes. Should they be concerned about the integrity of the car seat after it has been through baggage handling?
There are definitely special protocols within airlines, so I think they handle them sort of carefully, but there is no way of knowing. All car rental companies also will rent you a car seat if you do not want to fly with a seat.
Do they outgrow rear-facing when they exceed height and weight, or is it one or the other?
It is one or the other. There are some seats that will go upwards of 120 pounds. particularly for kids with special needs. However, once a child is that big, they may be a wheelchair user and the family is switching to a van because it will be too hard to get them in and out of the car seat at that weight.
Is it okay for kids to use a multi-sport helmet when riding?
The more coverage, the better in terms of protecting a child, but some sports helmets restrict vision. I would pay attention to that and switch to a bike helmet if there is a problem.
References
Alderman, E. M., Johnstron, B. D. (2018). Committee on adolescence, & council on injury, violence and poison prevention. The teen driver. Pediatrics, 142(4), e20182163. https://doi.org/10.1542/peds.2018-2163
Durbin, D. R., Hoffman, B. D. (2018). American Academy of Pediatrics, & Council on injury, violence, and poison prevention. (2018). Child passenger safety. Pediatrics, 142(5), e20182461. https//doi.org/10.1542/peds.2018-2461
Elias, J. C., Sullivan, L. K., & McCray, L. B. (n.d.). Large school bus safety restraint evaluation. Transportation Research Center & National Highway Traffic Safety Administration. [Paper No. 345]. Retrieved from https://www.nhtsa.gov/sites/nhtsa.gov/files/00158.pdf
McAdams, R. J., Swidarski, K., Clark, R. M., Robers, K. J., Yang, J., & Mckenzie, L. B. (2018). Bicycle-related injuries among children treated in US emergency departments, 2006-2015. Accident Analysis & Prevention, 118, 11-17. https://doi.rg/10/1016/j.aap.2018.05.019
National Highway Traffic Safety Administration. (2021). National pedestrian safety month 2021 resource guide. Retrieved from https://www.trafficsafetymarketing.gov/sites/tsm.gov/files/2021-10/THE FINAL NHTSA Ped Toolkit Layout_508_9.30.pdf
National Highway Traffic Safety Administration. (n.d.). Child pedestrian safety curriculum. Retrieved from https://www.nhtsa.gov/pedestrian-safety/child-pedestrian-safety-curriculum
Citation
Stav, W. (2023). Supporting pediatric engagement in community mobility. OccupationalTherapy.com, Article 5598. Available at www.occupationaltherapy.com